Are you interested in creating your own chat app? Do you want to use Flutter and ZEGOCLOUD to make it happen? Well, you've come to the right place! In this article, we will guide you through the process of creating a chat app using Flutter and ZEGOCLOUD.
What is ZEGOCLOUD?
ZEGOCLOUD is a cloud platform that provides a range of services and tools to help developers build and deploy applications quickly and easily. One of the services that ZEGOCLOUD provides is the real-time communication,which is perfect for building chat applications.
I've shared a link to a video on my YouTube channel that exhibits a detailed procedure for building a chat app with zegocloud.
Getting Started
To get started, you will need to have Flutter installed on your machine. If you haven't done so already, head over to the flutter.dev and follow the installation instructions.Once you have flutter installed, you can create a new Flutter project using the following command:
flutter create my_chat_app
Setting up ZEGOCLOUD
To configure ZEGOCLOUD, begin by creating an account on the ZEGOCLOUD Admin Console after setting up a new Flutter project. Following this, create a new project and specify the desired use case, such as in-app chat. You'll also need to obtain your project's appID and appSign, which are essential for authenticating your requests to the ZEGOCLOUD API.
Implementing Real-time Communication
Now that you have set up ZEGOCLOUD, it's time to implement real-time communication in your Flutter app. First you will need to add the ZEGOCLOUD Flutter SDK to your project.
You can do this by adding the following dependency to your pubspec.yaml file:
dependencies:

  zego_zimkit: ^latest_version
or run the following command
flutter pub add zego_zimkit
The code below initializes the ZIMKit SDK with the required credentials to enable real-time communication features in your Flutter application. By following the steps outlined in the code comments and obtaining the necessary credentials from the ZEGOCLOUD Admin Console.
void main() {
  ZIMKit().init(
    appID: YourSecret.appID, // your appid
    appSign: YourSecret.appSign, // your appSign
  );
  runApp(YourApp());
}
ZIMKit().connectUser(id: id, name: name).then(_){
    Navigator.of(context).push(
        MaterialPageRoute(
            builder: (context) => const ZIMKitDemoHomePage(),
        ),
    );
}

class ZIMKitDemoHomePage extends StatelessWidget {
  const ZIMKitDemoHomePage({Key? key}) : super(key: key);

  @override
  Widget build(BuildContext context) {
    return WillPopScope(
      onWillPop: () async => false,
      child: Scaffold(
        appBar: AppBar(
          title: const Text('Conversations'),
          actions: const [HomePagePopupMenuButton()],
        ),
        body: ZIMKitConversationListView(
          onPressed: (context, conversation, defaultAction) {
            Navigator.push(context, MaterialPageRoute(
              builder: (context) {
                return ZIMKitMessageListPage(
                  conversationID: conversation.id,
                  conversationType: conversation.type,
                );
              },
            ));
          },
        ),
      ),
    );
  }
}
The code above shows how to connect a user to ZIMKit and navigate to the home page. It uses the ZIMKit().connectUser method to establish a connection to the user with the given id and name. Once the connection is established, the app navigates to the ZIMKitDemoHomePage using MaterialPageRoute.
The ZIMKitDemoHomePage is a StatelessWidget that displays a list of conversations using ZIMKitConversationListView. When a conversation is clicked, the app navigates to the ZIMKitMessageListPage widget, which displays the messages for the selected conversation.
The WillPopScope widget prevents the user from navigating back from the home page. The AppBar widget provides a title and an overflow menu with a HomePagePopupMenuButton. The ZIMKitConversationListView widget listens for user taps and passes the selected conversation to the ZIMKitMessageListPage.
Overall, this code demonstrates how to use ZIMKit to connect to a user, display a list of conversations, and navigate to a conversation's messages.
Configure Our project in Android and also setup permissions
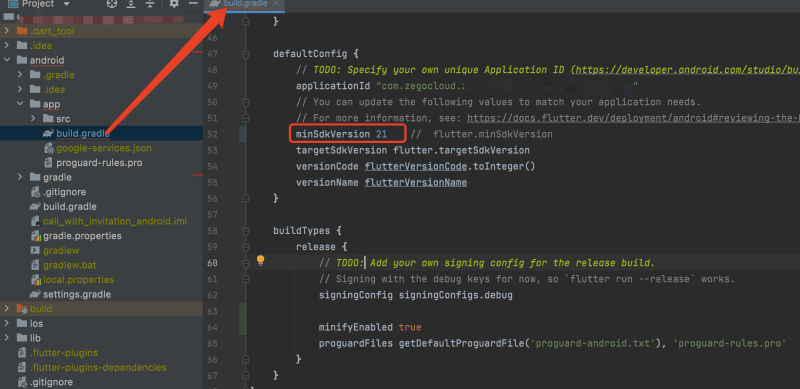
- Go to your_project/android/app/build.gradle file, and modify the compileSdkVersion to 33

- And in the same file, edit the minSdkVersion minSdkVersion 21
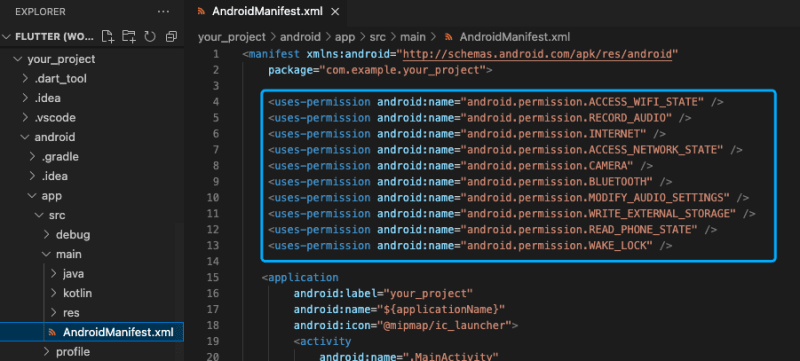
- Add app permissions. Open the file your_project/app/src/main/AndroidManifest.xml, and add the following code:
<uses-permission android:name="android.permission.ACCESS_WIFI_STATE" />
<uses-permission android:name="android.permission.RECORD_AUDIO" />
<uses-permission android:name="android.permission.INTERNET" />
<uses-permission android:name="android.permission.ACCESS_NETWORK_STATE" />
<uses-permission android:name="android.permission.CAMERA" />
<uses-permission android:name="android.permission.BLUETOOTH" />
<uses-permission android:name="android.permission.MODIFY_AUDIO_SETTINGS" />
<uses-permission android:name="android.permission.WRITE_EXTERNAL_STORAGE" />
<uses-permission android:name="android.permission.READ_PHONE_STATE" />
<uses-permission android:name="android.permission.WAKE_LOCK" />
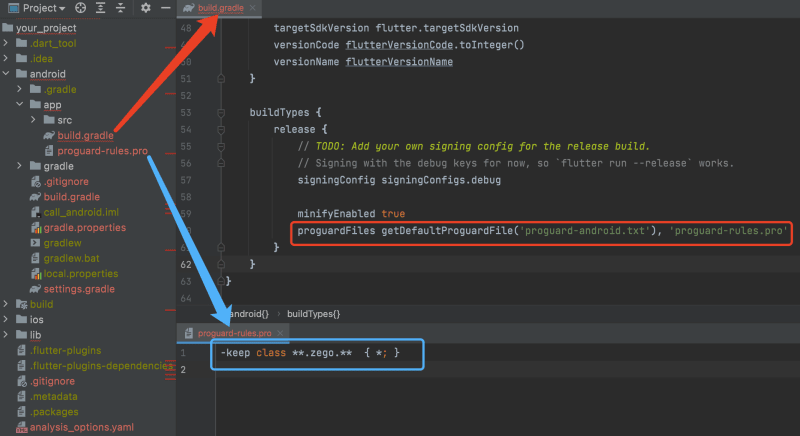
- Prevent code obfuscation. To prevent obfuscation of the SDK public class names, do the following: a.In your project's your_project > android > app folder, create a proguard-rules.pro file with the following content as shown below:
keep class **.zego.** { *; }
b.Add the following config code to the release part of the your_project/android/app/build.gradle file.
proguardFiles getDefaultProguardFile('proguard-android.txt'), 'proguard-rules.pro'
like this
Configuring it for IOS
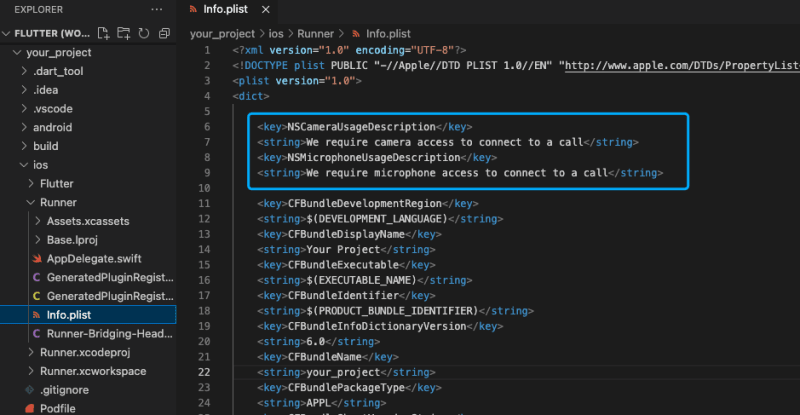
- To add permissions, open your_project/ios/Runner/Info.plist, and add the following code to the dict part:
<key>NSCameraUsageDescription</key>
<string>We require camera access to connect to a call</string>
<key>NSMicrophoneUsageDescription</key>
<string>We require microphone access to connect to a call</string>
Here's is the link to github source code
Conclusion
And there you have it, a complete guide to creating a chat app with ZEGOCLOUD in Flutter! We hope that you found this article helpful and that you are now ready to start building your own chat app. Remember to keep it simple,engage your users, and have fun!

Top comments (0)