
API's are what makes the internet work. They are the way your application interacts with your server so, as you might expect, having a solid API is crucial to the integrity of your application.
So what is an API?
API stands for Application Programming Interface and, at the risk of underselling its importance, it's a way of interacting with the server or a third party service through a series of predefined requests that usually return data.
I love the API analogies where they are compared to restaurant menus. You pick from a list of menu items and then the restaurant returns the order. Simple, right?
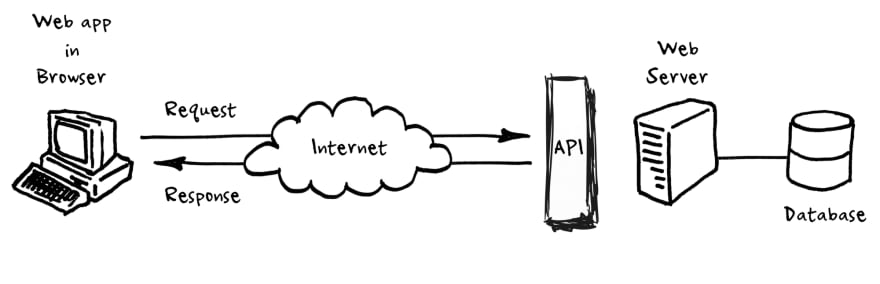
When people speak of “an API”, they sometimes generalize and actually mean “a publicly available web-based API that returns data, likely in JSON or XML”. The API is not the database or even the server, it is the code that governs the access point(s) for the server. - Perry Eising
How do you build an API?
Alright, we've established what an API is and how important it is for your application; let's see how we go about building one ourselves.
Since AWS Lambda is such a great fit for API's we'll be using that to build our first API. You can build one for free and, since you get the first million requests for free, it's going to make a good fit for your first API.
While you could do this whole thing without using a platform, we're going to use the most popular Serverless platform out there called, wait for it, the SERVERLESS platform!
I know what you're thinking, they are probably called that because they invented this whole Serverless thing but, no, they are called that just to mess with developers and confuse anyone just jumping on the Serverless bandwagon.
The first thing you need to do is install and configure your AWS and Serverless platform. To keep this short and sweet I'm going to link the easiest tutorial forsetting up Serverless.
Let's get started with your first API
I'm assuming you've already installed serverless and you've hooked up your account. Up next we'll be installing all the necessary stuff in order to build our API - so let's jump straight in. All you need is a terminal, so open it up and type the following commands.
$ serverless create -t aws-nodejs -p rest-api
$ cd rest-api
This will create a fresh boilerplate service. The second line is just navigating to the newly created folder
Now we need to install the modules we'll be using. I won't spend too much time explaining these since they are pretty self-explanatory.
We install serverless-offline, to mimic the serverless platform, and you install mongoose for your database related needs. You'll need to make sure you are in the rest-api folder we created earlier.
$ npm init -y
$ npm i --save-dev serverless-offline
$ npm i --save mongoose dotenv
Next, you'll have to set up your database using Mongodb Atlas; a free service that you can use. We'll use this as a sandbox to play around with our API.
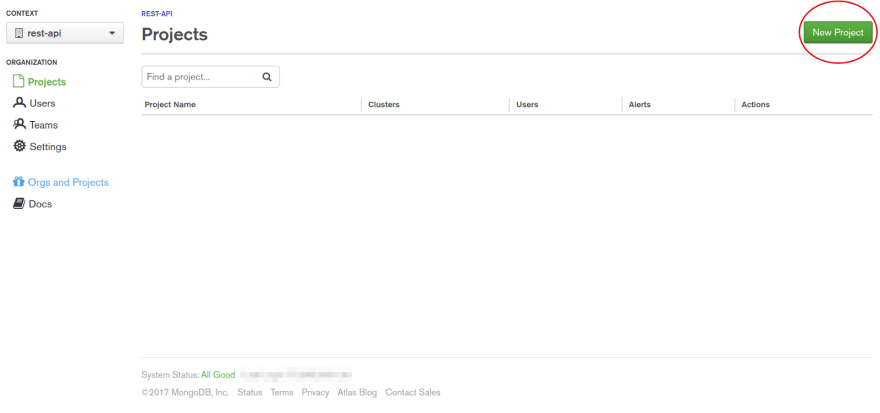
The setup isn't too complicated and should only take a few minutes. The first thing you need to do after you've set up your account is to create an organisation and give it a name. For the sake of keeping things clean and simple, we'll call it "rest-api".

After that, you need to create a project. Within the "organization" section hit "New Project", then create another project that we'll cleverly call "rest-api".
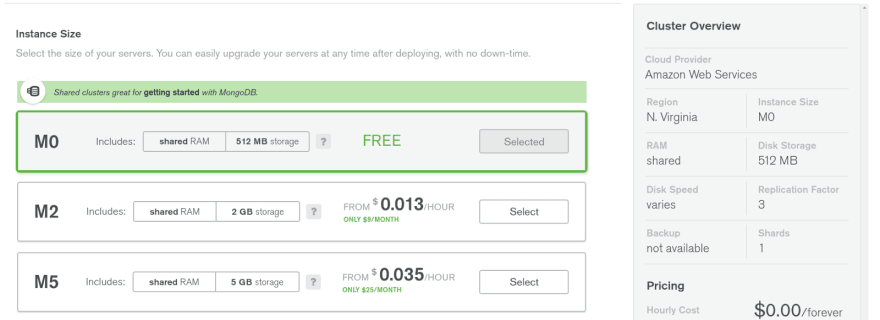
Then we need to create a cluster. From the project page, click the "Build a New Cluster" button that will take you to the cluster creation wizard. Here you'll select "M0", which is their free option. You'll want to disable backups, which you can do from the same page.
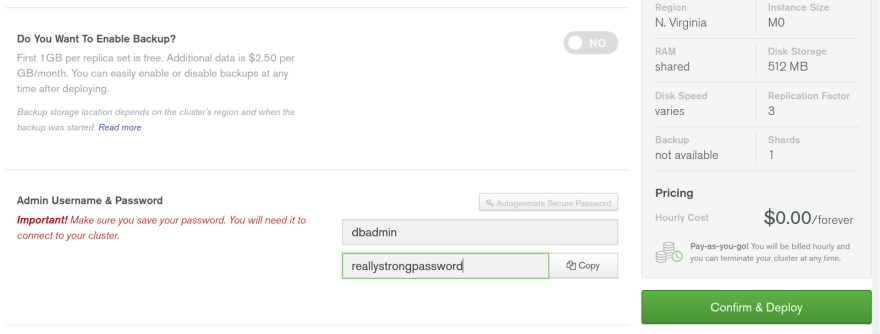
Don't forget to set your username and password and save them to a safe location. After that, we're on to writing some code.
Configure your Serverless framework
While we could do this without using the Serverless framework, one of the many perks of using the framework is the ease with which you setup a whole new project.
After initialising the platform (you already did this part earlier) you'll have a bunch of files in your folder. Amongst them, you'll see serverless.yml and handler.js.
Let's start with by opening up serverless.yml and adding the following code:
service: rest-api

provider:
  name: aws
  runtime: nodejs6.10 # set node.js runtime
  memorySize: 128 # set the maximum memory of the Lambdas in Megabytes
  timeout: 10 # the timeout is 10 seconds (default is 6 seconds)
  stage: dev # setting the env stage to dev, this will be visible in the routes
  region: us-east-1

functions: # add 4 functions for CRUD
  create:
    handler: handler.create # point to exported create function in handler.js
    events:
      - http:
          path: notes # path will be domain.name.com/dev/notes
          method: post
          cors: true
  getOne:
    handler: handler.getOne
    events:
      - http:
          path: notes/{id} # path will be domain.name.com/dev/notes/1
          method: get
          cors: true
  getAll:
    handler: handler.getAll # path will be domain.name.com/dev/notes
    events:
     - http:
         path: notes
         method: get
         cors: true
  update:
    handler: handler.update # path will be domain.name.com/dev/notes/1
    events:
     - http:
         path: notes/{id}
         method: put
         cors: true
  delete:
    handler: handler.delete
    events:
     - http:
         path: notes/{id} # path will be domain.name.com/dev/notes/1
         method: delete
         cors: true

plugins:
- serverless-offline # adding the plugin to be able to run the offline emulation
Without over complicating the tutorial, I'll quickly go over what we just did.
We named our service, you guessed it, "rest api" and configured our Lambdas to use a maximum of 128MB of Ram. You can go from 50 up to 3000mb but the more Ram you add, the more it will cost.
Next, we created a simple CRUD functionality using 5 functions: create, getOne, getAll, update and delete which will point to our handler.js file that we will get to in a second.
Last, but not least, is the serverless-offline plugin that we'll be using to test our service before going Live.
Adding logic to the functions
Our five functions don't need much to get going. Once we've defined what they do, all that's left to do is add the database connection and we're done. Here's the code you'll need for your handler.js file.
'use strict';

module.exports.create = (event, context, callback) => {
  context.callbackWaitsForEmptyEventLoop = false;

  connectToDatabase()
    .then(() => {
      Note.create(JSON.parse(event.body))
        .then(note => callback(null, {
          statusCode: 200,
          body: JSON.stringify(note)
        }))
        .catch(err => callback(null, {
          statusCode: err.statusCode || 500,
          headers: { 'Content-Type': 'text/plain' },
          body: 'Could not create the note.'
        }));
    });
};

module.exports.getOne = (event, context, callback) => {
  context.callbackWaitsForEmptyEventLoop = false;

  connectToDatabase()
    .then(() => {
      Note.findById(event.pathParameters.id)
        .then(note => callback(null, {
          statusCode: 200,
          body: JSON.stringify(note)
        }))
        .catch(err => callback(null, {
          statusCode: err.statusCode || 500,
          headers: { 'Content-Type': 'text/plain' },
          body: 'Could not fetch the note.'
        }));
    });
};

module.exports.getAll = (event, context, callback) => {
  context.callbackWaitsForEmptyEventLoop = false;

  connectToDatabase()
    .then(() => {
      Note.find()
        .then(notes => callback(null, {
          statusCode: 200,
          body: JSON.stringify(notes)
        }))
        .catch(err => callback(null, {
          statusCode: err.statusCode || 500,
          headers: { 'Content-Type': 'text/plain' },
          body: 'Could not fetch the notes.'
        }))
    });
};

module.exports.update = (event, context, callback) => {
  context.callbackWaitsForEmptyEventLoop = false;

  connectToDatabase()
    .then(() => {
      Note.findByIdAndUpdate(event.pathParameters.id, JSON.parse(event.body), { new: true })
        .then(note => callback(null, {
          statusCode: 200,
          body: JSON.stringify(note)
        }))
        .catch(err => callback(null, {
          statusCode: err.statusCode || 500,
          headers: { 'Content-Type': 'text/plain' },
          body: 'Could not fetch the notes.'
        }));
    });
};

module.exports.delete = (event, context, callback) => {
  context.callbackWaitsForEmptyEventLoop = false;

  connectToDatabase()
    .then(() => {
      Note.findByIdAndRemove(event.pathParameters.id)
        .then(note => callback(null, {
          statusCode: 200,
          body: JSON.stringify({ message: 'Removed note with id: ' + note._id, note: note })
        }))
        .catch(err => callback(null, {
          statusCode: err.statusCode || 500,
          headers: { 'Content-Type': 'text/plain' },
          body: 'Could not fetch the notes.'
        }));
    });
};
To anyone that has ever written a nodejs function before, this should be easy to understand. There is no special logic here; we define the five functions mentioned earlier and add the logic for each one.
Database connection setup
There are two steps involved here, one is to create a dynamic connection and the second one is to have a way to reuse the same connection if available. Sounds tricky but I'll walk you through it. What you want to do is add another file next to your handler.js file - let's call it database.js, then paste the following code:
const mongoose = require('mongoose');
mongoose.Promise = global.Promise;
let isConnected;

module.exports = connectToDatabase = () => {
  if (isConnected) {
    console.log('=> using existing database connection');
    return Promise.resolve();
  }

  console.log('=> using new database connection');
  return mongoose.connect(process.env.DB)
    .then(db => {
      isConnected = db.connections[0].readyState;
    });
};
Note : This syntax is valid for Mongoose 5.0.0-rc0 and above. It will not work with any version of Mongoose which is lower than 5.
We’re basically caching the database connection, making sure it’ll not get created if it already exists. In that case, we just resolve the promise right away.
With the databse.js file created, let’s require it in the handler.js. Just add this snippet to the top of the handler.
// top of handler.js
const connectToDatabase = require('./db');
Creating the Note model
We've referenced the note model in the handler.js file earlier, so we'll have to create that too. We'll create a folder in the root directory called models and in that create a Note.js file. Paste the following code in there.
const mongoose = require('mongoose');
const NoteSchema = new mongoose.Schema({
  title: String,
  description: String
});
module.exports = mongoose.model('Note', NoteSchema);
Now we have to export the model in our handler.js file, which we do by adding the following code at the top of the file.
// top of handler.js
const connectToDatabase = require('./db');
const Note = require('./models/Note');
Creating the dotenv for environment variables
Leaving config files and keys in a totally separate file is incredibly easy with dotenv, and a real life saver. You can just add the file to .gitignore and be sure you won’t risk compromising any keys.
You do this by creating a new file called variable.env and place it in the root directory.
DB=mongodb://<user>:<password>@mongodb.net:27017/db
To get the info you need you'll have to go back to Atlas and look at the cluster page. Click on the connect button and then grab the URL by hitting the "Connect your application" button.
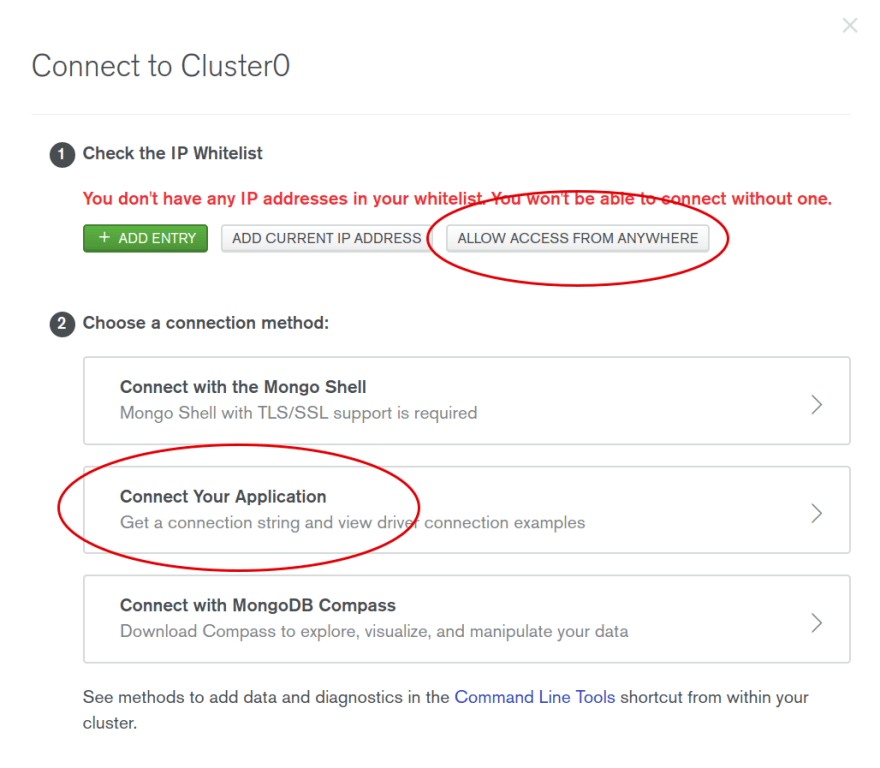
After you’ve pressed “Connect Your Application” you’ll be prompted to “Copy a connection string”. Press “I am using driver 3.4 or earlier” and you can FINALLY copy the URL. Whoa, that was a tiresome ride.

Once you’ve copied it, head back to the variables.env file and add the actual connection URL.
DB=mongodb://dbadmin:reallystrongpassword@cluster0-shard-00-00-e9ai4.mongodb.net:27017,cluster0-shard-00-01-e9ai4.mongodb.net:27017,cluster0-shard-00-02-e9ai4.mongodb.net:27017/test?ssl=true&replicaSet=Cluster0-shard-0&authSource=admin
Just replace the password and url to whatever you've used in Atlas and you are done.
Note : Don’t forget to add the variables.env to the .gitignore!
Lastly, before jumping into testing everything out, we need to require the dotenv module and point to the file where we’re keeping the environment variables. Add this snippet to the top of your handler.js file.
require('dotenv').config({ path: './variables.env' });
Running the API
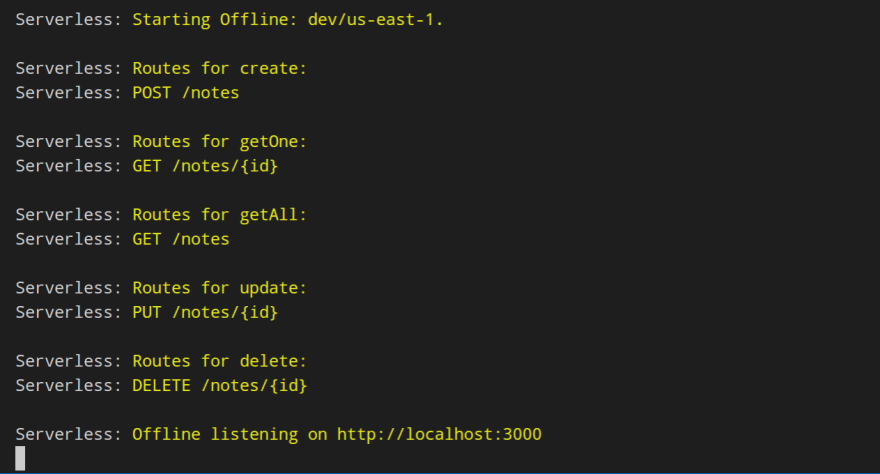
At this point, we should be ready to test our API and to do so we need to run the serverless-offline module and, because we are using the Mongoose model definition, there's a flag we need to trigger when running.
$ serverless offline start --skipCacheInvalidation
Once you’ve run the command in the terminal, you should see something like this.
To actually add a new note you can use Postman to POST a request to the following endpoint:
http://localhost:3000/notes
with a body that contains the title and description:
{
    "title": "some title"
    "description: "some description"
}
The response should look like this.
{
    "_id": "48hfs9da3f9jfdhs8g"
    "title": "some title"
    "description: "some description"
    "__v":0
}
Deployment
Alright, we've seen the API work locally with serverless-offline, and played with the routes a little bit. Now let's deploy this to AWS Lambda to see how it works live. All you need to do is run this command:
serverless deploy
This will provision all the AWS resources and upload the code to S3 from where it will be picked up by Lambda. It's going to take a few seconds but what you should be seeing is something like this:

Once it's done you'll be able to access the requests by using the endpoints written in the log. If you are going to mess with the API you can just redeploy using serverless deploy
It's imperative you understand how AWS Lambda works and get acquainted with the limits in order to create functions that are performing well. I'd suggest doing a little bit of homework on AWS Lambda before you jump right in.
Final thoughts
I have my doubts about how many people will take the time to go through all of these steps but I want to congratulate any that do. Creating an API is serious business and will take some time to get it right but it's a crucial component of any successful application.
While this tutorial revolved around the Serverless Platform, I do want to point out that there are other options out there. As an alternative to Serverless, I'd look into Zappa, they are newer to the Serverless scene but the guys behind the project are doing some really cool stuff with Python.
Also, AWS Lambda is not your only option,Microsoft Azure and Google Cloud Functions are solid options as well. One thing I'd do before jumping the gun is to look closely at what my project requires and make a decision based on the other services available from the cloud provider.
I want to give a shoutout to Adnan Rahic who helped me create this tutorial. He writes a lot of cool stuff related to Serverless and I can't recommend him enough to anyone serious about Serverless development. He spent the better part of the past 2 months writing this amazing book on NodeJS monitoring, I suggest you check it out.
Credits for the cool featured image go to Markus Spiske on Unsplash.
CodeTips strives to help beginners, with zero or very little experience, learn to code.
We do cross-post to other sites to reach a wider audience, but why not subscribe to our newsletter and get the newest articles straight to your mailbox?
The original source for this content is CodeTips. The original content is kept up-to-date, but other sources may not be the latest version.


Top comments (2)
Your link to the serverless website is broken.
Thank you - that should be fixed now!