
The article below tackles a topic that’s very interesting and presents a new branch for us to follow on this whole mobile-first path for our websites and/or apps.
The thing we call “responsive web design” has been with us for a while, and at this stage in the game, most developers/websites/web-tools have already integrated the principles of it fully. But is that the end game of “mobile-friendly”? Or maybe it’s just the beginning.
Well, Google thinks it’s the latter. And in come Progressive Web Apps!
Understanding Progressive Web Apps
Progressive Web Apps (PWA) are experiences that combine the best of the web and the best of apps. Native app store apps have become hugely popular in the past through features such as push notifications, working offline, smooth animations and transitions, loading on the homescreen and so on.
Mobile Web Apps are JavaScript applications that worked in the browser and attempted to bring some of the native apps features to the web, but weren’t able to provide push notifications for example. With the mobile introduction of new Web APIs, Progressive Web Apps are now closing the gap, providing the full app-like experience on the mobile web.
Google describes them as being:
Reliable – Load instantly
Fast – Quickly respond to user interactions
Engaging – Behaving like a native app
To hit all of these points, a Progressive Web App must have the following capabilities:
- Work offline or on poor network conditions
- Web App Install Banners or Add to Homescreen
- Use Web Push Notifications. With the introduction of the Web Push API, we can now send Push Notifications to our users, even when the browser is closed.
- Implement HTTPS
- Use an application shell (or app shell) architecture that instantly loads on the users’ screens, similar to native applications.
In essence, a PWA is a Single Page Application written in JavaScript. Offline mode, Add to Homescreen and Web Push Notifications are all implemented using service workers.
Progressive Web Apps vs. Responsive Web Design
Progressive Web Apps should not be confused with Responsive Web Design. Progressive Web Apps have responsive capabilities because they can adapt to different screen sizes, but their unique value proposition are the features that make them app-like.
In the last years, RWD has been the go-to solution for mobile web solutions, but a Forrester report from last year identified that RWD has reached saturation – 87% of digital experience makers embrace it – and that a shift in customer expectations to prefer app-like experiences on the web is taking place before our eyes.
Are PWAs the solution for engaging mobile web users?
Building a high-quality Progressive Web App has incredible benefits, making it easy to delight users, grow engagement and increase conversions. There are several examples of companies, particularly from the e-commerce industry, that have successfully used Progressive Web Apps to improve their metrics, a lot of them are listed on Google’s Developers website.
For example, Alibaba.com built a PWA that led to a fast, effective, and reliable mobile web experience. The new strategy delivered a 76% increase in total conversions across browsers and a four times higher interaction rate from Add to Homescreen.
In another use case, OLX wanted to re-engage mobile web users by using Add to Homescreen and Push Notifications. They increased engagement by 250% and improved other metrics too: the time until the page became interactive fell by 23%, with a corresponding 80% drop in bounce rates. Monetization also improved, with clickthrough rate (CTR) rising 146%.
How do we know that a mobile web app is progressive?
First of all, being progressive is a score, not a Yes or No, and there’s a Chrome plugin called Lighthouse that you can use to measure this score. This plugin is really easy to use and generates a report with all the PWA capabilities, basically it lets us know what we need to change for a web app to become fully progressive. For our alpha version of the WooCommerce PWA, we managed to hit a 91 score on Lighthouse.

How can we build a PWA?
Google’s PWA standard doesn’t list any particular technology or framework for creating Progressive Web Apps. It can be anything as long as the checklist is followed. Many PWAs are built using Angular JS or React, which are the most popular JavaScript frameworks at the moment.
Both AngularJS and React have their advantages:
The Angular / Ionic combination is pretty popular nowadays. Ionic is a great framework that was originally built for mobile apps, but has expanded to Progressive Web Apps and even desktop applications.
React is really intuitive and easy to understand. It benefits from a great boilerplate, create-react-app, which comes with PWA support by default.
Besides these two, VueJS is also gaining in popularity.
Next, we’re going to see some code samples from an e-commerce application built with React on top of the WordPress and WooCommerce REST API.
Understanding WooCommerce REST API
When it comes to building an e-commerce application, the first thing we need is an API from where we can retrieve the data. Fortunately, the inclusion of the REST API in the core has opened the door for using WordPress as a backend. In addition, for e-commerce apps we can use the REST API from the popular WooCommerce plugin.
WooCommerce also has an NPM package (WooCommerce API) for making API calls, but unfortunately this package requires both the consumer key and consumer secret in order to authenticate requests. We would have a security issue if we used the consumer secret in a frontend app.
Also, when creating keys from the WooCommerce admin section, it’s not possible to specify permissions at the route level, for example allowing view access for products and write access for orders.
So, we had to create a proxy in our WordPress plugin, that allows access to a restricted set of API endpoints. As a base, we used the WooCommerce REST API PHP wrapper, as you can see in the below example:
<?php
use Automattic\WooCommerce\Client;
class Custom_Endpoints_Woocommerce_API
{
    protected function get_client() {
        return new Client(
            get_site_url(),
            'woocommerce_consumer_key',
            'woocommerce_consumer_secret',
            [
                'wp_api' => true,
                'version' => 'wc/v1',
            ]
        );
    }
    public function register_woocommerce_routes() {
        register_rest_route( 'customroutes', '/products', array(
            'methods' => 'GET',
            'callback' => array( $this, 'view_products' )
        ));
    }
    public function view_products( WP_REST_Request $request ) {
        $woocommerce = $this->get_client();
        return $woocommerce->get( 'products/categories' );
    }
}
We first initialize the WooCommerce client using the consumer key and secret. The second and third methods are creating a custom route called products and map that route to the products/categories endpoint from the WooCommerce API.
In this way, we can allow access to reading categories and products, but allow only the create operation for an order.
Creating new React app in four simple steps
Once we have set up the API, we can start working on our React application. After installing NodeJS and NPM globally, you can use the create-react-app package to quickly generate a React JS app that has PWA support by default.
Install NodeJS and NPM globally
Install create-react-app boilerplate
npm install create-react-app -gGenerate new React application
create-react-app my-appStart application
cd my-app & npm start
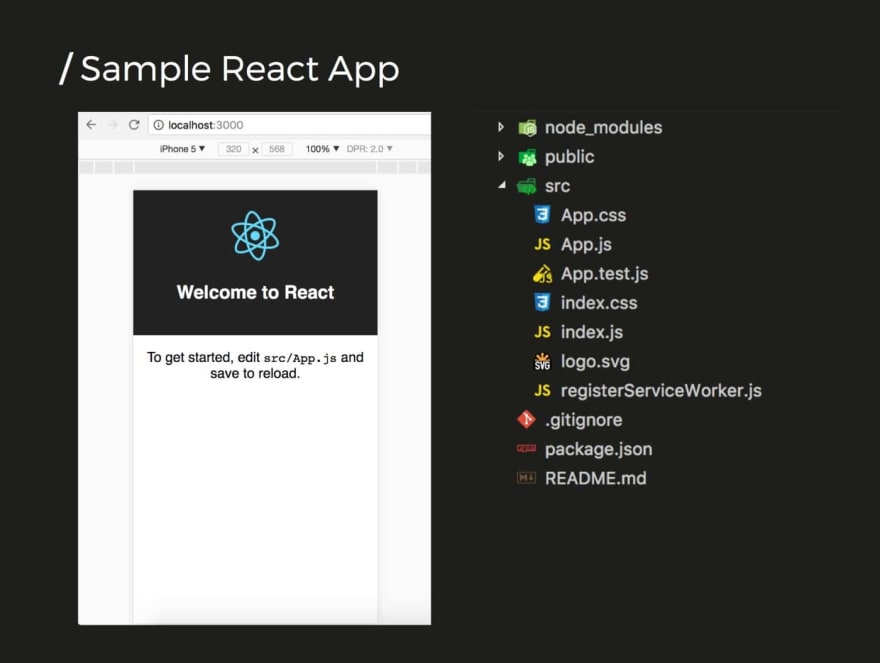
Below is a screenshot of the application that is generated by create-react-app, it has everything that we need, so we can start coding, including live reload:
There are a few things to keep in mind when starting a new app:
1) Organizing app files
There are several good tutorials out there about how to best structure the app. I prefer folders-by-feature, because it allows better scalability. You can find a really good explanation here.
2) Linters and coding standards
Coding standards can be annoying if you’re not used to them, but do not skip this step. They help clean up unused dependencies and make sure that data is properly validated at the component level. In addition, if you install a prettier editor plugin that automatically formats your code, using coding standards becomes a breeze. As for the standard itself, I prefer the popular one created by Airbnb.
3) Small components
Keeping components files small makes them easier to test and manage. You can start writing code in a single component and, once it gets bigger, divide it into smaller component. For UI/UX components, there are several libraries that are compatible with React, such as Material UI, Semantic UI or even Bootstrap, just to give a few examples.
These libraries contain a set of ready-made components, such as grids, menus, cards, buttons and so on. Here is an example of an e-commerce application interface built with basic Semantic UI elements:
You can see a list of categories, a list of products and a side menu. Let’s dive into the code – you’ll see how easy it is to use React to create such an example.

Diving into ReactJS
Below is a React component that reads a set of product categories from the API. The component’s state is initialized with an empty list of categories. In the componentWillMount method that is automatically called by React before render we make a request to fetch the categories and we add them to the state after receiving the response:
import React, { Component } from "react";
import config from "./config";
import CategoriesList from "./CategoriesList";

class Categories extends Component {
  constructor(props) {
    super(props);

    this.state = {
      categories: []
    };
  }

  componentWillMount() {
    fetch(config.API_CATEGORIES_URL)
      .then(response => response.json())
      .then(json => this.setState({ categories: json }))
      .catch(() => {
        console.log("An error occured");
      });
  }

  render() {
    return <CategoriesList categories={this.state.categories} />;
  }
}

export default Categories;
As you can see, we don’t need to call the render method when the categories are received, React takes care of that for us and re-renders the component. The render method just returns another custom component called CategoriesList that receives the categories data and looks like this:
import React from "react";
import CategoryCard from "./CategoryCard";

const CategoriesList = props => (
  <div>
    {props.categories.map(element => (
      <CategoryCard
        key={element.id}
        categId={element.id}
        src={element.image.src}
        name={element.name}
      />
    ))}
  </div>
);

export default CategoriesList;
The above component iterates over the list of categories that it receives as a prop and calls another custom component called CategoryCard to render a single category element.
All these components communicate by passing props between them. The main Categories component calls the API and passes down a list of categories to CategoriesList, which in turn passes a category’s details to the Category Cards.
Managing the global app state using Redux
The problem with the above approach is that sometimes we have data that needs to be managed at the top application level, for example a list of products that were added to the shopping cart. The number of products is shown in the shopping cart icon from the header bar, but these are also displayed as a list on the checkout page.
If we add all this data in the parent application component, it will become very difficult to manage on larger applications. This is where libraries such as ReduxJs come in. Just to clarify, Redux can be used in combination with any JavaScript framework, it is not specific to React.
Also, using Redux doesn’t mean that we can’t use state or props at the component level. Redux should be used only for retaining data that makes sense at the application level.
Let’s see how we can read products from the API and render them in a list, similar to what we need with categories, but this time using Redux. First, we need to make the connection with Redux by wrapping our main app component into a global store:
import { createStore, combineReducers, applyMiddleware } from "redux";
import thunk from "redux-thunk";

import categories from "./views/Categories/reducer";
import products from "./views/Products/reducer";

const rootReducer = combineReducers({ categories, products });
const defaultState = {};

const store = createStore(rootReducer, defaultState, applyMiddleware(thunk));

export default store;
In this example, the global app store will contain a list of categories and a list of products, which are merged together using the combineReducers method from Redux.
Then, we continue by defining Redux actions, which are very simple functions that return objects that must contain a type property. Since JS is asynchronous, we’ll need two actions: one for signaling when a request is sent and the other for signaling when a response is received. The whole app will know when these actions take place.
Below, we have also added a function called fetchProducts. As you can see, this function:
- dispatches the request products action,
- calls the API for retrieving products,
- dispatches the receiveProducts action when a result is received.
import config from "./config";

export const requestProducts = () => ({
  type: "REQUEST_PRODUCTS"
});

export const receiveProducts = products => ({
  type: "RECEIVE_PRODUCTS",
  products
});

export const fetchProducts = () => dispatch => {
  dispatch(requestProducts());

  return fetch(config.API_PRODUCTS_URL)
    .then(response => response.json())
    .then(json => dispatch(receiveProducts(json)))
    .catch(() => {
      dispatch(receiveProducts([]));
    });
};
To modify the app state, we’ll add a so-called Redux “reducer”. The reducer is just a function that listens to particular actions and changes a portion of the global state, in this case the list of products.
This reducer doesn’t do anything when receiving a request products action, it always returns the current state. For the receive products action, the reducer returns the data that is passed to it, in this case it will be a list of products.
import { combineReducers } from "redux";

const productsReducer = (state = [], action) => {
  switch (action.type) {
    case "REQUEST_PRODUCTS":
      return state;
    case "RECEIVE_PRODUCTS":
      return action.products;
    default:
      return state;
  }
};

export default productsReducer;
To wrap things up, we use these actions and reducer in a new Products component.
import React from "react";
import { connect } from "react-redux";
import { fetchProducts } from "./actions";
import ProductsList from "./ProductsList";

class Products extends React.Component {
  componentWillMount() {
    const { dispatch } = this.props;
    dispatch(fetchProducts());
  }

  render() {
    return <ProductsList />;
  }
}

export default connect(null, { fetchProducts })(Products);
This component is wrapped in the connect method from Redux, and just dispatches fetchProducts in its componentWillMount method. Also, the component includes a products list, but as you can see the products list component doesn’t directly receive the products data. That’s because the product list component is directly linked to the global app state, also using Redux.
In this way, it can access the products data directly from the app store, iterate over the list of products and use a ProductCard component to render a single product element.
import React from "react";
import { connect } from "react-redux";
import ProductCard from "./ProductCard";

class ProductsList extends React.Component {
  render() {
    const list = this.props.products.map(element => (
      <ProductCard
        key={element.id}
        src={element.images[0].src}
        name={element.name}
        price={element.price}
      />
    ));

    return <div>{list}</div>;
  }
}

const mapStateToProps = state => ({
  products: state.products
});

export default connect(mapStateToProps)(ProductsList);
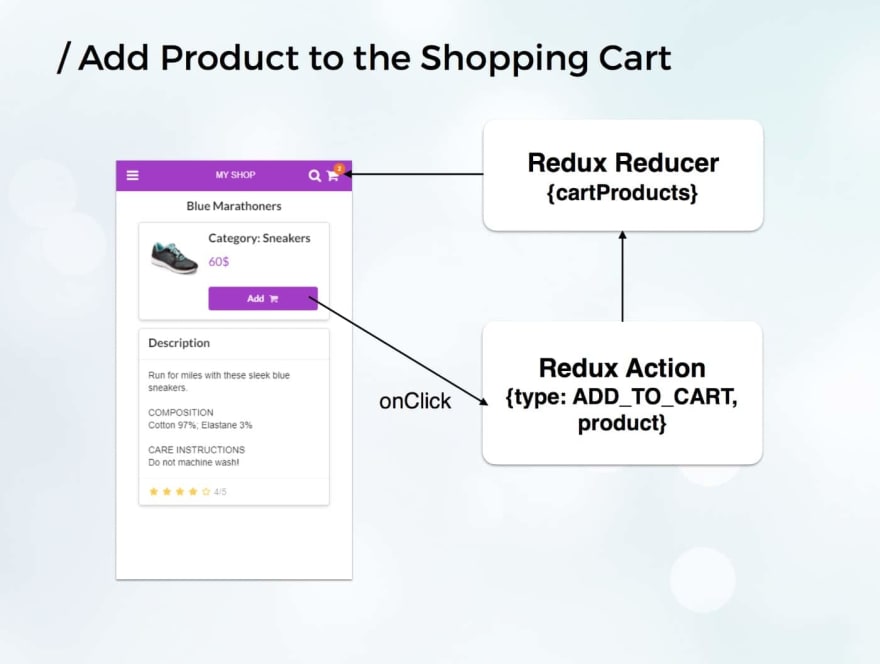
So far, we have seen some examples on how to display data, but what if we wanted to add user interaction, for example adding a product to cart?
In this case, when the user clicks the “Add to cart” button, we will dispatch an action that will modify the global app state. The header bar, which displays the number of cart products, will be connected with Redux. It will count the number of products saved in the application’s cart and update itself accordingly.
Linking the app with WordPress
These are all basic examples to get you started, and you’re probably wondering how exactly we can link this app with WordPress.
Well, we can host the app on a subdomain and let it connect to the API, or we can use it as a WordPress theme – meaning creating a very basic theme with an index.php file that will just load a JavaScript / CSS file. The create-react-app boilerplate includes commands for creating the application’s build, so we can get the production files immediately.
<html manifest="" <?php language_attributes(); ?>>
<head>
    <meta charset="UTF-8" />
    <meta name="viewport" content="width=device-width, initial-scale=1.0,
     maximum-scale=1.0, minimum-scale=1.0, user-scalable=no" />
    <!-- load other meta tags here -->

    <title><?php echo get_bloginfo("name");?></title>

<link rel="stylesheet" href="<?php echo get_template_directory_uri();?>/style.css" />
<script
        src="<?php echo get_template_directory_uri();?>/js/bundle.js"
        type="text/javascript">
    </script>

    <script>
        if('serviceWorker' in navigator) {
            navigator.serviceWorker
                .register('/sw.js')
                .then(function() { console.log("Service Worker Registered"); });
        }
    </script>

</head>
<body>
    <noscript>
      You need to enable JavaScript to run this app.
    </noscript>
    <div id="root" style="height:100%"></div>
</body>
</html>
Where to use service workers
For offline mode, we can add a service worker that will display the app shell even when users are offline. The service worker is just a JavaScript file that registers itself in the browser.
<script>
if('serviceWorker' in navigator) {
  navigator.serviceWorker
           .register('/sw.js')
           .then(function() { console.log("Service Worker Registered"); });
}
</script>
There are several strategies that you can use for offline mode, such as network first or cache first, and you can read about these in Google’s offline cookbook.
Caching the application’s shell has benefits even when we have a network connection, because the app will load much faster.
If you want to go even further and start caching the data that comes from the API, you can use NPM packages like redux-persist and modify your app to save / retrieve data from the browser’s local storage.
For web push notifications, we recommend taking a look at the One Signal free WordPress plugin. This plugin also works with responsive themes, so you should definitely check it out immediately.
What’s next?
You can find the demo for the above WooCommerce PWA here.
We’re already working on the beta version and here’s just a part of our roadmap:
- Add offline mode capabilities
- Add push notifications
- Finalize the checkout process If you want to contribute or customize it for your own needs, you can find the alpha version of the e-commerce progressive web application on GitHub.

What do you think of Progressive Web Apps and the role they can have on the mobile WordPress landscape? Are you considering following this path with your next project?
The article was originally published on CodeinWP.com
Written by Alexandra Anghel, co-founder and CTO at Appticles.com

Top comments (0)