
Two of the most important questions that people ask themselves on day 2 after adopting GitOps are:
- How should I represent different environments on Git?
- How should I handle promoting releases between environments?
In the previous article of the series, I focused on what NOT to do and explained why using Git branches for different environments is a bad idea. I also hinted that the “environment-per-folder” approach is a better idea. This article has proved hugely popular and several people wanted to see all the details about the suggested structure for environments when folders are used.
In this article, I am going to explain how to model your GitOps environments using different folders on the same Git branch, and as an added bonus, how to handle environment promotion (both simple and complex) with simple file copy operations.

Hopefully this article will help with the endless stream of questions and discussions on this hot topic.
Learn your application first
Before creating your folder structure you need to do some research first and understand the “settings” of your application. Even though several people talk about application configuration in a generic manner, in reality not all configuration settings are equally important.
In the context of a Kubernetes application, we have the following categories of “environment configuration”:
- The application version in the form of the container tag used. This is probably the most important setting in a Kubernetes manifest (as far as environment promotions are concerned). Depending on your use case, you might get away with simply changing the version of the container image. However, several times a new change in the source code also requires a new change in the deployment environment
- Kubernetes specific settings for your application. This includes the replicas of the application and other Kubernetes related information such as resource limits, health checks, persistent volumes, affinity rules, etc.
- Mostly static business settings. This is the set of settings that are unrelated to Kubernetes but have to do with the business of your application. It might be external URLs, internal queue sizes, UI defaults, authentication profiles, etc. By “mostly static,” I mean settings that are defined once for each environment and then never change afterwards. For example, you always want your production environment to use production.paypal.com and your non-production environments to use staging.paypal.com. This is a setting that you never want to promote between environments
- Non-static business settings. This is the same thing as the previous point, but it includes settings that you DO want to promote between environments. This could be a global VAT setting, your recommendation engine parameters, the available bitrate encodings, and any other setting that is specific to your business.
It is imperative that you understand what all the different settings are and, more importantly, which of them belong to category 4 as these are the ones that you also want to promote along with your application version.
This way you can cover all possible promotion scenarios:
- Your application moves from version 1.34 to 1.35 in QA. This is a simple source code change. Therefore you only need to change the container image property in your QA environment.
- Your application moves from version 3.23 to 3.24 in Staging. This is not a simple source code change. You need to update the container image property and also bring the new setting “recommender.batch_size” from QA to staging.
I see too many teams that don’t understand the distinction between different configuration parameters and have a single configuration file (or mechanism) with values from different areas (i.e. both runtime and application business settings).
Once you have the list of your settings and which area they belong to, you are ready to create your environment structure and optimize the file copy operations for the settings that change a lot and need to be moved between environments.
Example with 5 GitOps environments and variations between them
Let’s see an actual example. I thought about doing the classic QA/Staging/Production trilogy, but this is rather boring so let’s dive into a more realistic example.
We are going to model the environment situation mentioned in the first article of the series. The company that we will examine has 5 distinct environments:
- Load Testing
- Integration Testing
- QA
- Staging
- Production
Then let’s assume that the last 2 environments are also deployed to EU, US, and Asia while the first 2 also have GPU and Non-GPU variations. This means that the company has a total of 11 environments.
You can find the suggested folder structure at https://github.com/kostis-codefresh/gitops-environment-promotion. All environments are different folders in the same branch. There are NO branches for the different environments. If you want to know what is deployed in an environment, you simply look at envs/ in the main branch of the repo.
Before we explain the structure, here are some disclaimers:
Disclaimer 1: Writing this article took a long time because I wasn’t sure if I should cover Kustomize or Helm or plain manifests. I chose Kustomize as it makes things a bit easier (and I also mention Helm at the end of the article). Note however that the Kustomize templates in the example repo are simply for illustration purposes. The present article is NOT a Kustomize tutorial. In a real application, you might have Configmap generators, custom patches and adopt a completely different “component” structure than the one I am showing here. If you are not familiar with Kustomize, spend some time understanding its capabilities first and then come back to this article.
Disclaimer 2: The application I use for the promotions is completely dummy, and its configuration misses several best practices mainly for brevity and simplicity reasons. For example, some deployments are missing health checks, and all of them are missing resource limits. Again, this article is NOT about how to create Kubernetes deployments. You should already know how proper deployment manifests look. If you want to learn more about production-grade best practices, then see my other article at https://codefresh.io/kubernetes-tutorial/kubernetes-antipatterns-1/
With the disclaimers out of the way, here is the repository structure:

The base directory holds configuration which is common to all environments. It is not expected to change often. If you want to do changes to multiple environments at the same time, it is best to use the “variants” folder.
The variants folder (a.k.a mixins, a.k.a. components) holds common characteristics between environments. It is up to you to define what exactly you think is “common” between your environments after researching your application as discussed in the previous section.
In the example application, we have variants for all prod and non-prod environments and also the regions. Here is an example of the prod variant that applies to ALL production environments.
---
apiVersion: apps/v1
kind: Deployment
metadata:
  name: simple-deployment
spec:
  template:
    spec:
      containers:
      - name: webserver-simple
        env:
        - name: ENV_TYPE
          value: "production"
        - name: PAYPAL_URL
          value: "production.paypal.com"
        - name: DB_USER
          value: "prod_username"
        - name: DB_PASSWORD
          value: "prod_password"
        livenessProbe:
          httpGet:
            path: /health
            port: 8080
In the example above, we make sure that all production environments are using the production DB credentials, the production payment gateway, and a liveness probe (this is a contrived example, please see disclaimer 2 at the start of this section). These settings belong to the set of configuration that we don’t expect to promote between environments, but we assume that they will be static across the application lifecycle.
With the base and variants ready, we can now define every final environment with a combination of those properties.
Here is an example of the staging ASIA environment:
apiVersion: kustomize.config.k8s.io/v1beta1
kind: Kustomization

namespace: staging
namePrefix: staging-asia-

resources:
- ../../base

components:
  - ../../variants/non-prod
  - ../../variants/asia

patchesStrategicMerge:
- deployment.yml
- version.yml
- replicas.yml
- settings.yml
First we define some common properties. We inherit all configuration from base, from non-prod environments, and for all environments in Asia.
The key point here is the patches that we apply. The version.yml and replicas.yml are self-explanatory. They only define the image and replicas on their own and nothing else.
The version.yml file (which is the most important thing to promote between environments) defines only the image of the application and nothing else.
---
apiVersion: apps/v1
kind: Deployment
metadata:
  name: simple-deployment
spec:
  template:
    spec:
      containers:
      - name: webserver-simple
        image: docker.io/kostiscodefresh/simple-env-app:2.0
The associated settings for each release that we DO expect to promote between environments are also defined in settings.yml
---
apiVersion: apps/v1
kind: Deployment
metadata:
  name: simple-deployment
spec:
  template:
    spec:
      containers:
      - name: webserver-simple
        env:
        - name: UI_THEME
          value: "dark"
        - name: CACHE_SIZE
          value: "1024kb"
        - name: PAGE_LIMIT
          value: "25"
        - name: SORTING
          value: "ascending"
        - name: N_BUCKETS
          value: "42"
Feel free to look at the whole repository to understand the way all kustomizations are formed.
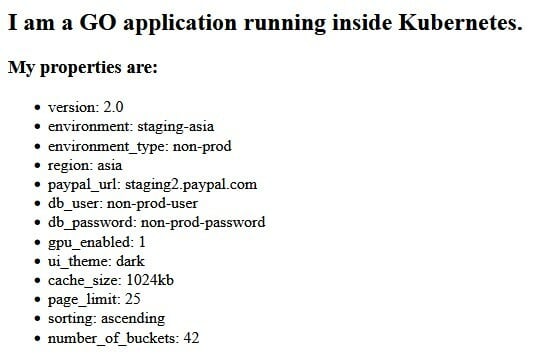
Performing the initial deployment via GitOps
To deploy an application to its associated environment, just point your GitOps controller to the respective “env” folder and kustomize will create the complete hierarchy of settings and values.
Here is the example application as it runs in Staging/Asia.
You can also use Kustomize on the command line to preview what is going to be deployed for each environment. Examples:
kustomize build envs/staging-asia
kustomize build envs/qa
kustomize build envs/integration-gpu
You can of course pipe the output to kubectl to deploy each environment, but in the context of GitOps, you should always let your GitOps controller deploy your environments and avoid manual kubectl operations.
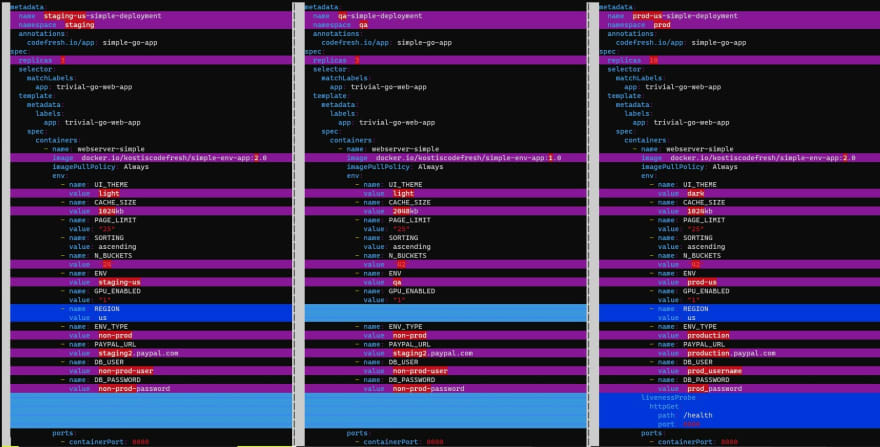
Comparing the configuration of two environments
A very common need for a software team is to understand what is different between two environments. I have seen several teams who have the misconception that only with branches you can easily find differences between environments.
This could not be further from the truth. You can easily use mature file-diffing utilities to find what is different between environments just by comparing files and folders.
The simplest way is to diff only the settings that are critical to the app.
vimdiff envs/integration-gpu/settings.yml envs/integration-non-gpu/settings.yml

And with the help of kustomize, you can compare any number of whole environments for the full picture:
kustomize build envs/qa/> /tmp/qa.yml
kustomize build envs/staging-us/ > /tmp/staging-us.yml
kustomize build envs/prod-us/ > /tmp/prod-us.yml
vimdiff /tmp/staging-us.yml /tmp/qa.yml /tmp/prod-us.yml
I personally don’t see any disadvantage between this method and performing “git diff” between environment branches.
How to perform promotions between GitOps environments
Now that the file structure is clear, we can finally answer the age-old question “how do I promote releases with GitOps”?
Let’s see some promotion scenarios. If you have been paying attention to the file structure, you should already understand how all promotions resolve to simple file copy operations.
Scenario: Promote application version from QA to staging environment in the US:
- cp envs/qa/version.yml envs/staging-us/version.yml
- commit/push changes
Scenario: Promote application version from integration testing (GPU) to load testing (GPU) and then to QA. This is a 2 step process
- cp envs/integration-gpu/version.yml envs/load-gpu/version.yml
- commit/push changes
- cp envs/load-gpu/version.yml envs/qa/version.yml
- commit/push changes
Scenario: Promote an application from prod-eu to prod-us along with the extra configuration. Here we also copy our setting file(s).
- cp envs/prod-eu/version.yml envs/prod-us/version.yml
- cp envs/prod-eu/settings.yml envs/prod-us/settings.yml
- commit/push changes
Scenario: Make sure that QA has the same replica count as staging-asia
- cp envs/staging-asia/replicas.yml envs/qa/replicas.yml
- commit/push changes
Scenario: Backport all settings from qa to integration testing (non-gpu variant)
- cp envs/qa/settings.yml envs/integration-non-gpu/settings.yml
- commit/push changes
Scenario: Make a global change to all non-prod environments at once (but see also next section for some discussion on this operation)
- Make your change in variants/non-prod/non-prod.yml
- commit/push changes
Scenario: Add a new configuration file to all US environments (both production and staging).
- Add the new manifest in the variants/us folder
- Modify the variants/us/kustomization.yml file to include the new manifest
- commit/push changes
In general, all promotions are just copy operations. Unlike the environment-per-branch approach, you are now free to promote anything from any environment to any other environment without any fear of taking the wrong changes. Especially when it comes to back-porting configuration, environment-per-folder really shines as you can simply move configuration both “upwards” and “backwards” even between unrelated environments.
Note that I am using cp operations just for illustration purposes. In a real application, this operation would be performed automatically by your CI system or other orchestration tool. And depending on the environment, you might want to create a Pull Request first instead of directly editing the folder in the main branch.
Making changes to multiple environments at once
Several people have asked in the comments of the first article about the use-case of changing multiple environments at once and how to achieve and/or prevent this scenario.
First of all, we need to define what exactly we mean by “multiple” environments. We can assume the following 2 cases.
- Changing multiple environments at once that are on the same “level.” As an example, you want to make a change that affects prod-us, prod-eu and prod-asia at the same time
- Changing multiple environments at once that are NOT on the same level. As an example, you want to make a change to “integration” and “staging-eu” at the same time
The first case is a valid scenario, and we will cover this below. However, I consider the second scenario an anti-pattern. The whole point of having different environments is to be able to release things in a gradual way and promote a change from one environment to the next. So if you find yourself deploying the same change in environments of different importance, ask yourself if this is really needed and why.
For the valid scenario of deploying a single change to multiple “similar” environments, there are two strategies:
- If you are absolutely certain that the change is “safe” and you want it to reach all environments at once, you can make that change in the appropriate variant (or respective folders). For example, if you commit/push a change in the variants/non-prod folder then all non-production environments will get this change at the same time. I am personally against this approach because several changes look “safe” in theory but can be problematic in practice
- The preferable approach is to apply the change to each individual folder and then move it to the “parent” variant when it is live on all environments.
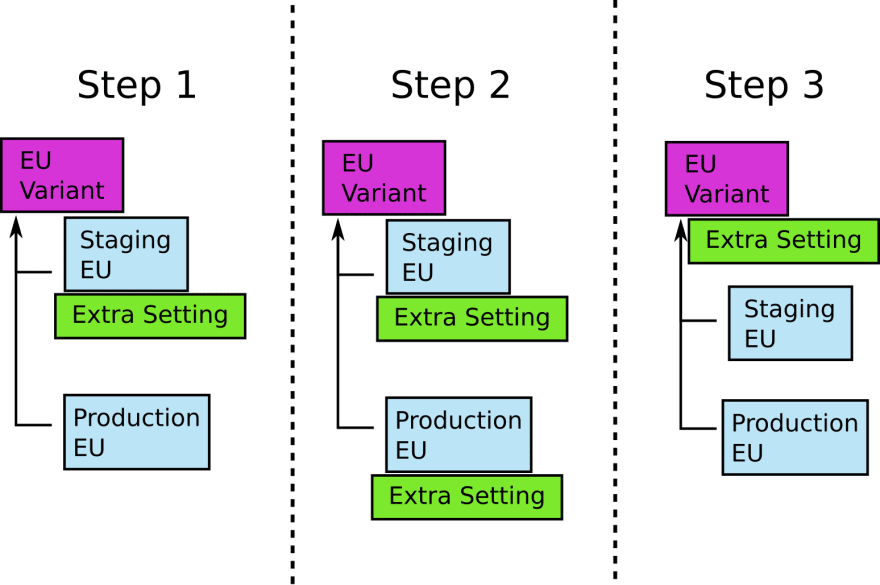
Let’s take an example. We want to make a change that affects all EU environments (e.g. a GDPR feature). The naive way would be to commit/push the configuration change directly to variants/eu folder. This would indeed affect all EU environments (prod-eu and staging-eu). However this is a bit risky, because if the deployment fails, you have just brought down a production environment.
The suggested approach is the following:
- Make the change to envs/staging-eu first
- Then make the same change to envs/prod-eu
- Finally, delete the change from both environments and add it in variants/eu (in a single commit/push action).
You might recognize this pattern from gradual database refactorings. The final commit is “transitional” in the sense that it doesn’t really affect any environments in any way. Kustomize will create the exact same definition in both cases. Your GitOps controller shouldn’t find any differences at all.
The advantages of this approach are of course the easy way to rollback/revert the change as you move it through environments. The disadvantage is the increased effort (and commits) you need to promote the change to all environments, but I believe that the effort outweighs the risks.
If you adopt this approach, it means that you never apply new changes to the base folder directly. If you want a change to happen to all environments, you first apply the change to individual environments and/or variants and then backport it to the base folder while simultaneously removing it from all downstream folders.
The advantages of the “environment-per-folder” approach
Now that we have analyzed all the inner workings of the “environment-per-folder” approach, it is time to explain why it is better than the “environment-per-branch” approach. If you have been paying attention to the previous sections, you should already understand how the “environment-per-folder” approach directly avoids all the problems analyzed in the previous article.
The most glaring issues with environment branches is the order of commits and the danger of bringing unwanted changes when you merge from one environment to another. With the folder approach, this problem is completely eliminated:
- The order of commits on the repo is now irrelevant. When you copy a file from one folder to the next, you don’t care about its commit history, just its content
- By only copying files around, you only take exactly what you need and nothing else. When you copy envs/qa/version.yml to envs/staging-asia/version.yml you can be certain that you only promote the container image and nothing else. If somebody else has changed the replicas in the QA environment in the meantime, it doesn’t affect your promotion action.
- You don’t need to use git cherry-picks or any other advanced git method to promote releases. You only copy files around and have access to the mature ecosystem of utilities for file processing.
- You are free to take any change from any environment to either an upstream or downstream environment without any constraints about the correct “order” of environments. If for example you want to backport your settings from production US to staging US, you can do a simple copy operation of envs/prod-us/settings.yml to envs/staging-us/settings.yml without the fear that you might take inadvertently unrelated hotfixes that were supposed to be only in production.
- You can easily use file diff operations to understand what is different between environments in all directions (both from source and target environments and vice versa)
I consider these advantages very important for any non-trivial application, and I bet that several “failed deployments” in big organizations could be directly or indirectly attributed to the problematic environment-per-branch model.
The second problem mentioned in the previous article was the presence of configuration drift when you merge a branch to the next environment. The reason for this is that when you do a “git merge,” git only notifies you about the changes it will bring, and it doesn’t say anything about what changes are already in the target branch.
Again this problem is completely eliminated with folders. As we said already, file diff operations have no concept of “direction.” You can copy any setting from any environment either upwards or downwards, and if you do a diff operation on the files, you will see all changes between environments regardless of their upstream/downstream position.
The last point about environment branches was the linear complexity of branches as the number of environments grows. With 5 environments, you need to juggle changes between 5 branches, and with 20 environments, you need to have 20 branches. Moving a release correctly between a large number of branches is a cumbersome process, and in the case of production environments, it is a recipe for disaster.
With the folder approach, the number of branches is not only static but it is exactly 1. If you have 5 environments you manage them all with your “main” branch, and if you need more environments, you only add extra folders. If you have 20 environments, you still need a single Git branch. Getting a centralized view on what is deployed where is trivial when you have a single branch.
Using Helm with GitOps environments
If you don’t use Kustomize but prefer Helm instead, it is also possible to create a hierarchy of folders with “common” stuff for all environments, specific features/mixins/components, and final folders specific to each environment.
Here is how the folder structure would look like
chart/
  [...chart files here..]
common/
  values-common.yml
variants/
  prod/
     values-prod.yml
  non-prod/
    Values-non-prod.yml
  [...other variants…]
 envs/
     prod-eu/
           values-env-default.yaml
           values-replicas.yaml
           values-version.yaml
           values-settings.yaml
   [..other environments…]
Again you need to spend some time to examine your application properties and decide how to split them into different value files for optimal promotion speed.
Other than this, most of the processes are the same when it comes to environment promotion.
Scenario: Promote application version from QA to staging environment in the US:
- cp envs/qa/values-version.yml envs/staging-us/values-version.yml
- commit/push changes
Scenario: Promote application version from integration testing (GPU) to load testing (GPU) and then to QA. This is a 2 step process
- cp envs/integration-gpu/values-version.yml envs/load-gpu/values-version.yml
- commit/push changes
- cp envs/load-gpu/values-version.yml envs/qa/values-version.yml
- commit/push changes
Scenario: Promote an application from prod-eu to prod-us along with the extra configuration. Here we also copy our setting file(s).
- cp envs/prod-eu/values-version.yml envs/prod-us/values-version.yml
- cp envs/prod-eu/values-settings.yml envs/prod-us/values-settings.yml
- commit/push changes
It is also critical to understand how Helm (or your GitOps agent which handles Helm) works with multiple value files and the order in which they override each other.
If you want to preview one of your environments, instead of “kustomize build” you can use the following command
helm template chart/ --values common/values-common.yaml --values variants/prod/values-prod.yaml –values envs/prod-eu/values-env-default.yml –values envs/prod-eu/values-replicas.yml –values envs/prod-eu/values-version.yml –values envs/prod-eu/values-settings.yml
You can see that Helm is a bit more cumbersome than Kustomize, if you have a large number of variants or files in each environment folder.
The “environment-per-git-repo” approach
When I talk with big organizations about the folder approach, one of the first objections I see is that people (especially security teams) don’t like to see a single branch in a single Git repository that contains both prod and non-prod environments.
This is an understandable objection and arguably can be the single weak point of the folder approach against the “environment-per-branch” paradigm. After all, it is much easier to secure individual branches in a Git repository instead of folders in a single branch.
This problem can be easily solved with automation, validation checks, or even manual approvals if you think it is critical for your organization. I want to stress again that I only use “cp” in the file operations for promoting releases just for illustration purposes. It doesn't mean that an actual human should run cp manually in an interactive terminal when a promotion happens.
Ideally you should have an automated system that copies files around and commits/pushes them. This can be your Continuous Integration (CI) system or other platform that deals with your software lifecycle. And if you still have humans that make the changes themselves, they should never commit to “main” directly. They should open a Pull Request instead. Then you should have a proper workflow that checks that Pull Request before merging.
I realize however that some organizations are particularly sensitive to security issues and they prefer a bulletproof approach when it comes to Git protection. For these organizations, you can employ 2 Git repositories. One has the base configuration, all prod variants, and all prod environments (and everything else related to production) while the second Git repository has all non-production stuff.
This approach makes promotions a bit harder, as now you need to checkout 2 git repositories before doing any promotion. On the other hand, it allows your security team to place extra security constraints to the “production” Git repository, and you still have a static number of Git repositories (exactly 2) regardless of the amount of environments you deploy to.
I personally consider this approach an overkill that, at least to me, shows a lack of trust against developers and operators. The discussion on whether or not people should have direct access to production environments is a complex one and probably deserves a blog post on its own.
Embrace folders and forget branches
We hope that with this blog post we addressed all the questions that arose from the “don’t use branches for environments” article and you now have a good understanding about the benefits of the folder approach and why you should use it.
If you have other interesting use cases or have extra questions on the subject of organizing your GitOps environments, please ask in the comments section.
Happy GitOps deployments!

Top comments (0)