This is a follow-up to my previous article on Firebase authentication. I was not satisfied with the binary solution and decided to enhance it with XState.
It's hard to understand XState just with light bulb and red light examples. I need something concrete, something to chew on. A practical use case. That's why I asked myself if I could use XState for Firebase authentication.
XState is hard to learn. In order to understand the concepts you must actually sit down and type out the code.
Take 20 minutes of your busy schedule. It will be time well spent. I promise!
What you will learn
Below is a list of the things you will learn:
- Creating XState machines
- Using XState in Svelte
- Encapsulating external libraries in XState
- Using Firebase authentication in XState
This is what the final result will look like.

Onward.
Requirements
Since this is a follow-up article to Firebase authentication with Svelte we will base all the code on it. Read it first if you want to understand how Firebase authentication works.
What is XState?
XState is a small (and lightweight) library that helps you manage state in your application. The gist of XState is that you application can only be in one state at a time and from that state you can only move to other predefined states by the rules you define. Because of that, it makes working with state very predictable, but notice I didn't say easy.
Even though, XState has one of the best documentations I have seen, it's not easy to understand all its concepts. You have to start with a blank state of mind and take your time to absorb all the new ideas it offers.
Many people think that XState can only be used in UI when working with forms, but that not true. You can use it anywhere you need predicable state.
State machines briefly explained
I won't explain the XState in-depth, because XState's documentation does it 1000 times better that I ever could, but I want to briefly explain state machines.
State machines are the core of XState and you will be writing many when working with the XState library.
Here is a very basic and oversimplified example of an auth state machine just to get an idea on how to work with XState.
import { createMachine, interpret } from 'xstate';

// create a state machine config
const config = {
  id: 'auth',
  initial: 'signedOut',
  states: {
    authenticating: {
      on: {
        'SUCCESS': 'signedIn',
        'FAILURE': 'signedOut'
      }
    },
    signedIn: {
      on: { 'LOGOUT': 'signedOut' }
    },
    signedOut: {
      on: { 'LOGIN': 'authenticating' }
    }
  }
};

// create a machine instance from config
const machine = createMachine(config);

// create an instance of an interpreted machine,
// also known as a service.
const service = interpret(machine)

// start our service
service.start();

service.state.value === 'signedOut';
// true

// send an event that initiates a state transition
// to the 'authenticating' state
service.send('LOGIN');

service.state.matches('authenticating');
// true

service.send('SUCCESS');

service.state.matches('signedIn');
// true

service.stop();
You can do many fancy things with state machines, as you will learn. The basics of the state machines - you make decisions on the current state by sending events to the instance of the state machine.
Identifying all possible states
With our newly gained basic state machine knowledge, let's try to identify the states we have when it comes to our Firebase authentication.
We have three obvious states:
- Authenticating, when checking user's authentication status
- Signed out, when the user is logged out
- Signed in, when the user is logged in
But if we think hard about it we have two more states:
- Signing in, when the user is logging in
- Signing out, when the user is logging out
You might think they are actions, but they are actually states. At least in my eyes.
When I am trying to identify states I often start with an action, such as "log in", and try to convert action to state - "logging in". If it makes sense, then it's probably a state.
We can also have additional states that are related to authentication such as loading, where we enrich the user with additional data like roles and permissions.
With our naïve assumptions let's try and build an initial version of our state machine.
Initial auth machine version
Let's get cranking! Create an authMachine.js file in the src/auth directory.
const config = {
  id: 'auth',
  // we want to start by checking if
  // user is logged in when page loads
  initial: 'authenticating',
  // context is where you keep your app state
  context: {
    auth: null,
    error: null
  },
  // all possible authentication states
  states: {
    authenticating: {},
    // we will enrich the user profile
    // with additional data
    loading: {},
    signedIn: {
      // when receiving 'LOGOUT' event
      // transition to singingOut state
      on: { LOGOUT: { target: 'signingOut' } }
    },
    signedOut: {
      // when receiving 'LOGIN' event
      // transition to signingIn state
      on: { LOGIN: { target: 'signingIn' } }
    },
    signingIn: {},
    signingOut: {}
  }
};
That will do for now. But how do we check if the user is authenticated or not? That's where XState's effects come in.
Doing side effects in XState
In XState you can invoke different actions when you transition to a state. You can invoke callbacks, promises, observables and even other state machines.
The options are many, but in our example we will use promises to keep things simple. Because everyone knows how promises work, right?
When we want transition to a different state (by sending an event for example) we can invoke a XState service, a function that return promise in our case, with the invoke property.
When invoking the service XState will pass two arguments to it - machine's context and event that triggered the state transition.
Here is a pseudo-example of it could look for our authenticating state.
states: {
  authenticating: {
    // when entering a state invoke
    // the service
    invoke: {
      id: 'checkAuth',
      // can be inline or we can refer to it
      // by an identifier as we will see later
      src: (ctx, event) => {
        console.log({ctx, event});
        return new Promise((resolve, reject) => {
          // simulate a slow auth method
          setTimeout(resolve, 1000);
        });
      },
      // called on Promise.resolve()
      onDone: {
        target: 'signedIn'
      },
      // called on Promise.reject()
      onError: {
        target: 'signedOut',
      }
    }
  },
  // ...
  signedIn: {},
  signedOut: {}
}
Are you with me so far? In the example above when our auth machine starts, it will start in the authenticating state and immediately invoke the promise with the checkAuth id.
The promise will in this case resolve and therefore call the onDone hook, which will transition from authenticating to signedIn state. In the onDone hook it will pass in the current app context and event as arguments.
One important concept to understand is that XState uses events to transition from one state to another. They are external and also internal stimulus that we can act on.
If you ever worked with Redux you can think of events as Redux actions. Every event always has a type, its name, and along side with that you can pass in data.
As an analogy we can think of (context, event) arguments as Redux (state, action) concept.
Don't know if its a fair comparison, but that's how I see it. More on that later.
Wiring up the machine
To make things more clear let's play around a bit our auth machine in its current state and wire it up to few buttons that we can push.
First, we need to wrap it in a Svelte readable store. Create a useMachine.js file in src/auth directory.
// useMachine.js

import { readable } from 'svelte/store';
import { interpret } from 'xstate';

export const useMachine = (config, options) => {
  // interpret the machine config
  const service = interpret(config, options);

  // wrap machine in a svelte readable store with
  // initial state (defined in config) as its starting state
  const store = readable(service.initialState, set => {
    // every time we change state onTransition
    // hook is triggered
    service.onTransition(state => {
      set(state);
    });

    // start the machine
    service.start();

    return () => {
      service.stop();
    };
  });

  // return a custom Svelte store
  return {
    state: store,
    send: service.send
  };
};
Before we can use machine we need to create it. Adjust the authMachine.js to following.
// authMachine.js

import { createMachine } from 'xstate';

const config = {
  // ...
}

export const initAuthMachine = () => createMachine(config);
Now we are ready to use it in the our auth/index.js file. Let's change it to this for now.
import firebase from 'firebase/app';
import 'firebase/auth';
import { useMachine } from './useMachine';
import { initAuthMachine } from './authMachine';

const userMapper = claims => ({
  id: claims.user_id,
  name: claims.name,
  email: claims.email,
  picture: claims.picture
});

export const initAuth = (useRedirect = false) => {
  const auth = firebase.auth();

  const loginWithEmailPassword = (email, password) =>
    auth.signInWithEmailAndPassword(email, password);

  const loginWithGoogle = () => {
    const provider = new firebase.auth.GoogleAuthProvider();

        return useRedirect
            ? auth.signInWithRedirect(provider)
            : auth.signInWithPopup(provider);
  };

  const authMachine = initAuthMachine();

  return useMachine(authMachine);
};
There are a few unused functions, but don't worry, we will put them to use later.
We can finally wire up the machine in our App.svelte file. You can find the complete setup code for the app and styles for the main file in my previous tutorial on Firebase authentication.
<!-- App.svelte with styles omitted -->

<script>
  import firebase from 'firebase/app';
  import { initAuth } from './auth';
  import { fade } from 'svelte/transition';

  const firebaseConfig = {
    // vite reads env variables from .env file in root dir
    apiKey: `${import.meta.env.VITE_FIREBASE_KEY}`,
    authDomain: 'testing-firebase-emulators.firebaseapp.com',
    projectId: 'testing-firebase-emulators'
  };

  firebase.initializeApp(firebaseConfig);

  // user custom auth machine store
  const { state, send } = initAuth();

  const loginHandler = async event => {
    const { email, password } = event.target.elements;
    // send login event
    send('LOGIN');
  };
</script>

<div class="wrapper">
  <div class="w-full max-w-xs">

    {#if $state.matches('authenticating')}
      <h2 class="text-2xl text-center">Authenticating ...</h2>
    {/if}

    {#if $state.matches('signedIn')}
      <div class="text-center">
        <button type="button" class="mt-3" on:click={() => send('LOGOUT')}>
          Logout
        </button>
      </div>
    {/if}

    {#if $state.matches('signedOut')}
      <form
        on:submit|preventDefault={loginHandler}
        class="px-8 pt-6 pb-8 bg-white shadow-md"
      >
        <div class="mb-4">
          <label for="email">Email</label>
          <input
            class="input-field"
            id="email"
            type="email"
            placeholder="name@acme.com"
          />
        </div>
        <div class="mb-6">
          <label for="password">Password</label>
          <input
            class="input-field"
            id="password"
            type="password"
            placeholder="******************"
          />
        </div>
        <div>
          <button type="submit">Sign In</button>
        </div>
        <div class="mt-3">
          <button type="button" on:click|preventDefault={() => send('LOGIN')}>
            Sign In with Google
          </button>
        </div>
      </form>
    {/if}

    <!-- debugging: show current state -->
    <div class="p-3 mt-5 bg-blue-200">
      <pre>{JSON.stringify($state.value, null, 2)}</pre>
    </div>
  </div>
</div>
You might have noticed that we only have "if" statements in our code. By using XState you can only be in one state at a time. Pretty neat!
Manipulating app state using XState actions
We've come far, but without app state our app is useless. Let's do something about it.
Remember that we defined a context property in our auth machine config? That's where we are going to keep our app state.
For manipulating it, XState has the concept of actions, fire-and-forget side effects.
XState actions are functions that take context and event as arguments. Actions can do many useful things, but you will most likely use actions to manipulate the XState context.
To understand the concept we will continue with a pseudo-example of transitioning from authenticating state, but instead we will reject the promise and put that error on the context.error property.
import { assign } from 'xstate';

// ...

states: {
  authenticating: {
    invoke: {
      id: 'checkAuth',
      src: (ctx, event) => {
        console.log({ ctx, event });
        return new Promise((resolve, reject) => {
          // simulate a slow auth method
          setTimeout(() => reject('wrong password'), 1000);
        });
      },
      // called on Promise.resolve()
      onDone: {
        target: 'signedIn'
      },
      // called on Promise.reject()
      onError: {
        target: 'signedOut',
        // assign the error to the `context.error`
        // that comes in event.data from the Promise.reject.
        // assign is a helper function that you import from XState
        // that we will use later
        actions: assign({
          error: (_, event) => event.data
        })
      }
    }
  },
  // ...
  signedIn: {},
  signedOut: {}
}
XState is flexible when it comes to defining its config. You can supply a list of actions and also pass them in a separate external dictionary and refer to them by key name instead of writing them inline.
Actions are kind of hard to understand, but stick with me. Everything will clear as we progress further.
Defining side effects as XState services
Now that we know how to perform side effects in XState we need to wrap all Firebase authentication methods in XState services and also add actions to manipulate our app state.
Remember that I told that we can supply both actions and services as external objects and refer to them by name in our config? Let's do that.
We will start with XState services. Open the auth/index.js file and replace initAuth function with this code.
// auth/index.js

// constructor function. need to call it after we
// initialize our firebase app
export const initAuth = (useRedirect = false) => {
    const auth = firebase.auth();

    const loginWithEmailPassword = (email, password) =>
        auth.signInWithEmailAndPassword(email, password);

    const loginWithGoogle = () => {
        const provider = new firebase.auth.GoogleAuthProvider();

        return useRedirect
            ? auth.signInWithRedirect(provider)
            : auth.signInWithPopup(provider);
    };

  // define XState services
  const services = {
    authChecker: () =>
      // wrap the onAuthStateChanged hook in a promise and
      // immediately unsubscribe when triggered
      new Promise((resolve, reject) => {
        const unsubscribe = firebase.auth().onAuthStateChanged(auth => {
          unsubscribe();
          return auth ? resolve(auth) : reject();
        });
      }),
    authenticator: (_, event) => {
      if (event.provider === 'email') {
        return loginWithEmailPassword(event.email, event.password);
      } else if (event.provider === 'google') {
        return loginWithGoogle();
      }
    },
    loader: (ctx, _) => {
      return new Promise(resolve => {
        setTimeout(() => {
          ctx.auth
            .getIdTokenResult()
            .then(({ claims }) => userMapper(claims))
            .then(resolve);
        }, 1500);
      });
    },
    logout: () => auth.signOut()
  };

  // pass the services as argument
    const authMachine = initAuthMachine(services);

    return useMachine(authMachine);
};
It's time to fix our auth machine config.
Fixing the auth machine config
I can talk a lot about how to adjust our config, but code speaks louder than words, even if it's made up of words.
Here is updated authMachine.js in all its glory, with comments and all.
// authMachine.js

import { createMachine, assign } from 'xstate';

const config = {
  id: 'auth',
  // we want to start by checking if
  // user is logged in when page loads
  initial: 'authenticating',
  // context is where you keep state
  context: {
    auth: null,
    user: null,
    error: null
  },
  // all possible authentication states
  states: {
    authenticating: {
      // when entering a state invoke
      // the authChecker service
      invoke: {
        id: 'authChecker',
        src: 'authChecker',
        onDone: { target: 'loading', actions: 'setAuth' },
        onError: { target: 'signedOut' }
      }
    },
    // we will enrich the user profile
    // with additional data
    loading: {
      invoke: {
        id: 'loader',
        src: 'loader',
        onDone: { target: 'signedIn', actions: 'setUser' },
        onError: {
          target: 'signedOut.failure',
          actions: ['setError', 'clearAuth']
        }
      }
    },
    signedIn: {
      // when receiving 'LOGOUT' event
      // transition to singingOut state
      on: { LOGOUT: { target: 'signingOut' } }
    },
    // signedOut has two sub-states
    // we will transition to failure in
    // case of wrong password, username
    // or network error
    signedOut: {
      initial: 'ok',
      states: {
        ok: { type: 'final' },
        failure: {}
      },
      on: {
        LOGIN: { target: 'signingIn' }
      }
    },
    signingIn: {
      invoke: {
        id: 'authenticator',
        src: 'authenticator',
        onDone: {
          target: 'authenticating',
          // clear error if successful login
          actions: 'clearError'
        },
        onError: {
          // transition to failure state
          // and set an error
          target: 'signedOut.failure',
          actions: 'setError'
        }
      }
    },
    signingOut: {
      invoke: {
        id: 'logout',
        src: 'logout',
        onDone: {
          target: 'signedOut',
          actions: ['clearAuth', 'clearError']
        },
        onError: {
          target: 'signedOut.failure',
          actions: ['clearAuth', 'setError']
        }
      }
    }
  }
};

export const initAuthMachine = services => {
  // define XState actions so that we can
  // refer to them by name in machine config
  const actions = {
    // clear user info on logout
    clearAuth: assign({ user: null, auth: null }),
    clearError: assign({ error: null }),
    // put Firebase auth object on context
    setAuth: assign({ auth: (_, event) => event.data }),
    // put user on context in loading service
    setUser: assign({ user: (_, event) => event.data }),
    setError: assign({
      error: (_, event) => event.data
    })
  };

  // create an options object containing
  // actions and services
  const options = {
    actions,
    services
  };

  return createMachine(config, options);
};
And this is what it looks like in the XState's visualizer.
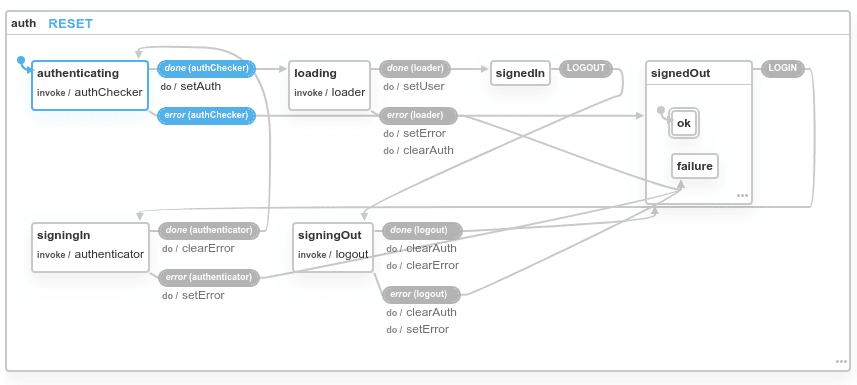
If you start at the authenticating state, and follow a path, it will all make sense. Notice that in configuration we refer to our services and actions by their names (keys) instead of writing them inline.
One thing to know is that if you have a transition with no action you can omit the target keyword and just use a string. XState is flexible, but in my opinion, it's good to be consistent and not take any shortcuts.
You can also see that we supplied an options object with our actions and services to createMachine functions. XState has plenty of different options to create your machines.
Understanding XState events
Just like in Redux, you define an action, but it's called event in this case.
In the event you can also supply event data. Here is the link to the XState documentation that explains it in great detail.
Below are a few examples of XState events.
// simplest case possible
send('LOGIN');

// same as above, this is what XState tranforms to internally
send({ type: 'LOGIN'});

// provide an object payload
send('LOGIN', { provider: 'google'});

// or
send({type:'LOGIN', provider: 'google'});

qend('LOGIN', { provider: 'email', email: 'john@example.com', password: 'qwerty' });
It's crucial that you understand the concept of XState events, because they are the base of everything in XState.
Using auth machine states in UI
Empowered by our new knowledge, let's do a final adjustment to our UI in App.svelte. We already logic for state management in place. We only need to adjust our handlers with correct events and also take care of error handling.
Here is the final version of App.svelte sprinkled with comments.
<!-- App.svelte -->

<style lang="postcss">
    label {
        @apply block mb-2 text-sm font-bold text-gray-700;
    }
    .input-field {
        @apply border w-full py-2 px-3 text-gray-700 mb-3;
    }
    .input-field:focus {
        @apply shadow-outline outline-none;
    }
    button {
        @apply w-full px-4 py-2 font-bold text-white bg-blue-500 rounded-sm;
    }
    button:hover {
        @apply bg-blue-700;
    }
    button:focus {
        @apply outline-none shadow-outline;
    }
    .wrapper {
        @apply flex flex-grow h-screen justify-center items-center bg-blue-100;
    }
</style>

<script>
    import firebase from 'firebase/app';
    import { initAuth } from './auth';
    import { fade } from 'svelte/transition';

    const firebaseConfig = {
        // vite reads env variables from .env file in root dir
        apiKey: `${import.meta.env.VITE_FIREBASE_KEY}`,
        authDomain: 'testing-firebase-emulators.firebaseapp.com',
        projectId: 'testing-firebase-emulators'
    };

    firebase.initializeApp(firebaseConfig);

    // use custom auth machine store
    const { state, send } = initAuth();

    const loginHandler = async event => {
        const { email, password } = event.target.elements;
        // send login event
        send('LOGIN', {
            provider: 'email',
            email: email.value,
            password: password.value
        });
    };

    // we don't want to be explicit about signingIn state
    $: displayLoginForm = ['signingIn', 'signedOut'].some($state.matches);
</script>

<div class="wrapper">
    <div class="w-full max-w-xs">
        {#if $state.matches('authenticating')}
            <h2 class="text-2xl text-center">Authenticating ...</h2>
        {/if}

        {#if $state.matches('loading')}
            <h2 class="text-2xl text-center">Loading ...</h2>
        {/if}

        <!-- uncomment if you want to be explicit about signingIn state -->
        <!--
        {#if $state.matches('signingIn')}
            <h2 class="text-2xl text-center">Signing in ...</h2>
        {/if}
        -->

        {#if $state.matches('signedIn')}
            <div class="text-center">
                <h2 class="text-2xl">{$state.context.user.email}</h2>
                <button type="button" class="mt-3" on:click={() => send('LOGOUT')}>
                    Logout
                </button>
            </div>
        {/if}

        {#if displayLoginForm}
            <form
                on:submit|preventDefault={loginHandler}
                class="px-8 pt-6 pb-8 bg-white shadow-md"
            >
                <div class="mb-4">
                    <label for="email">Email</label>
                    <input
                        class="input-field"
                        id="email"
                        type="email"
                        placeholder="name@acme.com"
                    />
                </div>
                <div class="mb-6">
                    <label for="password">Password</label>
                    <input
                        class="input-field"
                        id="password"
                        type="password"
                        placeholder="******************"
                    />
                </div>
                <!-- show auth errors -->
                {#if $state.context.error}
                    <div class="bg-red-500 p-3 mb-6" transition:fade>
                        {$state.context.error}
                    </div>
                {/if}
                <div>
                    <button type="submit">Sign In</button>
                </div>
                <div class="mt-3">
                    <!-- tell auth machine that this is a Google login -->
                    <button
                        type="button"
                        on:click|preventDefault={() => send('LOGIN', {
                                provider: 'google'
                            })}
                    >
                        Sign In with Google
                    </button>
                </div>
            </form>
        {/if}

    </div>
</div>
If you look carefully you will see that we added data to our events and we also show an error to the user in case of authentication failure.
Notice that we communicate with our machine by sending events. The logic is encapsulated in the machine itself.
I don't know about you, but I actually find it quite beautiful.
While our states are now explicit, I am struggling to show user correct information (or state transitions).
But this is not a code problem, only my lack of UX skills.
To compensate for it I created a reactive variable displayLoginForm. That way login form is visible even in the signingIn state.
Conclusion
This was a fun and educating experience. We achieved our goal and have a fully functioning Firebase authentication solution.
There are many ways to structure your application state with XState and if you are not careful you will end up with an unmanageable config that is hard to understand. The key is to write small, single purpose machines.
XState is also flexible in how you define your state machines. Its flexibility is also one of its weaknesses, because it's easy to get lost in all the options available and what to use where. It's easy to get into an analysis paralysis state, especially when you are just starting out learning the library.
With that said, I am happy with results and look forward to exploring XState further. Hope you do too now!
Here is the code to the final solution on Github.
 codechips
/
svelte-firebase-auth-xstate-example
codechips
/
svelte-firebase-auth-xstate-example
Example of how to use XState and Svelte with Firebase authentication
Thanks for reading!

Top comments (2)
Have you had a chance to look at thisrobot.life/ and compare it with XState?
I've looked at it some time ago, but not in-depth. Thanks for reminding me! Will take a closer look soon.