Next.js API is a convenient alternative for building RESTful APIs. One of the early on challenges you will face is that dealing with auth for Next.js APIs is quite different to what you might be used to from other frameworks like express.
In this article, you will see how to secure a Next.js API with authentication and authorization. You will learn how to model data for the API, how to rate limit the API, and how to host the API on AWS using AWS Amplify. By the end, you’ll have a recipe API that you can write to, read from, and test.
Prerequisites
To follow along with this tutorial, please ensure you have the following:
- An AWS account. If you don't have one, you can follow these instructions to create an account.
- AWS Amplify CLI set up. You can follow this quick guide to set it up.
- The Postman app installed on your computer.
- Familiarity with the basics of Next.js.
Project Setup
To get started, create a Next.js project:
npx create-next-app@latest secure-api-w-nextjs
Change directory into the new project and install the following dependencies:
npm i aws-amplify lru-cache
Once the dependencies have been installed, the next thing we need to do is initialize an Amplify app. To do this, run the following command in your terminal:
amplify init
You will be asked a series of questions to gather details about your project's configuration. Accept the values highlighted below:
➜  secure-api-w-nextjs amplify init
Note: It is recommended to run this command from the root of your app directory
? Enter a name for the project secureapiwnextjs
The following configuration will be applied:

Project information
| Name: secureapiwnextjs
| Environment: dev
| Default editor: Visual Studio Code
| App type: javascript
| Javascript framework: react
| Source Directory Path: src
| Distribution Directory Path: build
| Build Command: npm run-script build
| Start Command: npm run-script start

? Initialize the project with the above configuration? No
? Enter a name for the environment dev
? Choose your default editor: Visual Studio Code
✔ Choose the type of app that you're building · javascript
Please tell us about your project
? What javascript framework are you using react
? Source Directory Path:  .
? Distribution Directory Path: .next
? Build Command:  npm run-script build
? Start Command: npm run-script start
Using default provider  awscloudformation
? Select the authentication method you want to use: AWS profile

For more information on AWS Profiles, see:
https://docs.aws.amazon.com/cli/latest/userguide/cli-configure-profiles.html

? Please choose the profile you want to use default
Adding backend environment dev to AWS Amplify app: <env_name>

Deployment completed.
Deploying root stack secureapiwnextjs [ ====================----------
    amplify-secureapiwnextjs-dev-… AWS::CloudFormation::Stack     CREATE_
    AuthRole                       AWS::IAM::Role                 CREATE_
    UnauthRole                     AWS::IAM::Role                 CREATE_
    DeploymentBucket               AWS::S3::Bucket                CREATE_

✔ Help improve Amplify CLI by sharing non sensitive configurations on failures (y/N) · no

Deployment state saved successfully.
✔ Initialized provider successfully.
✅ Initialized your environment successfully.

Your project has been successfully initialized and connected to the cloud!

Some next steps:
"amplify status" will show you what you've added already and if it's locally configured or deployed
"amplify add <category>" will allow you to add features like user login or a backend API
"amplify push" will build all your local backend resources and provision it in the cloud
"amplify console" to open the Amplify Console and view your project status
"amplify publish" will build all your local backend and frontend resources (if you have hosting category added) and provision it in the cloud

Pro tip:
Try "amplify add api" to create a backend API and then "amplify push" to deploy everything
After setting up an Amplify app, the next step is to add authentication to the project. Writing the logic for an application's login flow can be challenging and time-consuming. You are responsible for handling tokens correctly, managing user sessions, and storaing user details. However, Amplify simplifies this process by providing a complete authentication solution, which uses Amazon Cognito under the hood, that can be easily added to your app. To do that, run the following command in your terminal:
amplify add auth
You will be prompted with a few questions. Accept the values shown below:
➜  secure-api-w-nextjs amplify add auth


Using service: Cognito, provided by: awscloudformation

 The current configured provider is Amazon Cognito.

 Do you want to use the default authentication and security configuration? Manual configuration
 Select the authentication/authorization services that you want to use: User Sign-Up, Sign-In, connected with AWS IAM controls (Enables per-user Storage features for
 images or other content, Analytics, and more)
 Provide a friendly name for your resource that will be used to label this category in the project: secureapiwnextjs59380b6c59380b6c
 Enter a name for your identity pool. secureapiwnextjs59380b6c_identitypool_59380b6c
 Allow unauthenticated logins? (Provides scoped down permissions that you can control via AWS IAM) Yes
 Do you want to enable 3rd party authentication providers in your identity pool? No
 Provide a name for your user pool: secureapiwnextjs59380b6c_userpool_59380b6c
 Warning: you will not be able to edit these selections.
 How do you want users to be able to sign in? Email
 Do you want to add User Pool Groups? No
 Do you want to add an admin queries API? No
 Multifactor authentication (MFA) user login options: OFF
 Email based user registration/forgot password: Enabled (Requires per-user email entry at registration)
 Specify an email verification subject: Your verification code
 Specify an email verification message: Your verification code is {####}
 Do you want to override the default password policy for this User Pool? Yes
 Enter the minimum password length for this User Pool: 6
 Select the password character requirements for your userpool:
 Warning: you will not be able to edit these selections.
 What attributes are required for signing up?
 Specify the app's refresh token expiration period (in days): 30
 Do you want to specify the user attributes this app can read and write? No
 Do you want to enable any of the following capabilities?
 Do you want to use an OAuth flow? No
? Do you want to configure Lambda Triggers for Cognito? No
✅ Successfully added auth resource secureapiwnextjs59380b6c59380b6c locally

✅ Some next steps:
"amplify push" will build all your local backend resources and provision it in the cloud
"amplify publish" will build all your local backend and frontend resources (if you have hosting category added) and provision it in the cloud
After adding authentication, the next step is to add storage functionality. We need to add storage to provide a store where we can upload images for our API. This allows us to link the uploaded images with the API records. To do that, run the following command in your terminal:
amplify add storage
You will be prompted with some questions here as well. Accept the values shown below:
➜  secure-api-w-nextjs amplify add storage
? Select from one of the below mentioned services: Content (Images, audio, video, etc.)
✔ Provide a friendly name for your resource that will be used to label this category in the project: · <name>
✔ Provide bucket name: · <name>
✔ Who should have access: · Auth and guest users
✔ What kind of access do you want for Authenticated users? · create/update, read, delete
✔ What kind of access do you want for Guest users? · create/update, read, delete
✔ Do you want to add a Lambda Trigger for your S3 Bucket? (y/N) · no
✅ Successfully added resource <name> locally

⚠️ If a user is part of a user pool group, run "amplify update storage" to enable IAM group policies for CRUD operations
✅ Some next steps:
"amplify push" builds all of your local backend resources and provisions them in the cloud
"amplify publish" builds all of your local backend and front-end resources (if you added hosting category) and provisions them in the cloud
One more thing we need to add to this app is the API. To do that, run the following command in your terminal:
amplify add api
As usual, you will be prompted with some questions. Accept the values shown below:
➜  secure-api-w-nextjs amplify add api
? Select from one of the below mentioned services: GraphQL
? Here is the GraphQL API that we will create. Select a setting to edit or continue Continue
? Choose a schema template: Blank Schema

⚠️  WARNING: your GraphQL API currently allows public create, read, update, and delete access to all models via an API Key. To configure PRODUCTION-READY authorization rules, review: https://docs.amplify.aws/cli/graphql/authorization-rules

✅ GraphQL schema compiled successfully.

Edit your schema at /Users/chnwamba/Desktop/secure-api-w-nextjs/amplify/backend/api/secureapiwnextjs/schema.graphql or place .graphql files in a directory at /Users/chnwamba/Desktop/secure-api-w-nextjs/amplify/backend/api/secureapiwnextjs/schema
✔ Do you want to edit the schema now? (Y/n) · yes
Edit the file in your editor: /Users/chnwamba/Desktop/secure-api-w-nextjs/amplify/backend/api/secureapiwnextjs/schema.graphql
✅ Successfully added resource secureapiwnextjs locally

✅ Some next steps:
"amplify push" will build all your local backend resources and provision it in the cloud
"amplify publish" will build all your local backend and frontend resources (if you have hosting category added) and provision it in the cloud
Let’s enable fine grained user-based authentication so logged in users can access the API without an API key. Run the following command in your terminal:
amplify update api
Accept the values shown below:
➜  secure-api-w-nextjs amplify update api
? Select from one of the below mentioned services: GraphQL

General information
- Name: secureapiwnextjs

Authorization modes
- Default: API key

Conflict detection (required for DataStore)
- Disabled

? Select a setting to edit Authorization modes
? Choose the default authorization type for the API API key
✔ Enter a description for the API key: ·
✔ After how many days from now the API key should expire (1-365): · 7
? Configure additional auth types? Yes
? Choose the additional authorization types you want to configure for the API Amazon Cognito User Pool
Cognito UserPool configuration
Use a Cognito user pool configured as a part of this project.

⚠️  WARNING: your GraphQL API currently allows public create, read, update, and delete access to all models via an API Key. To configure PRODUCTION-READY authorization rules, review: https://docs.amplify.aws/cli/graphql/authorization-rules

✅ GraphQL schema compiled successfully.

Edit your schema at /Users/chnwamba/Desktop/secure-api-w-nextjs/amplify/backend/api/secureapiwnextjs/schema.graphql or place .graphql files in a directory at /Users/chnwamba/Desktop/secure-api-w-nextjs/amplify/backend/api/secureapiwnextjs/schema
Once you have finished the previous steps, open your schema.graphql file so you can model data for the API. Replace all of it’s content with the following:
type Quantity @model @auth(rules: [{allow: public, operations: [read]}, {allow: owner}]) {
  id: ID!
  value: Float!
  unit: String!
  ingredientID: ID! @index(name: "byIngredient")
  recipeID: ID! @index(name: "byRecipe")
  Ingredient: Ingredient @belongsTo(fields: ["ingredientID"])
  Recipe: Recipe @belongsTo(fields: ["recipeID"])
}
type Ingredient @model @auth(rules: [{allow: public, operations: [read]}, {allow: owner}]) {
  id: ID!
  name: String!
  Quantities: [Quantity] @hasMany(indexName: "byIngredient", fields: ["id"])
}
type Recipe @model @auth(rules: [{allow: public, operations: [read]}, {allow: owner}]) {
  id: ID!
  direction: [AWSJSON!]!
  name: String!
  image: String
  Quantities: [Quantity] @hasMany(indexName: "byRecipe", fields: ["id"])
}
The code above defines three GraphQL types: Quantity, Ingredient, and Recipe.
In the Quantity model, there is an authentication directive, @auth(...) that sets the following rules: everyone (public) can only read (read operation) data from the Quantity type, while only the owner (the signed-in user who created the recipe) can perform create, update, and delete operations.
The Ingredient model has similar authorization rules as the Quantity type. Public users can read the data, but owners have full control over CRUD operations. Additionally, the Ingredient model has a one-to-many relationship with the Quantity type. This means that one ingredient can have multiple quantities, across different recipes.
Similarly, the Recipetype also the same authorization rules as the other types. It also has a one-to-many relationship with the Quantity type, allowing a recipe to be associated with multiple quantities of different ingredients.
I want quantity to act as a join table which will create a many to many relationship between Recipe and Ingredient. To achieve that, use the belongsTo directive to tell Amplify that Quanity belongs to the other models.
After making changes to the schema, open your terminal and run the following command:
amplify push -y
Accept all the default answers to the CLI prompts. The command will deploy all changes in the cloud.
Once the push is completed, we will receive a GraphQL endpoint and a GraphQL API key.
To store the credentials and use it in the Next.js API, create a .env.local file at the root of your project and add your GraphQL endpoint and a GraphQL API key to it:
GRAPHQL_ENDPOINT=YOUR ENDPOINT
GRAPHQL_KEY=YOUR API KEY
To ensure that the Amplify app was created, go to your browser and open the AWS console. You should see the newly created Amplify app there. Click on the app to open it.

Configure Amplify
Now that we have completed our setup, the next step is to setup Amplify in the API project. Since we will be using Amplify in a lot of API files, it is better to create it in a separate file and import it as needed, rather than configuring it in each of those file.
Create a new file named amplify-configure.js in the the lib folder in your project and add the following to it:
import { Amplify } from "aws-amplify";
import awsconfig from "../aws-exports";

export function configureAmplify() {
  Amplify.configure(awsconfig);
}
In the code, we import the Amplify library and also import the awsconfig file, which contains all of our Amplify credentials and was generated when we ran amplify push. Next, we define and export a function named configureAmplify, where we configure Amplify with the details we imported.
This setup ensures that the Amplify library knows about your specific backend setup and can interact with it correctly.
Now that we have finished our configuration settings, the next step is to setup, configure start building our API.
In order to access our API, we need to be signed in to get an access token. To do this, we need to create an API for user authentication.
Set Up API Testing
Before we jump in and start creating the API endpoints, I want to ensure we are set up for testing. Instead of implementing each test instance in Postman, I’ve created a Postman collection that you can download, which contains all the tests you’ll run for the rest of the article.
Once you’ve downloaded the collection, open Postman and import the collection. Select the collection file using a file picket. You should find the new collection on your sidebar after import.

The collection has a variable that stores the base URL so you don’t have to set the base URL for all of the API. You can find it the variable under the variable tab of the collections folder:

Create a New User
Once you’re done with the setup for testing, create a new file named route.js inside the app/api/auth/user directory. Add the following to the file:
import { Auth } from "aws-amplify";
import { configureAmplify } from "@/lib/amplify-configure";
configureAmplify();

export async function POST(request) {
  let user;
  const body = await request.json();
  try {
    user = await Auth.signUp({
      username: body.username,
      password: body.password,
    });
  } catch (error) {
    console.log("Error signing in", error);
  }
  return Response.json(user);
}
In the code above, we import the Auth module from the AWS Amplify library. It provides authentication functions such as sign-up, sign-in, and password reset. Additionally, we import the configureAmplify function which we just created and call it to configure AWS Amplify in this file.
After that, we define an asynchronous function that handles incoming POST requests. Within this function, we declare a variable called user which will be used to store user details. The request body is parsed as JSON and stored in the body constant.
The function then attempts to signup a new user using the signUp method from the Auth object, passing the username and password extracted from the request body. If the sign-up process is successful, the user's details will be stored in the user variable. If an error occurs, it will be logged to the console.
Run the following command to start your Next.js server:
npm run dev`
```
To test the sign-up API, run the Postman SignUp test:

You should get a similar response to the one below:

If you go back to Amplify Studio and click **User management** on the side bar, you should see the user's status listed as **UNCONFIRMED**.

## Handle Sign Up Confirmation
After testing the sign-up API, the next thing we need to do is create an API for confirming user sign-up. Create a new file named `route.js` inside the `app/api/auth/confirm` directory and add the following to the it:
```js
import { Auth } from "aws-amplify";
import { configureAmplify } from "@/lib/amplify-configure";
configureAmplify();
export async function POST(request) {
let user;
const body = await request.json();
try {
user = await Auth.confirmSignUp(body.username, body.code);
} catch (error) {
console.log("Error signing in", error);
}
// return new Response("Hit");
return Response.json(user);
}
```
In this file, we start by importing the `configureAmplify` function and calling it to configure AWS Amplify. After that, we define an asynchronous function called `POST` which receives a `request`. We then parse the body of the incoming request and assign it to the constant `body`.
We then call the `confirmSignUp` method to confirm a user's signup. Once a user signs up, they receive a confirmation code via email. The `confirmSignUp` method takes in the `username` and `code` as parameters and attempts to confirm the user. If the confirmation is successful, the user's data is returned. Otherwise, any errors encountered are logged to the console.
To test the confirmation API, run the Postman **Confirm Sign Up** test:
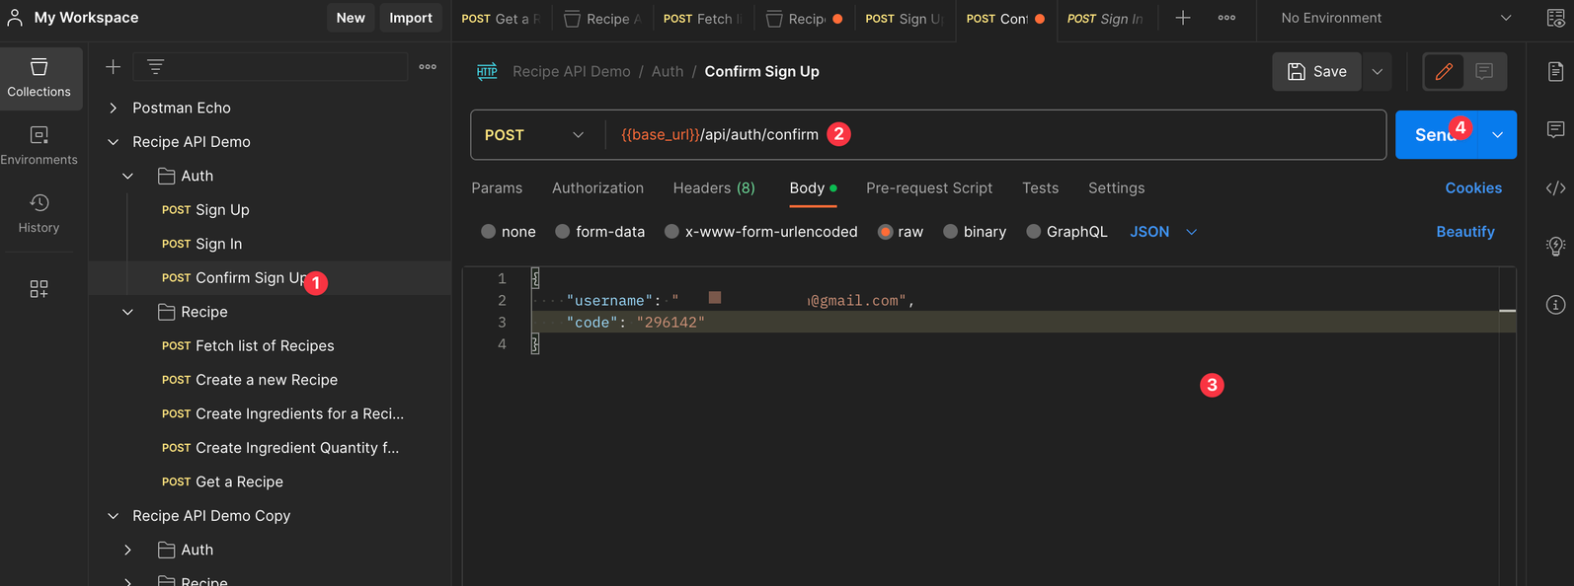
You should get a success message in the response:

Now if you save this and head back to Postman and click the confirm sign up. Replace the code with the code received in your email
Go back to Amplify Studio and click **User management** on the side bar. Refresh the page and you should see the user's status has changed to **CONFIRMED**.

## Create the Sign In API
So far, we've covered the steps for confirming a user's signup. Now, we need to create another API route to handle the user's sign-in process. Create a new file named `route.js` inside the `app/api/auth/accessToken` directory and add the following to the it:
```js
import { Auth } from "aws-amplify";
import { configureAmplify } from "@/lib/amplify-configure";
configureAmplify();
export async function POST(request) {
let user;
const body = await request.json();
try {
user = await Auth.signIn(body.username, body.password);
} catch (error) {
console.log("Error signing in", error);
}
// return new Response("Hit");
return Response.json(user);
}
```
This code is similar to the previous examples we have seen for sign-up and confirm sign-up.
The difference here is that we are calling the **`signIn`** method to authenticate a user using the **username** and **password** they provide. If the sign-in process is successful, the authenticated user's details are returned; otherwise, an error is logged to the console.
To test the sign-in API, run the Postman Sign In test:

The response is going to contain an access token which you can find under `signInUserSession.accessToken.jwtToken`:

You are going to need the token to test the protected GraphQL API we are going to create next. Copy the token. Click the **Recipe** folder inside the Postman collection and open the **Authorization** Tab. Now set the Authentication Type to **Bearer** and Token to the token you copied.

## Create a GraphQL API
The next API we need to create is the GraphQL API. This API will handle all the read and write operations to our database.
We have the option to use [the Amplify JS library](https://docs.amplify.aws/lib/graphqlapi/getting-started/q/platform/js/) and define multiple routes to handle common queries and mutations like Create Recipe, Update Recipe and Read Recipe. Another option is to forward queries directly from the frontend to the endpoint. I went with the forwarding option to allow the client access every single queries and mutation my GraphQL endpoint offers. This is a an option that faster to implement but if you want control over every request, then you can create endpoints for each of them.
Before we create the forwarding API, let’s define a utility function that we can use to send GraphQL queries or mutations to our GraphQL endpoint. Create a file called `graphqlFetch.js` in the `lib` folder. Add the following to it:
```js
export default async function graphqlFetch(query, variables, headers) {
const GRAPHQL_ENDPOINT = process.env.GRAPHQL_ENDPOINT;
const options = {
method: "POST",
headers: {
"Content-Type": "application/json",
...headers,
},
body: JSON.stringify({ query, variables }),
};
const res = await fetch(GRAPHQL_ENDPOINT, options);
return await res.json();
}
```
In the code above, we defined an asynchronous function named `graphqlFetch`. This function accepts three parameters: `query`, `variables`, and `headers`.
We retrieve the GraphQL endpoint URL from the environment variables. The request body is then set with the provided `query` and associated `variables`. We make a fetch request to the specified `GRAPHQL_ENDPOINT` using the defined `options`. Finally, the response is converted to JSON format and returned.
Let’s go ahead and create the GraphQL API. Create a new folder called `graphql` in the `api` folder. Inside the `graphql` folder, create a new file called `route.js` and add the following to it:
```js
import { configureAmplify } from "@/lib/amplify-configure";
import graphqlFetch from "@/lib/graphqlFetch";
import { headers } from "next/headers";
configureAmplify();
export async function POST(request) {
const headersList = headers();
const accessToken = headersList.get("Authorization").split(" ")[1];
const body = await request.json();
const recipes = await graphqlFetch(body.query, body.variables, {
Authorization: accessToken,
});
return Response.json(recipes);
}
```
In the code above, we import the necessary function to configure AWS Amplify. Next, we import our utility function `graphqlFetch`. Lastly, we import the `headers` utility from Next.js, which will be used to access the request headers.
Next, we define and export an asynchronous function named `POST` that handles an incoming request. We call the `headers()` function to retrieve the headers of the incoming request. Next, we extract the `Authorization` token from the header, by splitting the header value and taking the token.
We then parse the incoming request's JSON body to extract the data sent with the request which contains a GraphQL query (`body.query`) and associated variables (`body.variables`) for that query.
Then we use the `graphqlFetch` utility function to make a request to the endpoint. It accepts in the query, associated variables, and the access token for authorization. Finally, we returns the fetched recipes as a JSON response.
Let’s test this out. Head back to Postman and try to create a new recipe.
## Test GraphQL API with Postman
To ensure the GraphQL API handles the common features we need, let’s test that we can create and read recipes with the API.
## Create Recipe
To create a recipe, run the **Create a new Recipe** test:

This time, we are not sending JSON, instead we are sending a GraphQL query with a variable for the input.
The response should contain the same input we sent:

### Create Ingredients
Now that we have a Recipe, let’s add an ingredients for the recipe. Run the **Create Ingredient for a Recipe** test:

You should get the ingredient back as a response:

### Connect Ingredient and Recipe with Quantity
Time to populate the Quantity join table we created when we modeled our data. It needs the ingredient ID and recipe ID to relate them and we can also pass in the quantity value, and unit.
Run the Create Ingredient Quantity for a Recipe test in Postman:

You should get the following response which not only contains the quantity but also fetches the related ingredient and recipe:

### Get a Recipe
Instead of fetching a recipe directly, we can use the `quantitiesByRecipeID`, which Amplify created because we explicitly declared that `Quantity` belongs to both `Recipe` and `Ingredient`. The benefit is that we get the recipe and ingredients alongside the quantity.
Run the **Get a Recipe** test in Postman using the recipe ID from your create recipe response:

You should get the following response:

## Implement Rate Limiting
At this point, we have successfully secured the API to restrict access to only authenticated users. Before users can access the API, they need to create an account and sign in to obtain an access token.
However, we still need to consider the frequency of access to the API. Even if users have valid access tokens, we want to prevent abuse by limiting the number of requests they can make within a specific timeframe. To do this, we can implement rate limiting using a cache and middleware in Next.js. If a client exceeds this limit, they receive a response indicating they've been rate-limited.
Let’s start with creating a middleware. Create a file names `middleware.js` at the root of your project and add the following to it:
```js
import { LRUCache } from "lru-cache";
import { NextResponse } from "next/server";
const interval = 60 * 1000;
const max = 500;
const tokenCache = new LRUCache({
max: max,
ttl: interval,
});
export async function middleware(request) {
const token = "CACHE_TOKEN";
const limit = 10;
const tokenCount = tokenCache.get(token) || [0];
if (tokenCount[0] === 0) {
tokenCache.set(token, tokenCount);
}
tokenCount[0] += 1;
const currentUsage = tokenCount[0];
const isRateLimited = currentUsage >= limit;
let response;
if (!isRateLimited) {
response = NextResponse.next();
response.headers.set("X-RateLimit-Limit", limit);
response.headers.set(
"X-RateLimit-Remaining",
isRateLimited ? 0 : limit - currentUsage
);
} else {
response = NextResponse.json(
{
message: `You can only make ${limit} requests in ${
interval / 1000
} seconds`,
},
{ status: 429 }
);
response.headers.set("X-RateLimit-Limit", limit);
response.headers.set(
"X-RateLimit-Remaining",
isRateLimited ? 0 : limit - currentUsage
);
}
return response;
}
```
In the code above, we implemented rate limiting using an LRU (Least Recently Used) cache. First, we import the **LRUCache** class from the **lru-cache** library and the **NextResponse** utility from Next.js to handle server responses.
We set the rate limiting interval to 60 seconds, and the maximum number of items the cache can store to 500. We create an instance of the **tokenCache** with the maximum capacity set to max and a time to live (ttl) of **interval**. This ensures that items stored in the cache will expire after the specified interval.
Next, we define a middleware function that handles incoming requests. We define a constant called `token` to serve as the key for storing and retrieving the request count from the cache.
We also set the rate limit to 10, meaning that a user can make a maximum of 10 requests within the specified interval.
If the request count for the token does not exist, we initialize it with a value of **[0]**. Otherwise, we retrieve its value and increment it for each incoming request, and based on this count, we determine if the client has exceeded the rate limit.
If the rate limit is not exceeded, the middleware continues processing the request. We set two headers, X-RateLimit-Limit and X-RateLimit-Remaining, on the response to inform the user about the maximum number of requests allowed within the interval and how many requests they have left.
If the rate limit is exceeded, the middleware returns a JSON response with a 401 status code and a message informing the user that they have exceeded the rate limit.
We can test by running any of our tests again and you should see that the response headers now include the rate limiting headers we added:

If you keep running, the `x-ratelimit-remaining` keeps reducing:

When it gets to 0, you will get a 401 error:

## Host Your API with AWS Amplify Hosting
We’ve completed the steps to secure our Next.js API using AWS Amplify. It’s now time to deploy our API. Before deploying your API on Amplify, you need to configure the hosting environment. We need to tell Amplify to grab the environmental variables we will set and set it to .env.production file so the Next.js build can pick it up.
Create a file called `amplify.yml` at the root of your project and add the following to it:
```yml
version: 1
backend:
phases:
build:
commands:
- amplifyPush --simple
frontend:
phases:
preBuild:
commands:
- npm ci
build:
commands:
- printenv | grep -e GRAPHQL_ENDPOINT >> .env.production
- npm run build
artifacts:
baseDirectory: .next
files:
- '**/*'
cache:
paths:
- node_modules/**/*
```
The `printev` command prints all of the current environment variables. Then grep matches the one you want and creates a file called `.env.production` and adds it to the file.
Now we can go ahead and deploy our API. To begin, you need to [push your project to a Git provider such as GitHub](https://docs.github.com/en/migrations/importing-source-code/using-the-command-line-to-import-source-code/adding-locally-hosted-code-to-github). With a git repository, you can use Amplify Hosting to set up continuous delivery automatically. Simply commit all your changes to Git and push your website to your repository. Amplify Hosting will take care of the rest, deploying your website to the cloud and updating it whenever you push changes to your repository.
After pushing to GitHub, run the following command in your terminal:
```sh
`amplify console`
```
Once you run this command will be redirected you to the AWS console. Click on the app name - `secureapiwnextjs`

Click **Hosting environments**, select **GitHub** and click the **Connect branch** button.

Select the repository you just pushed, select the main branch, and click **Next**.

On the build settings page, select an environment or Create a new environment. Select an existing service role if you have one, or click the **Create new role** button to create a new role that allows Amplify Hosting to access your resources. Once you have made your selections, click the **Next** button to continue.
Scroll down to the **Advanced settings** section and add your environment variables.

Review your settings on the next screen and click the **Save and deploy** button to start the deployment processes. Now you can sit back and watch your app get deployed.
After a successful deployment, copy deployment link and head over to Postman to test.

Copy the URL and replace your base url with it in the collection variable:

Then run any of the tests to confirm that the production URL is working:

## Clean Up
To ensure that you don’t have any unused resources in you AWS account, run the following command to delete all the resources that were created in this project if you don’t intend to keep them.
```sh
amplify delete
```
## Conclusion
In this article, we’ve seen that we can use Next.js and Amplify Hosting to build a production API with modern features, including rate-limiting, authentication, GraphQL, etc. To learn how to consume the API in an Next.js while leaveraging SSR, check out the [Amplify SSR docs](https://docs.amplify.aws/lib/ssr/q/platform/js/).

Top comments (0)