
Table of Contents
- Introduction
- What You Will Learn
- Prerequisites
- Step 1 - Get Into Azure Cloud Shell & Editor
- Step 2 - Deploy Azure Container Registry with an ARM Template
- Step 3 - Create a .NET Core Web Application
- Step 4 - Create a Docker File
- Step 5 - Build and Push a Docker Image to Azure Container Registry
- Step 6 - Prepare to Deploy Your Docker Image as a Serverless Container
- Step 7 - Deploy Your Container, Review and Test
- Step 8 - Clean Up
- Conclusion
Introduction
Keeping up with cloud technology is a continual challenge that requires continuous learning by cloud builders. As we seek to stay current with the evolution of new cloud technologies, we must decide which tools to invest our time in, choosing the most powerful and flexible tools available to maximize our effectiveness and time investment.
 Azure Cloud Shell is one such powerful tool. Learn Azure Cloud Shell and you unlock the full capability of the Azure cloud, with tools built in including Code Editor, Azure PowerShell and CLI, .NET Core and Docker.
This tutorial introduces you to these tools very rapidly, and toward a very useful goal. You will create, build and publish a .NET Core application, inside a Docker container, to Azure in a Serverless deployment model.
What You Will Learn
- Use the Azure Cloud Shell Editor to create a PowerShell script that sets variables for the tutorial.
- Deploy infrastructure as code using a Quickstart ARM Template.
- Create an ASP.NET Core application with the .NET Core CLI with no development environment setup.
- Use the Azure Cloud Shell Editor to create a docker file.
- Use Azure CLI az acr build command to build and push a docker image to your Azure Container Registry (ACR) with no tooling setup.
- Deploy a Docker image as a serverless container to Azure Container Instances with no infrastructure setup.
- Use Azure Cloud Shell with Azure PowerShell and Azure CLI command line interface as powerful tools in infrastructure and application development and deployment.
Prerequisites
In order to follow this guide, you will need:
- An active Azure subscription
Step 1 - Get Into Azure Cloud Shell & Editor
Log into your Azure account at portal.azure.com, then click the Cloud Shell icon in the top nav bar to enter the Azure Cloud Shell. If this is your first time in the shell you will need to create your cloud drive storage. First time users may refer to David Lamb's Azure Cloud Shell tutorial (1.5 min) for guidance. Choose PowerShell as your shell type on the dropdown to the top left.
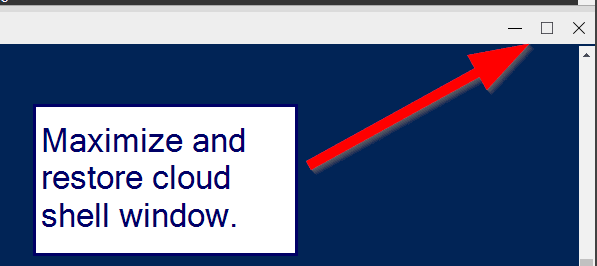
During the tutorial you may want to maximize the cloud shell window using the maximize button at the upper right. Click that button again to restore the cloud shell window back down to the original size.
Before continuing, note the prompt for Azure Cloud Shell, PS Azure:\> , indicates your location as Azure:\. You can imagine this as the root directory of a file server, but instead of files, it holds hierarchy of all your Azure resources. You can type Get-ChildItem to see your subscription(s), and use Set-Location <TAB> to begin navigating that hierarchy. But that is the subject of another tutorial.
If you try to use the code editor to save files in this starting location of Azure:\, you will get an error. Instead, type cd ~\clouddrive (that starts with the tilde character (~) at the top right of your keyboard, a symbol for your home directory) to navigate to your clouddrive, and type pwd (an alias of Get-ChildItem) to see your current location in the drive.
cd ~\clouddrive
pwd

Now type code mySettings.ps1 to launch the cloud shell editor in your ~\clouddrive folder and edit the new PowerShell script.
code mySettings.ps1
Use the editor to paste in the content of the powershell script below using Control-V instead of right-click. Customize the values, then click the ellipsis (...) in the upper right corner of the cloud shell editor to save, then close editor.
NOTE: Globally Unique Names
Naming things in Azure can be tricky, with different naming rules for different types of resources.
For simplicity, stick with lowercase letters and numbers.
Certain values must be GLOBALLY UNIQUE, like registry names and domain names,
so something like 'DaveApp' doesn't usually work. It is a good idea to
append numbers to a name, like daveawesomedockerapp0123 to create a unique name easily.
# Your personal settings, customize these using lowercase letters and numbers
$myLocationName = 'eastus2'                 # An Azure region close to you, 'Get-AzLocation' to list them all
$myRGName       = 'containerdemo-rg'        # Resource group to contain this demo
$myWebAppName   = 'davewebappdocker0123'    # Name for your web app
$myRegistryName = 'daveregistry0123'        # GLOBALLY UNIQUE name for your container registry
$myDNSName      = 'daveawesomedockerapp0123'# GLOBALLY UNIQUE dns name, will be prepended to .azurecontainer.io
Now dot source the script by running . ./mySettings.ps1. This will define the variables you'll need for this tutorial in this PowerShell session.
WARNING: If Cloud Shell session is interrupted, restart the session and re-run this script line
The success of the tutorial depends on the variables above. If for some reason your
Azure Cloud Shell session is interrupted, (perhaps with an access token expiry error, or unauthorized error),
You may need to restart your session with the Restart Cloud Shell button at top of shell window.
Once you resume your session, remember to runcd ~\clouddrivesince you can't save files in theAzure:\location, then run. ./mySettings.ps1again.
This will ensure you can continue the tutorial.

Step 2 - Deploy Azure Container Registry with an ARM Template
Next, you use New-AzResourceGroup to create a resource group for this demo.
New-AzResourceGroup -Name $myRGName -Location $myLocationName
Now you deploy your Azure Container Registry (ACR), once you have tested the name to ensure uniqueness.
Test-AzContainerRegistryNameAvailability -Name $myRegistryName
WARNING: Ensure unique name for your Azure Container Registry
If
NameAvailableis notTruein the result, redefine your registry name by running the command
$myRegistryName = 'mynewregname001'and pressing enter. Then press UP-Arrow twice, scrolling through > command history to display theTest-AzContainerRegistryNameAvailabilitycommand, then press enter to
run it again.
With your registry name verified as unique, you deploy a Quickstart Azure Resource Manager Template (ARM Template) from Microsoft's GitHub repository to create your Azure Container Registry. This ARM Template is a small JSON file that describes the resource to deploy, and you can view the JSON for the ARM Template you will use here.
Review and run the code below, which will set$containerRegistryTemplateUrl to the URL for this ARM Template that will define your Azure Container Registry resource. Then you define $containerRegistryParams as a hash table to pass the parameters the template needs. Then you execute New-AZResourceGroupDeployment to deploy the ARM template.
Paste the code block below into the Azure Cloud Shell to deploy.
    $containerRegistryTemplateUrl = 'https://raw.githubusercontent.com/microsoft/devops-project-samples/master/dotnet/aspnetcore/kubernetes/ArmTemplates/containerRegistry-template.json'
    $containerRegistryParams = @{
        registryName        = $myRegistryName
        registryLocation    = $myLocationName
    }
    New-AZResourceGroupDeployment -Name "$myRGName-ACR-Deployment" -ResourceGroupName $myRGName -TemplateUri $containerRegistryTemplateUrl -TemplateParameterObject $containerRegistryParams
If all is well, the ProvisioningState value should display Succeeded

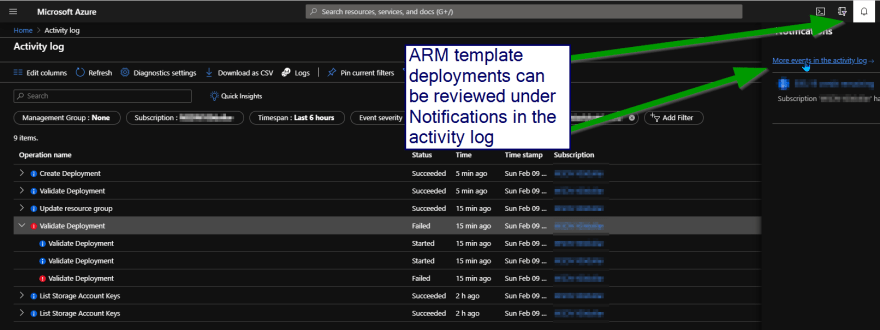
NOTE: Troubleshoot using Activity Log
If at first you don't succeed, review the Activity Log
under Notifications in the portal.
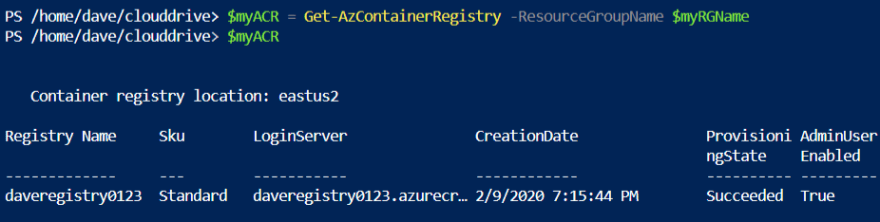
Next you use the Get-AZContainerRegistry command to store your Azure Container Registry (ACR) information in a variable to refer to it later in the tutorial.
$myACR = Get-AzContainerRegistry -ResourceGroupName $myRGName
$myACR
Step 3 - Create a .NET Core Web Application
Begin from your clouddrive folder. Type pwd to verify your current location.
cd ~\clouddrive
pwd
Create a new folder docker-working and cd into it.
mkdir docker-working
cd docker-working

Now you will build a new .NET Core web application using the dotnet command line tool.
NOTE: Alternately build an existing Asp.NET Core project
Alternately, instead of creating a new application, you could use
git clone
to work with an existing application in GitHub. This is another topic for a future tutorial.
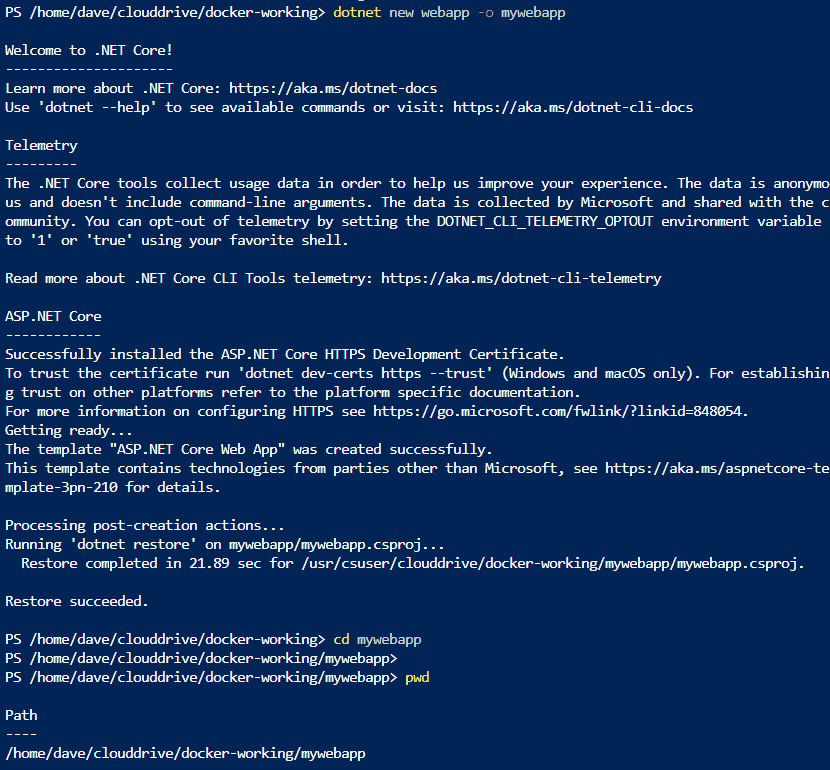
Paste the next 3 lines to create your new web app and its dependencies, then use cd to the new directory. You can run ls to inspect the contents of the published folder, or gci -r, and alias to Get-ChildItem -Recurse and see the entire contents of the application folder hierarchy.
dotnet new webapp -o mywebapp
cd mywebapp

pwd
Step 4 - Create a Docker File
You can type cls any time to clear the screen, then type code DOCKERFILE from within your new webapp folder to launch the cloud shell editor and create a new file named DOCKERFILE.
code DOCKERFILE
Paste the following code block into the DOCKERFILE using Shift-Insert or Command-V (macOS) instead of right-click, then click the ellipsis (...) in the upper right corner of the cloud shell editor to save, then close editor.
FROM mcr.microsoft.com/dotnet/core/sdk:2.2 AS build-env
WORKDIR /app
# copy csproj and restore as distinct layers
COPY *.csproj ./
RUN dotnet restore
# copy everything else and build
COPY . ./
RUN dotnet publish -c Release -o out
# build runtime image
FROM mcr.microsoft.com/dotnet/core/aspnet:2.2-stretch-slim
WORKDIR /app
COPY --from=build-env /app/out .
ENTRYPOINT ["dotnet", "mywebapp.dll"]

NOTE: Docker Syntax
The dockerfile commands describe how to build and run the .NET Core web application created in Step 3 as a container.
Docker syntax is another topic for a future tutorial.
Step 5 - Build and Push a Docker Image to Azure Container Registry
First, run pwd to ensure you're in the root of the webapp folder, then use the Azure CLI command az acr build shown below (including the period at the end) to build the docker image. This is a powerful tool that enables you to build docker images and push to a repository in one step, all without setting up or running docker on your workstation.
NOTE: Azure CLI in PowerShell
You can use Azure CLI commands in Bash or PowerShell sessions.
Sometimes Azure CLI is more terse than PowerShell, or new features may get support in Azure CLI before PowerShell, so use what gets the job done.
az acr build --registry $myACR.Name --image mywebapp:v1 .

WARNING: Troubleshooting
If you get an error on this step, possibly your Azure Cloud Shell session is interrupted,
you can repeat the code from above to define variables including those from the. ./mySettings.ps1command and$myACRthen try it again:
# If Cloud Shell Session was interrupted, run to redefine your variables
cd ~/clouddrive
. ./mySettings.ps1
$myACR = Get-AzContainerRegistry -ResourceGroupName $myRGName
Step 6 - Prepare to Deploy Your Docker Image as a Serverless Container
Gather information needed for deploying to Azure Container Instances using the New-AzContainerGroup command.
First, get your container repository from your container registry (ACR):
[array]$myRepositories = az acr repository list --name $myACR.Name | ConvertFrom-Json
$myRepository = $myRepositories[0]
$myRepository
Next, get the latest tag from the image in your container repository:
$myImageTags = az acr repository show-tags --name $myACR.Name --repository $myRepository --detail --orderby time_desc | ConvertFrom-JSON
$myImageTag = $myImageTags[0]
$myImageTag.name
Now build the path to the docker image you will deploy. Note the format is a DNS name that points to your Azure Container Registry, followed by the repository (mywebapp) and the tag (v1.)
$myDockerImagePath = "$($myACR.LoginServer)/$($myRepository):$($myImageTag.name)"
$myDockerImagePath
Since this is a private container registry, you need to provide credentials. Use the Get-AzContainerRegistryCredential command along with the PSCredential type accelerator to create the credential object.
$regCred = Get-AzContainerRegistryCredential -ResourceGroupName $myRGName  -Name $myACR.Name
$PSCred = [PSCredential]::New($regCred.Username, (ConvertTo-SecureString $regCred.Password -AsPlainText -Force)) # Type accelerators rule!
In this optional step, you create a hash table to define resource tags, these are useful for keeping track of your Azure resources.
$tags = @{
    Env = 'Dev'
    Purpose = "Use Azure PowerShell command 'New-AzContainerGroup' to deploy containers from your Azure container registry easily!"
}
Now set up parameters in a hash table to pass to the command via Splatting
$ContainerGroupArguments = @{
    ResourceGroupName   = $myRGName
    Name                = "$myWebAppName-cg"    #build container group name from the webapp name
    Image               = $myDockerImagePath
    IpAddressType       = 'Public'
    DNSNameLabel        = $myDNSName
    Port                = 80                    #optional
    RegistryCredential  = $PSCred               #required if this is NOT a public docker registry
    IdentityType        = 'SystemAssigned'      #optional, but useful for a future tutorial
    Tag                 = $tags                 #optional uses hash table defined above
    Debug               = $true                 #optional but very interesting to see the debug output
    }

# review contents of the parameter hash table

$ContainerGroupArguments
Step 7 - Deploy Your Container, Review and Test
You are ready to deploy your new Azure container group by running the New-AzContainerGroup command. Since it has a Debug flag in the arguments, you will need to confirm the execution. Review the debug output in yellow for an interesting peek under the hood of Azure.
$newACG = New-AzContainerGroup @ContainerGroupArguments
After you confirm the execution and it completes, review the Debug output, then inspect your container group via the $newACG variable.
$newACG | Get-Member
$newACG | Select-Object *
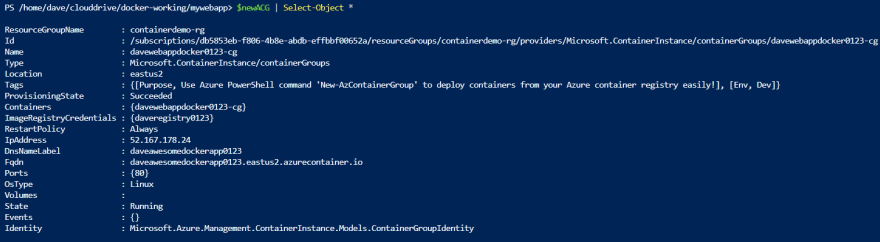
The FQDN property is the Fully Qualified Domain Name of your containerized application. Paste this into your favorite browser to see your new ASP.NET Core serverless containerized web application in action.
Write-Output " Paste $($newACG.FQDN) into your favorite web browser"
Browse your newly deployed Azure serverless Docker containerized ASP.NET Core web application!

After browsing the web application, review the log of your container instance.
Get-AzContainerInstanceLog -ResourceGroupName $myRGName -ContainerGroupName $ContainerGroupArguments.Name
Step 8 - Clean Up
The resources for this tutorial are very cost effective. Even so, it's a good idea to clean up once completed.
Remove-AzResourceGroup -ResourceGroupName $myRGName -Force
cd ~/clouddrive
rm ./docker-working/ -r
Conclusion
You have used Azure Cloud Shell on a whirlwind tour of powerful tools and features it contains.
You have:
- Created an ASP.NET Core web application
- Built a Docker container
- Pushed that container to a repository image in your private Azure Container Registry
- Deployed that image to Azure Container Instances
Along the way you explored features of Azure Cloud Shell including Azure PowerShell and Azure CLI, Azure Resource Manager templates, the Cloud Shell Code Editor, and the .NET Core CLI.
I hope this tutorial encourages you to explore Azure with the Cloud Shell, and makes you a more effective cloud builder!

Top comments (0)