
I had a user reach out to me on X asking if there was any way to integrate a Stripe credit card entry field with Clerk's sign-up forms.
Kostas is building a Chrome extension that uses AI to let users write responses to LinkedIn posts directly from their browser. To reduce the friction of users who want to sign up for the trial, he presented the following requirements:
- It should be a single form that accepts an email address, tier selection, and credit card details.
- The user should complete the sign-up using a one-time passcode sent to their email account.
- Upon verifying their email, the user should automatically be signed up for a trial of the selected tier with no further interaction.
In this article, I'll walk through the process of building a completely custom sign-up form that matches the above requirements, starting with the end result.
The final product
Before walking through how this solution was built, it's worth seeing it in action. The first phase of the signup process has the user entering the details outlined above.

Upon completing this form, the user receives an email from Clerk with their sign-up code. The form in the previous screenshot will automatically update to accept a verification code.
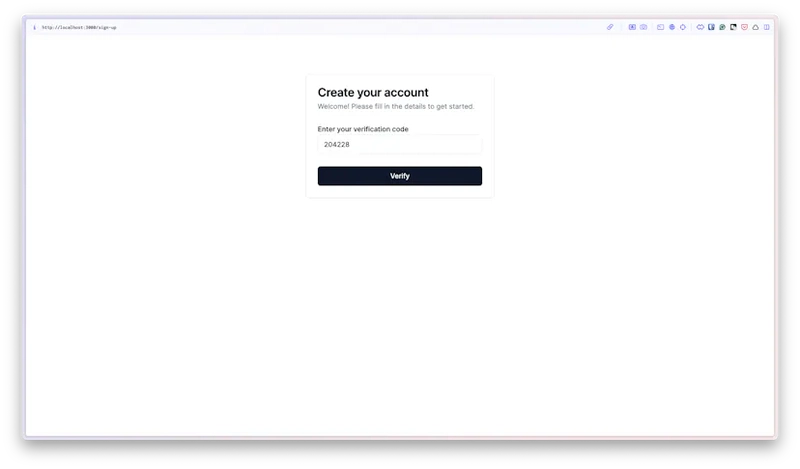
After the code is entered, the user is presented with a loading view, indicating that their account is being created in Clerk and the subscription is being registered in Stripe. Although the user experience appears seamless, the process happening behind the scenes is rather complex with a number of moving parts. Let's explore how this solution was built, starting with the front-end part.

Constructing the form
We'll start by exploring the components of both Clerk and Stripe that are used to build the user-facing part of this flow.
Custom flows
Clerk has a great set of predesigned components that developers can drop directly into their application to provide a great sign-up and sign-in experience for their users.
In this scenario, however, the default components are not flexible enough to embed a product selection and credit card form, so we'll need to use Custom flows. Custom flows in Clerk allow you to build custom forms with your own logic to both register and sign in users, as well as customize the logic behind these actions to do whatever you need to for your application. Instead of using any of the components, we can instead build an HTML <form> with an onSubmit function to handle the submit process.
Stripe Elements
Stripe Elements is a set of prebuilt components that can be used during the payment processing flow of your application.
One of these components is a credit card entry form that can generate a token for a given set of credit card details, allowing us to securely store a reference to the card and not the card details themselves. This token can be used later in the process to tie the card as a form of payment to the customer in Stripe. In order to use Elements in a Next.js application, the component that renders the form must be wrapped in the <Elements> component.
Because we're using a Custom flow, we can create a separate component that renders and handles the form logic and wrap it in <Elements> on the page, allowing us to combine the credit card entry form with our sign-in form.
Unsafe metadata
Users in Clerk have a number of different metadata categories that are used for different purposes:
- public metadata - readable on the frontend, but writeable from the backend
- private metadata - accessible only from the backend
- unsafe metadata - readable and writeable from the front end, can also store pre-signup info about the user
Since unsafe metadata can be used to store information before the signup process is complete, we can take advantage of this to store information about the selected tier (a “product” in Stripe) and payment details provided in the custom form. When the user completes signup, the data stored locally in unsafe metadata will also be saved with the user on Clerks systems.
Exploring the form code
After walking through all the moving parts required to solve this on the front end, let's take a look at the code.
To start, we have the page.tsx file which renders one of two forms based on if the signup attempt is verifying or not. If verifying is true, it means that the user has submitted the required details and the application is just waiting for them to add the OTP code they received via email. Take note that SignUpForm is wrapped in the Stripe <Elements> node, which is required to use Elements.
// src/app/sign-up/[[...sign-up]]/page.tsx
'use client'

import * as React from 'react'
import { useState } from 'react'
import SignUpForm from './SignUpForm'
import { loadStripe } from '@stripe/stripe-js'
import { Elements } from '@stripe/react-stripe-js'
import VerificationForm from './VerificationForm'

export default function Page() {
  const [verifying, setVerifying] = useState(false)
  const options = {
    appearance: {
      theme: 'stripe',
    },
  }
  const stripePromise = loadStripe(process.env.NEXT_PUBLIC_STRIPE_PUBLISHABLE_KEY as string)

  // 👉 Render the verification form, meaning OTP email has been set
  if (verifying) {
    return <VerificationForm />
  }

  // 👉 Render the signup form by default
  return (
    <div className="mt-20 flex items-center justify-center">
      {/* @ts-ignore */}
      <Elements options={options} stripe={stripePromise}>
        <SignUpForm setVerifying={setVerifying} />
      </Elements>
    </div>
  )
}
Next let's explore the SignUpForm.tsx which is the form that accepts an email address, product selection, and credit card information. This component accepts a single prop of setVerifying which is only to signal to the page that the form has been submitted and the VerificationForm component can be shown instead.
When the form is submitted, three main things happen:
- The card info is tokenized.
- Clerk is notified that a signup is being attempted using the provided email address. This is where unsafe metadata is set as well.
- The
setVerifyingprop is set to true, indicating to the parent that theVerificationFormcomponent can now be rendered.
// src/app/sign-up/[[...sign-up]]/SignUpForm.tsx
'use client'
import Link from 'next/link'
import { Button } from '@/components/ui/button'
import {
  Card,
  CardContent,
  CardDescription,
  CardFooter,
  CardHeader,
  CardTitle,
} from '@/components/ui/card'
import { Input } from '@/components/ui/input'
import { Label } from '@/components/ui/label'
import { CardElement, useElements, useStripe } from '@stripe/react-stripe-js'
import { useSignUp } from '@clerk/nextjs'
import { useState } from 'react'
import { RadioGroup, RadioGroupItem } from '@/components/ui/radio-group'

type Props = {
  setVerifying: (val: boolean) => void
}

function SignUpForm({ setVerifying }: Props) {
  const { isLoaded, signUp } = useSignUp()
  const stripe = useStripe()
  const elements = useElements()
  const [priceId, setPriceId] = useState('')
  const [email, setEmail] = useState('')

  // 👉 Handles the sign-up process, including storing the card token and price id into the users metadata
  async function onSubmit() {
    if (!isLoaded && !signUp) return null

    try {
      if (!elements || !stripe) {
        return
      }

      let cardToken = ''
      const cardEl = elements?.getElement('card')
      if (cardEl) {
        const res = await stripe?.createToken(cardEl)
        cardToken = res?.token?.id || ''
      }

      await signUp.create({
        emailAddress: email,
        unsafeMetadata: {
          cardToken,
          priceId,
        },
      })

      // 👉 Start the verification - an email will be sent with an OTP code
      await signUp.prepareEmailAddressVerification()

      // 👉 Set verifying to true to display second form and capture the OTP code
      setVerifying(true)
    } catch (err) {
      // 👉 Something went wrong...
    }
  }

  return (
    <form onSubmit={onSubmit}>
      <Card className="w-full sm:w-96">
        <CardHeader>
          <CardTitle>Create your account</CardTitle>
          <CardDescription>Welcome! Please fill in the details to get started.</CardDescription>
        </CardHeader>
        <CardContent className="grid gap-y-4">
          {/* // 👉  Email input */}
          <div>
            <Label htmlFor="emailAddress">Email address</Label>
            <Input
              value={email}
              onChange={(e) => setEmail(e.target.value)}
              type="email"
              id="emailAddress"
              name="emailAddress"
              required
            />
          </div>

          {/* // 👉 Product selection radio group */}
          <div>
            <Label>Select tier</Label>
            <RadioGroup
              defaultValue="option-one"
              className="mt-2"
              value={priceId}
              onValueChange={(e) => setPriceId(e)}
            >
              <div className="flex items-center space-x-2">
                <RadioGroupItem value="price_1PG1OcF35z7flJq7p803vcEP" id="option-one" />
                <Label htmlFor="option-one">Pro</Label>
              </div>
              <div className="flex items-center space-x-2">
                <RadioGroupItem value="price_1PG1UwF35z7flJq7vRUrnOiv" id="option-two" />
                <Label htmlFor="option-two">Enterprise</Label>
              </div>
            </RadioGroup>
          </div>

          {/* // 👉 Use Stripe Elements to render the card capture form */}
          <Label>Payment details</Label>
          <div className="rounded border p-2">
            <CardElement />
          </div>
        </CardContent>

        <CardFooter>
          <div className="grid w-full gap-y-4">
            <Button type="submit" disabled={!isLoaded}>
              Sign up for trial
            </Button>
            <Button variant="link" size="sm" asChild>
              <Link href="/sign-in">Already have an account? Sign in</Link>
            </Button>
          </div>
        </CardFooter>
      </Card>
    </form>
  )
}

export default SignUpForm
Finally, we have the VerificationForm.tsx component, which simply accepts the code that was sent to the user's email address. The submit handler for this form sends the code to Clerk where it is checked to be valid. If valid, the user account will be created and the user will be redirected to /after-sign-up .
// src/app/sign-up/[[...sign-up]]/VerificationForm.tsx
import * as React from 'react'
import { useSignUp } from '@clerk/nextjs'
import { useRouter } from 'next/navigation'
import { Button } from '@/components/ui/button'
import {
  Card,
  CardContent,
  CardDescription,
  CardFooter,
  CardHeader,
  CardTitle,
} from '@/components/ui/card'
import { Input } from '@/components/ui/input'
import { Label } from '@/components/ui/label'
import { useState } from 'react'

function VerificationForm() {
  const { isLoaded, signUp, setActive } = useSignUp()
  const [code, setCode] = useState('')
  const router = useRouter()

  // 👉 Handles the verification process once the user has entered the validation code from email
  async function handleVerification(e: React.FormEvent) {
    e.preventDefault()
    if (!isLoaded && !signUp) return null

    try {
      // 👉 Use the code provided by the user and attempt verification
      const signInAttempt = await signUp.attemptEmailAddressVerification({
        code,
      })

      // 👉 If verification was completed, set the session to active
      // and redirect the user
      if (signInAttempt.status === 'complete') {
        await setActive({ session: signInAttempt.createdSessionId })
        router.push('/after-sign-up')
      } else {
        // 👉 If the status is not complete. User may need to complete further steps.
      }
    } catch (err) {
      // 👉 Something went wrong...
    }
  }

  return (
    <div className="mt-20 flex items-center justify-center">
      <form onSubmit={handleVerification}>
        <Card className="w-full sm:w-96">
          <CardHeader>
            <CardTitle>Create your account</CardTitle>
            <CardDescription>Welcome! Please fill in the details to get started.</CardDescription>
          </CardHeader>
          <CardContent className="grid gap-y-4">
            <div>
              <Label htmlFor="code">Enter your verification code</Label>
              <Input
                value={code}
                onChange={(e) => setCode(e.target.value)}
                id="code"
                name="code"
                required
              />
            </div>
          </CardContent>
          <CardFooter>
            <div className="grid w-full gap-y-4">
              <Button type="submit" disabled={!isLoaded}>
                Verify
              </Button>
            </div>
          </CardFooter>
        </Card>
      </form>
    </div>
  )
}

export default VerificationForm
Registering the subscription in Stripe
Now that we've covered everything the user sees, let's break down what happens behind the scenes to make sure the user is successfully registered for the trial of their chosen tier.
Clerk webhooks
We'll need a reliable way to signal that a user has been created and something needs to be done about it, and that's where webhooks come in.
Webhooks are HTTP requests that are automatically dispatched to an API endpoint of your choosing when an event happens in Clerk. One of these can be triggered when a user is created, using the user.created event. The dispatched request also contains various details about the user that was created, including the unsafe metadata. By configuring a webhook handler in our application to accept the request, we can read in the selected product and payment info, and create the subscription using the Stripe SDK.

Using the @brianmmdev/clerk-webhooks-handler utility library, we can define functions that automatically validate the webhook signature and allow you to easily handle the payload, including pulling out the unsafe metadata that was set during the signup process.
// src/app/api/clerkhooks/route.ts
import { createWebhooksHandler } from '@brianmmdev/clerk-webhooks-handler'
import { Stripe } from 'stripe'
import { clerkClient } from '@clerk/nextjs/server'

const stripe = new Stripe(process.env.STRIPE_SECRET_KEY as string)

const handler = createWebhooksHandler({
  onUserCreated: async (user) => {
    // 👉 Parse the unsafe_metadata from the user payload
    const { cardToken, priceId } = user.unsafe_metadata
    if (!cardToken || !priceId) {
      return
    }

    // 👉 Stripe operations will go here...
  },
})

export const POST = handler.POST
Creating the Stripe entities
Creating a subscription in Stripe requires three separate entities:
- Customer
- Payment method
- Subscription
Since the card info was tokenized and stored in the user's unsafe metadata along with the selected product, we can take advantage of the info sent to our application to create these three entities and tie them to each other. The first thing is to create a payment method based on the tokenized card info:
// src/app/api/clerkhooks/route.ts
const pm = await stripe.paymentMethods.create({
  type: 'card',
  card: {
    token: cardToken as string,
  },
})
Next, we can use the captured email address to create a customer in Stripe and tie the payment method to them:
// src/app/api/clerkhooks/route.ts
const customer = await stripe.customers.create({
  email: user?.email_addresses[0].email_address,
  payment_method: pm.id,
})
Finally, we can create the subscription entity, attach it to the customer, set the payment method, AND set a trial period:
// src/app/api/clerkhooks/route.ts
const subscription = await stripe.subscriptions.create({
  customer: customer.id,
  default_payment_method: pm.id,
  trial_period_days: 14,
  items: [
    {
      price: priceId as string,
    },
  ],
})
Syncing subscription state
Although the frontend and backend flows occur separately, we need a way to signal to the front end that processing has been completed on the backend. To do this, we can use metadata again (public metadata in this case) to set data from the Stripe operations to indicate that the process has been completed:
// src/app/api/clerkhooks/route.ts
await clerkClient.users.updateUser(user.id, {
  publicMetadata: {
    stripeCustomerId: customer.id,
    stripeSubscriptionId: subscription.id,
  },
})
On the front end, our redirect page actually just renders a loading indicator but also polls the user's info from Clerk to redirect them once that data is available. The following is the code that makes up the page for /after-sign-up, which is where the user was redirected after the OTP code was entered.
// src/app/after-sign-up/page.tsx
'use client'

import { Icons } from '@/components/ui/icons'
import { useUser } from '@clerk/nextjs'
import { useRouter } from 'next/navigation'
import React, { useEffect } from 'react'

async function sleep(ms: number) {
  return new Promise((resolve) => {
    setTimeout(resolve, ms)
  })
}

function AfterSignUp() {
  const router = useRouter()
  const { user } = useUser()

  // 👉 Poll the user data until a stripeSubscriptionId is available
  useEffect(() => {
    async function init() {
      while (!user?.publicMetadata?.stripeSubscriptionId) {
        await sleep(2000)
        await user?.reload()
      }
      // 👉 Once available, redirect to /dashboard
      router.push('/dashboard')
    }
    init()
  }, [])

  return (
    <div className="mt-20 flex items-center justify-center">
      <Icons.spinner className="size-8 animate-spin" />
    </div>
  )
}

export default AfterSignUp
Putting it all together
As you can see there are quite a lot of moving parts that allow for this simple form to do so much. To put everything into context, let's look at the entire flow step by step:
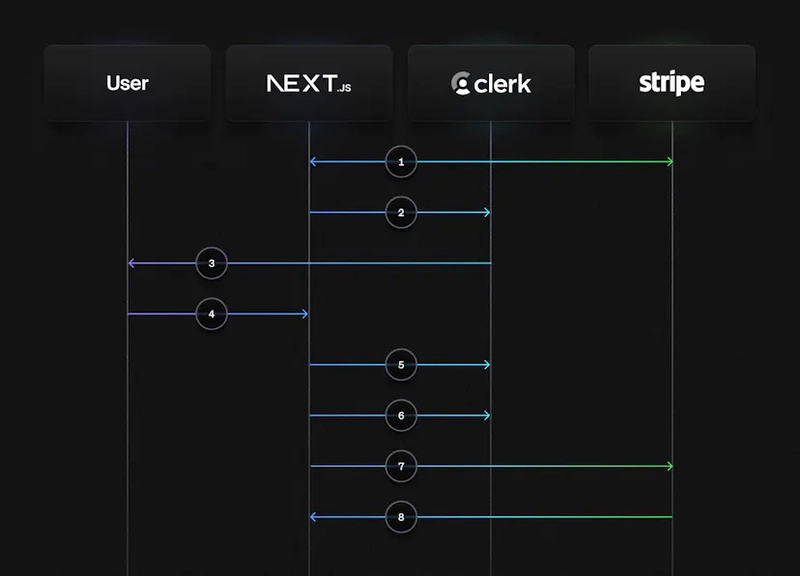
- When the user submits the form, the card details are sent to Stripe to tokenize the card. That token, and the selected product, are stored as
unsafeMetadata. - The app will signal to Clerk that a user is trying to sign up.
- Clerk sends the user an OTP to their email.
- The user enters the code into the application.
- The app signals to Clerk that the user completed the signup and the account should be created.
- The
user.createdwebhook is triggered and the payload is sent to an API route in the application. - The webhook handler uses the Stripe SDK to create a payment method, customer, and subscription.
- Once done, the user record is updated from Next and the user is allowed to proceed
Conclusion
Custom flows in Clerk open a world of opportunities, allowing you to create your own forms to handle sign-up and sign-in. By taking advantage of webhooks and using the various types of metadata, you can also build in complex and advanced automation, while creating a seamless experience for your users.
If you enjoyed this, share it on X and let us know by tagging @clerkdev!

Top comments (0)