
My motivation
I used to code android apps 10 years ago. Back then Google had not much opinion on how apps should be coded and I was very happy to code terrible apps with eclipse and Java. About 3 years ago, I wanted to code another app, after years in web development. I figured I’d try this newfangled Kotlin thing with the cool new recommended MVVC and Room ORM that Google has been trying to push. It was a terrible mistake. It was so painfully slow to make any progress on my app at all, and I spent so much of my time trying to figure out how to implement everything. So much so that each time I found the motivation to start work on the project, I would lose it again after spending a whole weekend on it and barely making any progress. To be fair to Kotlin and native development, this is mostly because I am primarily a web developer and didn’t have someone to mentor me on Android dev. So it was a very different paradigm for me.
On multiple occasions, I considered switching to React Native or some other cross-platform framework. But the issue with those is that they didn’t come with the default android app feel, and would look a lot more like a bootstrap web app unless I hired a designer. Also, I had already sunk so much effort into my app, why would I want to recode the entire thing?
Recently, I had found my motivation again to start working on my app. But just thinking of having to figure out Kotlin again put me off. Then I decided to instead look into the feasibility of React Native once again, and I was taken by surprise. The developer community around the framework has grown significantly with libraries like NativeBase and WatermelonDB since I last looked at it. This alleviated many concerns I had with the feasibility of coding an app in React Native. This meant that redoing my app in react native would probably only take a week or so to get to the point I was already at.
The Technologies
If you are reading this, I assume you’d most likely know what these technologies are, but here’s a quick overview anyway.
React Native is a way to code native apps with react code, making it easy for web developers to make native apps. It allows deploying to both android and iOS with a single codebase (for the most part)
Native Base is a UI library that sits on top of React Native to make the UI coding easier, and more consistent. Instead of having to define different styles for both iOS and Android, you just need to code with their set of components and it’ll automatically take on each OSes native look.
WatermelonDB is an observable lazy loading database for web or mobile applications that are designed to be offline-first. This also ensures the app is performant even with a large amount of data. It comes with functionality to make syncing with a server easy if it is ever required.
It comes with functionality to make syncing with a server easy if it is ever required.
All these projects are open-sourced too, which is great.
The Project and Requirements
What this project is
- To keep things simple, we’ll make a classic todo app.
- The focus on this tutorial is to get a basic app that creates a basic UI, and touches on the database.
- We will have only a single page
- The app will be persistent, and will save the data to the database.
What this is not
- This is not a UI/UX tutorial, you will see some terrible UI, you have been warned.
- This will not be using multiple screens as that requires a navigation library like React Navigation
- This will not be using complex forms as that will require a good form handling library like formik
- This will have no state management like Redux
you are making a real app, I will provide additional recommended libraries at the end of this post. For this tutorial, I will stick to React Native, NativeBase, and WatermelonDB.
Platform
I will be coding this on macOS, and targeting the Android platform. Since this is React Native, you could code on either Linux or Windows and target iOS or web as well. You would probably just need to change some configurations, but coding on MacOS for Android is the configuration I have chosen to use. I have also tested this on Linux and it seems to work fine.
Required Software
Android Studio with Android SDK >= 28
node >= 10.21
npm >= 6.9.0
JDK >= 1.8
Recommended Knowledge
How to code react (not strictly necessary)
How to use git (also not really necessary)
How to use the terminal
How databases work
What an app is
How to use a text editor
How to use a keyboard
How to use your computer
The Process
For each of these sections, I will be providing a link to the relevant commit so that you can see the changes from the previous state.
Here's a link to the repo if that's all you want.
There will be a total of 5 sections to this tutorial:
- Starting a basic react native app
- Getting started with NativeBase
- Installing WatermelonDB
- Creating the schema and tables
- Hooking everything up
Section 1: Starting a basic react native app
💡 Code changes for this section 💡
To start off, make sure you have the required software installed. Since this is an Android tutorial, you will also need to create an Android Virtual Device to run your app on. You can follow the instructions on the official react-native documentation here.
Once you have node, watchman, jdk, and the Android Virtual Device set up, we will create a new app.
We’ll use the built-in react-native cli to create the app. You can call this app whatever you want but we’ll call ours BadTodo.
npx react-native init BadTodo

Notice there are a bunch of errors related to iOS. Well since I am not coding for iOS, I am going to ignore these errors.
After that, we need to run the metro js server that the app will use to get the javascript code. First, navigate to the new folder cd BadTodo and run the following command,
npx react-native start
Then we open a new terminal and run the android app.
npx react-native run-android
You should end up with something that looks like this:
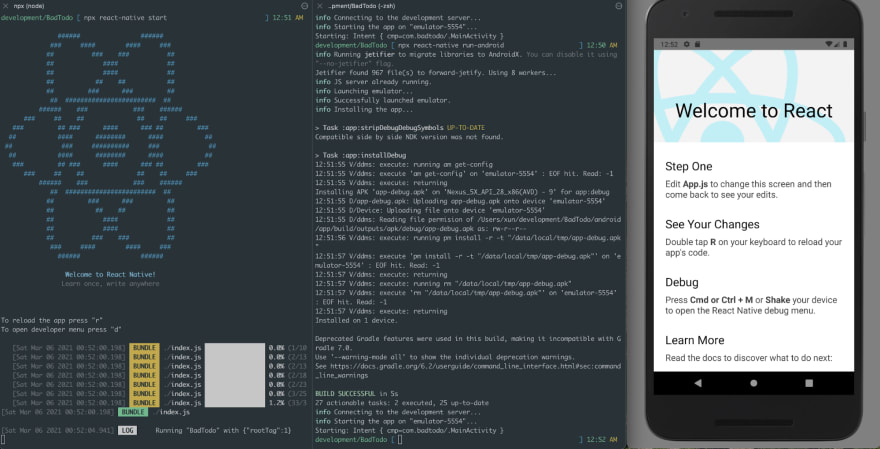
We now have a basic react native app running in the android emulator. This is the point where you should probably make this a git repo.
git init
git add -A
git commit -m “Initial React Native Commit”
In the next section, we’ll install NativeBase and create a basic todo page.
Section 2: Getting started with NativeBase
💡 Code changes for this section 💡
First, we’re going to install nativebase, simply run this command in the same repo.
npm install native-base --save

NativeBase does not automatically link the peer dependencies, so run this to link them.
npx react-native link
You will see that native-base has been added to your package.json. Here’s the commit where that happens.

Now that we have that up, we’re going to change the home screen to something less template looking and more bad-todo looking.
Open up App.js and replace the entire thing with the following code
import React, { Component } from 'react';
import { Container, Header, Title, Content, Footer, FooterTab, Button, Right, Body, Text, ListItem, CheckBox, Grid, Row, Form, Input, Item, Label } from 'native-base';

export default class BadTodo extends Component {
 render() {
   return (
     <Container>
       <Header>
         <Body>
           <Title>Really Bad Todo</Title>
         </Body>
         <Right />
       </Header>
       <Content padder>
         <Text>
           There are { 0 } tasks
         </Text>
         <ListItem>
           <Grid>
             <Row>
               <CheckBox checked={false}/>
               <Body>
                 <Text>Need to do this</Text>
               </Body>
             </Row>
           </Grid>
         </ListItem>
         <ListItem>
           <Grid>
             <Row>
               <CheckBox checked={false}/>
               <Body>
                 <Text>Need to do that</Text>
               </Body>
             </Row>
           </Grid>
         </ListItem>
         <Form>
           <Item floatingLabel>
             <Label>New Task Name</Label>
             <Input/>
           </Item>
         </Form>
       </Content>
       <Footer>
         <FooterTab>
           <Button full>
             <Text>Add Task</Text>
           </Button>
         </FooterTab>
       </Footer>
     </Container>
   );
 }
}
You can then reload the app (press r on the metro window) and you should get something like this.

I hope that the code layout and the results are self-explanatory. You can see that NativeBase takes all the pain of styling out of your code and it looks somewhat like native android with very little code. The best part is that if you were coding for the iPhone as well, it would be the same code! For a list of components and example code, you can check out their official documentation.
We’ll hook this up to something more dynamic in section 5, after we set up WatermelonDB.
Section 3: Installing WatermelonDB
💡 Code changes for this section 💡
You can follow the official WatermelonDB docs to get it installed, but I will be covering the steps here as well.
First, install WatermelonDB with these commands. You should still be in the root directory of your app.
yarn add @nozbe/watermelondb
yarn add @nozbe/with-observables
yarn add --dev @babel/plugin-proposal-decorators
Next, create a .babelrc file in the root directory.
touch .babelrc
Then paste the following snippet in the newly created file.
{
  "presets": ["module:metro-react-native-babel-preset"],
  "plugins": [
    ["@babel/plugin-proposal-decorators", { "legacy": true }]
  ]
}
❓ If you are confused as to where to put the code, check out this commit on github.
In the android/settings.gradle, add the following code:
include ':watermelondb'
project(':watermelondb').projectDir =
    new File(rootProject.projectDir, '../node_modules/@nozbe/watermelondb/native/android')
In android/app/build.gradle, add the following.
❗ Note that there are 2 build.gradle files, please make sure you are editing the correct one.
apply plugin: 'kotlin-android'
// ...
dependencies {
    // ...
    implementation project(':watermelondb')
}
In android/build.gradle, add Kotlin support to the project
buildscript {
    ext {
        // ...
        kotlin_version = '1.3.21'
    }
    dependencies {
        // ...
        classpath "org.jetbrains.kotlin:kotlin-gradle-plugin:$kotlin_version"
    }
}
In android/app/src/main/java/{YOUR_APP_PACKAGE}/MainApplication.java, add:
import com.nozbe.watermelondb.WatermelonDBPackage; // This line
// ...
List<ReactPackage> packages = new PackageList(this).getPackages();
packages.add(new WatermelonDBPackage()); // This line
Now that this is done, you should rerun your android app by running:
npx react-native run-android
Everything should compile without errors. If not, please refer to the troubleshooting section at the bottom of this post
Section 4: Creating the schema and tables
💡 Code changes for this section 💡
If you’ve used an ORM before, WatermelonDB should be pretty familiar to use. If not, here are some basic concepts.
There are two main things you will need to create, the schema, and the models. The schema is usually the thing that generates the database tables and fields, while the model is the object that you get when you query the database from the ORM. Some ORMs automatically create the schema for you given the model file, but watermelon does not.
Watermelon only has three column types. Boolean, Number, and String. Dates are stored as numbers. IDs are stored as strings. You can store json objects as strings as well, but it’s not generally recommended as WatermelonDB is unable to index json keys. (Some DBs like Postgres can though!)
Let’s begin by creating a new folder src/db. This is where our database stuff will go.
Next, we’ll create our schema in this file src/db/schema.js
import { appSchema, tableSchema } from '@nozbe/watermelondb'

export const mySchema = appSchema({
 version: 1, // Used for migrations
 tables: [
   tableSchema({
     name: 'tasks', // Convention is to be plural lowercase of the model
     columns: [
       { name: 'description', type: 'string' },
       { name: 'is_complete', type: 'boolean' },
       // These will be dates but we define it as numbers
       { name: 'created_at', type: 'number' },
       { name: 'updated_at', type: 'number' }
     ]
   })
 ]
})
Then we’ll create the Task model under src/db/Task.js
import { Model } from '@nozbe/watermelondb'
import { field, date, readonly, action } from '@nozbe/watermelondb/decorators'

// Naming convention is CamelCase singular
export default class Task extends Model {
 static table = 'tasks'

 // These are our own fields
 @field('description') description
 @field('is_complete') isComplete

 // These are special fields that will automatically update when the
 // record is created and updated
 @readonly @date('created_at') createdAt
 @readonly @date('updated_at') updatedAt

 // Actions are functions that you can call on the database object
 // These can be something like calculating a new field, but in this
 // case we're using them to modify the database object directly.
 @action async rename(newName) {
   await this.update(t => {
     t.description = newName
   })
 }

 @action async delete() {
   await this.markAsDeleted()
 }
}
Following that, we need to register the model with the database. In your index.js file, add these lines of code just before the register component line.
import Task from './src/model/Task'
import { mySchema } from './src/db/schema';
import SQLiteAdapter from '@nozbe/watermelondb/adapters/sqlite'
import { Database } from '@nozbe/watermelondb';

const adapter = new SQLiteAdapter({
 dbName: 'BadTodo',
 schema: mySchema,
})

const database = new Database({
 adapter,
 modelClasses: [Task],
 actionsEnabled: true,
})
Now we run the android app again. npx react-native run-android. If you’ve set up everything correctly, you will see the database being set up in the metro window.

❗ Note that each time you make any changes to the database schema, you will need to uninstall the app or clear the app cache. You can do this by long-pressing the app and clicking on app info, then uninstalling it. After that, all you need to do is to run the run-android command again to reinstall the application.
🧡 Bonus: If you want to know how to do relations and indices, check out github where I added the code for that.
We’re almost there!
Section 5: Hooking everything up
💡 Code changes for this section 💡
Now comes the best part, hooking everything up so that we have a working todo app.
In your App.js file, add this code just above the render() method.
constructor(props) {
   super(props)

   // A better way to do this would be to use observables.
   // You can find out more about this in the watermelondb docs.
   this.updatePage()

   // We're just using the react basic state.
   // For a real app, it's recommended to use something like redux
   this.state = {
     taskCount: 0,
     tasks: [],
     newTaskDescription: ''
   }
 }

 // Refreshes the page
 async updatePage() {
   // Note this is the table name 'tasks' and not the model name 'Task'
   const tasksCollection = this.props.database.get('tasks')
   // query() without any parameters will get all the records in the table
   const taskCount = await tasksCollection.query().fetchCount()
   const tasks = await tasksCollection.query()
   console.log("Tasks count", taskCount)
   this.setState({taskCount: taskCount, tasks: tasks})
 }


 // Adds a new task from the newTaskDescription varaible in the component state
 async add() {
   const tasksCollection = this.props.database.get('tasks')
   if (this.state.newTaskDescription == '') {
     alert("Cannot add a blank task")
     return false;
   }
   await this.props.database.action(async () => {
     const newTask = await tasksCollection.create(task => {
       task.description = this.state.newTaskDescription;
       task.isComplete = false
     })
     console.log("Adding new task")
   })
   this.setState({newTaskDescription: ''})
   console.log("Added new task")
   this.updatePage()
 }

 // This should actually not delete the task, but instead set the
 // is_complete variable to true. But this is just a proof of concept.
 async setChecked(task) {
   console.log("Setting checked", task.id)
   await task.delete()
   this.updatePage()
 }

 // Renames a task. It's currently hardcoded to Renamed!
 async rename(task) {
   console.log("Renaming", task.id)
   await task.rename("Renamed!")
   this.updatePage()
 }

 // This is called when the text is changed.
 async onChangeText(text) {
   this.setState({newTaskDescription: text})
   console.log(text)
 }
Notice that the code assumes there is a database object passed in from the props? Well, let’s pass the database object into the props then. In index.js, replace the line:
AppRegistry.registerComponent(appName, () => App);
with
import React from 'react';
// ...
const AppWrapper = (props) => {
 return <App {...{
   ...props,
   database: database,
 }}/>;
};

AppRegistry.registerComponent(appName, () => AppWrapper);
This creates a wrapper where we get to pass in the database object.
Now we need to make sure our render method actually makes use of the component state. Replace the whole render method with the code below:
render() {
   return (
     <Container>
       <Header>
         <Body>
           <Title>Really Bad Todo</Title>
         </Body>
         <Right />
       </Header>
       <Content padder>
         <Text>
           There are { this.state.taskCount } tasks
         </Text>
         {
           this.state.tasks.map((m, i) => {
             return (
               <ListItem key={m.id}>
                 <Grid>
                   <Row>
                     <CheckBox checked={m.isComplete} onPress={() => this.setChecked(m) }/>
                     <Body>
                       <Text onPress={() => this.rename(m) }>{m.description}</Text>
                     </Body>
                   </Row>
                 </Grid>
               </ListItem>
             )
           })
         }
         <Form>
           <Item floatingLabel>
             <Label>New Task Name</Label>
             <Input value={this.state.newTaskDescription} onChangeText={text => this.onChangeText(text)}/>
           </Item>
         </Form>
       </Content>
       <Footer>
         <FooterTab>
           <Button full onPress={() => this.add()}>
             <Text>Add Task</Text>
           </Button>
         </FooterTab>
       </Footer>
     </Container>
   );
 }
Once done, you should have a fully* functional working todo app!
<!--kg-card-begin: html-->* definition of fully may vary.<!--kg-card-end: html-->
If you have issues, check the troubleshooting section.
The Result
We now have a functional CRUD app. 🎉🎉🎉
Creation
To add a task, type a description in the text field, and click on Add Task at the bottom
Retrieval
Well, the task list itself is an example of retrieval
Update
Tapping on the task name will rename it to Renamed!
Delete
Checking the task will delete it.

Further Improvements
This app is nowhere near what you would consider complete or even production-ready, but I hope it helped you to understand the basics of an app with a database.
For further reading, please take a look at the NativeBase and WatermelonDB documentation, they are pretty detailed.
These are things that should have been done but aren’t.
Using a router for page navigation
An app does not exist as a single page. We definitely need more than one page. In this case, we need a routing library. One that I see come up pretty often is React Navigation.
Using a library for state management
As apps get much bigger, allowing your state to be modified willy nilly by anyone is a recipe for many many bugs. A state management library like Redux will help you keep your app state sane.
Using observables for the page updates
Needing to call the refresh method to update your page is fine, but that sometimes leads to unnecessary updates. You should instead use the observable paradigm which is described in this section of the watermelon docs. Observables mean that a list or text field will automatically update when the underlying database updates. That’s the whole point of using WatermelonDB as opposed to other React Native databases.
Setting this up for iOS as well
I don’t like Apple so I didn’t bother (yes I know I’m using a Mac, it was required for my job okay?), but the whole point of React Native and NativeBase is to allow deploying to multiple devices with a single code base.
It’s probably better to start your project off testing with both iOS and Android, instead of trying to get it running on iOS once your app is complete. You might end up finding out that some things you did would not work on iOS and you might spend way more time than necessary trying to “port” it over to iOS.
As you can see, creating an app is pretty easy for a web developer these days. With so many libraries out there you don't even need to learn a new language to code a simple app. If you do it right, you can even use the same codebase for your website since WatermelonDB supports web apps as well.
Troubleshooting
Troubleshooting Section 3: Installing WatermelonDB

I ran into some issues when trying to run the android app. The error message is pretty misleading. It tells you that you should check if your Android development environment is set up, but we already know that is working since we’ve been able to run the app before. The real error is above. In this case it was simply that my android virtual device had run out of storage space.
 > Could not resolve project :watermelondb.
     Required by:
         project :app
      > Unable to find a matching configuration of project :watermelondb:
          - None of the consumable configurations have attributes.
In this case, this means that the WatermelonDB installation likely doesn’t exist for some reason. If you take a look at the settings.gradle you will see that we are sourcing the watermelon db installation from this folder: ../node_modules/@nozbe/watermelondb/native/android
So you should check if that folder exists. In my case it did not and I could not seem to install it. So I deleted the node_modules folder, updated my node to a newer version and tried to reinstall WatermelonDB again. Then it worked.
Troubleshooting Section 5: Hooking everything up
WARN Possible Unhandled Promise Rejection (id: 0):
TypeError: undefined is not an object (evaluating 'columnSchema.type')
This means a column is named wrongly, check the column names in the Task.js file and in the schema.js file

Top comments (0)