
Make your URL's pretty on Amazon S3
I host multiple websites on Amazon s3 Static site hosting. They offer a great product for an extremely reasonable price. They even offer a free tier, though there are some requirements. It is definitely worth checking out. There is a decent learning curve, but it is not impossible. I was able to figure it out as a newbie with a decent amount of searches and just reading their docs.
I set my first couple sites up using all of their services, with the exception of the domain, which I got from Namecheap. I used their S3 buckets, CloudFront, and Route 53. After setting my sites up, one of the problems I noticed was the URL's of the website had the .html on the end. Once my domain was set up, the homepage was the only page that did not have .html at the end. I wanted to get rid of this and so I set out on a mission to do so.
I started searching their docs, which are massive, and really don't respond to the words 'pretty url', so I set out with my search engine and came to a few excerpts on Stack Overflow on how to do this, but not really an in depth explanation. Now, the sites I am trying to clean the URL's for are business websites that I would rather not have go down while I am trying to do this. I was able to stitch together a few main points that the different excerpts had in common and figure it out. But since I was confused while doing it, I figured I would put this together for anyone else.
I am going to start with an already set up site. If you want to know how to set up the site please reference this article by Mike Tabor which I found to be the most helpful.
Once your site is set up, you have your bucket with all your files listed. When you initially set it up, you had to select an 'index document', which I set to 'index.html'. This does not change. My site was structured similar to this:

You can see all the files had the .html after their name. My 'index document' was index.html which again, I left as such. The first thing I did was went through all the other pages, under their 'Properties' tab and confirmed the metadata had them listed as 'text/html'. If it doesn't, you will need to set it:

After confirming that, I had to go to the code. The website I did this on was eight pages and I had to tediously go through every page and change every single 'href' to read <a href="/gallery">Gallery</a> leaving off the .html on every single link, instead of the original <a href="/gallery.html">Gallery</a>. I used the 'find and replace' tool in VS Code to do it:

I did this on every page, for every link, until all links, for any kind of internal navigation on my site were set up to the <a href="/gallery">Gallery</a> instead of the original way. This will break the navigation if you try to preview the site in a browser without it being hosted on AWS. So remember that if you are updating the site or working on it and previewing it in a browser. You will have to preview each page individually instead of clicking through the navigation.
Then, you will have to re-upload all the pages you changed. Once you upload everything, it will look as it originally did. Now on Amazon, in your website's bucket, go through all the pages and 'rename' the pages, leaving off the '.html'. It should now look something like this:

Once this was done I noticed upon internal navigation, that when you click from another page back to the homepage, it would show up as www.mysite.com/index.html. To fix this, I went ahead and uploaded a duplicate index.html page and changed the name to just 'index' so now it will internally navigate to www.mysite.com/index. Just note, when you upload the second index page, make sure to rename it to 'index1.html', or something different, prior to uploading, or it will just replace the 'index.html' page already in your bucket. Once uploaded, rename 'index1.html' to just 'index'. It should now look like this:

*Edit*
After this was up for a while I got a notification saying I had duplicate pages. So this trick with the index.html page did not work. So I changed tactics and all I did to get rid of that index.html, was back in the code, I changed all the links going to the index.html page, to the actual website https://example.com and left it as an external link. Everything else, I left the same, and it all works seamlessly.
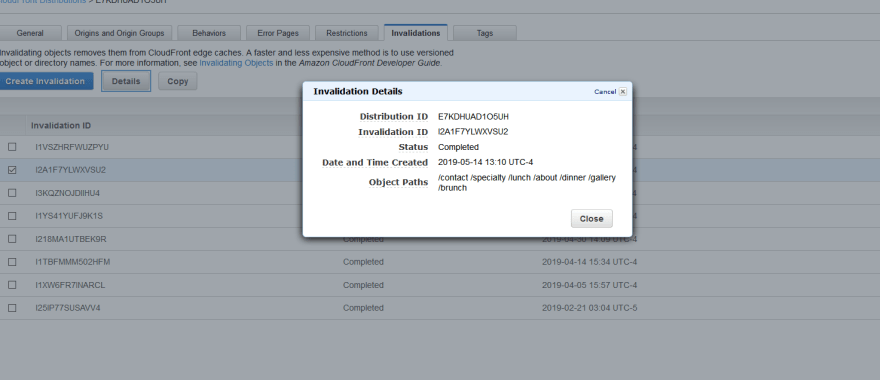
Once this is done, you are in the home stretch. If you just leave it the way it is, depending on how your cache is set up or how you have it hosted, it will eventually work correctly. My site is set up with Amazon's default cache policy, so it will only check back once every 24 hours. Since this was a business website, I had to see if this worked right away. I went ahead and created an invalidation for every single page that I changed so I would know if what I did broke the site, or worked correctly. To do that, head over to CloudFront, select the correct distribution, then along the top, select the tab labeled 'Invalidations'. Click on the blue button to 'Create Invalidation' and fill in all the pages you changed.
Once this is done invalidating all the pages, navigate to your site and check it out. Remember to clear your browsers cache so if you looked at the site recently it won't serve you a stale copy from the cache.
I hope this was helpful.


Top comments (0)