react-router 🔀
Hi, how are you guys? hope you are doing good, today we'll be talking about React Router.
react-router is a library that allows us to handle routes in our Web application.
Why do we need routes? 🤷♂️
You might be wondering why do we need routes, if we are developing SPA, it's very likely that you have been using conditional rendering based on the state to change the components that you want show, and it works, but... what happens when our application becomes bigger and more complex?
this conditional rendering might become difficult to understand, manage and maintain.
From the documentation:
Components are the heart of React's powerful, declarative programming model. React Router is a collection of navigational components that compose declaratively with your application.
With react-router, we'll be able to:
1.- Define which component/components to render based on a path.
2.- Use the back and forward buttons of our browser.
Main components of react-router
1.- BrowserRouter: This component is used for applications which have a dynamic server that knows how to handle any type of url. This means that our server has to be configured correctly. Specifically, our web server needs to serve the same page at all URLs that are managed client-side by react-router.
History 📍
Something important that we need to know is that our router will create a history object which is used to keep track of the current location.
2.- Route: This is a key piece of react-router, it's main responsibility is to render something when a location matches the route's path. the route expects this 3 arguments:
| Argument | Description |
|---|---|
| exact | Is a boolean property, it means that the specified path must be exactly, for render the specified component |
| path | Is a string that’s equal to the path of the current place where we are |
| component* | The component that we want to render |
*There are other ways to specify what do we want to render if the route's path matches, but we'll talk about it later.
3.- Link: Provides declarative, accessible, navigation around our Application.
Link takes 2 attributes, to and replace.
| Argument | Description |
|---|---|
| To | Can be a string, object or function which tells the app which path to redirect to |
| Replace | Is an optional boolean, is it's true will replace the current entry in the history stack instead of adding a new one |
4.- Redirect: Rendering a will navigate to a new location. The new location will override the current location in the history stack, we can use this for example, when a user is already logged in and he try to navigate to the Login Page, there' s no point on doing that, so if he try to do it, we can redirect him to the Home Page.
5.- Switch: We can use the component to wrap our routes/redirects and it will render/redirect the first child that matches the location.
How's different than just using a bunch of routes?
is unique in that renders a route exclusively.
Installation 🔧
npm install --save react-router
Setup ⚙️
Lets start coding, first lets create a couple of components to start playing with our Router, lets create a components folder and inside 3 components, Login, Home and Dashboard:
In the last picture you can see the components folder and inside a folder for each component, right now I haven't created files for the styles, we'll do it later, and I like to name my component files as .component.jsx but you can name them however you like.
The components will be very simple, we just want to render the name of the component.
import React from 'react';

const Login = () => {
  return(
    <div>This is Login Page</div>
  )
}

export default Login;
Now lets go to our App.js where we'll import our components and our router components. First lets wrap everything with our BrowserRouter and first we will create a couple of links to navigate through our components, then lets specify our routes and lets test it, here is the code of our App.js.
import React from 'react';
import {
  BrowserRouter as Router,
  Route,
  Link
} from 'react-router-dom'
import './App.css';

import Login from './components/login/login.component';
import Home from './components/home/home.component';
import Dashboard from './components/dashboard/dashboard.component';

function App() {
  return (
    <Router>
      <div>
      <Link to="/login">Login</Link><br/>
      <Link to="/home">Home</Link><br/>
      <Link to="/dashboard">Dashboard</Link><br/>
      </div>
      <Route exact path='/login' component={Login}/>
      <Route exact path='/home' component={Home}/>
      <Route exact path='/dashboard' component={Dashboard}/>
    </Router>
  );
}

export default App;
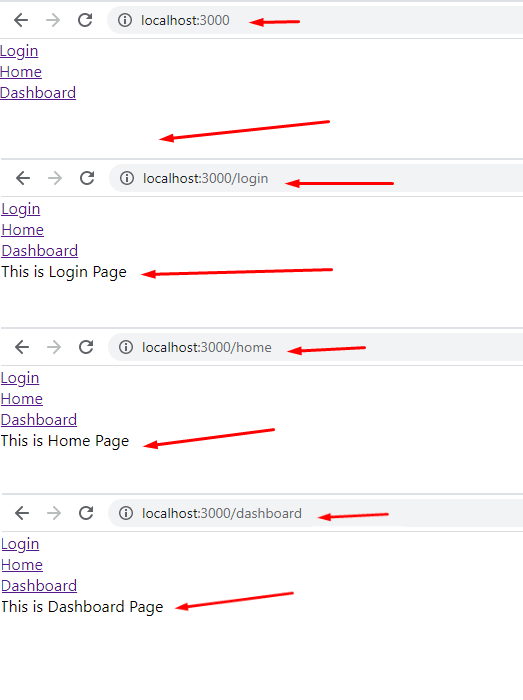
As you can see, after saving our changes, we will see in the browser our links to navigate through our components, but nothing else, notice that when we click in the login link our URL will change as well as the content in the page, under our links we will see our Login component.
We expect the same behavior when we click in the rest of our links, the URL will change as well as the component being rendered.
Great our router is working as we expect, lets see how the exact argument of the route works, first lets change the path of the route for our Home component, also lets change the Link for our Home component and lets remove the exact argument from our Routes, this is the new code:
function App() {
  return (
    <Router>
      <div>
        <Link to="/">Home</Link><br/>
        <Link to="/login">Login</Link><br/>
        <Link to="/dashboard">Dashboard</Link><br/>
      </div>
      <Route exact path='/' component={Home}/>
      <Route exact path='/login' component={Login}/>
      <Route exact path='/dashboard' component={Dashboard}/>
    </Router>
  );
}
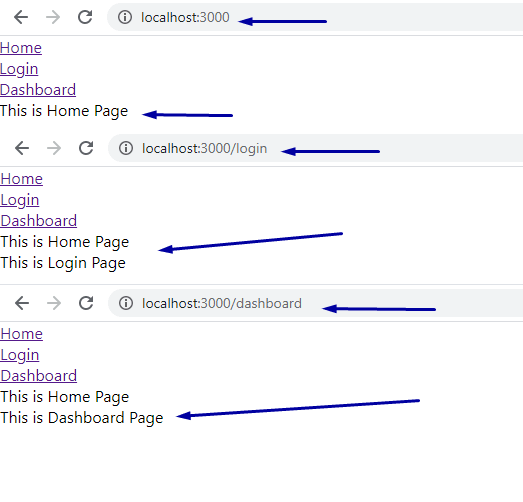
As we can see now, our Home component is always visible and the reason of this is because it's path ('/') matches with the URL in the browser in all scenarios.
Arguments passed to the rendered component.
Something important is that any component that gets rendered by a route get passed 3 arguments, History, location and Match.
Here is a description of the most used properties of our arguments.
| Argument | Description |
|---|---|
| match | ⬇️ |
| url | is the url until our component matches, so if the path associated to our component is ‘/’ but we navigate to http://localhost:3000/ or to http://localhost:3000/topics/details/something our url inside the match object will be ‘/’ because is the url until it match. |
| path | Is the pattern that our route is looking to match, it means, the path that we specify in our route. |
| isExact | Becomes true if the entire url match the pattern to match |
| params | Is an object of url parameters. Lets say that we have a route with this path ='/topics/:topicId' notice that after ‘/topics/’ we have “:topicId” this means that after this point we can dynamically change our url. And we can use those params for fetch data from a database or if it’s a title for some item, we can use it to display that title in the Component. |
| history | ⬇️ |
| push | There are 2 ways to navigate with react-router the first one is using the Link component, where we can specify a parameter called to and we specify the route where when want it to takes us to. For example: to='/topics'. Just remember that React is SPA, so what we are actually doing is hijacking the url and determine with Javascript what component to replace, there’s no navigation at all (we are not re-rendering the whole application). The other way to do this is: props.history.push('/topics') |
| location | ⬇️ |
| pathname | It tells us where we are in the application. So if we navigate to: http://localhost:3000/topics/15/something/props that url is exactly what pathname will return. And this is useful because our component is aware what the full url looks like. |
Nested Routing
Lets create an quickly example of nested routing, Lets add a TopicsList component a Topic component to our project.
This is the code of our TopicsList component:
import React from 'react';
import { Link } from 'react-router-dom'

const TopicsList = (props) => {

  React.useEffect(() => {
    console.log(props.match.url);
  }, []);

  return(
    <div>
      <h1>Topics List Page</h1>
      <Link to={`${props.match.url}/A`} >To topic A</Link><br/>
      <Link to={`${props.match.url}/B`} >To topic B</Link><br/>
      <Link to={`${props.match.url}/C`} >To topic C</Link><br/>
    </div>
  )
}

export default TopicsList;
As you can see we are using Links inside our TopicsList component. and the "to" argument is being created with a string template so we can use our props.match.url + the topic we want to see. The props.match.url at this point is '/topics' because that is the path specified to render the TopicsList component, we can see that if we console.log that value.
And after that we specify which Topic we want to see
This is the code of our Topic component:
import React from 'react';

const Topic = (props) => {

  React.useEffect(() => {
    console.log(props);
  }, []);

  return(
    <div>
      <h1>Topic {props.match.params.topicId}</h1>
    </div>
  )
}

export default Topic;
Inside our topic component we are using the props.match.params.topicId because we want to know which Topic we need to render, we are using the same component to render all the topics, we just need to change the content and we get it from the params:
Now we just need to update our App.js with this code:
import React from 'react';
import {
  BrowserRouter as Router,
  Route,
  Link
} from 'react-router-dom'
import './App.css';

import Home from './components/home/home.component';
import TopicsList from './components/topicsList/topicsList.component';
import Topic from './components/topic/topic.component';

function App() {
  return (
    <Router>
      <div>
        <Link to="/">Home</Link><br/>
        <Link to="/topics">TopicsList</Link><br/>
      </div>
      <Route exact path='/' component={Home}/>
      <Route exact path='/topics' component={TopicsList}/>
      <Route exact path='/topics/:topicId' component={Topic}/>
    </Router>
  );
}

export default App;
Notice our Route for the Topic Component, we are using a new syntax:
<Route exact path='/topics/:topicId' component={Topic}/>
After /topics/ we use :topicId as we said before in our table, this means that after this point we can dynamically change our url, and it will be passed as a parameter.
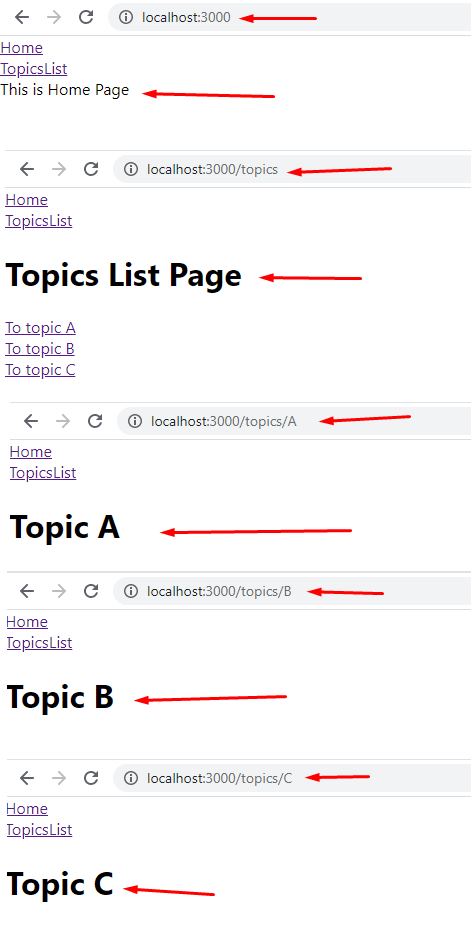
Lets save our changes and test our App.
As you can see everything is working as expected, now you know how everything works together, how we can used the props that are being passed to the components rendered by the Route and by the Link components.
I hope you enjoyed this post and found it useful, if you like it, feel free to share, also if you have any thoughts about this post, feel free to comment here or contact me, any feedback would be appreciated.
Have a nice day! ✌️


Top comments (6)
I used to build and love a lot ( talking about react)
But then I tried NextJS which have a simple and funny routing system but that is extremely powerful and its ability of sar and ss generatrion
I prefer to use next now, but react dom is ❤️..
Really? I haven't use NextJS but definitely I will try it, thanks for reading 💪 have a nice day 👍
Good read just one thing to mention you can add syntax highlighting to your code blocks in markdown google it.
Thanks! I didn't know about it 👍
Great article writeup
thanks for reading 💪 have a nice day 👍