There are tons of creative portfolio sites out there, but it takes a lot of effort to build a website that stands out. Instead of building the perfect portfolio site, what if you built an interactive resume CLI? That also sounds difficult, but I'm going to show you how to do it in under 10 minutes using a CLI generator I created.
We need TypeScript because this library generates the CLI by parsing the parameter types of our CLI functions. TypeScript provides enough context for the library to generate complex terminal interactions with minimal effort from you as the developer.
Note: This library is an alpha release, so some bugs are expected. There are also currently some limitations so for now keep all your cli code in index.ts.
Setup
We first start by initializing a new CLI project using npx.
npx @christianjuth/ts-cli-generator
Enter whatever you like when prompted for the cli-name, but I recommend some combination of your name and resume.
$ npx @christianjuth/ts-cli-generator
✔ Enter a name for your cli … christianjuth-resume
✔ Creating project files
⠧ Installing npm dependencies
Select math-cli as the starting template.
✔ Enter a name for your cli … christianjuth-resume
? Pick a template › - Use arrow-keys. Return to submit.
❯   math-cli
    rss-reader-cli
    stocks-cli
    with-auth
This gives us the following files:
christianjuth-resume
├── index.ts
├── package.json
├── README.md
└── tsconfig.json
If we open index.ts we should see something like this:
import { call, CLI } from "@christianjuth/ts-cli-generator";

/**
 * Add two numbers
 */
function add(x: number, y: number) {
  console.log(x + y);
}

/**
 * Subtract two numbers
 */
function _subtract(x: number, y: number) {
  return x - y;
}

/**
 * Add then subtract as separate interactioins
 */
async function addSubtract(x: number, y: number) {
  console.log(x + y);
  // call allows you to call a cli function
  // from within another cli function
  console.log(await call(_subtract)());
}

/**
 * Get the length of a string
 */
function lengthOfString(str: string) {
  console.log(str.length);
}

export const cli: CLI = {
  add,
  addSubtract,
  lengthOfString,
  // underscore means function is available but hidden
  _subtract,
};
The above index.ts generates these commands when we run npm start:
christianjuth-resume CLI 0.0.0

Powered by @christianjuth/ts-cli-generator

Commands:
  add               Add two numbers
  add-subtract      Add then subtract as separate interactions
  length-of-string  Get the length of a string

Options:
  -i, --interactive Run CLI in interactive mode
We have also get the following npm scripts:
npm start <cli-command> # more on this later
npm start # excluding <cli command> gives us usage
npm run dev <cli-command> # same as start but with nodemon
npm run build # build the cli
Customize your resume
We will use the npm openurl package so we can have our CLI programmatically open links in the browser. Start by installing openurl and it's types.
npm i openurl
npm i -D @types/openurl
Start by adding some social links to your resume. Replace the contents of index.ts with the following:
import { CLI } from "@christianjuth/ts-cli-generator";
import { open, mailto } from "openurl";

/**
 * Follow me on Twitter 🐦
 */
function twitter() {
  open("<your Twitter url>");
}

/**
 * Connect with my on LinkedIn 👔
 */
function linkedin() {
  open("<your LinkedIn url>");
}

/**
 * See my projects on GitHub 🚀
 */
function github() {
  open("<your GitHub url>");
}

export const cli: CLI = {
  twitter,
  linkedin,
  github,
};
If we run our CLI using npm start we get the following commands:
$ npm start

> christianjuth-resume@0.0.0 start
> ts-cli-generator build && node .

✔ Detecting cli functions
✔ Writing cli files
✔ Emitting CLI build
christianjuth-resume CLI 0.0.0

Powered by @christianjuth/ts-cli-generator

Commands:
  twitter   Follow me on Twitter 🐦
  linkedin  Connect with my on LinkedIn 👔
  github    See my projects on GitHub 🚀
We can open the links by running:
# npm start <cli-command>
npm start twitter
npm start linkedin
npm start github
Add some projects to our resume
Add the following to index.ts
// prev functions...

/**
 * Check out some of my projects ✨
 */
 function projects(str: "project1" | "project2") {
  switch (str) {
    case "project1":
      open("https://...");
      break;
    case "project2":
      open("https://...");
  }
}

export const cli: CLI = {
  twitter,
  linkedin,
  github,
  projects
};
If we run npm start projects, we now get a CLI interface to select what project we want to open.
$ npm start projects

> christianjuth-resume@0.0.0 start
> ts-cli-generator build && node . "projects"

✔ Detecting cli functions
✔ Writing cli files
✔ Emitting CLI build
? Select praram type for str › - Use arrow-keys. Return to submit.
❯   project1
    project2
Select a project and press enter to view the project in the browser.
Add a contact form
For simplicity, we will create a contact form that opens a mailto link, but you could easily make a POST request instead.
And add the following to index.ts:
// prev functions...

/**
 * Contact me 📪
 */
function contact(info: {
  subject: string;
  name: string;
  email: string;
  phoneNumber: string;
}) {
  const { subject, name, email, phoneNumber } = info;
  const EMAIL = "your.email@example.com";

  const message = `
    Name: ${name}
    Email: ${email}
    ${phoneNumber ? `Number: ${phoneNumber}` : ""}
  `;

  mailto([EMAIL], {
    subject,
    body: message,
  });
}
Notice how our CLI is able to handle objects as parameters (it can even handle nested objects). Arrays aren't supported yet, but coming soon.
Try running yarn start contact and see what happens.
The final product
The final version of index.ts is posted at the bottom if you want to see it for reference.
Install the CLI locally by running:
npm run build
npm link

# substitute christianjuth-resume with your cli name
christianjuth-resume # print usage
christianjuth-resume <cli-command> # run command
Next steps
You could publish your package to NPM to easily share with others, but for this tutorial we are going to use GitHub because it's simpler.
Before you can share your package with others, you must:
- Create a GitHub repo
- Build your project via
npm run buildbefore committing - Commit and push your CLI project to GitHub
- We can now run the CLI directly off of GitHub using
npm exec
You can check out my repo here.
Normally I would use npx, but I've had better luck with npm exec when working with GitHub repos.
# substitute github:christianjuth/resume-cli with your GitHub repo username/repo
npm exec github:christianjuth/resume-cli
npm exec github:christianjuth/resume-cli <cli command>
Thanks for reading!
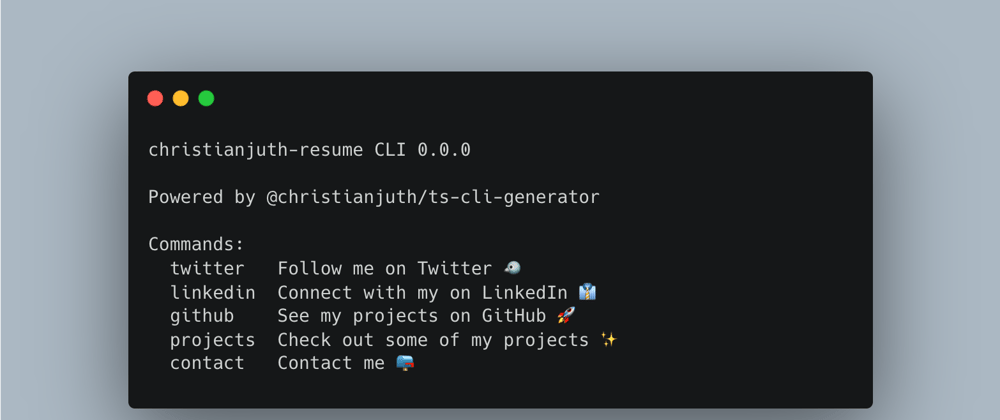
Out final CLI has these commands:
christianjuth-resume CLI 0.0.0

Powered by @christianjuth/ts-cli-generator

Commands:
  twitter   Follow me on Twitter 🐦
  linkedin  Connect with my on LinkedIn 👔
  github    See my projects on GitHub 🚀
  projects  Check out some of my projects ✨
  contact   Contact me 📪
And our final index.ts file looks like this:
import { call, CLI } from "@christianjuth/ts-cli-generator";
import { open, mailto } from "openurl";

/**
 * Follow me on Twitter 🐦
 */
function twitter() {
  open("<your Twitter url>");
}

/**
 * Connect with my on LinkedIn 👔
 */
function linkedin() {
  open("<your LinkedIn url>");
}

/**
 * See my projects on GitHub 🚀
 */
function github() {
  open("<your GitHub url>");
}

/**
 * Check out some of my projects ✨
 */
function projects(str: "project1" | "project2") {
  switch (str) {
    case "project1":
      open("https://...");
      break;
    case "project2":
      open("https://...");
  }
}

/**
 * Contact me 📪
 */
function contact(info: {
  subject: string;
  name: string;
  email: string;
  phoneNumber: string;
}) {
  const { subject, name, email, phoneNumber } = info;
  const EMAIL = "your.email@example.com";

  const message = `
    Name: ${name}
    Email: ${email}
    ${phoneNumber ? `Number: ${phoneNumber}` : ""}
  `;

  mailto([EMAIL], {
    subject,
    body: message,
  });
}

export const cli: CLI = {
  twitter,
  linkedin,
  github,
  projects,
  contact,
};


Top comments (0)