
In Voyage 16, my team wanted to create a React app using the next.js framework, and a node server using express.
This is how we wanted to setup our project:
- Have both frontend and backend in the same Github repo
- Have our next.js react app automatically deploy to now.sh on merge to the master branch
- Have our express server automatically deploy to Heroku on merge to the master branch
I managed to get this working, but ran into a number of challenges along the way so I decided to document the process.
First clone your repo so you have it locally. You should have just a README.md in the directory.
Frontend
- Use create-next-app to create a next.js app. Use "frontend" as the project name so it creates the app inside a folder called "frontend" and then update the project name inside the
package.jsonfile after creation. - Before deploying to now.sh, it's important you setup a new team so you can link it to the Github organisation (e.g. chingu-voyages). This is important for using the Github integration. The way to create a new team is through the menu in now.sh

- After creating the team, you'll need to invite a GitHub organization owner to the team so they can create the Github integration link. This is important as only the organization owner on Github can link it.
To do this, select your team via the menu and follow the gif below to get the invite link. Send the link to one of the owners of the Github organization so they can join the team and setup the integration.
-
While you're waiting for the Github organization to be linked, you can deploy your project to now.sh.
With the now.sh CLI; In your repo's root directory, run:
> now frontend -
And answer the following questions:
> Which scope do you want to deploy to?: (choose the team you just setup)
> Link to existing project [y/N]: N
> What's your project's name?: (type in the project name you want)
> In which directory is your code located?: frontend/
..
..
> Want to override the settings? [y/N]: N
Now that your project has been deployed, you should be able to see it in now.sh under your team name's dashboard.
You'll now need to wait for the GitHub organization owners to finish linking the Github integration. Once they are finished, it should look like this:

Note that you will see the edit button, and it will look like you can link the integration yourself, but it won't work. You need to be the owner of the organisation that your Github repo is in.Once the Github integration has been linked, you'll finally be able to link your project for auto deployment! I created a test organisation and test repo so you can see what that looks like:
Congratulations! Your frontend is now linked to now.sh and will auto deploy whenever you push code to your master branch!
Backend
- Create a new folder in your repo's root directory called "backend".
-
Inside the backend folder, create an express server
Note: make sure you aren't assigning a port value directly, do this instead.
const port = process.env.PORT || 3000 -
Setup the Heroku CLI if you haven't done so already. Then login with the command:
> heroku login Make sure you have committed your express app to git.
-
Create your app in Heroku by running the command below in your repo's root directory. Obviously replace "project-name" with whatever you want your backend project to be called.
> heroku apps:create project-name -
Now instead of pushing up the entire repo, we only want to push up the contents of the backend folder. To do that, we can use the
git subtreecommand.
> git subtree push --prefix backend heroku master Your server should now be deployed to Heroku and you should be able to see it working by opening the URL that Heroku provides you. (If something went wrong, run the command
heroku logs --tailto debug!).In your Heroku dashboard, go to your project's settings and add a config variable of PROJECT_PATH and set it to backend.

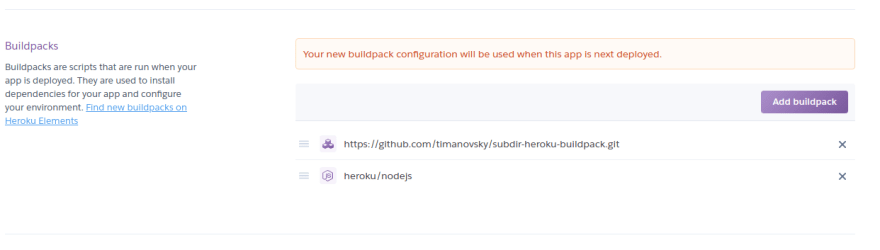
Also in settings, add a build pack and enter this url:
https://github.com/timanovsky/subdir-heroku-buildpack.gitDon't worry about selecting a supported buildpack, just add the url and click save changes.

Using the drag handles, drag the buildpack you just created, to above the
heroku/nodejsbuildpack that was already there.
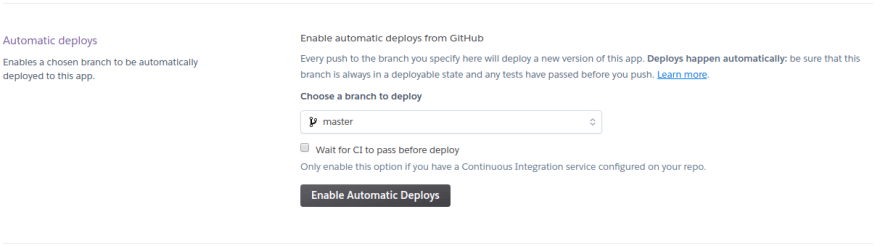
Finally, on the deploy tab. Select your repo from the integrations dashboard, and then click the "Enable Automatic Deploys" button!

..
..
..
..
And that's it! You now have your skeleton frontend and backend in the same repo and auto deploying to now.sh and heroku whenever you push your code to the master branch!
Happy coding!


Top comments (1)
Now and Netlify have their CLI, so you can deploy without setting up a Git.
For Heroku, you need Git, but you can hack with Branches / Subtree. My solutions are in patarapolw/qsearch/web/heroku, and also web/backend/webpack.config.js, web/frontend/vue.config.js. I might write up on How-To someday.
I also have Now.sh with serverless solution, here, and here. Indeed, the problem is
now.shtrying to be too smart.