ERPnext is a 100% open source and FREE Enterprise Resource Planning software developed and maintained by a FOSS-promoting company, Frappe Technologies Pvt. Ltd., based out of India's financial capital Mumbai.
ERPNext is the best among FREE ERPs available in 2023 such as Dolibarr, Odoo, etc. In 2018, ERPNext was rated among the top 5 user-friendly ERP systems by Gartner, surpassing Microsoft, SAP, Bexio, and several other ERP systems.

ERPNext is available as a self-hosted software for your small to medium business to install on your own servers helping you to maintain your data privacy without paying a dime for the licensing fee (except the server costs).
However, it is not easy for non-technical users to get the hang of it.
My ERPNext installation guide below is an easy-to-follow set of instructions helping you to easily install ERPNext version 14 on a 4GB droplet hosting Ubuntu 22.04 LTS.
Let's get started:-
Create a new droplet on Digitalocean with Ubuntu 22.04
Signup for a new account or log in to your already existing account on Digitalocean.
Once you are on the "projects" page of your Digitalocean account, click on the green "Create" button on the top right and select "droplet" from the dropdown. This will take you to the "Create Droplets" page.
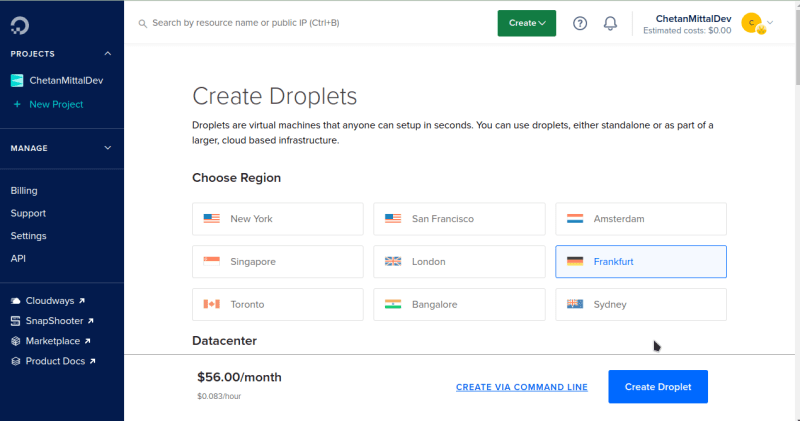
On the "Create Droplet" page you can configure your server by following the instructions on this page such as:-
Your server's data center: I usually pick Bengaluru or Singapore because those are the nearest to my location.
An operating system image for your server: I usually prefer the latest Ubuntu LTS. Currently, the LTS version of Ubuntu is 22.04.
The CPU size for your server: I usually pick Basic and Regular with 4GB RAM for a new ERPNext installation. I would recommend a minimum RAM for ERPNext of 2GB with 4GB SWAP.

After you have configured the server add your SSH key for easy access to your server from your PC.
If you are on Windows then you can use Putty to access your server else you can simply run ssh root@-your-droplet-ip-address on your Linux terminal or Mac Command.
Finally, hit the "Create Droplet" button to create a new server for your ERPNext 14 installation.

Install all the preliminary software required to install Frappe and ERPNext
To install Frappe and ERPNext we need to install a few essential software such as gcc, python, mariadb, etc.
Follow the instructions below:-
Login to your server from your PC for easy access. As I use ArchLinux thus I just have to open a Terminal window and then just ssh into my server.

Replace my server's IP address with your droplet's IP address. Note:- I will delete my server post-publishing this article.
$ssh root@-your-droplet-ip-address
Add SWAP to your server
Though 4GB RAM is enough for an ERPNext instance, however, just in case there might be a RAM-eating process so to keep our instance running it would be nice to have some SWAP.
I usually prefer a SWAP of 2x of your server RAM but you can add a 4GB swap too to save disk space.
Follow the guide here to add swap: https://www.digitalocean.com/community/tutorials/how-to-add-swap-space-on-ubuntu-22-04.
Verify if you already have a SWAP:-

Create an 8GB SWAP:-

Make your SWAP permanent so that when you restart your server then also you will have your SWAP.
![]()
Adjust or tune your SWAP settings swappiness and vfs_cache_pressure:-

Update your server and install the LOCALES
$ sudo apt update
$ sudo apt upgrade
After you have completely upgraded your Ubuntu 22.04 server, then you can install LOCALES which are required by ERPNext.
$ sudo localectl set-keymap us && sudo localectl set-locale LANG=en_US.utf8
Note:- If you get an error Failed to set keymap: Keymap us is not installed. then you can follow the instructions given at https://www.claudiokuenzler.com/blog/1257/how-to-fix-missing-keymaps-debian-ubuntu-localectl-failed-read-list to resolve this error and continue with installing ERPNext 14.

$ sudo nano /etc/environment (and copy-paste the following at the bottom of the file after $PATH)
##############
LC_ALL=en_US.UTF-8
LC_CTYPE=en_US.UTF-8
LANG=en_US.UTF-8

Now, reboot your server for the locales and server updates.
$ sudo reboot
Install the NGINX HTTP server
$ sudo apt install nginx (and test by opening your-droplet-ip-address in a browser window)

The below section is optional, however, if you want to access your ERPNext instance using HTTPS://DOMAIN_NAME then you must follow these optional instructions.
OPTIONAL
Install certbot (ubuntu 20.04 doesnt support certbot-auto required by erpnextfrappe-bench thus we will use snap to install certbot classic to generate SSL certificates manually using lets-encrypt).
$ sudo service nginx stop
$ sudo snap install --classic certbot
Generate a lets-encrypt SSL certificate for your domain name(s) - the certificate will be saved under -your-domain-name-folder-name- at /etc/letsencrypt/live
$ sudo certbot certonly --standalone (your domain name(s) will be asked here)
$ sudo service nginx start
OPTIONAL ENDS
Install the MySQL database server
$ sudo apt install mariadb-server
$ sudo apt install python3-mysqldb libmysqlclient-dev
$ sudo mysql_secure_installation

$ sudo systemctl stop mariadb
$ sudo nano /etc/mysql/mariadb.conf.d/mariadb.cnf (and copy-paste the following to save file)
https://gist.github.com/chetanmittaldev/28ea822b9815feac891d2c809f8d2598
Restart the MySQL server:-
$ sudo systemctl start mariadb
$ sudo systemctl enable mariadb
Install the Ubuntu packages required for Python3, etc.
$ sudo DEBIAN_FRONTEND=noninteractive apt install -y curl build-essential python3-testresources python3-setuptools python3-dev libffi-dev python3-pip libcurl4 dnsmasq fontconfig git htop libcrypto++-dev libfreetype6-dev liblcms2-dev libwebp-dev libxext6 libxrender1 libxslt1-dev libxslt1.1 libffi-dev ntpdate postfix python3-dev python-tk screen vim xfonts-75dpi xfonts-base zlib1g-dev apt-transport-https libsasl2-dev libldap2-dev libcups2-dev pv libjpeg8-dev libtiff5-dev tcl8.6-dev tk8.6-dev libdate-manip-perl logwatch
Add a system user 'frappe' to install ERPNext
Add user 'frappe' with password 'password' by running the commands below in your terminal:-
$ adduser frappe
$ usermod -aG sudo frappe
$ rsync --archive --chown=frappe:frappe ~/.ssh /home/frappe/
Create your MySQL database
Add a MySQL database 'frappe' with user 'frappe' and password 'password' by running the commands below:-
$ mysql
$ MariaDB [(none)]> CREATE DATABASE frappe;
$ MariaDB [(none)]> SHOW DATABASES;
$ MariaDB [(none)]> GRANT ALL PRIVILEGES ON . TO 'frappe'@'%' IDENTIFIED BY 'password' WITH GRANT OPTION;
$ MariaDB [(none)]> SELECT host, user, Super_priv FROM mysql.user;
$ MariaDB [(none)]> FLUSH PRIVILEGES;
$ MariaDB [(none)]> exit

SSH into your server using the 'frappe' user in a new console or terminal window
$ ssh frappe@-your-droplet-ip-address
Install some python3-based packages such as setuptools, etc
$ sudo -H python3 -m pip install --upgrade setuptools cryptography psutil

Install wkhtmltopdf
install wkhtmltopdf as erpnext12 requires 0.12.5 version (i am not sure about erpnext13 or erpnext14 but installed just in case):-
$ cd /tmp
$ wget https://github.com/wkhtmltopdf/wkhtmltopdf/releases/download/0.12.5/wkhtmltox_0.12.5-1.bionic_amd64.deb
Now, wkhtmltopdf needs libssl1.1 package which is not available on Ubuntu 22.04 LTS thus we will add the packages repo for Ubuntu 20.04 and then install libssl1.1 from there:-
$ echo "deb http://security.ubuntu.com/ubuntu focal-security main" | sudo tee /etc/apt/sources.list.d/focal-security.list
$ sudo apt-get update
$ sudo apt-get install libssl1.1
$ sudo dpkg -i wkhtmltox_0.12.5-1.bionic_amd64.deb
$ sudo cp /usr/local/bin/wkhtmlto* /usr/bin/
$ cd ~
$ sudo chmod a+x /usr/bin/wk*
$ sudo rm /etc/apt/sources.list.d/focal-security.list
Install the Redis Cache Server
$ sudo apt install git python-dev-is-python3 python3-dev redis-server
$ sudo apt-get install software-properties-common
$ sudo apt-get install xvfb libfontconfig wkhtmltopdf
$ sudo systemctl enable redis-server

Install nodejs by using NVM
$ curl -o- https://raw.githubusercontent.com/nvm-sh/nvm/v0.39.3/install.sh | bash
$ sudo reboot (required to run nvm command)
SSH into 'frappe' user again
$ nvm install --lts (install the LTS version of NodeJS; currently, it is v18.15.0)
$ npm install -g yarn
Verify nodejs, npm, yarn installations:-
$ yarn --version
$ npm -v
$ node -v

Lets summarize what we have accomplished so far. Up to this point, you have installed all the major components required by ERPNext 14, which include:-
Nginx
Certbot
SSL Certificate Generate
Python3
MariaDB DB
Nodejs, NPM
The Yarn package manager
A Redis database cache
The wkhtmltopdf PDF documents generator
Whether you are installing the ERP system for development or for production, you are now ready for the next step, which is installing the Frappe full-stack framework and the actual ERPNext 14 web application.
Install the Frappe full-stack web framework and ERPNext web application
SSH 'frappe' system user in a new console or terminal window:-
$ ssh frappe@-your-droplet-ip-address
Install bench (Installing Frappe Bench CLI)
$ cd ~
$ sudo chown frappe -R /home/frappe
$ sudo pip3 install frappe-bench
$ bench --version
$ sudo apt install python3.10-venv
$ bench init frappe-bench

$ cd frappe-bench
$ echo fs.inotify.max_user_watches=524288 | sudo tee -a /etc/sysctl.conf && sudo sysctl -p
$ ./env/bin/pip install numpy && ./env/bin/pip install pandas
Upgrade pip
$ /home/frappe/frappe-bench/env/bin/python -m pip install --upgrade pip
Install bench apps
$ bench get-app erpnext
Add a new site to the bench
$ bench new-site -your-domain-name-or-droplet-ip-address- --admin-password -your-admin-password- --mariadb-root-username frappe --mariadb-root-password 'password'

Install bench app to bench site
$ bench --site -your-domain-name-or-droplet-ip-address- install-app erpnext

Test bench on port 8000
$ bench start
Open a new browser window and open -your-domain-name-or-droplet-ip-address-:8000 to test:-


Setup production server using NGINX for your ERPNext instance
SSH your server using 'frappe' user in a new console or terminal window:-
$ ssh frappe@-your-droplet-ip-address
$ cd /home/frappe/frappe-bench
$ sudo bench setup production frappe --yes
Verify if the required services work on your server:-
$ sudo supervisorctl stop all
$ sudo supervisorctl start all
$ systemctl list-unit-files | grep 'fail2ban|nginx|supervisor'
After confirming that everything is working as expected, you can test ERPNext 14 live on your server.
Open your favorite browser and navigate to -your-domain-name-or-droplet-ip-address-, or wherever you are hosting your ERPNext 14 application.
After a few seconds, you should see the ERPNext 14 login screen.
Use Administrator for the username (email) and the erpnext_admin_password you created previously for the password.
The NGINX conf file is saved in the path below:-
$ sudo nano /etc/nginx/conf.d/frappe-bench.conf
Add HTTPS
$ sudo -H bench setup add-domain -your-cname-domain-name-
$ sudo -H bench setup nginx
$ sudo service nginx reload
Turn on multi-tenancy for HTTPS to work:-
$ sudo -H bench config dns_multitenant on
$ sudo -H bench setup nginx
$ sudo service nginx reload
Add SSL certificate (lets-encrypt) to bench site (install HTTPS on apex domain) - frappe-bench uses the same path /etc/letsencrypt/live to get SSL certificates:-
$ sudo -H bench setup lets-encrypt -your-domain-name-or-droplet-ip-address- custom-domain -your-cname-domain-name-
$ sudo -H bench setup nginx
$ sudo service nginx reload {or $ sudo service nginx start}
Start using ERPNext
Open -your-domain-name-or-droplet-ip-address- in a browser window.
Known Issues
WARN Cannot connect to redis_cache to update assets_json during
bench initthen you can follow the instructions at https://discuss.frappe.io/t/issue-w-redis-during-bench-init-step/87134.Bench runs fine on port 8000, however, during production it doesn't run. This might be due to the redis-server not being run on port 11000. To fix this open file
sudo nano /etc/redis/redis.confand change the port to 11000. Do not forget to reload the redis-server again. Follow the instructions at https://linuxhint.com/change-default-port-redis/.
Any issues then comment
If you face any issues then please comment, and I will try to rectify them.

Top comments (1)
Whenever you are ready; there is a way I can help you:
If you're still looking for traction in your software product or service, I'd recommend starting with an affordable technical content writing package: