
Author✒️: Zidi Chen, Sihan Chen
Introduction
This is a small tutorial about how to run TeamCity on the docker container. TeamCity is a CI/CD tool published by JetBrains. It basically helps to deliver software with high quality faster and simplier. Developers can specify the builds, run the builds and view the results, which will be introduced later in this tutorial. Running TeamCity on Docker would allow us to use TeamCity without local installation, regardless of operating systems.
This tutorial includes how to run docker images of TeamCity Server and TeamCity Agent, how to connect them, and how to build a project using TeamCity on docker images.
This tutorial might need around 15-20 minutes, because we need time to pull images from Docker Hub repository.
Here is an excellent free online tool which allows to run this tutorial purely on web browser: Play-With-Docker 😆 . You need to register for this tool, and then you can use this it to start this tutorial.
Step 1️⃣: Run TeamCity Server in Docker container
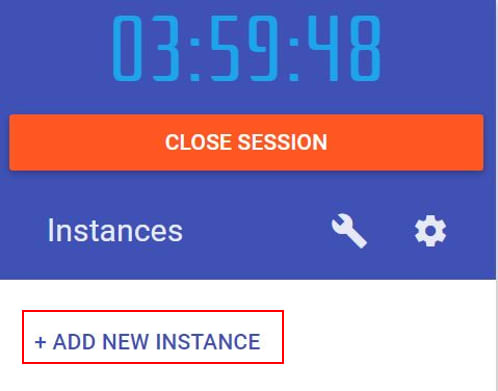
After you open Play-With-Docker, you can click on + ADD NEW INSTANCE to start a terminal in a new node.
This is how the terminal looks like in Play-With-Docker.

For preparation, create folders by these commands:
mkdir -p teamcity
mkdir teamcity/data
mkdir teamcity/logs
mkdir teamcity/agent
The first thing is to set up TeamCity Server. We need to pull the server image from the Docker Hub repository. This might need a few minutes.
docker pull jetbrains/teamcity-server
We can view the images on the machine using this command:
docker images
The TeamCity Server should be listed.
Now, we can run this command to start a Docker container with TeamCity Server.
docker run -it -d --name server -u root -v /teamcity/data:/data/teamcity_server/datadir -v /teamcity/logs:/opt/teamcity/logs -p 8111:8111 jetbrains/teamcity-server
Here are explanations of the command:
-
-d: Run in the background. We add this because we want to use only one terminal in Play-With-Docker. When you use your local machine, you can delete this. In that case, you need two terminals. One additional terminal for an agent, which will be introduced later. -
--name server: We name this container "server". -
-u root: To run the command under 'root' user. This can be removed in your local machine when you login in as the root user. -
-v /teamcity/data:/data/teamcity_server/datadir: We bound /teamcity/data folder in our machine with TeamCity Data Directory. When you execute the command on your own machine, please create or specify your own folder. -
-v /teamcity/logs:/opt/teamcity/logs: We bound /teamcity/logs folder in our machine with TeamCity logs. When you execute the command on your own machine, please create or specify your own folder. -
-p 8111:8111: This is a map of the port between our machine and the container. You can use this command as-p <host port>:8111, and specify your own perferred port on your local machine. -
jetbrains/teamcity-server: This is the name of the image.
This might also need a few minutes. After execution of the command, we can open port 8111 to see the page of TeamCity. In Play-With-Docker, click on OPEN PORT and enter 8111 in the pop up window.

In your local machine, you can open the browser and access to localhost:<host port> to see the page.
We can use this command to see the running Docker container.
docker ps
Step 2️⃣: Create a project and build steps in TeamCity
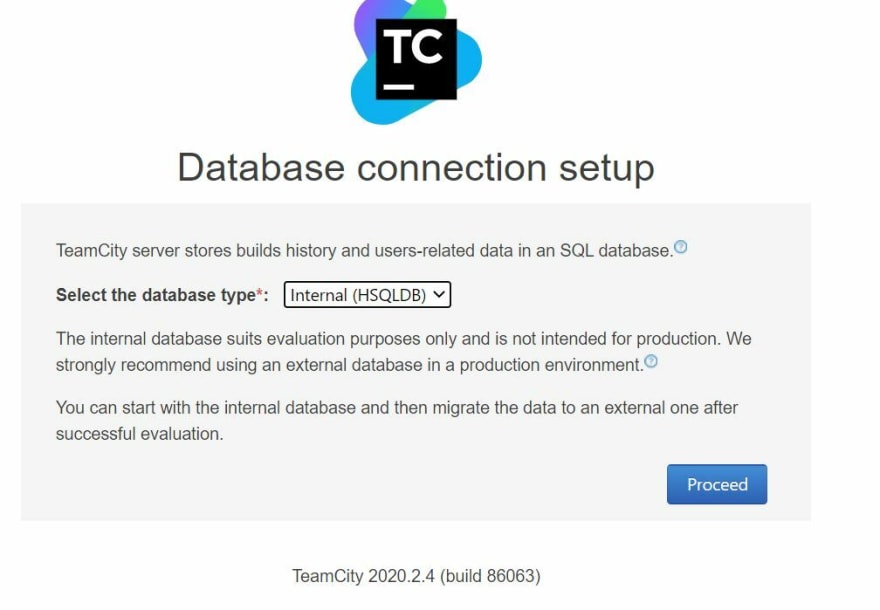
After initialization, we click on proceed to start TeamCity for the first time.

We keep the database type as default.
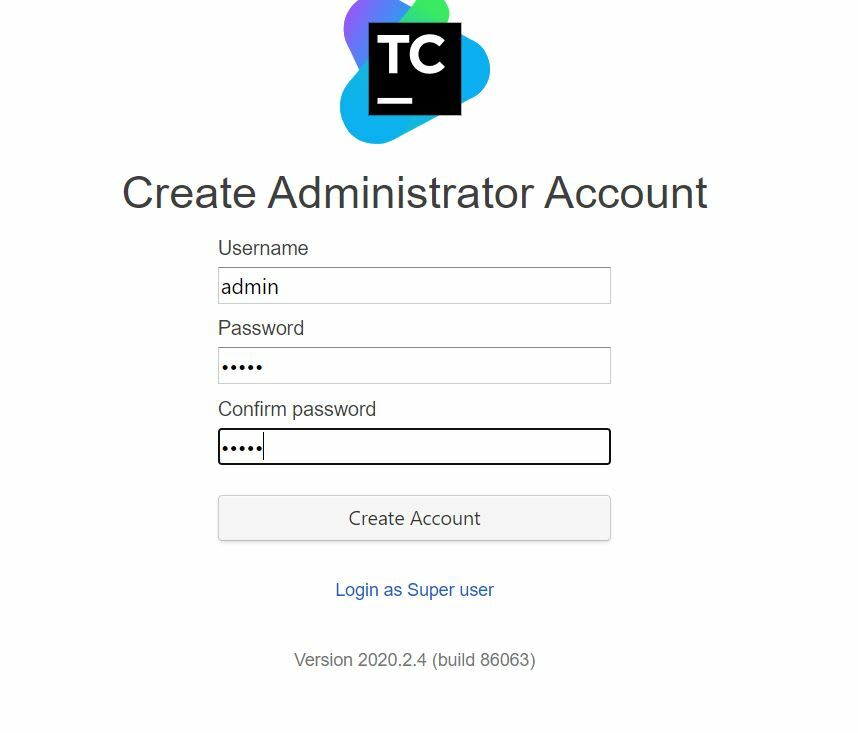
It might also need a few minutes to initialize TeamCity. Then, we accept the license agreement and continue to create administrator account. For this tutorial, we enter name admin and password admin.
Now, we can add a project and create build steps for it. By clicking on the create project button on the main page, we can add a project.

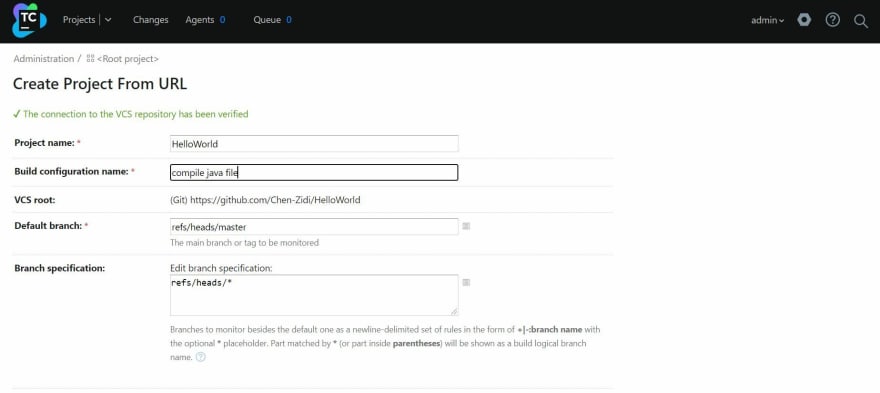
In this tutorial, we want to use TeamCity to automatically compile a java file when we build the project. Therefore, we create the project from a repository URL. I use a java hello world program from my github repository. Since it is a public repository, the username and password can be left empty. We just proceed.

In the next page, we name the configuration as compile java file.
We want TeamCity to automatically compile HelloWorld.java for us when building the project. Therefore, in the next page for configuring build steps, we click on configure build steps manually.

Tip: TeamCity can automatically detect build steps in the project. It supports to detect build steps in Maven,Gradle,Ant,NAnt,MSBuild,Powershell,Xcode,Rake,IntelliJ IDEA and so on.
We select runner type as Command Line. Step name could be compile. Custom script could be javac HelloWorld.java.

Tip: An interesting thing is that we can even create a docker image for our projects using TeamCity. TeamCity provides support for Docker. Details here. Explore yourself if you are interested in it 😝!
Save the step and switch to General Settings. Set the artifact path as ./ to output the class file to current directory. Let's save the setting.

Step 3️⃣: Run TeamCity Agent in Docker container
After configuring the project and the build step, we need to create a TeamCity Agent. TeamCity Agent is to listen to the commands from server and starts the actual build processes. Multiple agents can make parallel build steps possible.
Run this command to pull TeamCity Minimal Agent Image:
docker pull jetbrains/teamcity-minimal-agent
Tip: This image only provides minimal TeamCity Agent services. It is enough for this small example. Normally, you can use
jetbrains/teamcity-agenton your own machine.
Then, we can start a Docker container with TeamCity Agent which tries to connect with the TeamCity Server.
docker run -it -d -e SERVER_URL="http://server:8111" --link server -u root -v /teamcity/agent:/teamcity_agent/conf jetbrains/teamcity-minimal-agent
In this command:
-
-e SERVER_URL="http://server:8111": Set the environment variableSERVER_URL. -
--link server: Add link to the container whose name isserver. -
-v /teamcity/agent:/teamcity_agent/conf: Specify the path of the agent config folder. -
jetbrains/teamcity-minimal-agent: This is the name of the image.
Step 4️⃣: Build the project in TeamCity
Back to the web page of TeamCity. Click on the Agents on the top.

It might need a few minutes for the agent to show up. There should be one agent in the unauthorized category.
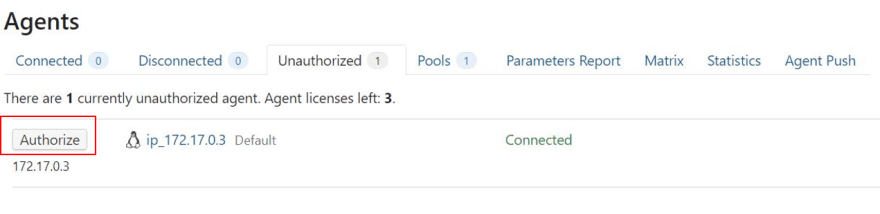
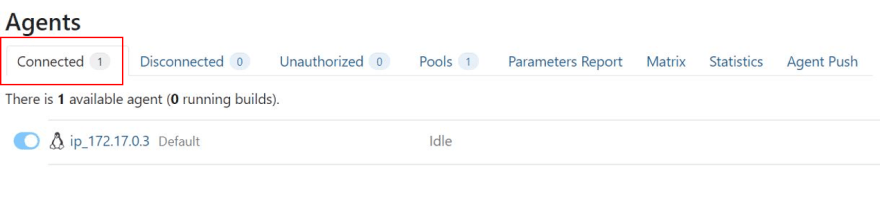
Authorize this agent. Then, there should be one connected agent with status idle.
Go to the projects page, we can find a Run|... button in the HelloWorld project.

Click on the ... in Run|..., and select the agent which we just created. Click on Run build.

Then, we can see the project starts to build the steps that we just created.
Step 5️⃣: Check output
TeamCity needs a few seconds to complete the task. When the task is done, Under the Run|... button, there is an Artifacts link. When we place the mouse on it, we can see the list of artifacts. There should be a file HelloWorld.class, which means our program has been complied. 😎

Conclusion
In this tutoiral, we use docker to create TeamCity Server and TeamCity Agent, and compile a java program in TeamCity.
Learn more about how to use TeamCity here.
Explore yourself with different possibilities and interesting news here. 💥
Thanks for reading! ❤️


Top comments (0)