I would like to share how to set up a fancy and productive terminal prompt under Windows PowerShell. Many people who have ever used Linux or Mac, will notice some great command, whereas the window command is not useful. Today I would like to show a tutorial on how to set up oh-my-posh environment.
If you ever use Linux/mac probably have heard of oh-my-zsh, it also makes our prompt to be more fancy. In oh-my-zsh it only supports zsh shell, but oh-my-posh supports many shells, but most people use it under the window. Both of these frameworks are used not just to fancy our terminal but also to let us be more productive when using cli command. Cli command means you can use the command to achieve many stuff without using the UI interface, which includes copy, filter, delete, rename, and many more.
1. Install Window Terminal and PowerShell
Before setting up oh-my-posh you need to install the window terminal and Powershell first. The default window provides you powershell which it's version 5.x version. You will need to install Powershell 7.x version which is typically named PowerShell core.
Powershell core supports many more functions in plugins, if not used it might occur error when installing and importing plugins. Window Terminal allows our prompt to display properly with the nerd font or fancy logo.
Window Terminal
There are two methods:
- Store: access Microsoft and type Window Terminal
- Winget: ```
winget install Microsoft.WindowsTerminal
There are two methods:
## Powershell
- Store: access Microsoft and type Power Shell
- Winget:
winget install Microsoft.Powershell
# Window package installation
## Winget
In case your `winget ` is not able to use it, please download and install it under this link:

Step 1: Download under this link
Please use either link ok:
https://learn.microsoft.com/en-us/windows/package-manager/winget/
https://github.com/microsoft/winget-cli/releases
The file will look like `Microsoft.DesktopAppInstaller_8wekyb3d8bbwe.msixbundle
`

Step2: Install by command
Add -AppPackage
If you ever meet `Fail-Error Execution Policies`, probably it might be the policy problem, please change it to remote
> check the current policy:  `Get-ExecutionPolicy -List`
    Scope ExecutionPolicy
    ----- ---------------
MachinePolicy Undefined
UserPolicy Undefined
Process Undefined
CurrentUser Undefined
LocalMachine RemoteSigned
> set policy: `Set-ExecutionPolicy RemoteSigned`
For more detail on each policy, please refer [here](https://learn.microsoft.com/en-us/powershell/module/microsoft.powershell.security/set-executionpolicy?view=powershell-7.4)
- Restricted (Default): No scripts are allowed to run, not even ones you write yourself.
- RemoteSigned: This allows scripts signed by a trusted source (like Microsoft) to run. It's like having a guard who checks IDs – only scripts with valid "signatures" (like an artist's signature) are allowed. Scripts you write yourself wouldn't work unless you sign them with a special certificate. Files that are downloaded from the internet must be signed by a trusted publisher or must be unblocked
- AllSigned: This allows any script with a valid signature to run, regardless of who signed it. It's less secure than RemoteSigned because it trusts any "signature," even from unknown sources. Imagine a guard who just checks for a valid ID but doesn't care who issued it. Scripts must be signed by a trusted publisher, like Microsoft or a well-known software vendor. Think of it like a document requiring a verified signature from a recognized authority.
- Bypass (Not Recommended): This completely disables script execution restrictions. It's like having no security guard at all! Any script can run, which is very risky and not recommended unless you fully understand the potential dangers.
# 2. Oh-My-Posh setup
## Step1: install Nerd Font
Please download either of the link below to download and install nerd font:
- Download:
> - https://github.com/ryanoasis/nerd-fonts
> - https://www.nerdfonts.com/font-downloads
- Install:
Extract the file and right-click to install or drag into `C:\Windows\Fonts`
## Step2: Window terminal setting
Navigate window terminal and set below setting:
- Startup: Default set PowerShell, Deafualt terminal: window terminal.
Setting like below picture:

- Appearance
Access to powershell>appearance> change `fontface` to `nerd font`
## Step3: install oh-my-posh
- Install Oh-my-posh
winget install JanDeDobbeleer.OhMyPosh -s winget
- update the latest version
winget upgrade JanDeDobbeleer.OhMyPosh -s winget
 After installing it press `Oh-my-posh` on the terminal to check command works or not.

## Step4: activate theme
activate default theme
oh-my-posh init pwsh | invoke-expression
list all the theme look like:
Get-PoshThemes
or display all theme location and filename
Get-PoshThemes –List
Change theme according to above theme filename
oh-my-posh init pwsh --config "$env:POSH_THEMES_PATH\iterm2.omp.json" | Invoke-Expression
## Step5: prompt setting writing profile

We need to create profile to write the theme in it. in Step4 it will only take effect on that session temporary, when reopening new session the command you enter like theme will be lost remain default.

profile location of different poweshell:
> - **PS5.1**: `C:\Users\test\Documents\WindowsPowerShell`
> - **PS7.1**: `C:\Users\test\Documents\PowerShell`


generate a file: will only generate an empty file
New-Item -Path $PROFILE -Type File –Force
You need to modify the file using `notepad $profile`, you can change Notepad to any you prefer text editor. The `$profile` will automatically open the file it generates, which no need to type the full path of the profile location.


Add your previous command on changing the theme to your profile
oh-my-posh init pwsh --config "$env:POSH_THEMES_PATH\iterm2.omp.json" | Invoke-Expression
You can also assign the full path of the theme below i mention many examples of assigned themes:
full path
$themepath = 'C:\Users\test\Documents\PowerShell\shanselman_v3-v2.json'
oh-my-posh --init --shell pwsh --config $themepath | Invoke-Expression
URL
oh-my-posh init pwsh --config 'https://raw.githubusercontent.com/JanDeDobbeleer/oh-my-posh/main/themes/jandedobbeleer.omp.json' | Invoke-Expression
same location as $profile
$omp_config = Join-Path $PSScriptRoot ".\theme.json"
oh-my-posh --init --shell pwsh --config $omp_config | Invoke-Expression
You might wonder how the `$env` knows the full path of the default theme, it's because it's an environment variable in powershell, you can use this command to check the env variable and path.
ChildItem env:
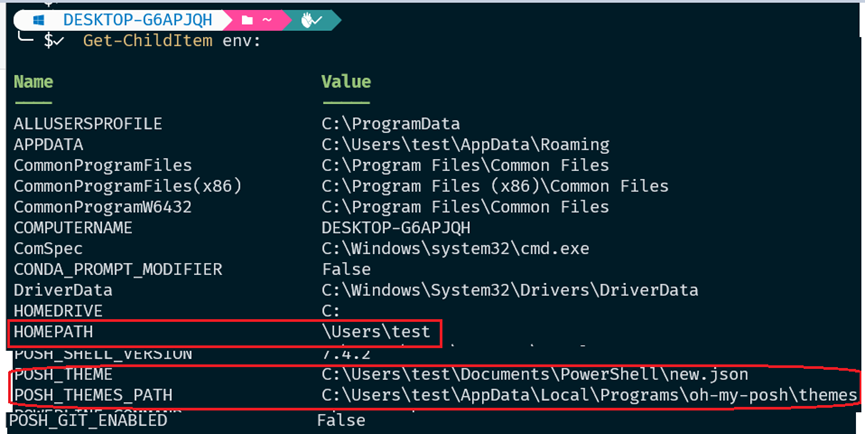
Note: You can set and remove an $env variable using the below command. But this will only take effect if you write into `$profile`, or in the command(temporary). If you set the env but not add into $profile will not take effect.
set $env
Set-Item -Path env:MYCUSTOMVAR –Value
remove
$env: = $null
## Step6 add some function or alias to profile
Now we can assign some Linux commands to alias, which you can use Linux commands on PowerShell. You will be using a lot of the $profile in the plugin, just think it's a configuration of PowerShell.

Before setting the alias or functions, let's install git and node, it's optional but if you want to add git to the alias, it is highly recommended you install it here.

- Install git
winget install --id Git.Git -e --source winget
- Install nodejs
WINGET INSTALL OPENJS.NODEJS.ltS
### Alias
Set-alias tt tree
Set -Alias ll ls
Set-Alias g git
Set alias vim nvim
Set-Alias grep findstr
Set-Alias tig 'C:\Program Files\Git\usr\bin\tig.exe'
Set-Alias less 'C:\Program Files\Git\usr\bin\less.exe'
Ultilities (Optional)
function which ($command) {
Get-Command -Name $command -ErrorAction SilentlyContinue |
Select-Object -ExpandProperty Path -ErrorAction SilentlyContinue
}
### Function
adding function can be alternative of alias
function getenv{
Get-ChildItem env:
}
function head {
param($Path, $n = 10)
Get-Content $Path -Head $n
}
function tail {
param($Path, $n = 10)
Get-Content $Path -Tail $n
}
function grep($regex, $dir) {
if ( $dir ) {
Get-ChildItem $dir | select-string $regex
return
}
$input | select-string $regex
}
function df {
get-volume
}
get $env variable
function getenv {ChildItem env:}
Git Shortcuts
function gs { git status }
function ga { git add . }
function gc { param($m) git commit -m "$m" }
function gp { git push }
function g { z Github }
function gcom {
git add .
git commit -m "$args"
}
function lazyg {
git add .
git commit -m "$args"
git push
}
adding hosts shortcut
function hosts { notepad c:\windows\system32\drivers\etc\hosts }
If you are interested in the profile, please refer to my profile on this [link](https://github.com/chenchih/Env_Setup_Note/blob/master/Terminal/ohmyposh/Microsoft.PowerShell_profile.ps1).


# 3. Plugin
There are many more plugins, but I will choose only those I think are commonly used by people or developers.

## Terminal Icons
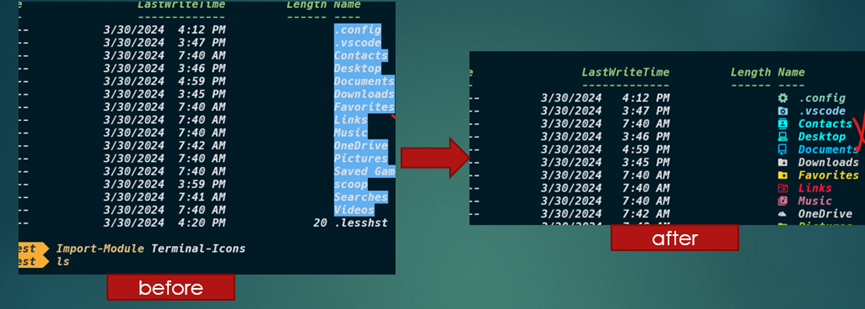
Display icon according to file type
> install module
Install-Module -Name Terminal-Icons -Repository PSGallery -Force
> import module
Import-Module Terminal-Icons
What will it look like, please refer below picture.
## psreadline(Autocompletion)
This is a powerful module, which has many functions on it. I will not use all of them, I will only pick important ones or useful ones. If you’re interested you can study on the [official site](https://learn.microsoft.com/en-us/powershell/module/psreadline/?view=powershell-7.4). PSReadline basely is developed by Microsoft and used under PowerShell.
You can use this command to get the default hotkey: `Get-PSReadLineKeyHandler`
> install module
Install-Module PSREadLine -Force
or below more detail which recommends
Install-Module -Name PSReadLine -AllowPrerelease -Scope CurrentUser -Force -SkipPublisherCheck
> Import module
method1
Import-Module PSReadLine
method2
if ($host.Name -eq 'ConsoleHost')
{
Import-Module PSReadLine
}
- all psreadline plugin
Set-PSReadLineOption -EditMode Windows
Set-PSReadLineOption -PredictionSource History
Set-PSReadLineOption -PredictionViewStyle ListView
Set-PSReadLineKeyHandler -key Tab -Function Complete
Set-PSReadLineKeyHandler -Key Tab -Function MenuComplete
Set-PSReadlineKeyHandler -Chord ctrl+x -Function ViExit
Set-PSReadLineKeyHandler -Chord 'Ctrl+d' -Function DeleteChar
Set-PSReadlineKeyHandler -Chord ctrl+w -Function BackwardDeleteWord
Set-PSReadlineKeyHandler -Chord ctrl+e -Function EndOfLine
Set-PSReadlineKeyHandler -Chord ctrl+a -Function BeginningOfLine
Set-PSReadLineKeyHandler -Key Alt+B -Function SelectShellBackwardWord
Set-PSReadLineKeyHandler -Key Alt+F -Function SelectShellForwardWord
CaptureScreen is good for blog posts or emails showing a transaction
of what you did when asking for help or demonstrating a technique.
ctrl+c and ctrl+d to copy terminal
ctrl+v to paste
Set-PSReadLineKeyHandler -Chord 'Ctrl+d,Ctrl+c' -Function CaptureScreen
if you feel like the color is too light can't read it might be the color, so you can add the color like below:
Set-PSReadLineOption -Colors @{
Command = 'Yellow'
Parameter = 'Green'
String = 'DarkCyan'
}
## Zoxide(directory jumper)
This lets you navigate the file system based on your cd command history, which just renumber your last command’s directory.

> `Install-Module -Name Z –Force`

So imagine every time go to a specific location like `cd C:\Users\User\Downloads`
But if we visit the directory once, it will remember it, so next time you can just type `z` with the directory or file name, like z Download, it will access to cd `C:\Users\User\Downloads`. It will recognize the path already.

## PSFzf(Fuzzy finder)
This is a tool like an interactive search bar on your terminal command line that allows regex matching, and filtering files, or directories.

> iNSTALL SCOOP (if you have scoop installed skip this part)
irm get.scoop.sh | iex
> Install fzf an pszf
scoop install fzf #install fzf
Install-Module -Name PSFzf -Scope CurrentUser -Force #powershell

> Import module into the profile
Import-Module PSFzf
Override PSReadLine's history search
Set-PsFzfOption -PSReadlineChordProvider 'Ctrl+f' -PSReadlineChordReverseHistory 'Ctrl+r'
> Below is how to use fzf to search your file or history command:
- `Ctrl+r(Fzf Reverse Fuzzy Search)`:to fuzzily search your command searches your history, **similar to the history command**, and run select or use it
- `Alt+c (Fzf Set Location)`: fuzzily search for a directory in your home directory and allow to cd to the directory. Basely this is **quickly selected to subdirectory**.
- `CTRL-f (Fzf Provider Select)`: to fuzzily **search for a file or directory in your home directory** and select it will get the path of it
> **Note**: In psreadline if you use the `Set-PSReadLineOption -EditMode Emacs` then probably `alt+c` you will not be able to use, due to the hotkey is been conflict, which psreadline will take higher priority. in the below picture you can see `alt+c` is a conflict, so if you use alt+c it will be a capitalized word in this case.

If I try to change the conflict function capitalize word using this `Set-PSReadLineKeyHandler -Chord 'Alt+Shift+C' -Function CapitalizeWord` it still won't change, probably it's been hotcode.
So there are two solutions to fix it:
- Method1: don't use `emac`, change to `window` or `vi` mode
- method2: use the alternative command as a function to use it
function FzfNav { Get-ChildItem . -Recurse -Attributes Directory | Invoke-Fzf | Set-Location }
### layout fzf
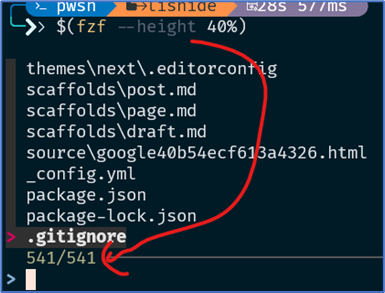
Layout allows you to adjust the percentage of the navigator bar, and adjust the total result position, like below. You can add it to the function when next time you want to use just call a function instead of typing a complicated command.
$(fzf --height 40% --reverse)
### preview files in fzf
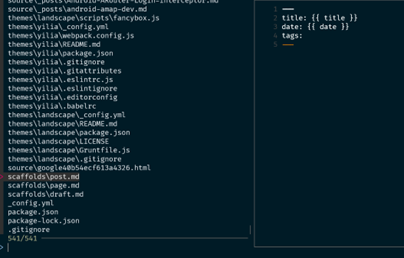
This allows you to preview or read the file without opening the file to see whether this is the file you want. You can also add text editor in front when you enter the file allowing you to modify it.
> install
scoop install bat
> preview file
fzf --preview='cat {}'
> Preview and enter the file to modify on a specific text editor
function ff{
vim $(fzf --preview 'bat --style=numbers --color=always --line-range :500 {}')
}
### search syntax
You can use this related syntax to search your file
- `'wild`: include wild
- `!^music`: do not start with music
- `!.mp3$`: do not end with .mp3
- `!test`: do not include test
- `^music`: start with music
`.mp3$` : end with .mp3
## FastFetch
Fastfetch is an alternative to neofetch tool that will show your system information. You can find more information on think [fastfetch link](https://github.com/fastfetch-cli/fastfetch). This [awesome-fetch](https://github.com/beucismis/awesome-fetch) provides many alternative related tools.
generate config:
fastfetch --gen-config
location window: C:\Users\test.config\fastfetch\config.jsonc
load customer cfg:
fastfetch --load-config /path/to/config_file
fastfetch --load-config .\aa.jsonc
SHOW ONLY HARDWARE:
fastfetch -c hardware
PRINT LOGOS:
fastfetch --print-logos
USE LOGO:
fastfetch --logo sparky
print all logo:
fastfetch --print-logos
USE CERTAIN COLOR :
fastfetch --color blue
YOu can find many more preset examples [here ](https://github.com/fastfetch-cli/fastfetch/tree/dev/presets/examples)to see more settings.

# window terminal some setting

## 1. Automatic copy string when select it
> - Method1: adding into the window terminal
Open terminal setting shortcut: `ctrl+shift+p`, or `ctrl+shift+,` to open `settings.json file`
Select will copy: `copyonselect=true`

> - Method2: add into profile
You can also automatically add to the profile:
function cpy { Set-Clipboard $args[0] }
function pst { Get-Clipboard }
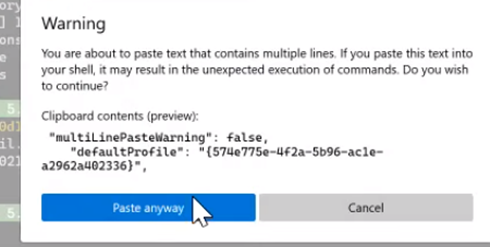
## 2. Paste multiply line pop warming
If you copy multiple lines and paste them into the window terminal will pop warming, to disable the warming we can set `Multipastingwarming=false`
This is what I mean about copy and pasting multiple line warming:
## 3. Clear-Hidden showing the terminal logo
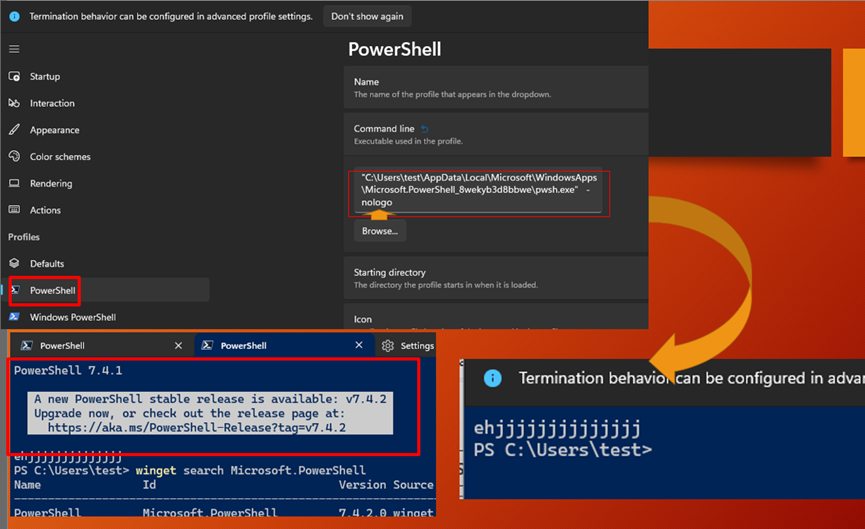
Powershell core release new version 7.4.2 will pop, you can hide this message or logo, just add `-nologo` into the window terminal like below
# conclusion
In this post I just wish to keep it simple on how to set up oh-my-posh, however, there are many more to cover. I have another post of [Medium ](https://medium.com/jacklee26/setup-fancy-terminal-using-ohmyposh-9f0ce00948bf)which cover a lot of detail. I wish to make it short in this post, there are many of the psreadline I didn't make more detail on each function.


Top comments (2)
For alias and path management, without worrying about the underlying syntax, have a look at aliae.dev ;-)
ok thanks