
Recently I have been working with .Net Core web applications which used Entity Framework with SQL Server Database. I wanted to figure out how to use EF Core 3 with a portable database like SQLite. This is how I got the idea for my latest pet project, a simple .Net Core Web API that uses EF Core 3 to store and retrieve data from a SQLite Db.
With this blog post I aim to demonstrate how easy it is to create this project with Visual Studio 2019.
You can find my source code here at my GitHub.
Things required for this project :
-
Visual Studio 2019
- Community edition available here.
-
Postman
- Download available here.
-
Microsoft Docs
- There’s no better reference than the official documentation!
Creating New Project
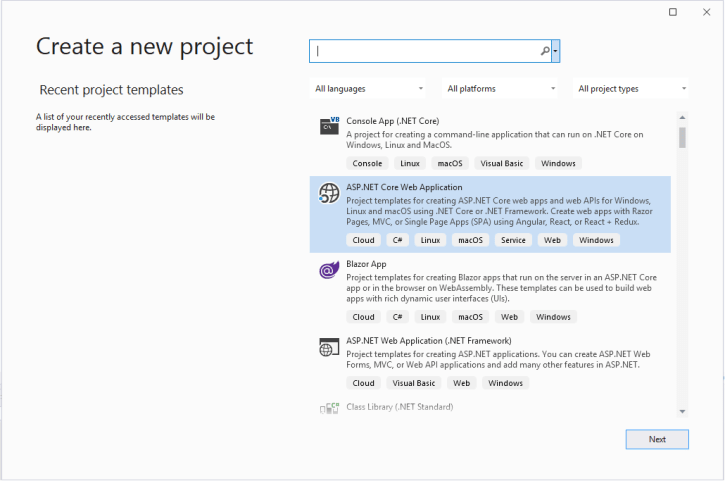
On Visual Studio, choose to create a new project and in the templates section select ASP.NET Core Web Application and click Next.
In the next screen, give a name to your Project and click Create.
In the final screen, choose API template and make sure ASP.NET Core 3.1 is selected in the drop-down menu.
Once you click Create you should see your project in the Solution Explorer.
Get rid of the sample WeatherForecast Controller and class as we will be creating our own.
Add three new folders called Contexts, Controllers and Entities to your project.
Once done, your project structure should look like this.

Adding EF Core and related packages
Now we will be adding EF Core NuGet package for SQLite using the Package Manager Console using the below command. This will also add the dependency EntityFramework Core package.
Tools > NuGet Package Manager > Package Manager Console
Install-Package Microsoft.EntityFrameworkCore.Sqlite
Once installation is complete you should see Microsoft.EntityFrameworkCore.Sqlite & Microsoft.EntityFrameworkCore in your Project at Dependencies -> Packages .
Now we are all set to start creating our entities and the DbContext.
Creating the Model
EF Core can read and write entity instances from/to the database, and if you’re using a relational database, EF Core can create tables for your entities via migrations.
By convention, each entity type will be set up to map to a database table with the same name as the DbSet property that exposes the entity.
For our example, let’s create an Entity called Athlete that’ll be used to store an Athlete’s information.
Add a new class file called Athlete.cs in the Entities folder in our project. The class will have 3 properties Name, Age and Sport along with an identifier called Id.
using System.ComponentModel.DataAnnotations;

namespace SQLiteDemoWebApi.Entities
{
    public class Athlete
    {
        [Key]
        public int id { get; set; }

        [Required]
        [MaxLength(100)]
        public string Name { get; set; }

        public int Age { get; set; }

        [Required]
        [MaxLength(100)]
        public string Sport { get; set; }
    }
}
Now let’s create a DbContext which will be used by EF Core to gather details about the application’s entity types that are exposed in DbSet properties in the context and how they map to a database schema.
Add a new class file called AthleteSQLiteDbContext.cs in the Contexts folder in our project which will expose the Athlete entity as Athletes DbSet.
using Microsoft.EntityFrameworkCore;
using SQLiteDemoWebApi.Entities;

namespace SQLiteDemoWebApi.Contexts
{
    public class AthleteSQLiteDbContext : DbContext
    {
        public DbSet<Athlete> Athletes { get; set; }

        public AthleteSQLiteDbContext(DbContextOptions<AthleteSQLiteDbContext> options) : base(options)
        { }
        protected override void OnModelCreating(ModelBuilder modelBuider)
        {
            base.OnModelCreating(modelBuider);
        }
    }
}
Adding Migrations and Updating the Database
Add-Migration command scaffolds a migration to create the initial set of tables for the model i.e. the details we have mentioned in the DbContext and the corresponding Entities.
Update-Database command creates the database and applies the new migration to it.
To execute these commands we need to install the PMC tools for EF Core. This can be done by executing the below command on the Package Manager Console.
Install-Package Microsoft.EntityFrameworkCore.Tools
Once the package is installed you should see Microsoft.EntityFrameworkCore.Tools added to your Dependencies.
Before we start creating migrations, we need to add a connection string for our SQLite database. We’ll be adding this connection string to the appsettings.json file. For the sake of this project, we’ll be creating our SQLite database at the root directory.
{
  "Logging": {...},
  "ConnectionStrings": {
    "SQLite": "Data Source=Athlete.db"
  },
  "AllowedHosts": "*"
}
We also need to make sure that AthleteSQLiteDbContext is added to the container at startup. This can be done by adding it to the services collection in the ConfigureServices() method in Startup.cs.
The UseSqlite method requires the connection string which we fetch from appsettings.json using the Configuration class.
The ConfigureServices method should look like this:
public void ConfigureServices(IServiceCollection services)
{
    services.AddControllers();
    services.AddDbContext<AthleteSQLiteDbContext>(o =>
                o.UseSqlite(Configuration.GetConnectionString("SQLite")));
}
We can now add our initial migration to the database with the Add-Migration command.
Add-Migration InitialMigration
This will create a Migrations folder in your project.
Three files are added to your project under the Migrations directory:
- XXXXXXXXXXXXXX_InitialMigration.cs–The main migrations file. Contains the operations necessary to apply the migration (in Up) and to revert it (in Down).
- XXXXXXXXXXXXXX_InitialMigration.Designer.cs–The migrations metadata file. Contains information used by EF.
- AthleteSQLiteDbContextModelSnapshot.cs–A snapshot of your current model. Used to determine what changed when adding the next migration.
The timestamp in the filename helps keep them ordered chronologically so you can see the progression of changes.
Update-Database command can be used to apply migrations to a database. While productive for local development and testing of migrations, this approach isn’t ideal for managing production databases. For our example, we’ll be using this command.
Update-Database
You should see a newly created Athlete.db file in your Project directory after the update-database command is executed successfully.
Creating a Controller for the API
Now that we have the database and it’s connectivity setup, all that’s remaining is to create a controller that’ll use EF Core to fetch and update data from the SQLite database.
As part of this blog post, I do not want to get into the details of creating an API Controller.
So we will be using the Visual Studio scaffolding magic to get a controller created for us that uses the AthleteSQLiteDbContext to GET, PUT, POST, DELETE Athlete data.
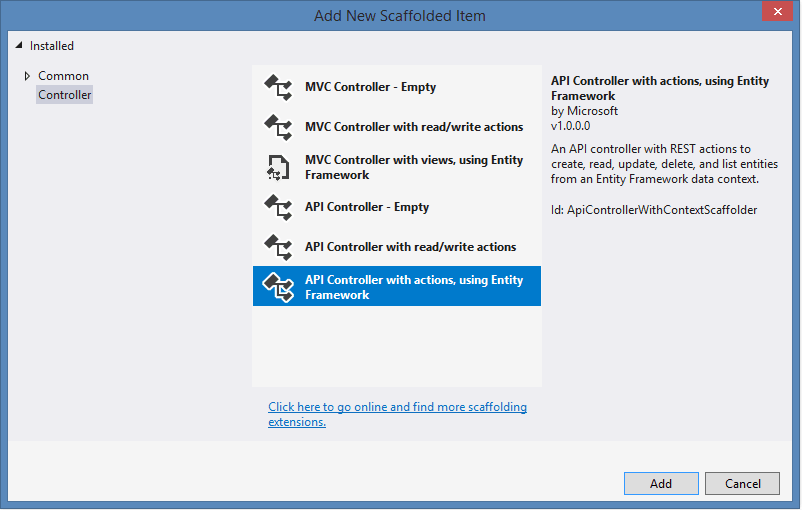
To do this, Right-Click on the Controllers directory in your project -> Add -> Controller.
Select API Controller with Actions using EntityFramework and click OK.
Select the Model: Athlete and DbContext: AthleteSQLiteDbContext from the drop-down and click Add.

You should now see a AthletesController.cs file in your Controllers directory. There’s no changes needed to be made in this controller class except, make sure he Controller’s Route is set to "api/Athletes" .
Test the API
To test the API we’ll use Postman so that we can send requests to the API endpoints.
We’ll use the App URL that is mentioned in the Debug section which can be found by Right-click on Project -> Properties -> Debug.
Once your project is running, in Postman we’ll first create a new POST request to the below endpoint so that we can create an Athlete record in the database.
https://localhost:43325/api/Athletes (Note that the port number may differ for you)

Once you get a 201 Created Response, we can be sure that the Athlete data is inserted into the database.
This can also be confirmed by creating a new GET request for the same endpoint URL.
You should receive a response similar to this :
[
    {
        "id": 2,
        "name": "John Doe",
        "age": 35,
        "sport": "Swimming"
    }
]
We have now successfully configured EF Core in our Web API to connect to an SQLite database. I hope you find this helpful and got to learn something new.
As stated earlier, you can find the finished project here at my GitHub page.

Top comments (0)