
Firebase is Google's backend as a service (BaaS) for serverless work, simplifying the development and deployment of web and mobile applications. It helps front-end developers to create fully-featured applications without the need to manage servers or infrastructure.
Check out this presentation on serverless if you aren't familiar with what it is and what services fall under its umbrella.
Firebase offers various tools, including a web console, command-line interface, and numerous software development kits (SDKs) for different frameworks such as JavaScript, React, Angular, and Vue. Key features of Firebase include serverless databases (a Realtime Database and Firestore), built-in authentication, file storage, hosting, and serverless Cloud Functions. Additionally, Firebase provides tools to improve app quality, monitor performance, analyze crashes, and grow your business, including monetization options. Basically, Firebase is an all-in-one platform for building and launching applications.
This article is based upon a presentation from Michael Dowden, a Google Developer Expert in Firebase, based on his more than six years experience with the platform.
Getting Started
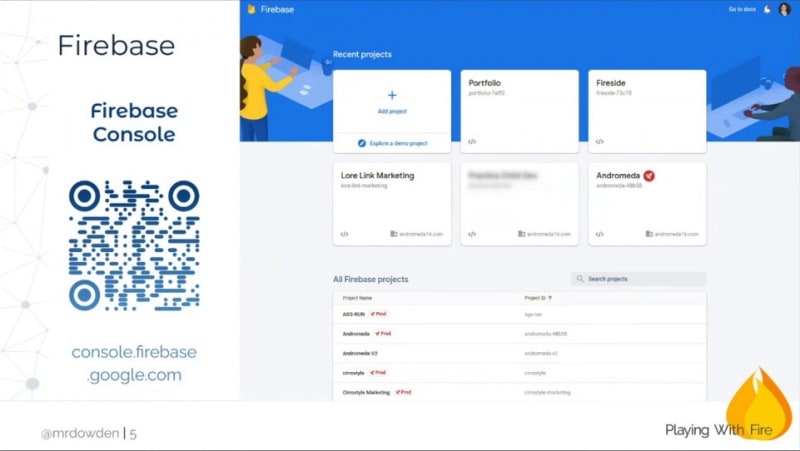
When you log into the Firebase console, you'll find a list of your projects. To create a new account and project, head to console.firebase.google.com. Once you have a project, you'll need to access your app configuration for essential information like your API key. Although it's not considered sensitive data, it's still better to keep it somewhat private.
Keep in mind that these IDs are not part of Firebase's security model, so you don't need to worry too much about them. The security model won't be discussed in depth here, but it's important to understand that you can safely commit these IDs to your repo and share them with others.
To enable a service, simply toggle it in the Firebase console. You can also access your project overview, project settings, and Firestore database. For instance, for our sample app, we can view chats and a list of users in our database.
Creating a Simple Chat Application with Firebase and Firestore
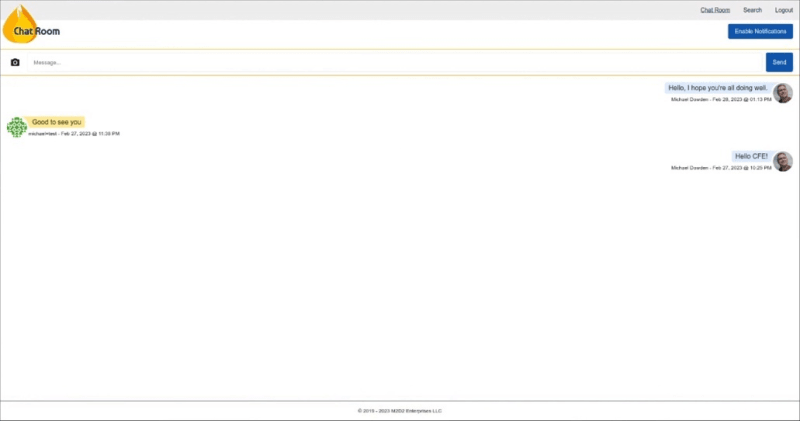
In order to dig into Firebase, we'll be exploring a simple chat application, allowing users to log in/out, send messages, upload files, and even run searches based on email addresses to display messages from specific users. This simple chat application serves as a framework to teach the principles and fundamentals of what you can do with Firebase.

Firebase offers two types of databases: the real-time database and Firestore. The real-time database is the original Firebase database, supporting multiple concurrent users and using pure JSON data structures. Firestore, on the other hand, is a true document database with documents and collections. It can support over a million concurrent users and has better security rules than the real-time database. Although working with pure JSON can be convenient for APIs and integrations, Firestore provides more value with improved querying and other features.
The pricing models for these databases differ, which can impact the choice between them. For our project, we'll use Firestore, as it is more popular and the default choice for most use cases.
Our Firestore database structure will consist of a collection of chats, each having a document ID and properties such as content text, display name, and timestamp. This allows sorting messages in chronological order. We'll also have a collection of users, with each user having their UID, display name, and a URL to their avatar for display in the app. To secure the database, we'll need to set up appropriate security rules.
Implementing Firestore Database Rules and Functionality for a Chat Application
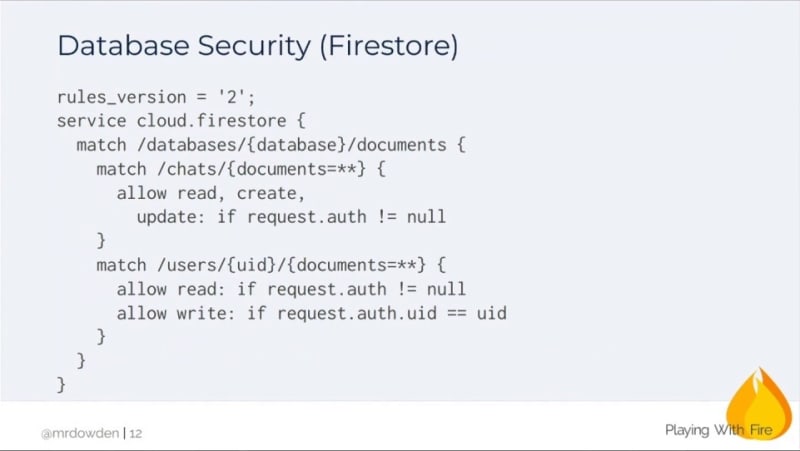
Let's discuss Firestore database rules for a chat application. First, the base match pattern is set for all Firestore databases using the first three lines of code. Next, we create rules for the data model. For the chats collection, we require users to be authenticated for reading and creating documents (allow red, create), but editing and deleting are not allowed to prevent users from changing their posts.
For the users collection, we add a variable UID to represent the user's unique ID. Although currently, there are no nested documents, the important part is the UID rule. This rule allows authenticated users to read any user record but limits writing only to their own user record.
allow read: if request.auth != null
allow write: if request.auth.uid == uid
This is because the user information, such as avatars and display names, is used in the chat.
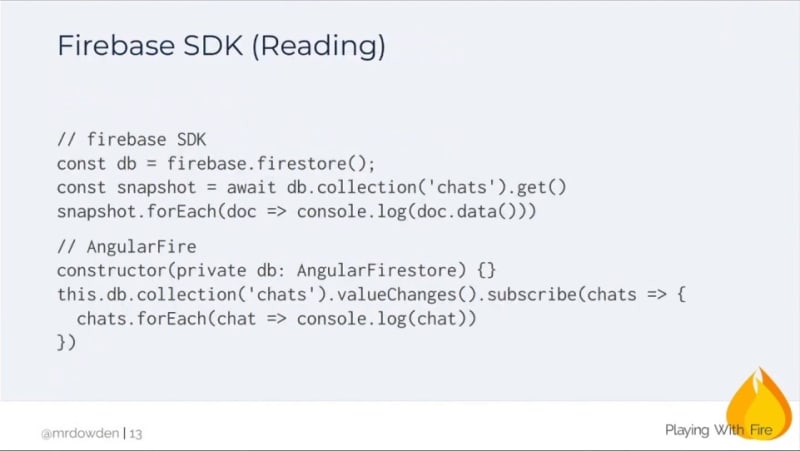
To read from the database using the Firebase SDK, you would obtain the Firestore object from the global Firebase object and perform a get operation to retrieve all documents in a collection. You can then print each document from the snapshot.
const db = firebase.firestore();
const snapshot = await db.collection('chats').get();
snapshot.forEach(doc => console.log(doc.data()));
This demo uses AngularFire, since this is an Angular-based demo, but you can accomplish similar tasks in other frameworks. By subscribing to changes on the collection, you can watch in real time as new data arrives and print it without requiring any special update checks. This subscription keeps you connected to the database, allowing you to receive updates as long as the code runs.
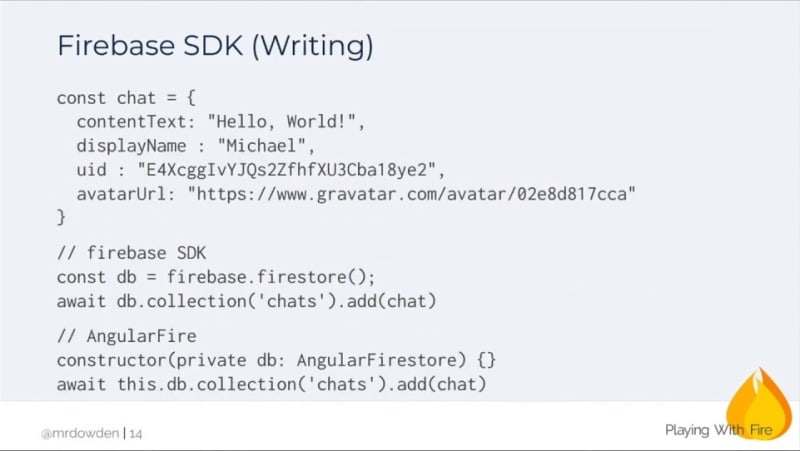
To create a chat object based on our data model, we utilize the SDK or AngularFire. With either method, adding the object to a collection is simple.
const chat = {
  contentText: "Hello, World!",
  displayName: "Michael",
  uid: "E4XcggIvYJQs2ZfhfXU3Cba18ye2",
  avatarUrl: "https://gravatar.com/avatar/02e8d17cca"
}

const db = firebase.firestore();
await db.collection('chats').add(chat);
Implementing Chat Image Functionality
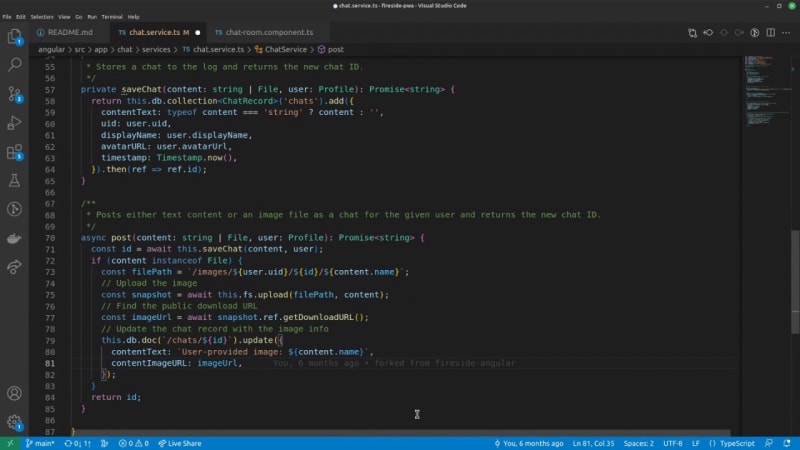
The process begins by accepting text or a file for upload. After saving the chat, the ID reference of the created object is stored for later use. If a file is uploaded, the AngularFire storage object from the SDK is used to handle the file upload. Once the file is uploaded, the URL for displaying the image is obtained.
Next, the chat document needs to be updated with the ID reference. This involves adding content text, such as "user provided image," the file name of the image, and the URL for displaying the image.
async post(content: string | File, user: Profile): Promise<string> {
  const id = await this.saveChat(content, user);
    if (content instanceOf File) {
    const filePath = `/images/${user.uid}/${id}/${content.name}`'
        const snapshot = await this.fs.upload(filePath, content);
    const imageUrl = await snapshot.ref.getDownloadURL();
    this.db.doc(`/chats/${id}`).update({
      contentText: `User provided image: ${content.name}`,
      contentImageURL: imageUrl,
    })
    }
    return id;
}
Implement Authentication
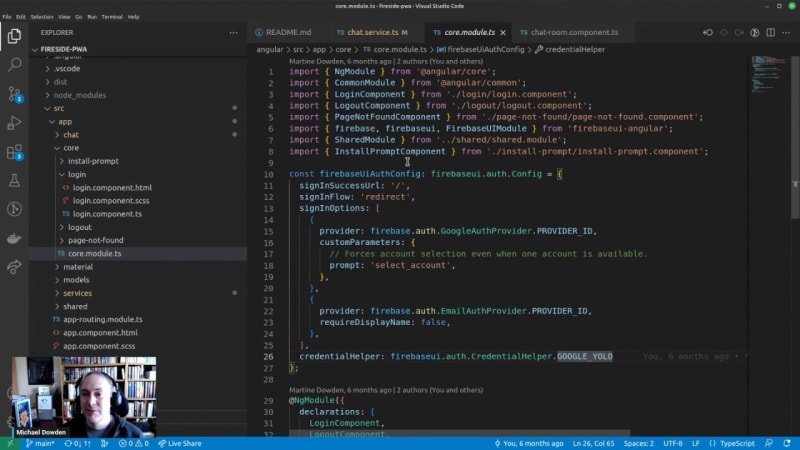
The FirebaseUI library offers a simple way to implement authentication in JavaScript applications. You can easily configure it to support various authentication methods, such as Google, email/password, and Facebook, and it will display the appropriate buttons and manage the necessary processes. To adapt FirebaseUI for Angular, an Angular wrapper is available, which requires minimal configuration. In this case, auto-sign-on is disabled, and users must sign in manually. The module configuration specifies the use of Google Auth and email auth provider. Additionally, users are prompted to select their Google account each time to accommodate those with multiple accounts. The credential helper feature assists users in remembering their previous login methods and managing credential information. To integrate authentication into an application, simply add the configuration, import the necessary components, and the process is complete.
const firebaseUiAuthConfig: firebaseui.auth.Config = {
  signInSuccessfulUrl: '/',
  signInFlow: 'redirect',
  signInOptions: [
    {
      provider: firebase.auth.GoogleAuthProvider.PROVIDER_ID,
      customParameters: {
        prompt: 'select_account',
      },
    },
    {
      provider: firebase.auth.EmailAuthProvider.PROVIDER_ID,
      requireDisplayName: false,
    },
  ],
  credentialHelper: firebaseui.auth.CredentialHelper.GOOGLE_YOLO
}
Creating a PWA
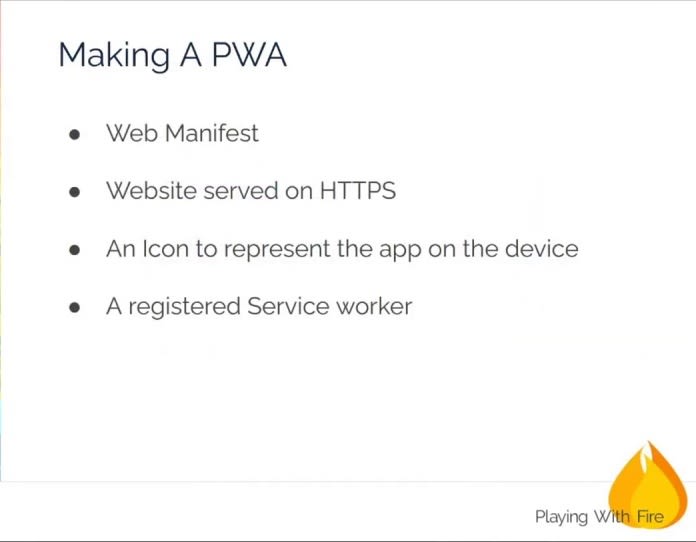
Progressive Web Applications (PWAs) require three main components: capability, reliability, and installability. To create a PWA, you need a web manifest for app details, HTTPS for security, an icon to represent the app on devices, and a registered service worker, which is mandatory.
If you're unfamiliar with PWA, check out this presentation by Lee Warrick on Demystifying PWAs
In Angular, creating a PWA is straightforward by adding the Angular PWA package, which handles configuration, service worker addition, and manifest building.
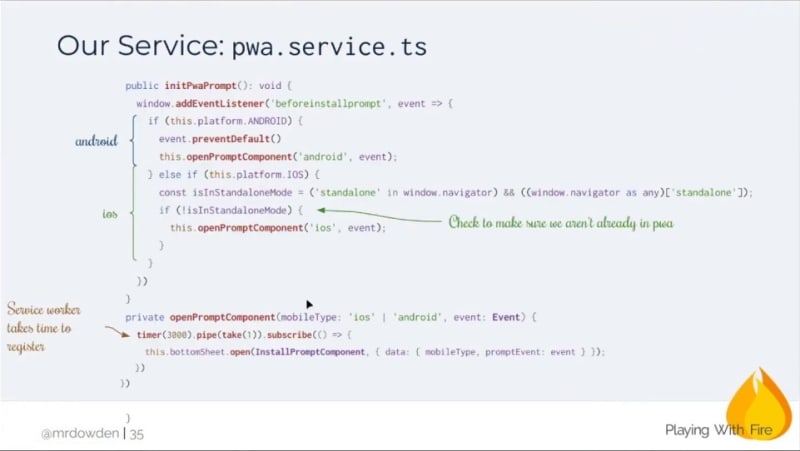
To ensure your app icons display correctly on various devices, use a tool like maskable.app to generate safe icons. This tool provides full bleed icons that adapt to different cropping shapes, such as circles or squares. To manage and test your Progressive Web App (PWA), utilize Chrome DevTools for handling service workers and Lighthouse for checking the PWA's status and potential issues. For Apple device compatibility, include the Apple Touch icon without a transparent background. Although not mandatory, prompting users to install your PWA can enhance their experience. To do this, subscribe to the relevant event and use the appropriate platform module for your framework. Note that Android and iOS require slightly different approaches, with Android needing event bubbling prevention and an "Add to Home Screen" prompt.
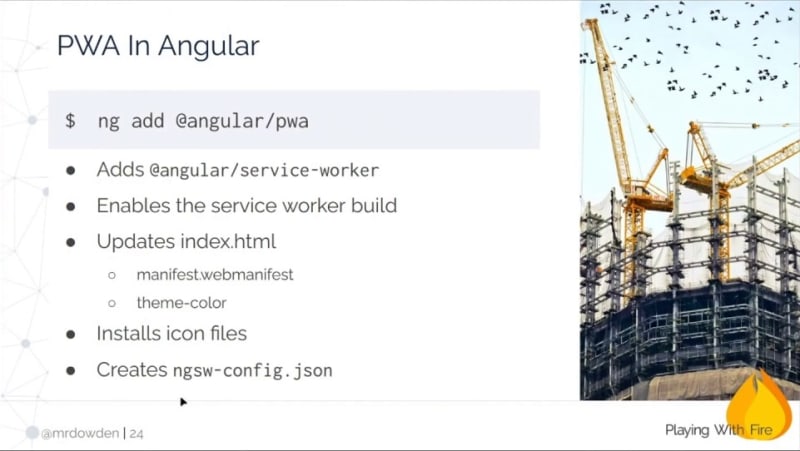
In iOS, it's crucial to ensure that our app is not already a Progressive Web App (PWA) by checking it as a separate step. Additionally, when opening the prompts component, it's necessary to include a slight timeout if the service worker is running for the first time, as it may take some time to initialize. To demonstrate this, we will be working with an Angular project that also contains Firebase functions. Using Angular 13, we can add the necessary package using the Angular command line, which automates additional configuration steps that would not be covered by simply using npm to add the package. Once completed, we can proceed with the remaining tasks.
With a web manifest and an Angular service worker config file in place, testing the Progressive Web App (PWA) requires a different approach. Instead of running the Angular build, you'll need to use the Firebase local server, which supports HTTPS—necessary for testing PWAs. After building the app, run it inside the Firebase server, changing the port from 4200 to 5000. Once up and running, use Lighthouse to evaluate your PWA's performance, giving you valuable feedback and insights into any potential improvements.
public installPwa(): void {
  this.data.promptEvent.prompt();
    this.close()
}

public close(): void {
  this.bottomSheetRef.dismiss();
}

The results for our application show that the PWA is installable and optimized, with six out of seven criteria met. The only issue found was the absence of a valid AppleTouch icon. To fix this, it's a simple process of adding a link to the icon.
Implementing Push Notifications for Progressive Web Applications
With the PWA functioning, the final step is to incorporate push notifications using Firebase Cloud Messaging. Many projects use Firebase Cloud Messaging for push notifications even if they don't use Firebase for other purposes, as it is effective for web applications.
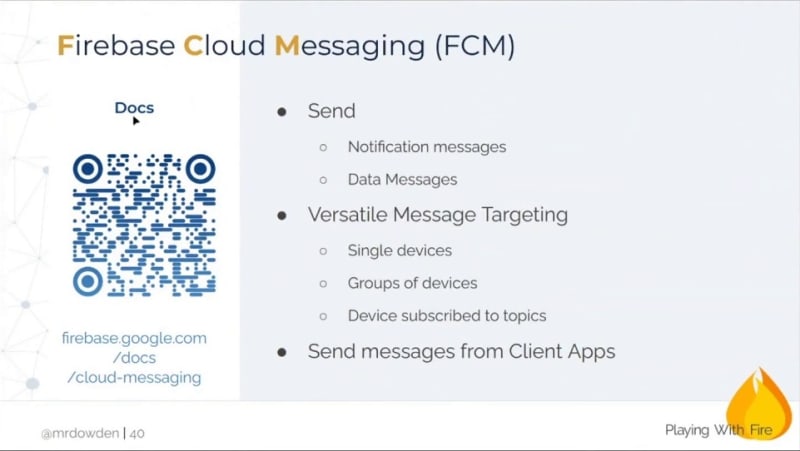
Firebase Cloud Messaging can be used with native applications or hybrid applications like Ionic. It allows you to send targeted messages to groups of devices. Each device must separately subscribe to receive push notifications. Typically, notifications are shown in-app when the app is loaded and on the device using the device notification system when the app is not loaded. Sending notifications to all subscribed devices can become complex, especially when data changes frequently.
For an Angular-based chat application, start by adding the Angular Fire Messaging Model. Next, enable the messaging API in the Google Cloud Console, as it is crucial for the functionality. Finally, choose the type of subscription or notification for your application. Keep in mind that this example demonstrates the basics, and more advanced use cases may require additional steps.
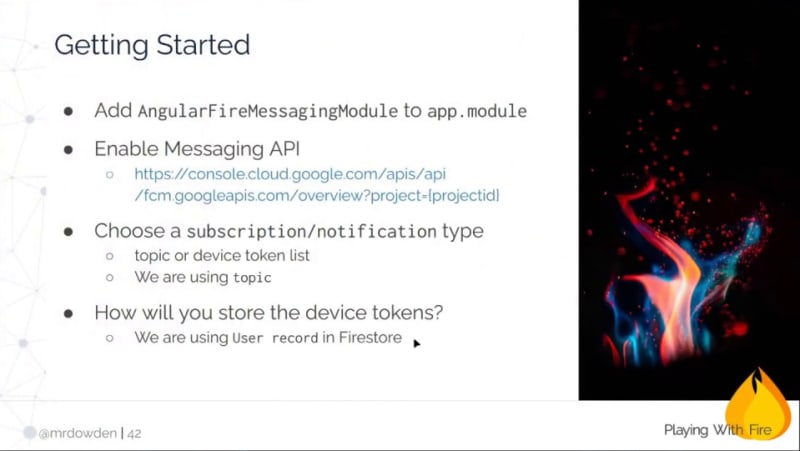
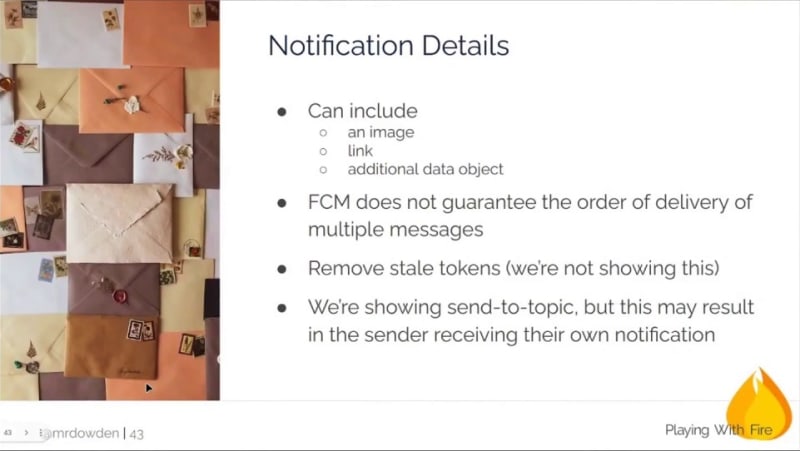
In this project, we utilize topic notifications, which may not suit all use cases. Device tokens for registered devices must be stored, and in our example, we keep an array of device tokens within the user record in our Firestore database. Notifications can contain images, links, and text messages, but the delivery order of multiple messages isn't guaranteed. It's essential to address the removal of stale tokens and require users to renew their device registration periodically. While topics are an excellent feature, it's crucial to implement exceptions, especially for user-centric events such as chat applications where users shouldn't receive notifications for their own messages. To begin, you'll need to enable the Firebase Cloud Messaging API in the Google Cloud Console.
AngularFire Messaging is used to subscribe to messages, and a snack bar displays the notification. The subscription takes place within the app, so it runs the entire time the app is active. When a message is received, the notification will be displayed. Ensure that the messaging module is added and the enable/disable notification buttons are functioning correctly. In the chat room component, if there is a user notification token, obtain the token and subscribe. When the enable notifications button is clicked, the device token will be registered.
The request token is a feature of AngularFire Messaging, which helps in managing notifications. To enable notifications, delete the token from AngularFire Messaging, record it in the database, and then subscribe the user to a topic. Conversely, to disable notifications, remove the token from the database and unsubscribe the user from the topic. A cloud function handles the actual sending and posting of notifications. This function subscribes to user updates, which change when users enable or disable notifications. When a chat is created, the cloud function sends the notification. The topic name used in this example is "chats."
When a chat is created, the admin SDK's messaging feature sends a message with the title "new chat message" to a topic, indicating the sender and the message content. This broadcasts the message to all subscribers of the topic, and they receive the notification. When the notifications are enabled and someone sends a message, an in-app notification appears thanks to Firebase Cloud Messaging (FCM)
Exploring Firebase Features and Integrations for Web and Mobile App Development
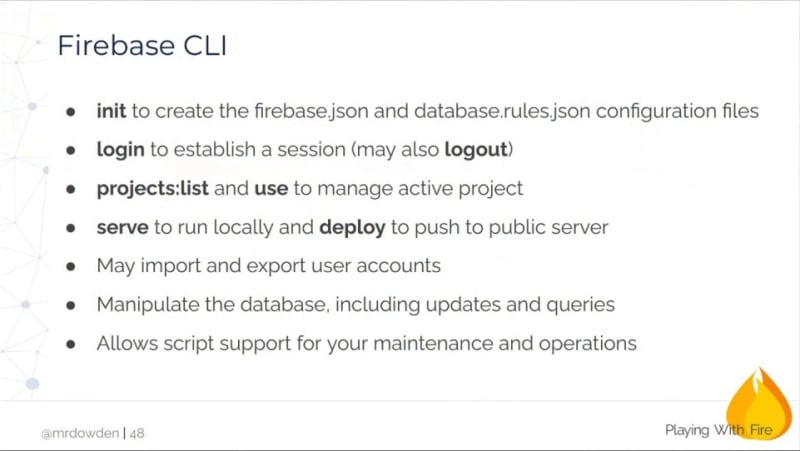
Firebase offers several useful features, such as the command line interface, which enables project creation and management, user account import/export, and database manipulation. The CLI provides extensive scripting and local management capabilities.
With just one command, Firebase Deploy, you can push your content to hosting and have it run in the wild. Firebase offers a range of configuration options, such as redirects, rewrites, and security headers. Additionally, you can easily roll back to a previous deployment using the web console.
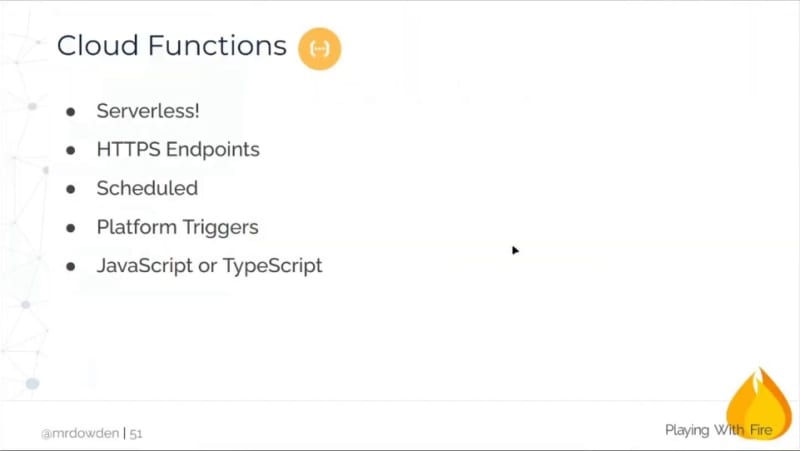
Firebase Cloud Functions allow for serverless functions, enabling you to create triggers for various events such as database updates or creations. For example, you can create an emoji function that replaces "LOL" with a laughing emoji whenever a chat is created. This function is triggered after the initial text post, showcasing the capabilities of serverless functions in real-time.
It's quite common to mix and match Firebase components with other services, such as using Firebase Cloud Messaging (FCM) for push notifications or Firebase Hosting for static files. While Firebase Auth might be the hardest component to mix and match, it's still possible to integrate it with other authentication providers like Auth0 or Okta.
Firebase Hosting is a fast, CDN-backed static file hosting service. Although it's primarily for static files, it can also deploy Node.js applications through serverless Cloud Functions. For example, Angular Universal can use server-side rendering with Firebase Deploy, which bundles the app into a Cloud Function. However, this approach can lead to cold starts, so it's advisable to have a minimum instance of one Cloud Function running to minimize latency issues in low-traffic sites.
Firebase doesn't lock you into the platform, and you can easily export data from the Realtime Database as JSON or use built-in REST APIs to interface with the data. The Firebase free tier offers a generous amount of usage, and even when you move to a paid tier, you still get a free allowance of bandwidth and storage every month. The cost of Firebase depends on factors such as data usage and optimization, but with careful planning, it can be an affordable solution.

Top comments (0)