
Auth0 is an amazing tool to easily integrate user authentication in any kind of app you are building. It has a great set of tools to enable auth in your app in a few really quick steps.
Today, we are going to look into how to integrate Auth0 into your Android App! First, we'll set up the local project for integrating Auth0, and then we'll set up the app on the Auth0 dashboard.
Check out this video to learn what we are going to build in this tutorial:
The code for this basic app that we are going to build is present here on GitHub, star it and follow me :)
 gouravkhunger
/
auth0-demo-android
gouravkhunger
/
auth0-demo-android
Demo implementation of Auth0 Authentication for Android
Demo Implementation of Auth0
Demo implementation of Auth0 Authentication for Android.
License
This project is MIT Licensed.
MIT License
Copyright (c) 2021 Gourav Khunger

Permission is hereby granted, free of charge, to any person obtaining a copy
of this software and associated documentation files (the "Software"), to deal
in the Software without restriction, including without limitation the rights
to use, copy, modify, merge, publish, distribute, sublicense, and/or sell
copies of the Software, and to permit persons to whom the Software is
furnished to do so, subject to the following conditions:

The above copyright notice and this permission notice shall be included in all
copies or substantial portions of the Software.

THE SOFTWARE IS PROVIDED "AS IS", WITHOUT WARRANTY OF ANY KIND, EXPRESS OR
IMPLIED, INCLUDING BUT NOT LIMITED TO THE WARRANTIES OF MERCHANTABILITY,
FITNESS FOR A PARTICULAR PURPOSE AND NONINFRINGEMENT. IN NO EVENT SHALL THE
AUTHORSAndroid app setup
Initialize the project
First, create a new Android Studio Project. If you are just checking out Auth0, you can follow the steps mentioned in one of my previous articles on how to make a basic project using Android Studio.
You can also use any existing project!
Set up view binding
What is it?
View binding is a new way of referencing views from XML layouts inside your java/kotlin classes. View Binding creates a Binding class for each XML layout resource which you can use to refer views without the hassle of using findViewById() or using the deprecated kotlin synthetics.
Enable View Binding
If you are reading this post in the future, chances are that view binding is supported right into new projects using Android Studio.
If not, you can go into the App level build.gradle file and add this piece of code anywhere inside the android scope.
buildFeatures {
    viewBinding true
}
This image will give you a gist of where to add it:

Integrate Auth0
To integrate Auth0 into our project, we need to do the following things.
Add Auth0 dependencies
In your app level build.gradle dependencies section, add the following:
dependencies {
  // ... other dependencies

  // Auth0 Android SDK
  implementation 'com.auth0.android:auth0:2.4.0'
}

Add manifest placeholders
You need to add one more simple line of code to the app level build.gradle file:
android {
    defaultConfig {

        // ...

        // Add this
        manifestPlaceholders = [auth0Domain: "@string/com_auth0_domain", auth0Scheme: "demo"]
    }
}
This creates an intent-filter which is used by the library to open your app back once the login is done by the user. If this is not done you have to define an intent-filter on your own. This method is easier than handling that.
The @string/com_auth0_domain is actually a string resource, you need to declare it in your strings.xml as follows:
<string name="com_auth0_domain">Your domain here</string>

Don't worry if you don't have a domain like this yet, scroll below to find the auth0 dashboard setup, or you can skip this for now and come back to it later!
Press Sync Now on the notification bar to complete the finalize the above things.

Add Internet Permissions to Manifest
You would need to add the internet permission to the AndroidManifest.xml file to allow network access, else the app may crash during login process.
Add this line in your AndroidManifest.xml file as shown in the image below:
<uses-permission android:name="android.permission.INTERNET" />

Make a basic UI
Open the res/layout/activity_main.xml file and replace the content with this layout:
<?xml version="1.0" encoding="utf-8"?>
<LinearLayout
    xmlns:android="http://schemas.android.com/apk/res/android"
    xmlns:app="http://schemas.android.com/apk/res-auto"
    xmlns:tools="http://schemas.android.com/tools"
    android:layout_width="match_parent"
    android:layout_height="match_parent"
    android:orientation="vertical"
    android:gravity="center"
    tools:context=".MainActivity">

    <TextView
        android:id="@+id/nameTv"
        android:layout_width="wrap_content"
        android:layout_height="wrap_content"
        android:layout_margin="10dp"
        android:textSize="30sp"
        android:textColor="#000000"
        android:text="@string/john_doe" />

    <TextView
        android:id="@+id/emailTv"
        android:layout_width="wrap_content"
        android:layout_height="wrap_content"
        android:layout_marginBottom="28dp"
        android:textSize="18sp"
        android:text="@string/email" />

    <Button
        android:text="@string/login"
        android:id="@+id/loginBtn"
        android:layout_width="wrap_content"
        android:layout_height="wrap_content"
        android:layout_marginTop="20dp"/>

    <Button
        android:text="@string/logout"
        android:id="@+id/logoutBtn"
        android:layout_width="wrap_content"
        android:layout_height="wrap_content"
        android:layout_marginTop="10dp" />

</LinearLayout>
This will create a simple layout that has the name and email text on top and two buttons to log-in and log-out. You'll have to create string resources for dummy name and email placeholder.

Coding the MainActivity
Initialize View Binding
Create a lateinit var for the view binding:
private lateinit var binding: ActivityMainBinding
Inflate the binding the the onCreate() method:
binding = ActivityMainBinding.inflate(layoutInflater)
Finally, set the root element of the binding as the content view:
setContentView(binding.root)
Here's what the MainActivity.kt file looks like after doing the above changes:
// package name
package com.github.gouravkhunger.auth0demo

// imports
import ...

class MainActivity : AppCompatActivity() {

    private lateinit var binding: ActivityMainBinding

    override fun onCreate(savedInstanceState: Bundle?) {
        super.onCreate(savedInstanceState)

        binding = ActivityMainBinding.inflate(layoutInflater)
        setContentView(binding.root)
    }
}
Initialize Auth0
First, you'll need to create an instance of the Auth0 class.
// Imports
import ...

class MainActivity : AppCompatActivity() {

    // other vars ...
    private lateinit var account: Auth0

    override fun onCreate(savedInstanceState: Bundle?) {

        // ...

        // Set up the account object with the Auth0 application details
        account = Auth0(
            "xljNBT32DCsVDN7sYDM1qEHMD2mA1fVp",
            "auth0-demo-android.us.auth0.com"
        )

        // ...
    }
}
This is the client id and domain of my sample app, replace it with yours to make it work. To get these parameters for your app, skip ahead to the setting up auth0 section.
Add Log-in
Now, proceed to set the onClickListener on the button. This will be triggered whenever the button will be clicked.
class MainActivity : AppCompatActivity() {
    override fun onCreate(savedInstanceState: Bundle?) {
        super.onCreate(savedInstanceState)

        binding.loginBtn.setOnClickListener {
            WebAuthProvider.login(account)
                .withScheme("demo")
                .withScope("openid profile email")
                // Launch the authentication passing the callback where the results will be received
                .start(this, object : Callback<Credentials, AuthenticationException> {
                    // Called when there is an authentication failure
                    override fun onFailure(error: AuthenticationException) {
                        // Something went wrong!
                        Toast
                            .makeText(this@MainActivity, "Login Error: \n${error.message}", Toast.LENGTH_LONG)
                            .show()
                    }

                    // Called when authentication completed successfully
                    override fun onSuccess(result: Credentials) {
                        // Get the access token from the credentials object.
                        // This can be used to call APIs
                        val accessToken = result.accessToken
                        showUserProfile(accessToken)
                    }
                })
        }
    }
}
Now, once a user presses this button, the login process will start and they'll be asked to log in with their E-mail id.
You can use any scheme name, here I used demo. But I recommend not to use https because it might conflict with the intent-filters internally. I got this error while building JekyllEx.
Once the login is successful, we can get the access token which can be used to retrieve the user profile. Let's make a function to get the user profile from the token:
private fun showUserProfile(accessToken: String) {
    val client = AuthenticationAPIClient(account)

    // With the access token, call `userInfo` and get the profile from Auth0.
    client.userInfo(accessToken)
        .start(object : Callback<UserProfile, AuthenticationException> {
            override fun onFailure(error: AuthenticationException) {
                // Something went wrong!
                Toast.makeText(
                    this@MainActivity,
                    "Error getting profile \n${error.message}",
                    Toast.LENGTH_LONG
                ).show()
            }

            override fun onSuccess(result: UserProfile) {
                // We have the user's profile!
                binding.nameTv.text = result.name
                binding.emailTv.text = result.email
                Toast.makeText(
                    this@MainActivity,
                    "Login Successful!",
                    Toast.LENGTH_SHORT
                ).show()
            }
        })
}
Add Log-out
Now, let's make a function that enables logging out.
private fun logout() {
    WebAuthProvider.logout(account)
        .withScheme("demo")
        .start(
            this,
            object : Callback<Void?, AuthenticationException> {
                override fun onSuccess(result: Void?) {
                    // The user has been logged out!
                    Toast.makeText(
                        this@MainActivity,
                        "Successfully logged out!",
                        Toast.LENGTH_SHORT
                    ).show()
                    binding.nameTv.text = resources.getString(R.string.john_doe)
                    binding.emailTv.text = resources.getString(R.string.email)
                }

                override fun onFailure(error: AuthenticationException) {
                    Toast.makeText(
                        this@MainActivity,
                        "Couldn't Logout!",
                        Toast.LENGTH_SHORT
                    ).show()
                }
            }
        )
}
Now, our app is ready to handle log-in and logout. You can also checkout the content of the MainActivity.kt file on the repo.
Setting up Auth0
Make an account
First, let's do the setup needed at the auth0 dashboard.
Go to the official Auth0 site and press signup on the navigation bar. After making an account, you would be taken to the dashboard where you can create a tenant. Here, the tenant is what auth0 calls a project. A project can have a number of applications in it.
All the applications in a single-tenant have the same user database and storage.
Set up the tenant
Create a new tenant. You can choose any domain name for your tenant, here I am choosing auth0-demo-android. For now, this will be a subdomain, but you can customize it to your custom domain by upgrading your free plan.

Create a new app
Go to the applications section and press create a new app. Since we are building an Android app, choose the native field and hit create.
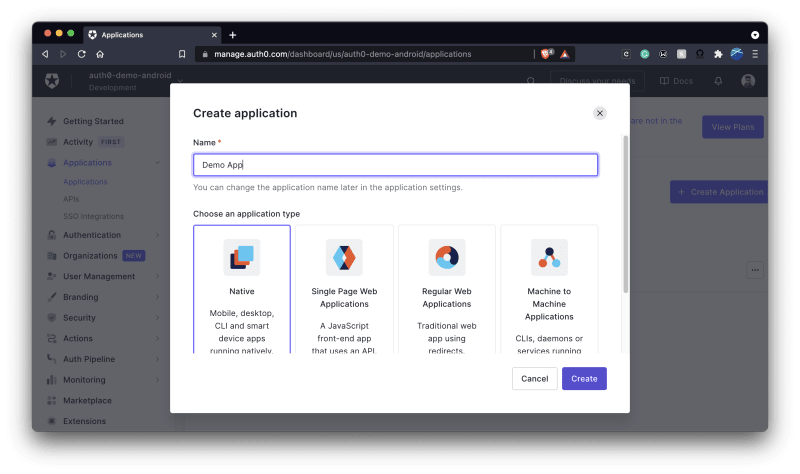
Since we are going to develop an app that will use this tenant, tag it in the development phase.
After creating your app, go to the app settings

Scroll down to the Application URIs section, there add callback URLs for login and logout. These are required to let Auth0 know what apps are authorized to perform these actions as these strings contain identifiers for our app.
demo://<tenant-domain>.us.auth0.com/android/PACKAGE_NAME/callback
Replace the package name and tenant domain with that of your own app. If you have set a scheme other than demo, change it here.
Here's an example:


After adding them, scroll all the way to the bottom and save the changes.
Now you can go ahead and replace the Client IDs and such things in the code, wherever necessary.
Congratulations 🥳
You have successfully added Auth0 to your Android app. Trust me, though this post was long, it is actually really easy if you try it on your own.
If you stayed along till this far, I am really thankful to you! Please comment on your experience with Auth0 and this article.
Let's connect with each other :)
Originally published at genicsblog.com

Latest comments (2)
My pleasure :)