
This write-up takes into account our two earlier write-up: Part 1 and Part 2; wherein we have been learning about deployment of smart contracts.
This particular write-up is with the intention of demonstrating a better way for deployment of smart contracts. You can look at this new way of deployment of smart contracts, as an optional strategy; however, if you are shaping your career to become a professional smart contract developer — then I would recommend you to keep this is as a MUST Learn practice.
RECAP
Till now, we have been deploying smart contracts, using a simple script in our: /scripts folder. Our script to deploy our last NFT Smart Contract was as follows:
const { ethers } = require("hardhat");async function main() {
    const NFT = await ethers.getContractFactory("NFT");
    const deployedNFT = await NFT.deploy();
    console.log(`Contract deployed to address:          ${deployedNFT.address}`)
}main()
.then(() => process.exit(0))
.catch((error) => {
    console.error(error);
    process.exit(1);
});
Time to UPGRADE!
First: We are going to install hardhat-deploy from here. Depending on what you use, it will be either npm install or yarn add.
Second: Add require('hardhat-deploy') to our file hardhat-config.js
Our updated config file will look like this:
require('dotenv').config();
require('@nomiclabs/hardhat-ethers');
require('hardhat-deploy'); // <--- This is the new additionconst {API_URL, PRIVATE_KEY} = process.env;
....
....
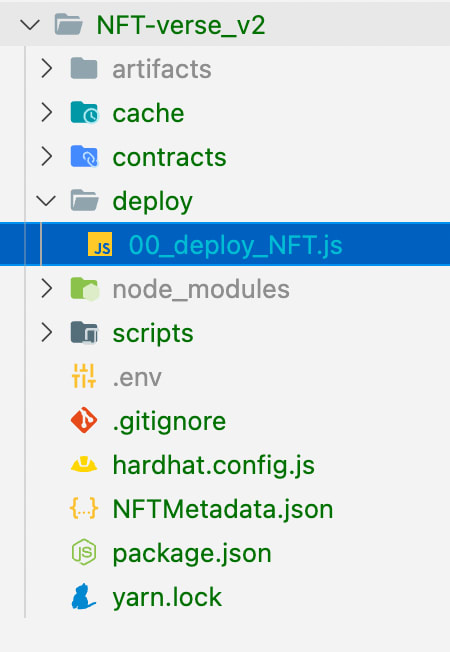
Third: Create a new folder deploy in the root of the project and add the following file to it. Note the name of the file. It is critical.
// location of the file: ./deploy/00_deploy_NFT.jsconst func = async function (hre) {
  const { getNamedAccounts, deployments } = hre;
  const { deployer } = await getNamedAccounts();
  const { deploy } = deployments;
  await deploy("NFT", {
    from: deployer,
    log: true,
  });
}func.tags = ["NFT"];module.exports = func;
Your folder structure should look like this after the addition of the above file:
Voilà! You have upgraded yourself 🥳🥳🥳🥳🥳
Let’s see the magic of what we have done.
Open a terminal in the location of the folder and run the command: npx hardhat node —-no-deploy This will spin-off a hardhat node with a number of accounts that are to be used for the purpose of deployments
Open a new terminal in the same location of the folder and now run the following command:
npx hardhat deploy —-network localhostIf all is done successfully, you should see the following in your terminal:
deploying "NFT" (tx: 0x5c8faff64acb214523566f9fa0d1168159c0c380d71cc5486828e34aff085a19)...: deployed at 0x5FbDB2315678afecb367f032d93F642f64180aa3 with 2525550 gas
AND, you will see a new folder in your directory structure with the name deployments. Something like this:
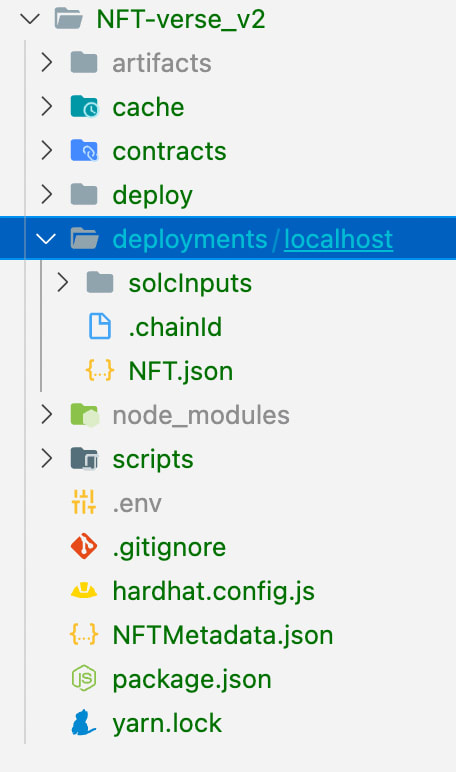
Dig into the files in the deployments folder and you will notice that it has saved the address to which the contract has been deployed, along with the other details. The details saved in the deployments folder are per chain to which the contracts are deployed.
We ran another command in our terminal npx hardhat deploy --network mumbai-matic to deploy our contract to the Mumbai Matic test network. Our directory structure afterwards was as follows:

As you will notice, we now have a new folder with the name mumbai-matic and also have the details saved in that directory.
There you go!!! You are now a better version of a blockchain developer.
We hope you like what we are doing over here. If you do, please do clap 👏 at the end of the article and yes, do share with your friends.
Also note: You can download and run the same code that we will using in our tutorial (aka tuts) from here 👉 Github repository. If you like out stuff, give us a star 🌟 on Github too.
Happy Coding!!!
Authors (open to feedback): 👇

Top comments (0)