- In this guide I will be showing you that what we are going to build first then only you can get the most out of this tutorial.
- click the link https://bugudiramu.github.io/#/ to see the output of this post I will be continuously updating this site this site still needs lot of changes.
- This tutorial will be of 2 parts.In this post we are dealing with all the widgets and screens in the next post we will be dealing with Responsiveness of the website and how to deploy it to github pages and in some other Hosting services.
- Flutte Web is still in preview version so you can face lot of errors and issues keep that in mind.
Overview of Flutter and Dart:
- You may be wondering that the Flutter Web is still in experimental or in technical preview mode but it is worth trying technology now.If you are familiar with Flutter it becomes easy to start but wait?
What is Flutter ?
Flutter is google's mobile SDK which can help the developers to create some stunning applications for Mobile,Web,Desktop and Watches as well with a single codebase with 60FPS.Isn't that great?
Why do we choose Dart to write Flutter applications ?
Flutter chooses Dart as the programming languages for writing the applications for different devices and OS because Dart is a compiled language.In Android and IOS the dart code is directly compiled into native machine code which is pretty much fast in case of performance.
Warning : The debugging of flutter web application is only working on Chrome browser.
- The flutter 1.9 update brings support to flutter web if you haven't upgraded flutter then open your terminal and write
flutter upgrade
Then switch the channel to master and enable web support.
 flutter channel master
 flutter upgrade
 flutter config --enable-web
 flutter create myportfolio
Then type
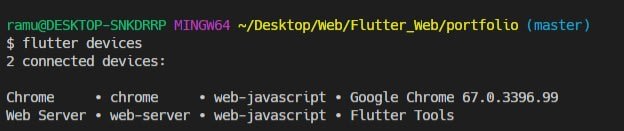
flutter devices
It will show available two devices like below image
Then you are good to go.
Let's get the party started!!!!
In this post we are going to discuss how to build a complete portfolio in flutter_web.
- Full source code available here (Pure Flutter and Dart Code) : https://github.com/bugudiramu/Flutter_Web
- Full source code available here (After compiling to html,css and javascript) : https://github.com/bugudiramu/bugudiramu.github.io
If you face any difficulty in understanding the topics in this post feel free to comment and if you like the post please like the post and star my github repo https://github.com/bugudiramu/Flutter_Web.
- First things first add all the required dependencies in the pubspec.yaml file.
  responsive_builder: any
  universal_html: ^1.1.6
  universal_io: ^0.8.4
  url_launcher: ^5.2.7
- In the fonts section use
  fonts:
    - family: Montserrat
      fonts:
        - asset: fonts/montserrat/Montserrat-Medium.ttf
- In the main.dart file remove the boiler plate code which comes with flutter create and paste the below code.
import 'package:flutter/material.dart';
import 'package:portfolio/pages/homepage.dart';

void main() => runApp(MyApp());

class MyApp extends StatelessWidget {
  // This widget is the root of your application.
  @override
  Widget build(BuildContext context) {
    return MaterialApp(
      title: "My Portfolio",
      debugShowCheckedModeBanner: false,
      theme: ThemeData(
        primarySwatch: Colors.pink,
        fontFamily: "Montserrat",
      ),
      home: HomePage(),
    );
  }
}
Create folders like widgets,pages,constants in the lib folder in order to separate all the UI code like below image.

We are going to divide our project into 5 parts
- Appbar (Navigation bar)
- Profile
- Projects
- About &
- Contact page
Appabar or Navigation Bar

- In the widgets folder create a file named appbar_widget.dart and paste the below code.
- Don't confuse by seeing the code because I have used functions everywhere because I don't like to copy the same code again and again.Once you try it will become easy for you aswell..
import 'package:flutter/material.dart';

class AppBarWidget extends StatefulWidget {
  @override
  _AppBarWidgetState createState() => _AppBarWidgetState();
}

class _AppBarWidgetState extends State<AppBarWidget> {
  Widget build(BuildContext context) {
    final width = MediaQuery.of(context).size.width;

    return Container(
      alignment: Alignment.center,
      height: 80.0,
      width: width,
      child: Row(
        mainAxisAlignment: MainAxisAlignment.spaceBetween,
        children: <Widget>[
          Container(
            child: Text(
              "Portfolio",
              style: TextStyle(
                  fontSize: 30.0,
                  fontWeight: FontWeight.normal,
                  color: Colors.black),
            ),
          ),
          Container(
            child: Row(
              mainAxisAlignment: MainAxisAlignment.end,
              children: <Widget>[
                SizedBox(width: 20.0),
                navbarItems("WORK"),
                SizedBox(width: 20.0),
                navbarItems("ABOUT"),
                SizedBox(width: 20.0),
                navbarItems("CONTACT"),
                SizedBox(height: 20.0),
              ],
            ),
          )
        ],
      ),
    );
  }

  navbarItems(String s) {
    return Container(
      child: Text(
        s,
        style: TextStyle(
          color: Colors.black,
        ),
      ),
    );
  }
}
- Here we are returning a Container() which is having a height of 80.0 and Row() as a child with 2 children of Text() and a Container().The Container again has a Row() because we are going to make the Work,About and Contact tabs as right side so we can define mainAxisAlignment: MainAxisAlignment.end for the second Row().Here all the tabs having same style but the name only changes so here we are using the power of
functions. navbarItems() which takes a String name as argument and calls in the Row() as many times as we want.
Profile :

- In the profile we are only making use of only two Text() widgets like follows.
import 'package:flutter/material.dart';
import 'package:portfolio/widgets/custom_line_star_widget.dart';

class MyProfileWidget extends StatelessWidget {
  @override
  Widget build(BuildContext context) {
    final double height = MediaQuery.of(context).size.height;
    return Container(
      height: height,
      decoration: BoxDecoration(
        gradient: LinearGradient(
          begin: Alignment.topLeft,
          end: Alignment.bottomRight,
          colors: [
            Colors.pink.shade700,
            Colors.pink,
            Colors.pink.shade700,
          ],
        ),
      ),
      child: Column(
        mainAxisAlignment: MainAxisAlignment.center,
        children: <Widget>[
          Container(
            child: Text(
              "RAMU",
              style: nameStyle(),
            ),
          ),
          SizedBox(height: 10.0),
          CustomLineStarWidget(
            borderColor: Colors.white,
          ),
          SizedBox(height: 10.0),
          Container(
            margin: const EdgeInsets.all(8.0),
            padding: const EdgeInsets.all(8.0),
            child: Text(
              "Flutter - Android & Computer Enthusiast.",
              textAlign: TextAlign.center,
              style: skillStyle(),
            ),
          ),
        ],
      ),
    );
  }

  nameStyle() {
    return TextStyle(
      color: Colors.white,
      fontSize: 80.0,
      fontWeight: FontWeight.bold,
    );
  }

  skillStyle() {
    return TextStyle(
        color: Colors.white, fontSize: 22.0, fontWeight: FontWeight.bold);
  }
}
- Here you might be wondering that where is CustomLineStarWidget() right!.

import 'package:flutter/material.dart';

class CustomLineStarWidget extends StatelessWidget {
  @override
  Widget build(BuildContext context) {
    return Row(
      mainAxisAlignment: MainAxisAlignment.center,
      children: <Widget>[
        Container(
          width: 100.0,
          color: Colors.black,
          height: 4.0,
        ),
        SizedBox(width: 10.0),
        Icon(
          Icons.star_half,
          color: Colors.black,
          size: 38.0,
        ),
        SizedBox(width: 10.0),
        Container(
          width: 100.0,
          color: Colors.black,
          height: 4.0,
        ),
      ],
    );
  }
}
Projects :
- Projects page looks like the below image

- If you find the Constants class here all the properties lies inside the constants.dart file
import 'package:flutter/material.dart';

class Constants {
  // * Images
  static String facebook = "images/facebook.png";
  static String twitter = "images/twitter.png";
  static String linkedin = "images/linkedin.png";
  static String github = "images/github.png";
  static String myimage = "images/myimage.jpg";
  static String bgimg = "images/bgimg.jpg";
  static String tasklist = "images/projectIcons/tasklist.png";
  static String ebazaar = "images/projectIcons/ebazaar.png";
  static String news = "images/projectIcons/news.png";
  static String calculator = "images/projectIcons/calculator.png";
  static String bmi = "images/projectIcons/bmi.png";
  static String weather = "images/projectIcons/weather.png";
  //* Fonts
  // static String montserratFont = "fonts/montserrat";

  // * TextStyles
  static TextStyle secondaryTitles = TextStyle(
    fontSize: 45.0,
    fontWeight: FontWeight.w700,
    color: Colors.brown.shade700,
  );

  static TextStyle nameStyle =
      TextStyle(color: Colors.red, fontSize: 86.0, fontWeight: FontWeight.w900);
  static TextStyle appBarStyle = TextStyle(backgroundColor: Colors.redAccent);
  static TextStyle customAppbarTitle = TextStyle(
      fontSize: 30.0, fontWeight: FontWeight.normal, color: Colors.black);
  static Color primaryColor = Colors.purple;
  static Alignment alignment = Alignment.center;

  // * Url's
  static const githubUrl = "https://github.com/bugudiramu";
  static const facebookUrl = "#";

  static const twitterUrl = "https://twitter.com/_iamramu";
  static const linkedinUrl =
      "https://www.linkedin.com/in/ramu-bugudi-2a5a5a161/";

  // * Colors
  static Color myPrimaryColor = Colors.blueGrey.shade900;
  static Color mySecondaryColor = Color(0xff95a5a6);
}
project_widget.dart
import 'package:flutter/material.dart';
import 'package:portfolio/constants/constants.dart';

class ProjectsWidget extends StatelessWidget {
  @override
  Widget build(BuildContext context) {
    final double width = MediaQuery.of(context).size.width;
    return Container(
      width: width,
      alignment: Alignment.center,
      child: Column(
        children: <Widget>[
          Row(
            mainAxisAlignment: MainAxisAlignment.center,
            children: <Widget>[
              projectContainer(Constants.bmi, context),
              projectContainer(Constants.news, context),
              projectContainer(Constants.ebazaar, context),
            ],
          ),
          Row(
            mainAxisAlignment: MainAxisAlignment.center,
            children: <Widget>[
              projectContainer(Constants.calculator, context),
              projectContainer(Constants.weather, context),
              projectContainer(Constants.tasklist, context),
            ],
          ),
        ],
      ),
    );
  }

  Widget projectContainer(String img, context) {
    return MaterialButton(
      splashColor: Colors.transparent,
      hoverElevation: 10.0,
      onPressed: () => _showDialogAboutProject(context),
      child: Container(
        decoration: BoxDecoration(
          backgroundBlendMode: BlendMode.colorBurn,
          // color: myColors[random.nextInt(6)],
          color: Colors.black,
          borderRadius: BorderRadius.circular(10.0),
        ),
        margin: const EdgeInsets.all(20.0),
        alignment: Alignment.center,
        height: 200.0,
        width: 300.0,
        child: Image.asset(
          img,
          height: 150.0,
          width: 150.0,
        ),
      ),
    );
  }

  _showDialogAboutProject(context) {
    return showDialog(
      context: context,
      child: AlertDialog(
        title: Text("Project Title"),
        content: ListTile(
          title: Text("Description of the Project"),
          subtitle: Text(
              "If you want to see the the project details head over to my GitHub profile (click the github icon below the contact section)"),
        ),
        actions: <Widget>[
          MaterialButton(
            onPressed: () => Navigator.of(context).pop(),
            child: Text("Close"),
          ),
        ],
      ),
    );
  }
}
- Here we are returning a Column() which contains Row() as a child. In the Row() widget we are returning the projectContainer() which acts a button when we click on it it will show an AlertDialog() about the Project.
About Page
- Image for about page

- In the about page we are only going to display about our self which is a text. Here I used SelectableText() widget because it allows us to use copy,paste and selectAll kinds of features.
import 'package:flutter/material.dart';
import 'package:portfolio/widgets/custom_line_star_widget.dart';

class AboutPage extends StatelessWidget {
  @override
  Widget build(BuildContext context) {
    return Container(
      decoration: BoxDecoration(
        gradient: LinearGradient(
          begin: Alignment.topLeft,
          end: Alignment.bottomRight,
          colors: [
            Colors.pink.shade700,
            Colors.pink,
            Colors.pink.shade700,
          ],
        ),
      ),
      padding: const EdgeInsets.all(20.0),
      alignment: Alignment.center,
      child: Column(
        children: <Widget>[
          SizedBox(height: 60.0),
          Container(
            child: Text(
              "ABOUT",
              style: TextStyle(
                fontSize: 45.0,
                fontWeight: FontWeight.w700,
                color: Colors.white,
              ),
            ),
          ),
          SizedBox(height: 10.0),
          CustomLineStarWidget(
            borderColor: Colors.white,
          ),
          SizedBox(height: 60.0),
          _dymmyText(),
          SizedBox(height: 60.0),
        ],
      ),
    );
  }

  _dymmyText() {
    return Container(
      alignment: Alignment.center,
      padding: const EdgeInsets.symmetric(horizontal: 10.0, vertical: 5.0),
      child: SelectableText(
        "“My Name Is Bugudi Ramu And I Am A Mobile,Web Developer And Programmer Aswell.I Am From India. I Will Get My Graduation In 2020 With A Bachelor’s Degree In Electronic And Communication Engineering From Bharath Institute Of Higher Education And Research(BIHER) In Chennai(Tamilnadu). I Served My Most Of The Time In Practicing,Exploring New Ways For Solving Problems And Doing Projects.As I Am Self-Taught I'm Looking For Right Platform To Explore My Knowledge And Improve Skills.”",
        style:
            TextStyle(color: Colors.white, fontSize: 16.0, letterSpacing: 1.0),
      ),
    );
  }
}
Contact Page

- In the Contact page I have used 3 TextFields() which is Name,Email and Message.A button is created to navigate the user the user to show a welcome message or it won't necessary.Here I have added validation aswell.
import 'package:flutter/material.dart';
import 'package:portfolio/constants/constants.dart';
import 'package:portfolio/pages/welcome_message_page.dart';
import 'package:portfolio/widgets/custom_line_star_widget.dart';
import 'package:responsive_builder/responsive_builder.dart';

class ContactPage extends StatefulWidget {
  @override
  _ContactPageState createState() => _ContactPageState();
}

class _ContactPageState extends State<ContactPage> {
  var _formKey = GlobalKey<FormState>();
  var nameController = TextEditingController();
  var emailController = TextEditingController();
  var msgController = TextEditingController();

  @override
  Widget build(BuildContext context) {
    final double width = MediaQuery.of(context).size.width;
    return Container(
      color: Colors.transparent,
      child: Column(
        children: <Widget>[
          SizedBox(height: 60.0),
          Container(
            child: Text(
              "CONTACT ME",
              style: Constants.secondaryTitles,
            ),
          ),
          SizedBox(height: 20.0),
          CustomLineStarWidget(borderColor: Colors.brown.shade900),
          SizedBox(height: 60.0),
          customForm(width),
          SizedBox(height: 60.0),
        ],
      ),
    );
  }

  Widget customForm(width) {
    return Container(
      padding: const EdgeInsets.all(20.0),
      margin: const EdgeInsets.all(20.0),
      width: width,
      alignment: Alignment.center,
      child: Form(
        key: _formKey,
        child: Column(
          children: <Widget>[
            _textFormField(nameController, "Name"),
            _textFormField(emailController, "Email"),
            _textFormField(msgController, "Message"),
            SizedBox(height: 10.0),
            Container(
              alignment: Alignment.topLeft,
              child: MaterialButton(
                onPressed: () {},
                hoverColor: Colors.pink,
                color: Constants.myPrimaryColor,
                child: Text("Send",
                    style: TextStyle(
                        color: Colors.white, fontWeight: FontWeight.bold)),
              ),
            ),
          ],
        ),
      ),
    );
  }

  _textFormField(controller, hintText) {
    return TextFormField(
      // autovalidate: true,
      enableInteractiveSelection: true,
      toolbarOptions:
          ToolbarOptions(copy: true, cut: true, paste: true, selectAll: true),
      onSaved: (val) {
        setState(() {
          controller.text = val;
        });
      },
      validator: (val) {
        if (val.isEmpty || val.length < 0) {
          print(val);
          return "Please provide atleast you'r name";
        }
        return "";
      },
      controller: controller,
      decoration: InputDecoration(hintText: hintText),
      onChanged: (text) {
        print(text);
      },
    );
  }
}
- In the end of the webpage we are interested to display our Social media accounts in order to showcase or the viewers let to know about ourselves.
import 'package:portfolio/constants/constants.dart';
import 'package:universal_html/prefer_universal/html.dart' as html;
import 'package:universal_io/io.dart';
import 'package:url_launcher/url_launcher.dart';
import 'package:flutter/foundation.dart';
import 'package:flutter/material.dart';

class CopyrightWidget extends StatelessWidget {
  @override
  Widget build(BuildContext context) {
    return Container(
        alignment: Alignment.center,
        color: Constants.myPrimaryColor,
        height: 170.0,
        child: Column(
          children: <Widget>[
            SizedBox(height: 30.0),
            Row(
              mainAxisAlignment: MainAxisAlignment.center,
              children: <Widget>[
                socialMediaLinks(Constants.facebook, Constants.facebookUrl),
                socialMediaLinks(Constants.twitter, Constants.twitterUrl),
                socialMediaLinks(Constants.github, Constants.githubUrl),
                socialMediaLinks(Constants.linkedin, Constants.linkedinUrl),
              ],
            ),
            SizedBox(height: 10.0),
            Container(
              child: Text(
                "Designed & Coded by ramu",
                style: TextStyle(color: Colors.white),
              ),
            ),
            SizedBox(height: 30.0),
          ],
        ));
  }

  Widget socialMediaLinks(String image, String url) {
    return InkWell(
      onTap: () => launchUrl(url),
      child: Container(
        padding: const EdgeInsets.all(12.0),
        margin: const EdgeInsets.all(8.0),
        decoration: BoxDecoration(
          shape: BoxShape.circle,
          color: Colors.white,
          border: Border.all(
            color: Colors.white60,
            width: 3.0,
          ),
        ),
        child: Image.asset(
          image,
          height: 30.0,
          width: 30.0,
          color: Colors.white,
          colorBlendMode: BlendMode.darken,
        ),
      ),
    );
  }

  launchUrl(String url) async {
    if (kIsWeb) {
      html.window.location.href = url;
      // html.window.location.assign(url);
    } else if (Platform.isAndroid || Platform.isIOS) {
      if (await canLaunch(url)) {
        await launch(url);
      } else {
        throw 'Could not launch $url';
      }
    } else {
      throw Exception("Unknown Platform");
    }
  }
}
- Here we have used universal_io and universal_html as html packages to launch the Urls on any platform.
- First we are checking KIsWeb a constant that is true if the application was compiled to run on the web then we will access the window object by
html.window.location.href = url
Or
If it is compiled on Android or IOS we can use the url_launcher plugin to launch the Url.
That's it folks I know the length of the article becomes long but I just want to refresh your flutter skills.In the next post we are going to deal with the Responsiveness of our site and adding some cool animations.
see you there.

Top comments (0)