Data is essential to all JavaScript applications. It determine what we see, hear and interact with when we open the app, and it must be stored properly to guarantee a smooth user experience. Specifically, the data must be a stored in a way that facilitates retrieval, manipulation and back storage. need data to represent information.
One of the most important prominent data structures in JavaScript is known as an Array. This is a collection of related elements, usually of the same data type, which can be accessed and manipulated using index numbers.
In this article, we will learn about Arrays and the operations we can perform with them. We will also explore the usage of many built-in array methods, with examples.
JavaScript Arrays
In JavaScript, arrays can be created using square brackets [] or the Array() constructor.
For example, the following code creates an array of strings:
let fruits = ["apple", "banana", "orange"];
We can access individual elements of an array using its index numbers. The index of the first element is always 0, and the index of the last element is always the length of the array, minus one. For example:
console.log(fruits[0]); // Output: "apple"
console.log(fruits[1]); // Output: "banana"
console.log(fruits[2]); // Output: "orange"
In JavaScript, arrays can also contain elements of different data types, such as numbers, strings, booleans, objects, and even other arrays. For example:
let mixedArray = ["apple", 3, true, {name: "John"}, ["one", "two", "three"]];
To explain it visually, the image below shows how the elements of an array fit into the respective indexes.
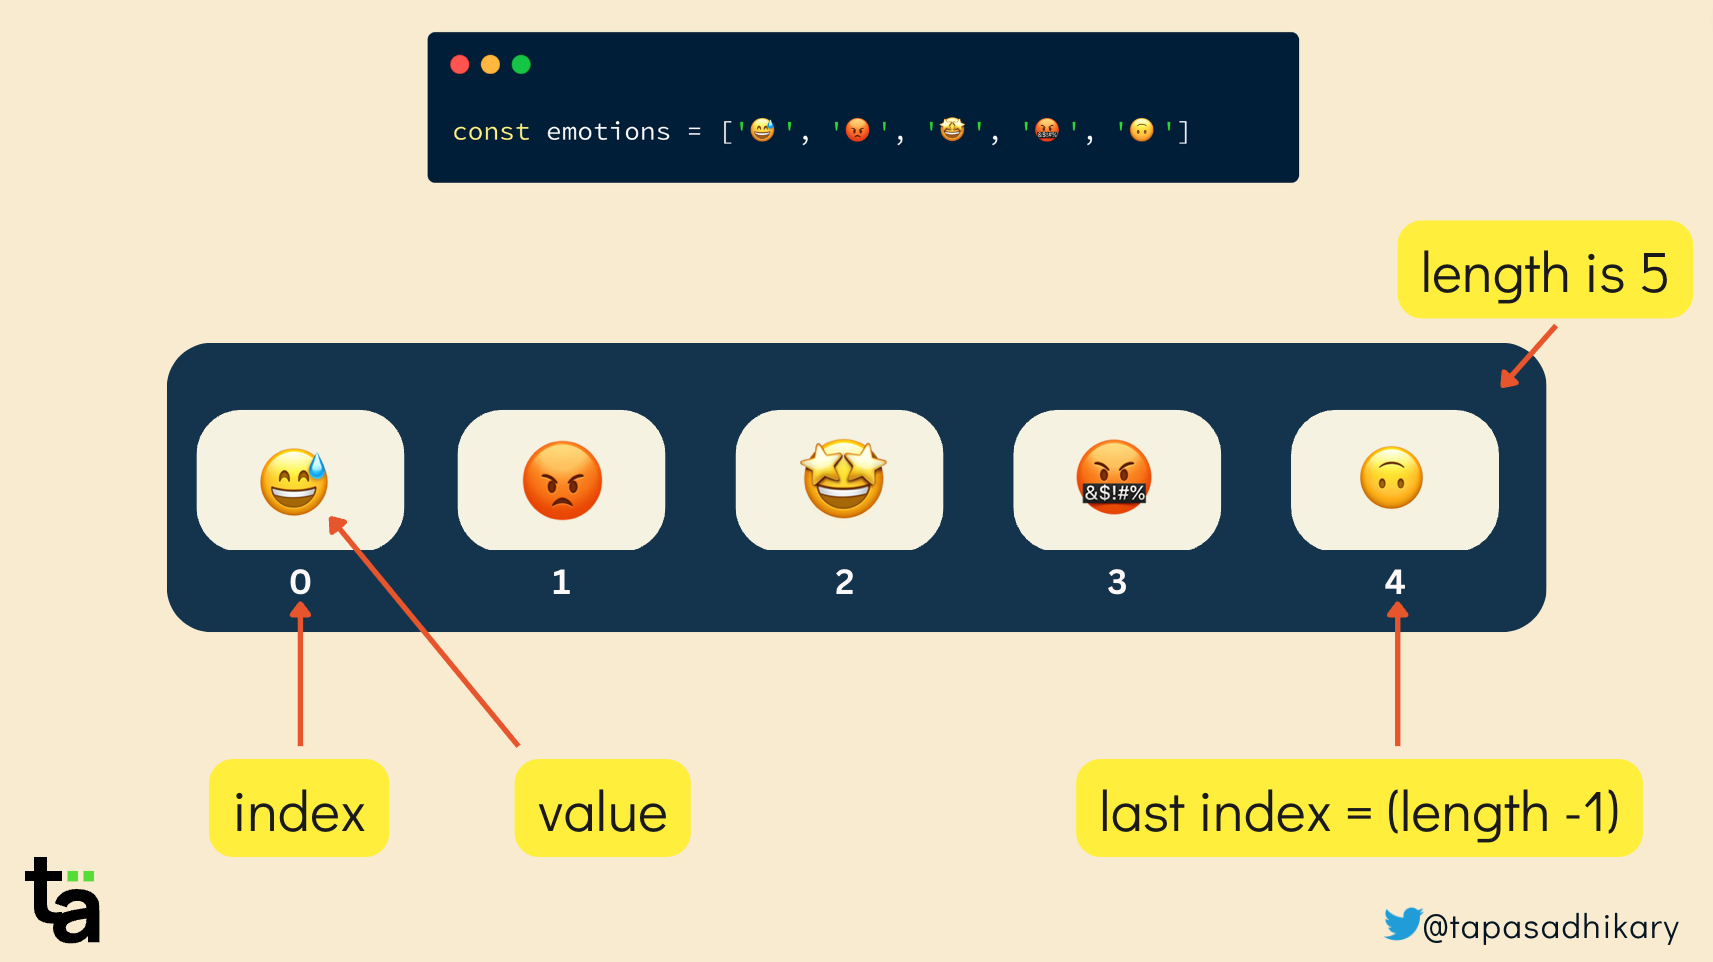
Length of an Array
The length of an array in JavaScript is the number of elements stored in the array. This is a property of the array object, and is accessible using the length property. The length property of an array is automatically updated when elements are added to or removed from the array.
Here’s an example of how to use the length property to determine the number of elements in an array:
const numbers = [1, 2, 3, 4, 5];
console.log(numbers.length); // Output: 5
In this example, we have an array called numbers that contains five elements. We use the length property to get the number of elements in the array, which is 5.
The length property can also be used to change the size of an array by assigning a new value to it. For example, if we assign a smaller value to the length property, the array will be truncated:
const numbers = [1, 2, 3, 4, 5];
numbers.length = 3;
console.log(numbers); // Output: [1, 2, 3]
In this example, we assign the value 3 to the length property of the numbers array. As a result, the last two elements of the array are removed, and the array now contains only three elements.
On the other hand, if we assign a larger value to the length property, the array will be extended, and the new elements will be set to undefined :
const numbers = [1, 2, 3, 4, 5];
numbers.length = 7;
console.log(numbers); // Output: [1, 2, 3, 4, 5, empty × 2]
In this example, we assign the value 7 to the length property of the numbers array. As a result, the array is extended with two new elements set to undefined.
It’s important to note that the length property does not always correspond to the number of defined elements in the array. For example, if we create an array with a length property of 5 but only define three elements, the length property will still be 5.
const numbers = [1, 2, 3];
numbers.length = 5;
console.log(numbers); // Output: [1, 2, 3, undefined, undefined]
console.log(numbers.length); // Output: 5
In this example, we create an array with three defined elements but then assign a length of 5. As a result, the last two elements of the array are set to undefined , and the length property is 5.
JavaScript Array Methods
JavaScript provides many built-in methods that can be used to manipulate arrays. Here’s a list of some of the most commonly used examples:
push() – When you want to add one or more elements to the end of an array, use the push() method. In the code snippet below, we add a new string, “kiwi”, at the end of the fruits array. The push() method modifies the original array.
const fruits = ['apple', 'banana', 'orange'];
fruits.push('kiwi');
console.log(fruits); // Output: ['apple', 'banana', 'orange', 'kiwi']
pop() – The pop() method removes the last element of an array and returs it, thereby modifying the original array. In the code example below, we remove the string “orange” using the pop() method.
const fruits = ['apple', 'banana', 'orange'];
const removedFruit = fruits.pop();
console.log(fruits); // Output: ['apple', 'banana']
console.log(removedFruit); // Output: 'orange'
shift() – While pop() removes the last element of the array, shift() helps you to remove the first element of an array and returns it. In the code example below, we have removed the first element, “apple”, from the array using the shift() method.
const fruits = ['apple', 'banana', 'orange'];
const removedFruit = fruits.shift();
console.log(fruits); // Output: ['banana', 'orange']
console.log(removedFruit); // Output: 'apple'
unshift() – This method helps add an element to an array, just like the push() method, but it also adds one or more elements to the beginning of an array.
Compare the code below with the example we have seen for the push() method. Now, the element “kiwi” gets added to the beginning of the array.
const fruits = ['apple', 'banana', 'orange'];
fruits.unshift('kiwi');
console.log(fruits); // Output: ['kiwi', 'apple', 'banana', 'orange']
-
slice()– The slice() method returns a new array that contains a portion of the original array, and you can provide the parameters to indicate how to slice out the portion of the array. Please note, however, that the slice operation will not change the original array.
const fruits = ['apple', 'banana', 'orange', 'kiwi'];
const slicedFruits = fruits.slice(1, 3);
console.log(slicedFruits); // Output: ['banana', 'orange']
-
splice()– The splice() method may sound similar to the slice() method, but they’re used for entirely different purposes. Whereas the slice() method returns a portion of the original array, the splice() method changes the content of an array by removing or replacing existing elements and/or adding new ones.
The parameters of the splice() method look like these:
splice(start)
splice(start, deleteCount)
splice(start, deleteCount, item1)
splice(start, deleteCount, item1, item2, itemN)
Now, take a look at the code snippet below. The numbers.splice(2, 1) expression removes one element at the index 2.
const numbers = [1, 2, 3, 4, 5];
numbers.splice(2, 1); // Removes 1 element at index 2
console.log(numbers); // Output: [1, 2, 4, 5]

numbers.splice(3, 0, 6, 7); // Adds 6 and 7 at index 3
console.log(numbers); // Output: [1, 2, 4, 6, 7, 5]
-
concat()– The contact() method combines two or more arrays in a single array. Note that the input arrays remained unchanged.
const fruits = ['apple', 'banana'];
const moreFruits = ['orange', 'kiwi'];
const allFruits = fruits.concat(moreFruits);
console.log(allFruits); // Output: ['apple', 'banana', 'orange', 'kiwi']
-
reverse()– As the name suggests, the reverse() method reverses the order of elements in an array. It’s important to highlight the fact that this method changes the input array itself.
const fruits = ['apple', 'banana', 'orange', 'kiwi'];
fruits.reverse();
console.log(fruits); // Output: ['kiwi', 'orange', 'banana', 'apple']
-
sort()– The sort() method sorts the elements of an array. It performs an ascending sort by default and converts the elements into strings while sorting. Sorting an array of string with the sort() method is straightforward.
const fruits = ['orange', 'apple', 'banana', 'kiwi'];
fruits.sort();
console.log(fruits); // Output: ['apple', 'banana', 'kiwi', 'orange']
However when you try to sort numbers with the sort() method, as in the case above, it may give you unexpected results like this:
const array1 = [1, 10, 5, 31, 100000];
array1.sort();
console.log(array1); // [1, 10, 100000, 31, 5]
To fix this, you need to use a compare function and pass that as an argument to the sort() method.
const array1 = [1, 10, 5, 31, 100000];
array1.sort((a,b) => a-b);
console.log(array1); // [1, 5, 10, 31, 100000]
-
join()– The join() method converts an array to a string. To avoid confusing this method with the concat() method, where two or more array elements merge, you can pass a specifier to the join method.
const fruits = ['apple', 'banana', 'orange', 'kiwi'];
const fruitString = fruits.join(', ');
console.log(fruitString); // Output: 'apple, banana, orange, kiwi'
-
indexOf()– It returns the index of the first occurrence of a specified element in an array.
const fruits = ['apple', 'banana', 'orange', 'kiwi'];
const index = fruits.indexOf('banana');
console.log(index); // 1
-
lastIndexOf() – This returns the index of the last occurrence of a specified element in an array.
const fruits = ['apple', 'banana', 'orange', 'banana', 'kiwi'];
const index = fruits.lastIndexOf('banana');
console.log(index); // Output: 3
-
includes()– When you want to determine whether an array includes a specified element or not, use the includes() method. It will return the value ‘true’ whether the element is included or false.
const fruits = ['apple', 'banana', 'orange', 'kiwi'];
const includesApple = fruits.includes('apple');
console.log(includesApple); // Output: true

const includesGrape = fruits.includes('grape');
console.log(includesGrape); // Output: false
-
filter()– The filter() method creates a new array with all elements that pass the test you provide, but remember that you need to provide the test using a callback function. In the example below, the test is designed to isolate the even numbers.
const numbers = [1, 2, 3, 4, 5, 6];
const evenNumbers = numbers.filter(function(num) {
  return num % 2 === 0;
});
console.log(evenNumbers); // Output: [2, 4, 6]
-
map()– This creates a new array with the results of calling a function on every element in the original array. The callback function that invokes every array element can be anything that suits your use cases.
const numbers = [1, 2, 3, 4, 5];
const doubledNumbers = numbers.map(function(num) {
  return num * 2;
});
console.log(doubledNumbers); // Output: [2, 4, 6, 8, 10]
-
reduce()– This applies a function against an accumulator and each element in the array, to reduce it to a single value. The example below uses the reduce() method to accumulate the array elements to find their sum.
const numbers = [1, 2, 3, 4, 5];
const sum = numbers.reduce(function(acc, num) {
  return acc + num;
}, 0);
console.log(sum); // Output: 15
-
forEach()– You can iterate over array elements in several ways, and there are loops for it. You can also use the forEach() method, which executes a provided function once for each array element. It iterates over the elements, as we see in the example below.
const numbers = [1, 2, 3, 4, 5];
numbers.forEach(function(num) {
  console.log(num);
});
// Output:
// 1
// 2
// 3
// 4
// 5
-
every()– The every() method ascertains whether all elements in the array pass the test provided by a callback function. It returns true or false accordingly.
const numbers = [1, 2, 3, 4, 5];
const isGreaterThanZero = numbers.every(function(num) {
  return num > 0;
});
console.log(isGreaterThanZero); // Output: true

const isGreaterThanTwo = numbers.every(function(num) {
  return num > 2;
});
console.log(isGreaterThanTwo); // Output: false
-
some()– Unlike the every() method, the some() method tests whether at least one element in the array passes the test provided by a callback function. Again, it returns answers in true or false.
const numbers = [1, 2, 3, 4, 5];
const isGreaterThanFour = numbers.some(function(num) {
  return num > 4;
});
console.log(isGreaterThanFour); // Output: true

const isGreaterThanSix = numbers.some(function(num) {
  return num > 6;
});
console.log(isGreaterThanSix); // Output: false
-
find()– The find() method returns the first element in the array that satisfies a provided testing function. Otherwise, it returns undefined.
const numbers = [1, 2, 3, 4, 5];
const foundNumber = numbers.find(function(num) {
  return num > 2;
});
console.log(foundNumber); // Output: 3

const foundNegativeNumber = numbers.find(function(num) {
  return num < 0;
});
console.log(foundNegativeNumber); // Output: undefined
-
findIndex()– The findIndex() method returns the index of the first element in the array that satisfies a provided testing function. Otherwise, it returns -1.
const numbers = [1, 2, 3, 4, 5];
const foundIndex = numbers.findIndex(function(num) {
  return num > 2;
});
console.log(foundIndex); // Output: 2

const foundNegativeIndex = numbers.findIndex(function(num) {
  return num < 0;
});
console.log(foundNegativeIndex); // Output: -1
-
flat()– The flat() method creates a new array with all sub-array elements concatenated recursively up to the specified depth.
const nestedArray = [1, [2, [3, 4]]];
const flattenedArray = nestedArray.flat(2);
console.log(flattenedArray); // Output: [1, 2, 3, 4]
-
flatMap()– The flatMap() method maps each element using a mapping function, then flattens the result into a new array.
const numbers = [1, 2, 3, 4, 5];
const mappedAndFlattened = numbers.flatMap(function(num) {
  return [num * 2, num * 3];
});
console.log(mappedAndFlattened); // Output: [2, 3, 4, 6, 6, 9, 8, 12, 10, 15]
-
at() – The
at()method is a relatively new addition to JavaScript, introduced in ECMAScript 2019. It allows you to retrieve an element from an array at a specific index, similar to using square bracket notation with the index.
However, at() also supports negative indexing and returns undefined for out-of-bounds indices instead of throwing an error.
Here’s the basic syntax of the at() method:
array.at(index)
-
array: The array to retrieve the element from. -
index: The index of the element to retrieve. This can be a positive or negative integer.
Here are a few examples to demonstrate the usage of the at() method:
const fruits = ['apple', 'banana', 'orange', 'pear'];

console.log(fruits.at(0)); // Output: 'apple'
console.log(fruits.at(2)); // Output: 'orange'
console.log(fruits.at(-1)); // Output: 'pear'
console.log(fruits.at(5)); // Output: undefined
console.log(fruits.at(-5)); // Output: undefined
Conclusion
That’s all for now. We hope it was useful and has given you a launchpad to start using the array methods. As a JavaScript developer, you don’t need to remember all the syntaxes of the Array methods. However, you must know their usage to ensure you maximise their benefits and deploy them at the right times.

Top comments (0)