In this article, we will learn how to setup a TLS connection in SQL Anywhere 11.
The connection will be like this:

A client device, e.g. laptop, connects to a server. Communications between the two will be encrypted and sent over a TLS protocol.
Requirements
- Both client and server use
Windows Operating System - The
SQL Anywhere 11is installed on both - A
telnetutility is installed on the client device
Boundary
- The client device should be able to connect to the server. We will test it using the telnet utility
- I use SQL Anywhere 11 here, but the steps described here should be applicable to version 9+
- The server should allow inbound connections to port 2638
- The scenario has been tested on Windows 10
Server Setup
We will now setup the TLS connection on the server. We will do these:
- Create a TLS certificate
- Run DB server
1. Create a TLS certificate
Before going further, make sure the SQL Anywhere 11 has been installed on the server already. We will use the createcert utility here.
Also, we first need to create a certs folder. The certificate files created will be stored in this folder. To create the folder, follow these steps:
- Open up Command Prompt
- Type:
mkdir c:\Users\Public\Documents\certs, and hit enter - Type:
dir c:\Users\Public\Documents\certs, and hit enter. There should be no error message, and the folder contents will be displayed.
To create the TLS certificate, simply login to your server, and follow these steps:
- Open up Powershell
- Type
cd "C:\Program Files (x86)\SQL Anywhere 11\Bin32"and then press enter - Type
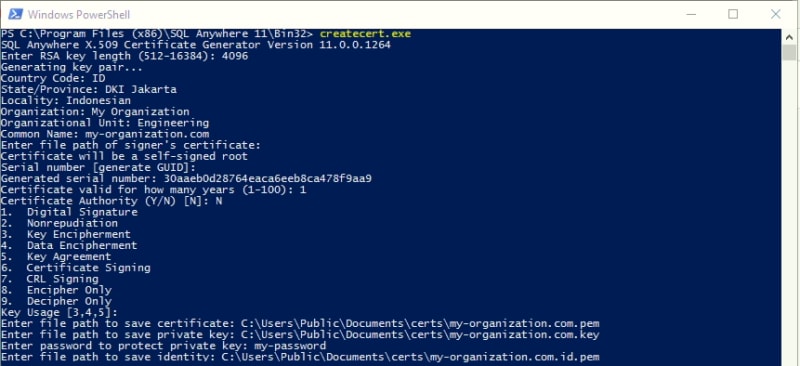
createcert.exeand then press enter. Note that, you may adjust the values accordingly.- Enter RSA key length (512-16384): 4096
- Country Code: ID
- State/Province: DKI Jakarta
- Locality: Indonesian
- Organization: My Organization
- Organizational Unit: Engineering
- Common name: my-organization.com
- Enter file path of signer's certificate: (leave this empty, and hit enter)
- Serial number [generate GUID]: (leave this empty, and hit enter)
- Certificate valid for how many years (1-100): 1
- Certificate Authority (Y/N) [N]: N
- Digital Signature
- Nonrepudiation
- Key Encipherment
- Data Encipherment
- Key Agreement
- Certificate Signing
- CRL Signing
- Encipher Only
- Decipher Only
- Key Usage [3,4,5]: (leave this empty, and hit enter)
- Enter file path to save certificate: C:\Users\Public\Documents\certs\my-organization.com.pem
- Enter file path to save private key: C:\Users\Public\Documents\certs\my-organization.com.key
- Enter password to protect private key: my-password
- Enter file path to save identity: C:\Users\Public\Documents\certs\my-organization.com.id.pem
After this, 3 certificate files will be created in C:\Users\Public\Documents\certs, and they are:
- my-organization.com.pem (we will use this on the client device later)
- my-organization.com.id.pem (we will use this on the server later)
- my-organization.com.key
2. Run DB server
Before we run the DB server, copy the SQL Anywhere database, e.g. DEMO2022.db to C:\Users\Public\Documents.
To run the DB server, follow these steps:
- Open up Windows Explorer, then go to C:\Program Files (x86)\SQL Anywhere 11\Bin32
- Find
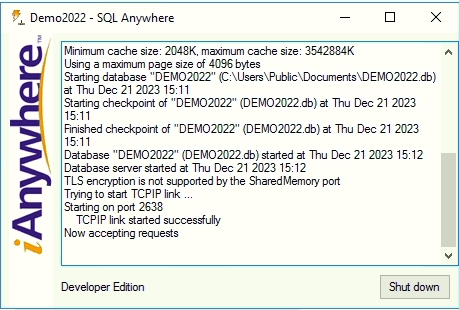
dbsrv11.exe, and double click it. - Once an application loaded, fill in the form as follow:
- Database:
C:\Users\Public\Documents\Demo2022.db - Server name:
DEMO2022 - Options:
-ec TLS(TLS_TYPE=RSA;IDENTITY=c:\Users\Public\Documents\certs\my-organization.com.id.pem;IDENTITY_PASSWORD=my-password) -x tcpip - Hit the OK button
The database server will now run at port 2638. If no error message is shown, the database server runs correctly.
- Database:
Setup Client
Before going further, make sure the SQL Anywhere 11 has been installed on the server already.
Also, we will use telnet to test the client connection to the server. If the telnet has not been installed yet, open up Powershell (run it as Administrator), and then run this command:
Enable-WindowsOptionalFeature -Online -FeatureName TelnetClient
If you receive an error message when running the command, make sure you are connected to the internet, and then re-run the command.
Now let's assume each of the device's ip addresses are:
- Client: 192.168.0.9
- Server: 192.168.0.10
To test the client-to-server connection, Open up Command Prompt, and then run this command:
telnet 192.168.0.10 2638
Hit enter, and then you will see a blank output, it means the connection goes through and the client can connect to the server successfully. Otherwise, if you see an error message, fix it first until you can connect to the server successfully.
Now, we need to copy the certificate files we created on the server to the client device, specifically at C:\Users\Public\Documents\certs (create the certs folder first).
Now, we will setup the ODBC connection. Open up Start Menu, and then type "ODBC", and then click "ODBC Data Sources (64-bit)". Make sure you choose the 64-bit option. Once it is opened, follow these steps:
- Hit the "System DSN" tab. We will create a system-wide ODBC configuration
- Hit the "Add" button
- Choose "SQL Anywhere 11". If the option does not appear, you need to install the SQL Anywhere 11 first
- At the ODBC tab, fill in the following:
- Data source name: Demo
- At the Login tab, if your database requires a login:
- Choose "Supply user ID and password"
- Fill in User ID and Password
- Tick the "Encrypt password" option
- At the Database tab, fill in the following:
- Server name: Demo2022 (we specify this name when running the DB server before)
- Untick "Stop database after last disconnect". This will make sure the DB server will always run on the server
- At the Network tab, fill in the following:
- Untick the "Shared memory" option. This option is enabled when we run the DB server locally
- Tick the "TCP/IP" option, and set the value to this:
"HOST=192.168.0.10;PORT=2638" - Click the "TLS" option, and then click the Edit button
- For the "Trusted certificates", click the Browse button and then point it to the
my-organization.com.pem. If you cannot see the certificate files, choose the "All Files" option, and then you should be able to see them. Or, directly set the value to this:C:\Users\Public\Documents\certs\my-organization.com.pem - TLS Type: RSA
- For the "Trusted certificates", click the Browse button and then point it to the
- Lastly, go back to the ODBC tab, and hit the "Test Connection" button. And you should see a "Connection successful" message.

- At the ODBC tab, fill in the following:
Now, you can use the created ODBC Data Source in your application. Happy coding!

Top comments (0)