What Is This All About?
I really like making perfect commits, and I particularly hate appending or creating a new commit because of a guideline mistake. So I needed a tool that would bark at me when I was about to make a bad commit.
The Internet is full of tutorials explaining what Git hooks are for, but I still had to spend a lot of time to build a nice workflow for my JavaScript applications to use them correctly. So here is an overview of my toolkit that I use today on every single project.
The first library focused on workflow automation is Husky — because a dog barking at me gets my attention. Husky is a JavaScript library that makes Git hooks easier. It offers the possibility of integrating them directly into our JavaScript projects, saving us from having to deal with startup guidelines or startup scripts on repository initialization.
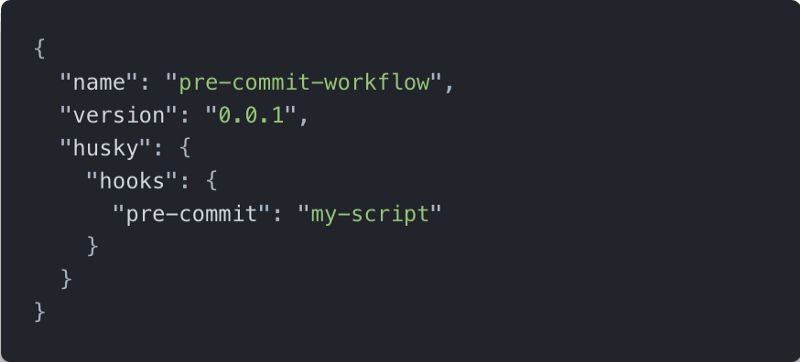
Using Husky is really simple. We just need to add a new husky key into the package.json file. This new entry contains a key/value object, hooks which represents our Git hooks, and the script we want to execute:

Here is a very simple package.json file with the husky hooks. For simplicity sake and because the husky version might change, it didn’t include the devDependencies.
Clarifying Our Needs
When I’m working on a React application, I use several tools to keep a consistent code and simplify the teamwork:
- Prettier, on JS, JSX, JSON, CSS and MD files, to format my code into something consistent across developers.
-
Eslint, with the Airbnb config, to propose a robust linting on my applications. I, however, prioritize Prettier’s rules with
[eslint-config-prettier](https://github.com/prettier/eslint-config-prettier). - Jest, for my applications unit tests.
- Stylelint, to keep my CSS modules clean.
Unfortunately, Husky only supports executing one command at a time per type of Git hook.
I will also have to check every file modified to apply the proper tools, which is tedious work.
Thankfully, there is already an awesome tool to help me do that: lint-staged.
lint-staged is awesome because it executes the needed scripts only on modified files, which make the hooks run very fast. Thanks to lint-staged, we are now able to run a very fast workflow on the delta commit stage, therefore drastically reducing the usual duration of all scripts.
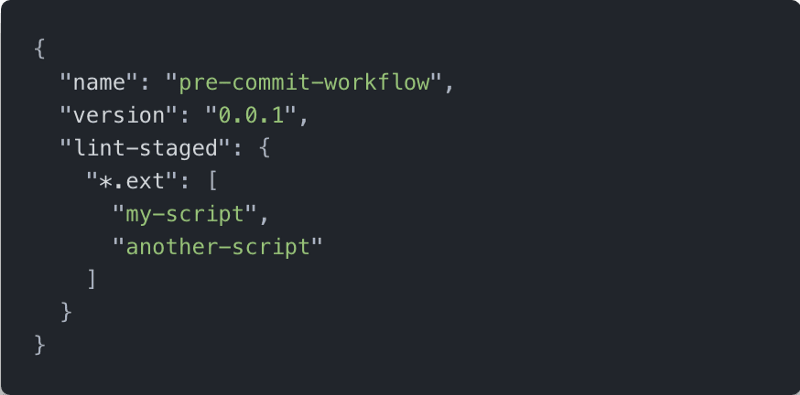
Same as Husky, lint-staged is a new key/value object in our package.json file that represents the scripts to execute.

Same as before, I have only included the interesting part of my package.json file
Now, everything just looks so simple. I just need to tell Husky to use lint-staged and tell lint-staged what I need to do on my files.
The Final Result
Putting it all together, this is what my package.json file looks like:
When I make a commit, my hooks do the following:
- For my CSS files, run Prettier then run Stylelint then add the updates automatically into the Git staging area.
- For my JS and JSX files, find and execute tests related to my changes, then run Prettier, followed by Eslint, and finally add the updates automatically to the Git staging area.
- For my MD and JSON files, run Prettier and add the updates automatically to the Git staging area.
And here we are, not messing with our commits anymore. 💪
There are a lot of other checks we can do before any commits and also other Git hooks that we could use to improve the versioning system workflow, I’d like to hear your needs and I’d also like to see you making improvements on my workflow!

Ascending to more robust development workflow. Photo credit to me.
Bonus
While writing this post, I realized that my boilerplate application is based on a lot of additional scripts. So here is a listing of what I add to every single new project of mine. Note this example is applied to a React application and I use yarn as a package manager.
So, first install the required packages:
yarn add --dev cross-env enzyme enzyme-adapter-react-16 eslint-config-airbnb eslint-config-prettier eslint-plugin-import eslint-plugin-jsx-a11y eslint-plugin-react eslint-plugin-react-hooks husky jest-enzyme lint-staged prettier stylelint stylelint-config-css-modules stylelint-config-prettier stylelint-config-recommended stylelint-order stylelint-prettier
Then, add the config files:
And we are good to go!


Top comments (0)