
Send your clients a weekly or monthly report through email – they’ll be grateful!
“Why do you pay for this product? What’s the real value, in numbers, of using this product?”.
If you ask your clients this question, and they don’t know the “value” they get in numbers (like hours saved or clients generated with your tool) – they’re in a risk zone for churn 😬

Every SaaS company has dashboards and metrics that they share with clients on their platform. This is the place where clients actually understand how your tool or service helps them.
Today, we’ll share with you how to save your clients’ time by sending report PDFs automatically to them so they don’t have to fetch them manually.
And if you ask: “Why do I actually need it?”.
I’ll tell you, this can improve your retention metrics:
_Your clients automatically get reports -> they feel value from using your product/service -> they stay with you for a longer time -> you increase the Lifetime Value of the client _🚀
Clients are always grateful when you can automate repetitive tasks such as downloading reports from your platform. This will only take about an hour to accomplish with browserless and will save your customers precious time.
We’ll share with you a puppeteer pdf generator *code snippet that you can copy & paste and save time even on coding *😅
How to automate PDF generation with Browserless
Let’s illustrate this with our own browserless’ account dashboard. We can see the number of sessions that have run and our worker’s CPU & memory statistics. We’ll use our browserless API key to run the script and get the PDF returned.
You can then make a simple NodeJS app to schedule that task and also send the PDF returned from browserless through email. Or you can send these PDFs via your current Email Marketing tools.

Let’s Get Started
First of all, create your Browserless account:
Choose the plan you want to go with; Usage-based with a free trial or Dedicated.
Once you create the account, you’ll have the Dashboard (yes, we also have a dashboard 😀) with an API key, that you can use for automation:
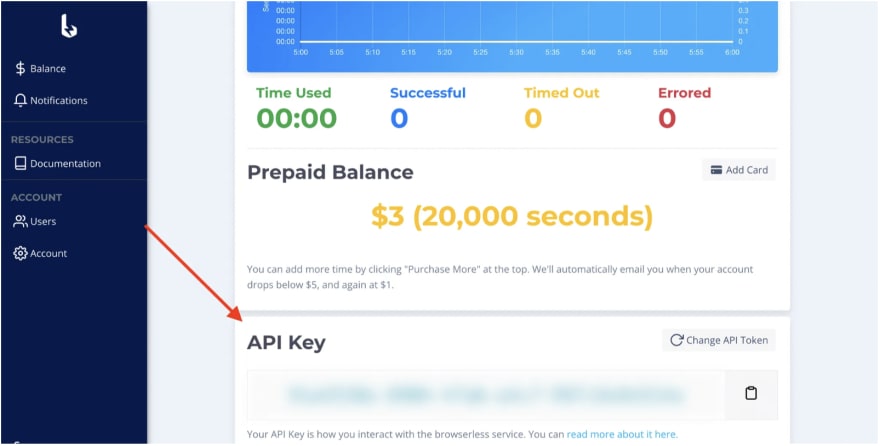
To extract this dashboard, we can use the /function API to run the script below, where “token” is your API key from Browserless:
const puppeteer = require('puppeteer-core');

(async() => {
    const token = "YOUR_API_KEY";
    const email = "YOUR_LOGIN_EMAIL";
    const password = "YOUR_LOGIN_PASSWORD";

    const browser = await puppeteer.connect({ browserWSEndpoint: 'wss://chrome.browserless.io?token='+token });
    const page = await browser.newPage();
    await page.setViewport({width:800,height:1020});
    await page.goto('https://cloud.browserless.io/account/',{ waitUntil: 'networkidle0'});
    await page.type('#login-email', email, {delay: 10});
    await page.type('#login-password', password, {delay: 10});
    await page.click('div.css-vxcmzt > div > button > span');
    await page.waitForSelector('.chartjs-render-monitor');
    await page.evaluate(() => {
        var leftpanel = document.querySelector(".sticky_nav__3r2Ep");
        leftpanel.parentNode.removeChild(leftpanel);
        const date = new Date();
        document.querySelector('.text-white.mb-0').innerHTML="Sessions on "+date;
        document.querySelector('#app > div > div > div > .col-8').classList.add("col-12");
        document.querySelector('#app > div > div > div > .col-12').classList.remove("col-8");
    })
    await page.emulateMediaType('screen');
    return page.pdf({path:"dashboard.pdf",printBackground:true});
})();
It’s a simple script, we basically access the dashboard URL, login with our credentials, and click on the sign in button. Once the dashboard is loaded, we generate the PDF.
First we import the puppeteer core library, which is lightweight since you’ll be connecting to a remote or existing chrome, and doesn’t come with browser binaries.
const puppeteer = require('puppeteer-core');
We’ll wrap all our code inside an async IIFE so that our code executes off the bat. Then we define our local variables, such as our API KEY, email, and password. The best practice here is to use process environments, but we’ll keep it simple for now.
(async() => {
    const token = "YOUR_API_KEY";
    const email = "YOUR_LOGIN_EMAIL";
    const password = "YOUR_LOGIN_PASSWORD";
Now let’s connect to the browserless WS endpoint by providing our API KEY and create a new browser and page to start automating.
const browser = await puppeteer.connect({ browserWSEndpoint: 'wss://chrome.browserless.io?token='+token });
const page = await browser.newPage();
Once that’s done, we’ll set the desired viewport
await page.setViewport({
    width: 1920,
    height: 1080
})
We then go to the browserless account page and wait for the network traffic to settle down so that the email and password selectors are actually loaded.
await page.goto('https://cloud.browserless.io/account/',
{
    waitUntil: 'networkidle0'
});
We enter our credentials and click on the submit button – you can use environment variables for the password here.
await page.type('#login-email', 'YOUR_EMAIL', {delay: 50});
await page.type('#login-password', 'YOUR_PASSWORD', {delay: 50});
await page.click('div.css-vxcmzt > div > button > span');
Once we’ve clicked log in, we want to wait to make sure the page is fully loaded by checking that the graph has been rendered.
await page.waitForSelector('.chartjs-render-monitor');
Now we want to modify the page before generating the PDF. We can do so inside the page.evaluate() method. We are fetching the left panel navigation menu and removing it. Then we are finding the main panel that has the content that we want, we’ll remove the .col-8 class and add the .col-12 class so that it is fullscreen. You can feel free to modify the UI of your dashboard in this section, such as removing unwanted sections or adding new graphic elements by injecting html+css that you may want to show in the PDF.
await page.evaluate(() => {
  var leftpanel = document.querySelector(".sticky_nav__3r2Ep");
  leftpanel.parentNode.removeChild(leftpanel); //removing the left panel
  const date = new Date();
  document.querySelector('.text-white.mb-0').innerHTML="Sessions on "+date; //adding the date in the title
  document.querySelector('#app > div > div > div > .col-8').classList.add("col-12"); //adding this class to be fullscreen
  document.querySelector('#app > div > div > div > .col-12').classList.remove("col-8"); //removing this class to overwrite the container size.
})
After all your modifications are done, feel free to generate the pdf. It is common that CSS defaults to print CSS styles (in order to save ink when printing) so you can add these two lines of code to make the CSS look more like a user would usually look at it. Otherwise the CSS could shift and look weird.
await page.emulateMediaType('screen'); //will help not to render print css
return page.pdf({printBackground:true}); //will render backgrounds of your page
In some cases pages are rendering their fonts with web fonts, so if your page looks weird even after adding these two lines of code, it could be that the web fonts aren’t loading properly because the page detects you’re running chrome headless, and hence doesn’t see the need to render any fonts at all. To overcome this, you can either run the session headful or set the user agent manually as so:
await page.setUserAgent(
  'Mozilla/5.0 (Macintosh; Intel Mac OS X 10_14_0) AppleWebKit/537.36 (KHTML, like Gecko) Chrome/84.0.4147.125 Safari/537.36'
);
Here’s an example of why setting these last two lines of code are relevant:
Page with only page.pdf(); looks like this:

Page with print background looks like this:

page with emulateMediaType set to screen looks like this (final result):

Now you can take care of sending this PDF through your marketing platforms, have fun!
👉 If you want to do this yourself, just create a Browserless account and get started!

Top comments (0)