
There are countless services nowadays for hosting static sites: GitHub, GitLab, Netlify, Surge, Porkbun, DigitalOcean, even Cloudflare.
If there are so many ways to get a static site online, why would anyone bother with setting up a plain ol' S3 bucket?
Well, there are lots of reasons:
Hosting multiple versions of a site. If you want
v1,v2, andv3at the same time, but don't want to commit your built sites to Git, then you need a writable location.Hosting many sites from one domain. Maybe you're a hosting service! Or maybe you just provide hosting for multiple users in your company. You can build out a consistent workflow on top of S3 and host all the content in a single location.
Total control of how the sites are published. Maybe you want to vary available content by region, add authentication, use server-side analytics, or just configure how content is cached by the CDN. Building your own custom workflow will give you access to all the levers you need.
In this article, we'll develop a recipe for using Cloudflare R2 as a static site hosting service. You will:
Create a simple static site,
Publish the site to Cloudflare R2 with MinIO Client, and
Use Cloudflare Transform Rules to make your bucket behave more like a web server.
By the end of it, you will be the proud owner of a many-headed static site hydra that you'd never know was a simple S3 bucket underneath.
Prerequisites
The easiest way to meet all the prerequisites for this tutorial is to complete the previous tutorial in this series, Serve static assets with Cloudflare R2.
Here's a summary of the things you'll need:
A domain name proxied by Cloudflare.
A Cloudflare account.
An R2 bucket configured for public access.
For this tutorial, I created an R2 bucket called
sitesand made it accessible atsites.brettops.io. The domains and paths you will use for this article will be different, but the steps should otherwise be the same for you.
Step 0: Build a static site (optional)
If you came here because you already have a static site that you're ready to publish, use that and skip this section. For everyone else, you can set up an example site with me.
I'll be using MkDocs, because it's fast and simple and generates some nice boilerplate so that the site isn't completely empty. MkDocs is written in Python, so you'll need Python installed (which probably isn't an issue if you're on Linux).
Install the mkdocs package:
pip install mkdocs
This installs the mkdocs command. You can test that mkdocs is available by doing the following:
mkdocs --version
$ mkdocs --version
mkdocs, version 1.4.2 from /home/brett/.pyenv/versions/3.10.7/lib/python3.10/site-packages/mkdocs (Python 3.10)
Create a new mkdocs.yml project in the current directory:
mkdocs new .
$ mkdocs new .
INFO - Writing config file: ./mkdocs.yml
INFO - Writing initial docs: ./docs/index.md
One more thing: let's add a subpage for this site. You'll see why this is important later in the article:
cat > docs/about.md <<EOF
# About

Some more info about that.
EOF
You can run a local dev server to see your changes in action:
mkdocs serve
$ mkdocs serve
INFO - Building documentation...
INFO - Cleaning site directory
INFO - Documentation built in 0.05 seconds
INFO - [23:22:45] Watching paths for changes: 'docs', 'mkdocs.yml'
INFO - [23:22:45] Serving on http://127.0.0.1:8000/
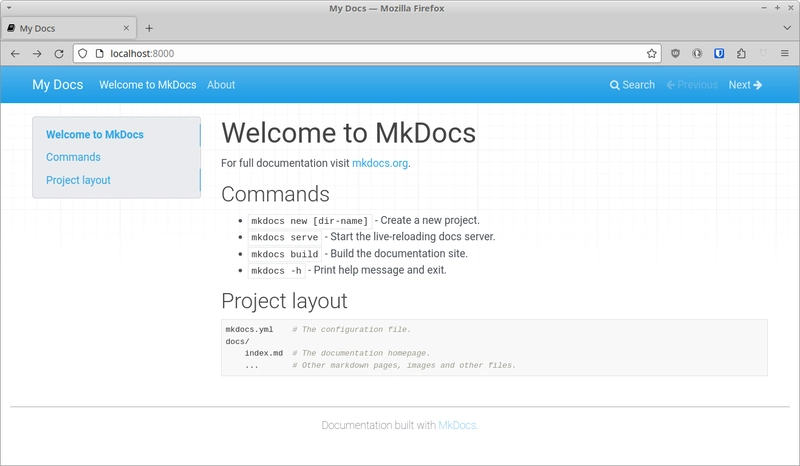
Visit your local dev server at http://127.0.0.1:8000/. Our fancy new docs site isn't going to be anything to write home about, but it'll do the job.
When you're satisfied with your site, you can build a finished site for hosting like so:
mkdocs build
$ mkdocs build
INFO - Cleaning site directory
INFO - Building documentation to directory: /home/brett/Projects/examples/mkdocs-site/site
INFO - Documentation built in 0.05 seconds
This will create a site/ directory that contains our finished site, which is what we'll publish to Cloudflare R2.
Step 1: Deploy the site with MinIO Client
MinIO Client is far and away the best S3 command line tool I've found.
It's written in Go, so getting it onto your system is easy, and it supports a ton of commands that alternatives such as aws s3 or s3cmd simply don't have.
First, download and install the mc tool:
curl -O https://dl.min.io/client/mc/release/linux-amd64/mc
sudo install mc /usr/local/bin/
$ curl -O https://dl.min.io/client/mc/release/linux-amd64/mc
  % Total % Received % Xferd Average Speed Time Time Time Current
                                 Dload Upload Total Spent Left Speed
100 24.9M 100 24.9M 0 0 10.2M 0 0:00:02 0:00:02 --:--:-- 10.2M
$ sudo install mc /usr/local/bin/
For more installation options, see the official quickstart.
The mc command should be usable at this point:
mc --version
$ mc --version
mc version RELEASE.2023-06-15T15-08-26Z (commit-id=bf3924b58341eb7a71785653a29bf26ca9fac95e)
Runtime: go1.19.10 linux/amd64
Copyright (c) 2015-2023 MinIO, Inc.
License GNU AGPLv3 <https://www.gnu.org/licenses/agpl-3.0.html>
mc allows you to configure a connection by creating an alias. You can have as many aliases configured as desired.
Use the mc alias set command to configure your R2 connection:
mc alias set NAME https://XXXXXX.r2.cloudflarestorage.com/ YYYYYY ZZZZZZ
Where:
NAMEis the desired name for your alias. You'll have to type this often, so it's better to keep it short. I'll call miner2.XXXXXXis your Cloudflare account ID.YYYYYYis your Cloudflare R2 access key ID.ZZZZZZis your Cloudflare R2 secret access key.
Once you've configured an alias, you can test it out or access it by prefixing the desired path with the alias:
mc ls r2/
$ mc ls r2/
[2023-06-17 18:38:11 UTC] 0B sites/
Hey, that's the sites bucket! Let's try accessing it!
$ mc ls r2/sites/
$
The above prints nothing. That's good! There's nothing in the bucket!
At this point, we've verified that the bucket works. Now we can put some stuff in it.
Note: The MinIO docs say to test the connection like this:
mc admin info r2This does not work with Cloudflare. I don't know why.
It probably has to do with the fact that AWS S3 buckets have the bucket name in the domain, whereas Cloudflare R2 buckets have the bucket name in the path. 🤔
For hosting a static site, far and away the best tool for the job is the mc mirror command, which synchronizes files between two locations:
mc mirror SOURCE TARGET
In our case, we'll set it up to synchronize the local MkDocs site/ directory to the R2 bucket. We'll add the --overwrite flag so that it overwrites existing files if there are any differences, and we'll add the --remove flag so that it deletes files from the target that no longer exist in the source.
This will be great for when we create a pipeline to continuously publish changes to a site.
Double-check your command before running. You can very easily delete any existing data in the bucket if you're not careful with these commands.
mc mirror site r2/sites/latest/ --overwrite --remove
$ mc ls r2/sites/
$ mc mirror site r2/sites/latest/ --overwrite --remove
...site/sitemap.xml.gz: 1.38 MiB / 1.38 MiB ━━━━━━━━━━━━━━━━━━━━━━━━━━━━━━━━━━━━━━━━━━━━━━━━━━━━━━━━━━━━━━━━━━━━ 556.07 KiB/s 2s
If we browse to the published location, we'll be able to access the individual files we just uploaded:

We're not done yet though.
Step 2: Rewrite trailing slashes
You may have noticed that if you try to click on the About link, you get an error:
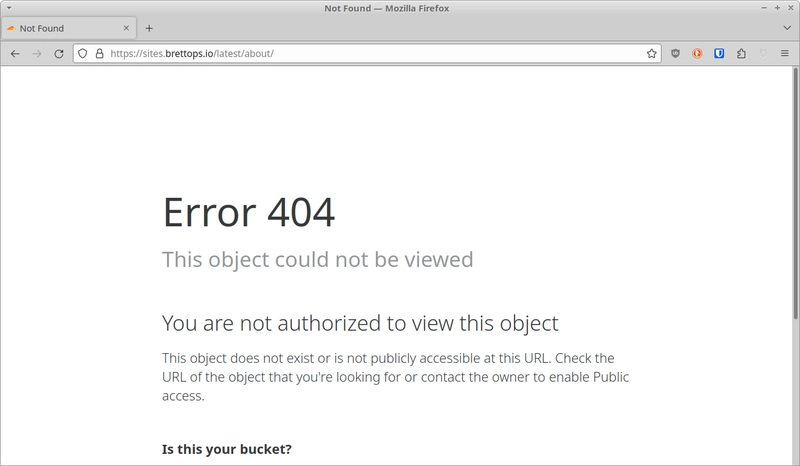
Web servers these days will almost always rewrite a URL that ends in a trailing slash (/) to an index.html file at the same path. In other words:
Is the same page as:
https://brettops.io/index.html
This allows you to visit sites.brettops.io/latest/ and the contents of sites.brettops.io/latest/index.html, which is how it worked when we tested our site locally. Cloudflare doesn't do this by default, which is why our About link leads to nowhere.
We can tell Cloudflare to behave like this when serving our R2 site, using Rewrite URL Rules. That way, our links will work, and we'll be able to access our site at sites.brettops.io/latest/.
Go to the Cloudflare dashboard for your domain, and click Rules, then Transform Rules in the sidebar:

Click the Create rule button under the Rewrite URL tab:

Add an actually good name for your rule. It's the only way you'll be able to remember what it does without reading through your rule expressions:

Under If..., select Custom filter expression, and add the following expressions to the Expression Builder with an And between them:
| Field | Operator | Value |
|---|---|---|
| Hostname | equals |
sites.brettops.io |
| URI Path | ends with |
/ |
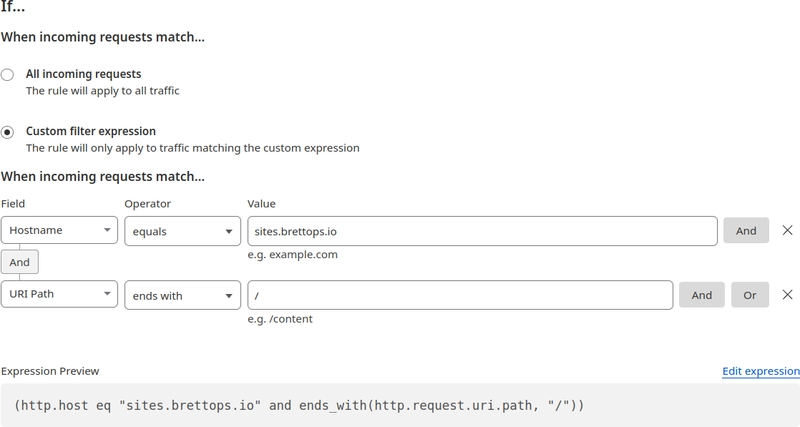
Alternatively, you can edit the expression manually by clicking Edit expression and add the following:
(http.host eq "sites.brettops.io" and ends_with(http.request.uri.path, "/"))
Under Then..., then under Path, select the Rewrite to... option, select Dynamic, and add the following expression (see screenshot image below for reference):
concat(http.request.uri.path, "index.html")
This uses the concat function to append index.html to the URLs of matched request.
And under Query, select Preserve.

When you're ready, click Deploy. Then your new rule will be live:

At this point, you should be able to navigate to your site's URLs and see that they're accessible without adding index.html to the path:
 is accessible.](https://media2.dev.to/dynamic/image/width=800%2Cheight=%2Cfit=scale-down%2Cgravity=auto%2Cformat=auto/https%3A%2F%2Fassets.brettops.io%2Fblog%2Fstatic-site-cloudflare-r2-minio-client%2Fdocs-site-rewritten.png)

Congratulations, we've built a fully functional static site hosting service!
Conclusion
Cloudflare R2 is deeply integrated with Cloudflare and easy to get started with. MinIO Client makes working with S3 clean and obvious. Together, they provide a slim, bare-bones hosting solution that is highly adaptable to different needs and use cases.
What's better, all of the steps taken in this article are easy to automate in a CI pipeline, allowing you to build a general solution for your team or company that scales with your users.
For simple use cases, I'd still rather use an off-the-shelf solution, but this is one of those tools that you keep in your toolbox, because you never know when you're going to need it. Sometimes, all you really need is something you can hack on and make your own.

Top comments (0)