
Object detection is an exciting area of computer vision that has numerous practical applications. From self-driving cars to security systems, object detection can help machines make sense of the world around them. In recent years, deep learning-based approaches have shown great promise in achieving state-of-the-art performance in object detection tasks. However, implementing these approaches can be challenging due to the complex models and hardware requirements. Fortunately, with the advent of single-board computers like the Brainy Pi, it is now possible to deploy sophisticated object detection models using open-source libraries like OpenCV. In this blog post, we will explore how to perform object detection using OpenCV on the Brainy Pi, and provide a step-by-step guide to get started with this exciting technology.
Overview
Before diving into the code, let’s first discuss the project structure and the different files and folders used.The objectDetection.py file contains the Python code for object detection using the Single Shot Detector (SSD) algorithm with MobileNetV3 as the base network. The code uses the OpenCV library for image and video processing.The requirements.txt file contains a list of the Python libraries required to run the object detection code. Let’s install libraries using the following command.
pip install -r requirements.txt
The Single Shot Detector (SSD) Algorithm
The Single Shot Detector (SSD) algorithm is a popular deep learning-based approach for object detection. It is a one-stage detector that directly predicts the bounding boxes and class labels for all objects in an image, without using a separate region proposal network. This makes it faster and more efficient than other object detection algorithms.The SSD algorithm uses a convolutional neural network (CNN) to extract features from the input image, and then applies a set of detection heads to predict the class labels and bounding boxes for each object. The MobileNetV3 architecture is a popular choice for the base network in SSD, as it is lightweight and optimized for mobile devices.
Running Object Detection with OpenCV
To perform object detection with OpenCV, we first need to install the necessary libraries. We can do this by running the following commands in the terminal:
git clone https://github.com/brainypi/brainypi-opencv-examples.git
cd object-detection
pip install -r requirements.txt
Once the libraries are installed, we can run the object detection code by running the following command:
python objectDetection.py
This will start the object detection script, which captures frames from the camera and uses the SSD model to detect objects within the frames. The detected objects are then displayed on the screen in real-time, with bounding boxes around them.To exit the program, press the q key.
Adapting the Code for Your Own Use
If you want to use this face recognition code for your own project, you’ll need to make some changes to customize it for your specific use case. Here are some tips for adapting the code:
`detectObjects()` – Function which is responsible for detection objects

- Inputs:
  - img ([cv2.Mat]): Input Image
  - thres ([int]): Object detection threshold
  - draw (bool, optional): Draw binding boxes in output frame. Defaults to True.
  - objects (list, optional): List of objects to filter, i.e will only detect these objects. Defaults to [].

- Outputs:
  - img [cv2.Mat]: Output image
  - objectInfo [list]: Object information
We can use this function as follow
threshold = 0.45
result, objectInfo = detectObjects(img, threshold, 0.2)
Let’s change the object detection threshold to remove false positives.
threshold = 0.85
result, objectInfo = detectObjects(img, threshold, 0.2)
Now it will only detect objects which the model is 85% sure of the object.
Let’s say you want to detect only 1 or 2 objects like chair or books, then you can
threshold = 0.85
objects = ["chair", "books"]
result, objectInfo = detectObjects(img, threshold, 0.2, true, objects)
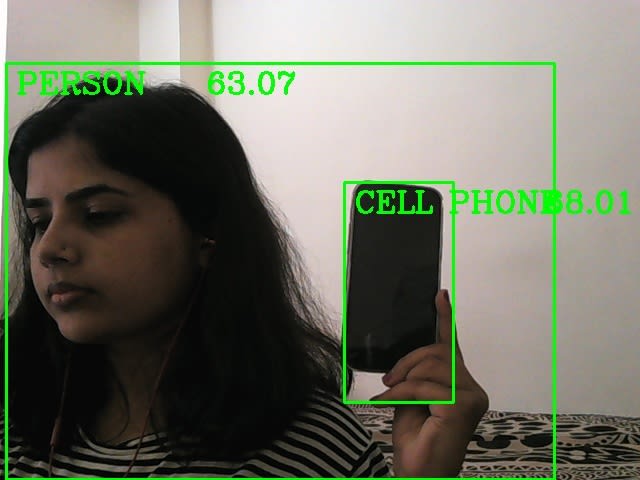
so will only detect chair and books and filter out all the other objects.Following example is for Cell phone and Person detection.
You can see the full example in the code here — https://github.com/brainypi/brainypi-opencv-examples/blob/main/object-detection/objectDetection.py
Conclusion
Object detection using OpenCV on brainypi can be used for many Edge applications. In this tutorial, we explored how to perform real-time object detection using Python, OpenCV, and the SSD algorithm. We also discussed some improvements to the code. With this knowledge, you can develop your own object detection system on Brainy Pi. Checkout more opencv applications


Top comments (0)