
With the launch of the Apple Watch Series 5 comes a new watchOS 6 update which brings us a lot of new and exciting stuff.
Some of the new features in this update include new watch faces, new health features and, for the first time, a dedicated App Store. You can download apps for your Apple Watch without an iPhone and that brings us to another major update – you can now develop apps exclusively for watchOS without the need to also create an iOS app.
So, with all these new updates, I decided it’s time for me to try and build my own watchOS app, and use this opportunity to see the differences between developing iOS and watchOS apps.
So let’s get started!
The idea behind the application
What will you be needing?
- Xcode 11 (for building only watchOS apps)
That’s pretty much everything you’ll need since you don’t actually need an Apple Watch to create an Apple Watch app – Xcode has all the simulators you need. If you plan on developing both an iPhone and an Apple Watch app, it’s better to have an actual Apple Watch because the communication between Apple Watch and iPhone is a bit delayed, and when you’re using simulators you don’t get the actual feeling of the duration of this delay.
What will we actually be developing?
- A simple countdown app
You can have all your important events and dates in one place, and use the app as a reminder or a timer for each one. For example, you can add your vacation plans or maybe someone’s birthday.
Our app is going to be a simple app with tableView on the first screen – with a list of all our important events, a single screen for each of those events and a few important pieces of information.
Let’s talk about the setup
Now that we are ready and have all the information we need, we can start by creating a new project by opening Xcode and choosing to Create a new Xcode project → Watch App and click next.
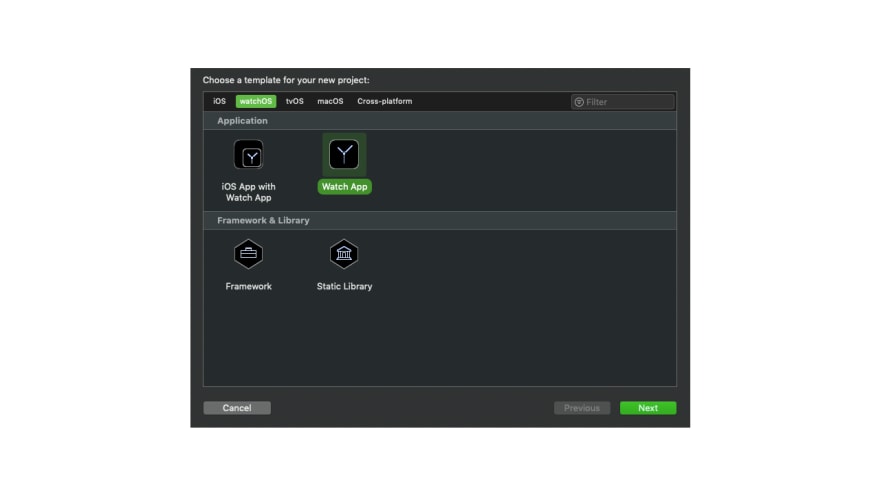
On the next screen, give your new app a name and add a few more specifics for your app – like are you going to be using Storyboard or SwiftUI. In this case, we’ll be using Storyboard.

After choosing everything you want to include/exclude from your app, click next.
OK, you have created your Apple Watch project and, as you can see, the structure of your project consists of two parts: WatchKit App and WatchKit Extension. You need both of them to develop the watchOS app. The main difference between them is that the WatchKit App deals with displaying UI, so you need to store all your assets and storyboards (if you are using them) here. At the same time, everything that includes code is stored in WatchKit Extension, so all your controllers and other classes need to be stored here. Also, if you are using some images or other assets, you need to store them inside Extension as well.

Creating the app UI
We are going to start by creating a user interface. The first step is selecting the interface storyboard – here you can see an empty interface controller, which is equivalent to the view controller in iOS apps. You can drag and drop elements in the same way you do in iOS apps, with the main difference being you can’t position elements using constraints or resize them, you can simply add another element beneath the previous element. If you want to add elements horizontally, you need to use groups that are most similar to stack views in iOS. You will see examples of this as we develop our app.
To create our first screen with tableView, we’ll start by dragging a table from the Object Library onto our empty Interface controller.
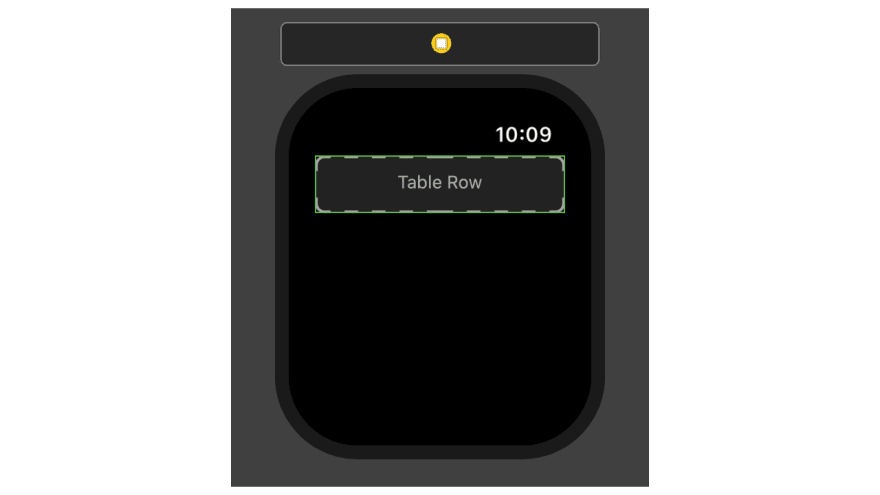
As you can see, the table row is actually a group, so you can just drag and drop other UI elements into it. We want to display our event’s title, date and image in each table row, and we’ll add a separator for decoration – but vertically, not horizontally. Since we want our table view row to be filled horizontally, we are going to use groups. Start by dragging a new group from the Object Library and set its layout to horizontal. Then add a separator and another group – only this one will be filled vertically since we want our two labels to be beneath one another. After doing so, your interface object hierarchy should look like this:

And at the end, add an image view. The end result should look something like this:

Our table view screen is set and we can start creating our interface controller for a single event. Start by dragging another interface controller and setting its identifier as Event in the Attributes inspector, so you can refer to this interface controller in code. On this screen, you won’t be needing a group since all our elements are going to be beneath one another. You can just drag image view, two labels and a timer onto the controller. After setting the desired positions and colors, your controller should be similar to this:

Now that we are all set on the UI part, we can switch to the coding part of our app – that means we are switching to the WatchKit Extension group of our project.
The process of creating controllers
For our app, we are going to use the existing InterfaceController with little modifications. We are going to start by deleting everything except the class definition. The next thing we need to do is connect our outlets in the storyboard to our controller, so we can access them from code. To do this, we need to go to our storyboard and select our first interface (the one with table view) and set its class to InterfaceController. Now that we connected our outlets, we can add our mock database that has a few Event objects. Every Event object consists of a name, a date and a category. The category determines the photo and the color of each event.

When we’re done with this part, we need to create a new controller – this time for each row of our interface table. Interface tables in WatchKit are much simpler than iOS tables – they don’t have delegates or data sources, and we only need a controller for each type of cell we use inside the table. Even though its name is a row controller, it is a subclass of NSObject. So, to create our EventRowController, we need to right-click on the WatchKit Extension group and choose the New file → WatchKit class and write its name, make sure we set the subclass to NSObject and click next and then create.
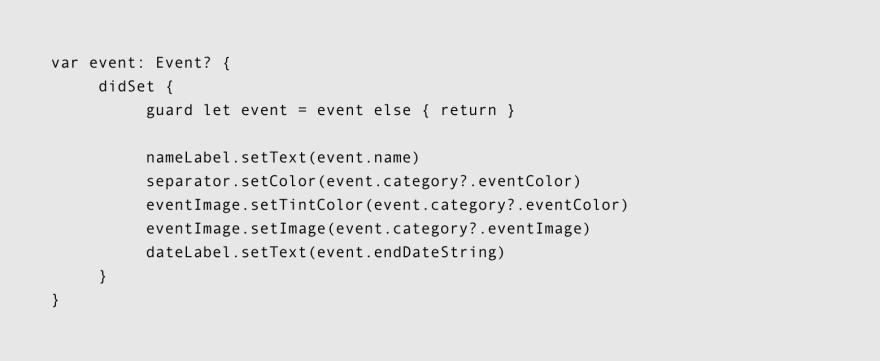
Now, let’s go back to our storyboard, select our table row on our first interface controller and set its class to EventRowController. This enables us to connect UI elements to code. After doing so, add this part below the outlets:
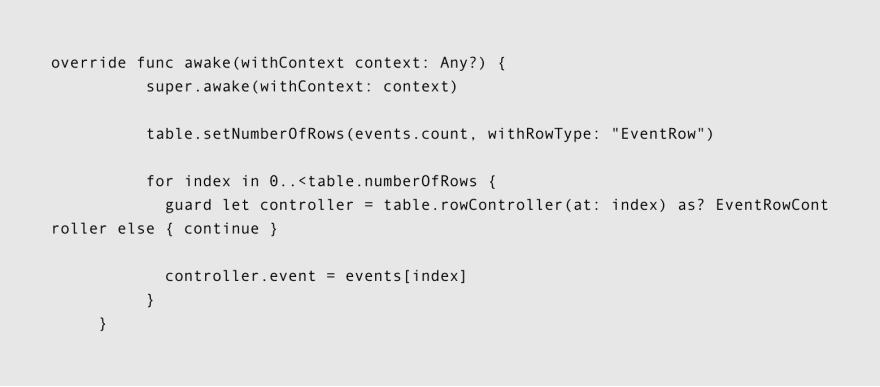
With this, our EventRowController is set. Now we need to pass an instance of Event to each row of our table. We need to go back to our InterfaceController and add this part of the code below the outlets:
After building and running our project, you’ll get something that looks like this:

Now we need to define what happens when the user selects a row. We need to add the following code to our InterfaceController:

Our table is ready and now we need to create our single event controller. Right-click on the WatchKit extension and choose New File → WatchKit class. Add a new controller name, in our case EventInterfaceController and set its subclass of WKInterfaceController. When you’re done, click next and then create.
Now we need to connect our storyboard interface again, so go to storyboard but this time to our second interface controller – set its class to EventInterfaceController. Now connect all of the UI elements to the code.
Add this part of the code below the outlets:
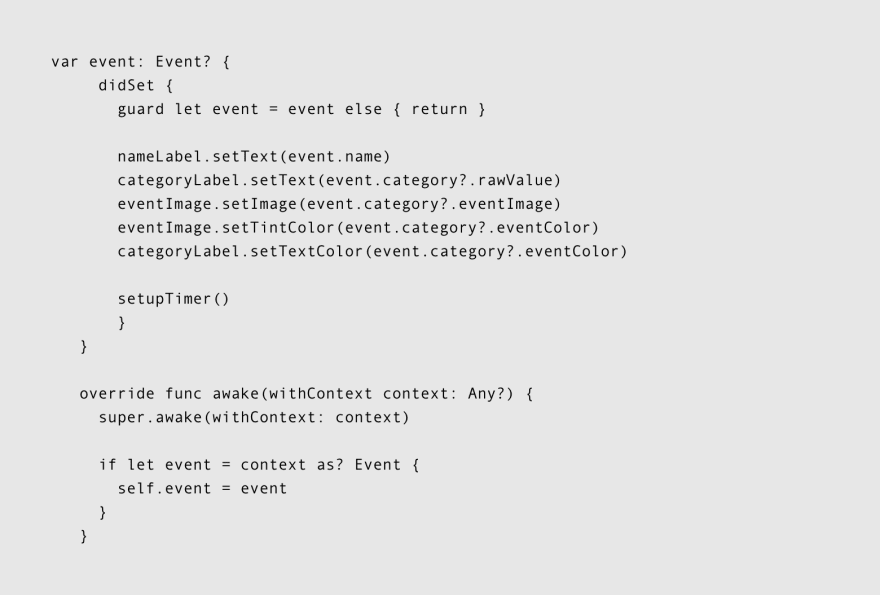
This last part of the code we added initializes our interface controller with the specified context data if there is any. In our case, the context object is Event and it has been provided by the previous interface controller.
We’ll also need a method for setting our timer, so add this part of the code as well:

Now that our EventInterfaceController is ready, we can build and run the app. You should get something like this:

And this gives us our first watchOS app
What we learned by doing this
To conclude this blog post, I have to say I expected that developing my first Apple Watch app will be more challenging than it actually was. I guess that was because I was doing something new that I haven’t done before and I didn’t really know what to expect.
I also detected a couple of key differences between iOS and watchOS apps:
- you use WatchKit instead of UIKit and that means you can’t use standard UI elements iOS developers got used to
- you have a lot less screen space so that means smaller number of UI elements
- you need to watch out for battery life – Apple Watch has a significantly smaller battery than an iPhone
- users spend very little time using watchOS apps there is no keyboard, so use text input only if it’s absolutely necessary
I hope you liked this basic tutorial for building your first Apple Watch app. You can use it as an inspiration for your own apps. Here is the github repo ! if you want to check it out!
We’re available for partnerships and open for new projects. If you have an idea you’d like to discuss, share it with our team !


Top comments (0)