
Written by Raphael Ugwu✏️
In this tutorial, we’ll learn how to build an e-commerce store with Vue and Flask (a micro web framework written in Python). Our store will be able to create, read, update, and delete content via a server-side RESTful API powered by Flask.
App requirements
If you have basic knowledge of Vue and Python and want to learn how to build cool stuff across a range of frameworks then this is a good place to get started. Our application will rely on the following frameworks and libraries as major dependencies:
-
Vue: A progressive framework used for building user interfaces -
Vue CLI: Vue’s command line interface which provides a robust system for rapid Vue JS development -
Node: JavaScript’s runtime environment that executes JavaScript code outside the browser -
npm: The default package manager for JavaScript’s runtime environment, NodeJS -
Flask: A micro web framework written in Python -
Python: A general-purpose programming language used to develop a wide range of applications -
virtualenv: A module that creates virtual environments in Python and its related frameworks
The first thing you should check for is if you have Python and virutalenv installed on your machine. If not, you can learn more about these here:

Setting up Flask
Before installing Flask, we’ll first create our project directory via our terminal:
$ mkdir vue-flask-store
$ cd vue-flask-store
In vue-flask-store, create a new directory, name it server. Then with the virtualenv’s venv command, create a virtual environment in vue-flask-store :
$ python3.7 -m venv env
$ source env/bin/activate
Now, install Flask along with the Flask-CORS extension which will assist us in handling cross-origin requests:
(env)$ pip install Flask Flask-Cors
When done with the installation, you should have a folder structure similar to this:
├── VUE-FLASK-STORE
└── env
    ├── bin
    ├── include
    ├── lib / python 3.7 / site-packages
    ├── pyvenv.cfg
└── server    (env)$ pip install Flask Flask-Cors
Setting up Vue
We’ll create a Vue project by using Vue CLI. Navigate to your terminal and install it globally:
$ npm install -g @vue/cli
Then, still in the terminal, navigate to the vue-flask-store project and initialize a new Vue project which we’ll call frontend. When prompted to choose from an array of options, follow the format below:
Vue CLI v3.7.0
? Please pick a preset: Manually select features
? Check the features needed for your project: Babel, Router, Linter
? Use history mode for router? Yes
? Pick a linter / formatter config: Airbnb
? Pick additional lint features: Lint on save
? Where do you prefer placing config for Babel, PostCSS, ESLint, etc.? In package.json
? Save this as a preset for future projects? (y/N) No
When we’re done, we’ll have a generated Vue project with a folder structure similar to this:
├── VUE-FLASK-STORE
└── frontend
    └── public
       ├── index.html
    └── src
       └── assets
          ├── logo.png
       └── components
          ├── HelloWorld.vue
       └── router
          ├── index.js
       ├── App.vue
       ├── main.js

    ├── .editorconfig
    ├── .gitignore
    ├── .babel.config.js
    ├── package-lock.json
    ├── package.json
└── server
In your terminal, navigate to frontend and start the development server:
$ cd client
$ npm run serve
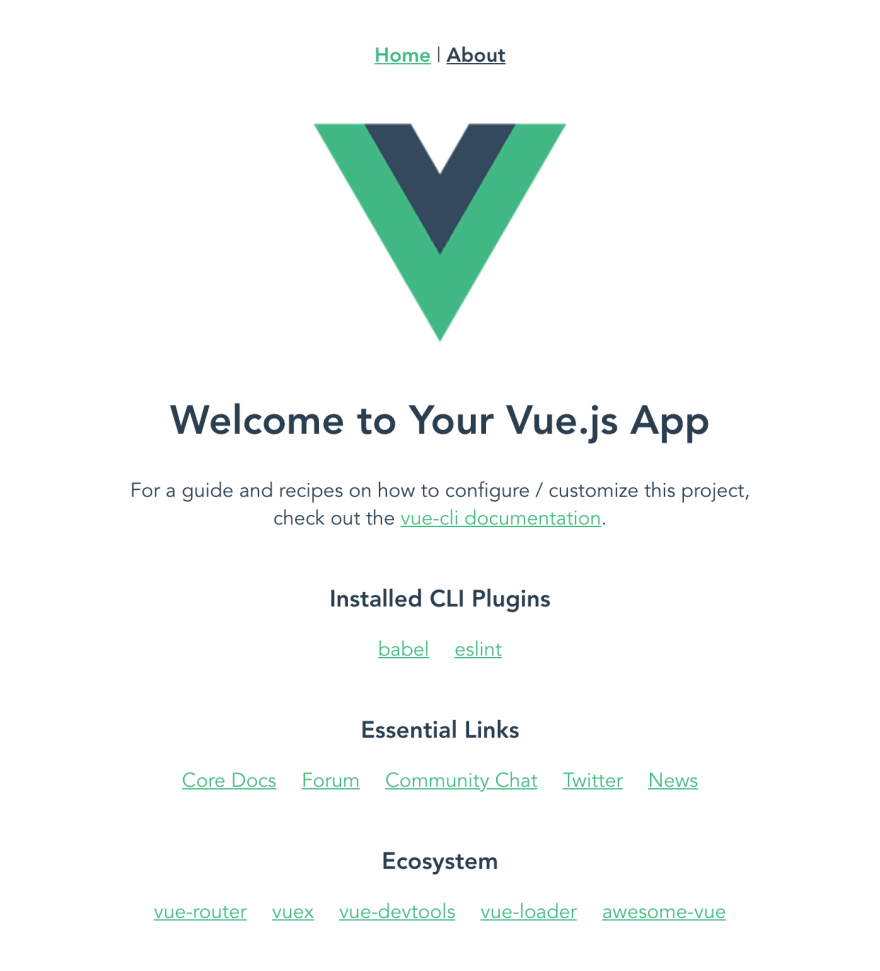
Then on your browser, navigate to http://localhost:8080. You should see a page similar to this:
To connect the requests we’ll be making on the frontend (our Vue app), to the backend (our Flask app), we’ll need to include the axios library in our project. Still in your terminal, install axios in the frontend folder:
$ npm install axios --save
Lastly for some styling, we’ll include bootstrap-vue (an implementation of Bootstrap for VueJS). We’ll install bootstrap-vue just the same way axios was installed:
$ npm install bootstrap-vue --save
Then enable it by importing it in frontend/src/main.js:
// frontend/src/main.js

import BootstrapVue from "bootstrap-vue";
import Vue from "vue";
import App from "./App.vue";
import router from "./router";
Vue.use(BootstrapVue);
Vue.config.productionTip = false;
new Vue({
  router,
  render: h => h(App)
}).$mount("#app");
At this point we have all the dependencies we need, we can then go on to build all the routes that will make up our app.
Building the application
When we’re done building our app it should look similar to this:
We want to build an e-commerce store that has JavaScript courses. A user should be able to perform the following operations:
- Select if they want the paperback version of a course or not
- Delete a course from the list of courses
- Add a course they want to purchase but is not on the default list (which we’ll create in our Flask server)
Creating a server in Flask
The first step would be to create a server in our Flask app. This would contain the default list of courses on our app as well as handles for any routes on the app that our users may want to take. Navigate to the server folder in your Flask app and create a file named app.py , the first thing we’ll do in app.py is to add the default list of courses:
// server/app.py

COURSES = [
    {
        'title': 'Effective JavaScript: 68 Specific Ways to Harness the Power of JavaScript ',
        'author': 'David Herman',
        'paperback': True
    },
    {
        'title': 'JavaScript: The Good Parts',
        'author': 'Douglas Crockford',
        'paperback': False
    },
    {
        'title': 'Eloquent JavaScript: A Modern Introduction to Programming',
        'author': 'Marijn Haverbeke',
        'paperback': True
    }
]
Then we’ll add a route handler that routes back to this list:
from flask import Flask, jsonify

@app.route('/courses', methods=['GET'])
def all_courses():
    return jsonify({
        'status': 'success',
        'courses': COURSES
    })
Head on to your terminal and run the Flask app (in your virtual environment) by inputting the command below:
(env) server % python app.py
On your browser, test out the route at http://localhost:5000/courses. You should see a page similar to this:

Updating the Vue app
Having created a server, the next step is to update our frontend with its content. In the src/components folder of your Vue app, create a file named Courses.vue . Here, we’ll create a template styled by classes from bootstrap-vue. We’ll use Vue directives as well to handle some logic:
<!-- src/components/Courses.vue -->

    <template>
      <div class="container">
          <h1>Courses</h1>
            <hr>
            <button type="button" class="btn btn-success btn-sm">Add Course</button>
            <table class="table table-hover">
                <tr>
                  <th scope="col">Title</th>
                  <th scope="col">Author</th>
                  <th scope="col">Paperback</th>
                </tr>
              <tbody>
                <tr v-for="(course, index) in courses" :key="index">
                  <td>{{ course.title }}</td>
                  <td>{{ course.author }}</td>
                  <td>
                    <span v-if="course.paperback">Yes</span>
                    <span v-else>No</span>
                  </td>
                  <td>
                  <button type="button" class="btn btn-info btn-sm">Update</button>
                  <button type="button" class="btn btn-danger btn-sm">Delete</button>
                  </td>
                </tr>
              </tbody>
            </table>
      </div>
    </template>
In the template, v-for is used to iterate through the list of courses using the index value as a key. Then v-if is used to render Yes or No options to indicate if a user wants the course in paperback or not.
In the script section of our component, we’ll create a method called getCourses() where we’ll use axios to make a GET request to our server. We’ll then use Vue’s created lifecycle hook to fetch our courses from the server we built with Flask:
<!-- src/components/Courses.vue -->

 <script>
 import axios from 'axios';
 export default {
  data() {
    return {
      courses: [],
    };
  },
  methods: {
    getCourses() {
      const path = 'http://localhost:5000/courses';
      axios.get(path)
        .then((res) => {
          this.courses = res.data.courses;
        })
        .catch((error) => {
          console.error(error);
        });
    },
  },
  created() {
    this.getCourses();
  },
 };
 </script>
There, save Course.vue and in your terminal, run npm run serve. You should have an interface that is closely similar to this:

Notice we explained everything except the Add Course button. We’ll handle that in the next section where we’ll learn how to modify our server and frontend to handle requests to add new courses from our users.
Modifying the server for POST requests
For a user to add a course to the already existing list of courses, a POST request has to be sent to the server. Let’s modify server/app.py to accept these requests. In app.py, update the existing route handler all_courses to handle POST requests for adding a new course:
from flask import Flask, jsonify, request

@app.route('/courses', methods=['GET', 'POST'])
def all_courses():
    response_object = {'status': 'success'}
    if request.method == 'POST':
        post_data = request.get_json()
        COURSES.append({
            'title': post_data.get('title'),
            'author': post_data.get('author'),
            'paperback': post_data.get('paperback')
        })
        response_object['message'] = 'Course added!'
    else:
        response_object['courses'] = COURSES
    return jsonify(response_object)
Next, in the Courses component we’ll add a modal to our frontend to enable users to add courses to the default list:
<!-- src/components/Courses.vue -->

<template>
<b-modal ref="addCourseModal"
         id="course-modal"
         title="Add a new course"
         hide-footer>
  <b-form @submit="onSubmit" @reset="onReset" class="w-100">
  <b-form-group id="form-title-group"
                label="Title:"
                label-for="form-title-input">
      <b-form-input id="form-title-input"
                    type="text"
                    v-model="addCourseForm.title"
                    required
                    placeholder="Enter title">
      </b-form-input>
    </b-form-group>
    <b-form-group id="form-author-group"
                  label="Author:"
                  label-for="form-author-input">
        <b-form-input id="form-author-input"
                      type="text"
                      v-model="addCourseForm.author"
                      required
                      placeholder="Enter author">
        </b-form-input>
      </b-form-group>
    <b-form-group id="form-read-group">
      <b-form-checkbox-group v-model="addCourseForm.paperback" id="form-checks">
        <b-form-checkbox value="true">Paperback</b-form-checkbox>
      </b-form-checkbox-group>
    </b-form-group>
    <b-button type="submit" variant="primary">Submit</b-button>
    <b-button type="reset" variant="danger">Reset</b-button>
  </b-form>
</b-modal>
</template>
In the code sample above, we created a modal and used the v-model directive to attach any values a user will input back to our app’s state. Let’s update our script section to include the state addCourseForm which is bound to user input via the v-model directive. When a user updates the input, this state gets updated as well:
<!-- src/components/Courses.vue -->

<script>
import axios from 'axios';
export default {
  data() {
    return {
      courses: [],
      addCourseForm: {
        title: '',
        author: '',
        paperback: [],
      },
    };
  },
  created() {
    this.getCourses();
  },
};
</script>
Then we’ll create different methods to handle each action a user performs. Below is a couple of methods we’ll be creating and how they’ll assist in handling each of our actions:
-
addCourse: This method sends a POST request to/coursesto include a new course to the existing list of courses -
initForm: This method appends every detail of the course that’s to be added toaddCourseForm -
onSubmit: This method executes when a user adds a course successfully. First, default browser behavior is prevented viae.preventDefault(), then the modal used to add the form is closed successfully withthis.refs.addCourseModal.hide(), theaddCoursemethod is executed and the form is reinitialized and cleared withinitForm()
// src/components/Courses.vue

methods: {
   addCourse(payload) {
     const path = "http://localhost:5000/courses";
     axios
       .post(path, payload)
       .then(() => {
         this.getCourses();
       })
       .catch(error => {
         // eslint-disable-next-line
         console.log(error);
         this.getCourses();
       });
   },
   initForm() {
     this.addCourseForm.title = "";
     this.addCourseForm.author = "";
     this.addCourseForm.paperback = [];
   },
   onSubmit(e) {
     e.preventDefault();
     this.$refs.addCourseModal.hide();
     let paperback = false;
     if (this.addCourseForm.paperback[0]) paperback = true;
     const payload = {
       title: this.addCourseForm.title,
       author: this.addCourseForm.author,
       paperback
     };
     this.addCourse(payload);
     this.initForm();
   }
 }
When we’re done, let’s update the Add Course button in our template so that the modal will be displayed when the button is clicked:
<!-- src/components/Courses.vue -->

<template>
  <button type="button" class="btn btn-success btn-sm" v-b-modal.course-modal>
    Add Course
  </button>
</template>
Now, let’s try to add a course and see what happens:
Adding an alert component
It would be nice for our users to have some sort of alert or popup whenever an action occurs like when a course is added, updated, or deleted. To include an alert for our app, let’s begin by creating a new component which we’ll call Alert.vue. In this component, we’ll use b-alert, an inbuilt component of bootstrap-vue, to display the message we want to show when an alert pops up:
<!-- src/components/Alert.vue -->

<template>
  <div>
    <b-alert variant="success" show>{{ message }}</b-alert>
    <br />
  </div>
</template>

<script>
export default {
  props: ["message"]
};
</script>
At this point, you may be wondering what’s going on here. We specified a message prop which can receive updates from the Courses component as that’s where we’ll export and handle the Alert component. In Courses.vue, import the Alert component and add the message prop to the data() object:
<!-- src/components/Courses.vue -->

<script>
import Alert from "./Alert.vue";
export default {
  data() {
    return {
      courses: [],
      addCourseForm: {
        title: "",
        author: "",
        paperback: []
      },
       message: "",
    };
  }
};
</script>
Next, in the addCourse method, we’ll update the message with what we need:
<!-- src/components/Courses.vue -->
...
  addCourse(payload) {
    const path = 'http://localhost:5000/courses';
    axios.post(path, payload)
      .then(() => {
        this.getCourses();
        this.message = 'Course added!';
      })
      .catch((error) => {
        console.log(error);
        this.getCourses();
      });
  }
...
In the data() object, we’ll include another property showMessage which will decide if an alert should be displayed or not, based on if a course has been added or not. showMessage will have an initial boolean value of false:
<!-- src/components/Courses.vue -->

<script>
import Alert from "./Alert.vue";
export default {
  data() {
    return {
      courses: [],
      addCourseForm: {
        title: "",
        author: "",
        paperback: []
      },
       message: "",
       showMessage: false,
    };
  }
};
</script>
Then in our template, we’ll update the Alert component with a v-if directive which conditionally renders Alert based on either of the two values – true or false:
<!-- src/components/Courses.vue -->

<template>
  <button>
    <alert :message=message v-if="showMessage"></alert>
  </button>
</template>
Lastly, we’ll update the AddCourse method and set showMessage to true whenever a course is successfully added:
<!-- src/components/Courses.vue -->
<script>
import Alert from "./Alert.vue";
export default {
  methods: {
    addCourse(payload) {
      const path = "http://localhost:5000/courses";
      axios
        .post(path, payload)
        .then(() => {
          this.getCourses();
          this.message = "Course added!";
          this.showMessage = true;
        })
        .catch(error => {
          console.log(error);
          this.getCourses();
        });
    }
  }
};
</script>
Now, let’s see if our alert will be displayed. Save your work, run npm run serve on your terminal and go to your browser:
Setting up unique identifiers
We may have a situation where two courses have exactly the same name. To handle this, we need each update our users make to have a unique identifier. To achieve this, we’ll use uuid, a module in Python’s library that provides unique IDs. Let’s update our server so all our default courses have random IDs:
# server/app.py

from flask import Flask, jsonify, request
import uuid

COURSES = [
   {
       'id': uuid.uuid4().hex,
       'title': 'Effective JavaScript: 68 Specific Ways to Harness the Power of JavaScript ',
       'author': 'David Herman',
       'paperback': True
   },
   {
       'id': uuid.uuid4().hex,
       'title': 'JavaScript: The Good Parts',
       'author': 'Douglas Crockford',
       'paperback': False
   },
   {
       'id': uuid.uuid4().hex,
       'title': 'Eloquent JavaScript: A Modern Introduction to Programming',
       'author': 'Marijn Haverbeke',
       'paperback': True
   }
]
Next, we’ll configure all_courses to process the random IDs each time a user adds a new course:
@app.route('/courses', methods=['GET', 'POST'])
def all_courses():
    response_object = {'status': 'success'}
    if request.method == 'POST':
        post_data = request.get_json()
        COURSES.append({
            'id': uuid.uuid4().hex,
            'title': post_data.get('title'),
            'author': post_data.get('author'),
            'paperback': post_data.get('paperback'),
                })
        response_object['message'] = 'Course added!'
    else:
        response_object['courses'] = COURSES
    return jsonify(response_object)
Updating existing courses
Suppose our users want to make changes to courses that exist on our app, we can make this possible by creating another modal in Courses.vue to handle this. In Courses.vue, create another modal called editCourseModal just below addCourseModal. We’ll wrap all the properties of the form we want to create under b-form which is a form element provided by bootstrap-vue. The first property we’ll create an input for is the title of the course. Here we can modify the title to what we want:
<b-form-group  id="form-title-edit-group"  label="Title:"
             label-for="form-title-edit-input"
>
    <b-form-input  id="form-title-edit-input"  type="text"
        v-model="editForm.title"
        required
        placeholder="Enter title"
    >
    </b-form-input>
</b-form-group>
Next, we’ll create an input field for where we can update the name of the author:
<b-form-group id="form-author-edit-group"  label="Author:"
  label-for="form-author-edit-input"
>
    <b-form-input  id="form-author-edit-input"  type="text"
        v-model="editForm.author"
        required
        placeholder="Enter author"
    >
    </b-form-input>
</b-form-group>
Then we’ll create a checkbox, where the user can have the option of modifying if the course should be in paperback or not:
<b-form-group id="form-read-edit-group">
    <b-form-checkbox-group v-model="editForm.paperback" id="form-checks">
        <b-form-checkbox value="true">Paperback</b-form-checkbox>
    </b-form-checkbox-group>
</b-form-group>
Then we’ll create two buttons – Update to update the changes we’ve made and Cancel to close the modal if we no longer want to make the changes:
<b-button-group>
    <b-button type="submit" variant="primary">Update</b-button>
    <b-button type="reset" variant="danger">Cancel</b-button>
</b-button-group>
Finally, we’ll wrap all the elements we just created in the b-form element:
<template>
    <b-modal ref="editCourseModal" id="course-update-modal" title="Update">
        <b-form @submit="onSubmitUpdate" @reset="onResetUpdate" class="w-100"

            <!--Place all the elements here-->

        </b-form>
    </b-modal>
</template>
Next, in the script tag of Courses.vue, we’ll update the state of this modal:
<!-- src/components/Courses.vue -->

<script>
import Alert from "./Alert.vue";
export default {
  data() {
    return {
      courses: [],
      addCourseForm: {
        title: "",
        author: "",
        paperback: []
      },
      editForm: {
        id: "",
        title: "",
        author: "",
        paperback: []
      },
      message: "",
      showMessage: false
    };
  }
};
</script>
Next, we’ll modify the Update and Cancel buttons to make updates to a course or delete a course off the list. First, for the Update button, we’ll create a method to update the values in editForm:
<!-- src/components/Courses.vue -->

<script>
import Alert from "./Alert.vue";
export default {

    methods: {
      editCourse(course) {
      this.editForm = course;
    },
  }

};
</script>
Next, we’ll create a method to handle the submitting of the form containing the updated details:
<!-- src/components/Courses.vue -->

<script>
import Alert from "./Alert.vue";
export default {
  methods: {
    editCourse(course) {
      this.editForm = course;
    },
    onSubmitUpdate(e) {
      e.preventDefault();
      this.$refs.editCourseModal.hide();
      let paperback = false;
      if (this.editForm.paperback[0]) paperback = true;
      const payload = {
        title: this.editForm.title,
        author: this.editForm.author,
        paperback
      };
      this.updateBook(payload, this.editForm.id);
    }
  }
};
</script>
Then we’ll use axios to make a request to update our server. We’ll also include a message that will display as an alert each time a book is added:
<!-- src/components/Courses.vue -->

<script>
import Alert from "./Alert.vue";
export default {
  methods: {
    updateCourse(payload, courseID) {
      const path = `http://localhost:5000/courses/${courseID}`;
      axios
        .put(path, payload)
        .then(() => {
          this.getCourses();
          this.message = 'Course updated!';
          this.showMessage = true;
        })
        .catch(error => {
          console.error(error);
          this.getCourses();
        });
    }
  }
};
</script>
To cancel an update, we’ll create a method that closes the editForm modal, reinitializes the form and makes a request to get the current list of courses:
<!-- src/components/Courses.vue -->

<script>
import Alert from "./Alert.vue";
export default {
  methods: {
    onResetUpdate(evt) {
      evt.preventDefault();
      this.$refs.editBookModal.hide();
      this.initForm();
      this.getBooks();
    }
  }
};
</script>
Then we’ll update initForm to include properties of editForm as well:
<!-- src/components/Courses.vue -->
<script>
import Alert from "./Alert.vue";
export default {
  methods: {
    initForm() {
      this.addBookForm.title = "";
      this.addBookForm.author = "";
      this.addBookForm.read = [];
      this.editForm.id = "";
      this.editForm.title = "";
      this.editForm.author = "";
      this.editForm.read = [];
    }
  }
};
</script>
There. Now let’s see if our updates and changes work:
Deleting existing courses
To delete an existing course from the list of courses, we’ll create a method in the script section of Courses.vue. Our method should be able to make a delete request via axios to delete a course by its ID, get the current list of courses, and display an alert that says the course has been deleted:
<!-- src/components/Courses.vue -->
<script>
import Alert from "./Alert.vue";
export default {
  methods: {
    removeCourse(courseID) {
      const path = `http://localhost:5000/courses/${courseID}`;
      axios
        .delete(path)
        .then(() => {
          this.getCourses();
          this.message = " Course removed!";
          this.showMessage = true;
        })
        .catch(error => {
          console.error(error);
          this.getCourses();
        });
    },
    onDeleteCourse(course) {
      this.removeCourse(course.id);
    }
  }
};
</script>
Let’s review how this works:
Conclusion
Frameworks were built to give developers more leverage and functionality with programming languages. Thankfully we’ve been able to show how awesome this leverage could be if it is used right. Readers are encouraged to go further and improve on this – add a shopping cart, images, or a payment method maybe. You can check out the full code of this project here on GitHub.
Experience your Vue apps exactly how a user does
Debugging Vue.js applications can be difficult, especially when there are dozens, if not hundreds of mutations during a user session. If you’re interested in monitoring and tracking Vue mutations for all of your users in production, try LogRocket.
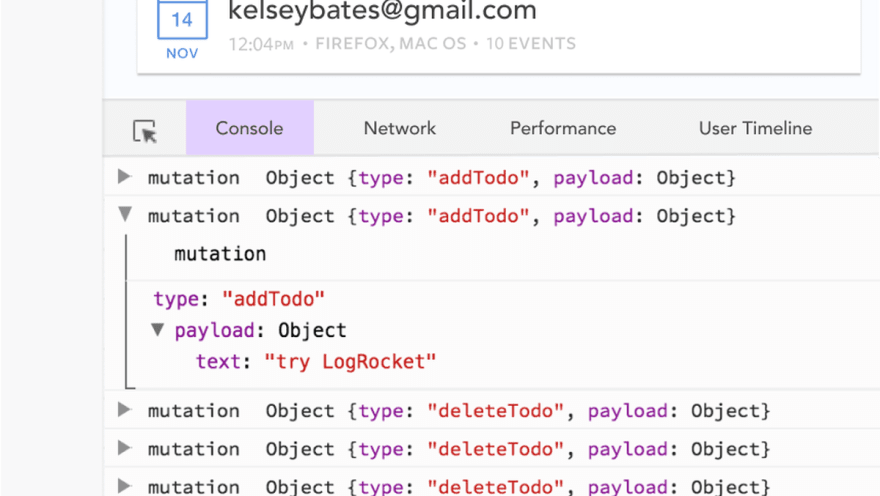
LogRocket is like a DVR for web apps, recording literally everything that happens in your Vue apps including network requests, JavaScript errors, performance problems, and much more. Instead of guessing why problems happen, you can aggregate and report on what state your application was in when an issue occurred.
The LogRocket Vuex plugin logs Vuex mutations to the LogRocket console, giving you context around what led to an error, and what state the application was in when an issue occurred.
Modernize how you debug your Vue apps - Start monitoring for free.
The post Setting up an online store with Flask and Vue appeared first on LogRocket Blog.


Top comments (1)
Any idea how scalable to use Flask as the backend comparing with others like Node?
Some comments may only be visible to logged-in visitors. Sign in to view all comments.