
Written by Paul Ryan✏️
What will we talk about?
Data structures are often overlooked in JavaScript — or, rather, we don’t think about them much. The problem with ignoring data structures is that for many top companies, you are usually required to have a deep understanding of how to manage your data. A strong grasp of data structures will also help you in your day-to-day job as you approach problems.
In this article, the data structures we will be discussing/implementing are:
- Stack
- Queue
- Linked list
- Hash table
- Trees

Stack
The first data structure we are discussing is the stack. This is quite similar to the queue, and you may have heard of the call stack before, which is what JavaScript uses to handle events.
Visually, the stack looks like this:
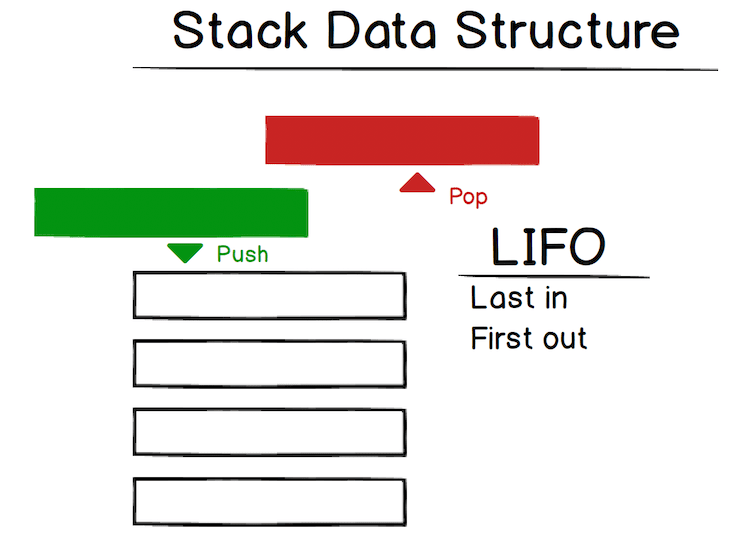
So when you have a stack, the last item you pushed on the stack will be the first one removed. This is referred to as last-in, first-out (LIFO). The back button in web browsers is a good example: each page you view is added to the stack, and when you click back, the current page (the last one added) is popped from the stack.
That is enough theory. Let’s get into some code:
class Stack {
  constructor() {
    // create our stack, which is an empty object
    this.stack = {}
  }
  // this method will push a value onto the top of our stack
  push(value) {

  }
  // this method is responsible for popping off the last value and returning it
  pop() {

  }

  // this will peek at the last value added to the stack
  peek() {

  }
}
I’ve commented the above code, so hopefully you are with me up to this point. The first method we will implement is the push method.
So let’s think about what we need this method to do:
- We need to accept a value
- We then need to add that value to the top of our stack
- We also should track the length of our stack so we know our stack’s index
It would be great if you could try this yourself first, but if not, the complete push method implementation is below:
class Stack {
  constructor() {
    this._storage = {};
    this._length = 0; // this is our length
  }

  push(value) {
    // so add the value to the top of our stack
    this._storage[this._length] = value;
    // since we added a value we should also increase the length by 1
    this._length++;
  }
  /// .....
}
I bet it was easier than you thought. I think with a lot of these structures, they sound more complicated than they actually are.
Now let’s get to the pop method. The goal with the pop method is to remove the last value that was added to our stack and then return that value. Try this yourself first if you can, otherwise just continue on to see the solution:
class Stack {
  constructor() {
    this._storage = {};
    this._length = 0;
  }

  pop() {
    // we first get the last val so we have it to return
    const lastVal = this._storage[--this._length]
    // now remove the item which is the length - 1
    delete this._storage[--this._length]
    // decrement the length
    this._length--;
    // now return the last value
    return lastVal
  }
}
Cool! Nearly there. The last thing we need to do is the peek function, which looks at the last item in the stack. This is the easiest function: we simply return the last value. Implementation is:
class Stack {
  constructor() {
    this._storage = {};
    this._length = 0;
  }
  /*
  * Adds a new value at the end of the stack
  * @param {*} value the value to push
  */

  peek() {
    const lastVal = this._storage[--this._length]
    return lastVal
  }
}
So this is pretty similar to the pop method, but this time, we do not remove the last item.
Yes! That is our first data structure covered. Now let’s move on to the queue, which is quite similar to the stack.
Queue
The queue is the next structure we will discuss — hopefully the stack is still fresh in your brain as the queue is quite similar. The key difference between the stack and the queue is that the queue is first-in, first-out (FIFO).
Visually, we can represent it like this:

So the two big actions are enqueue and dequeue. We add to the back and remove from the front. Let’s get into implementing a queue to get a better understanding.
The core structure of our code will look like this:
class Queue {
  constructor() {
    // similar to above we have an object for our data structure
    // and we also have a variable to keep track of the length
    this.queue = {}
    this.length = 0
    // this is a new variable which tracks the head
    this.head = 0
  }

  enqueue(value) {

  }

  dequeue() {

  }

  peek() {

  }
}
So let’s first implement our enqueue method. Its purpose is to add an item to the back of our queue.
enqueue(value) {
  // add a key of our length + head to our object with the value param
  this.queue[this.length + this.head] = value;
  this.length++
}
This is quite a simple method that adds a value to the end of our queue, but you may be a little confused by this.queue[this.length + this.head] = value;.
Let’s say our queue looked like this {14 : 'randomVal'}. When adding to this, we want our next key to be 15, so it would be length(1) + head(14), which gives us 15.
The next method to implement is the dequeue method:
dequeue() {
  // get a reference to our first val so we can return it
  const firstVal = this.queue[this.head]
  // now delete this from our queue
  delete this.queue[this.head]
  // decrement our lenght
  this.length--;
  // finally increment our head to be the next node
  this.head++;
}
Final method to implement is the peek method which is an easy one:
peek() {
  // simply return the value at our head
  return this.queue[this.head];
}
That’s it for the queue — let’s move on to the Linked List data structure.
Linked list
So let’s discuss the formidable linked list. This is more complicated than our structures above, but together, we can figure it out.
The first question you might have is why would we use a linked list? A linked list is mostly used for languages that do not have dynamic sizing arrays. Linked lists organize items sequentially, with each item pointing to the next item.
Each node in a linked list has a data value and a next value. Below, 5 is the data value, and the next value points to the next node, i.e., the node that has the value 10.
Visually, it looks like this:

As a side note, a previous pointer is called a doubly linked list.
In an object, the above LinkedList would look like the following

You can see that the last value 1 has a next value of null, as this is the end of our LinkedList.
So now, how would we implement this?
Let’s create a LinkedList that has the values 1, 2, and 37.
const myLinkedList = {
    head: {
        value: 1
        next: {
            value: 2
            next: {
                value: 37
                next: null
            }
        }
    }
};
So we know how to manually create a LinkedList, but let’s approach writing methods that will implement a LinkedList.
The first thing we should note is that a LinkedList is just a bunch of nested objects!
When constructing a LinkedList, we need a head and also a tail, which will initially point at our head (as the head is first and last).
class LinkedList {
  constructor(value) {
    this.head = {value, next: null}
    this.tail = this.head
  }
}
The first method we will implement is the insert method, which will insert a value to the end of our linked list.
// insert will add to the end of our linked list
insert(value) {
  /* create the node */
  const node = {value, next: null}
  /* set the next property of the tail = to the new node */
  this.tail.next = node;
  /* the new node is now the tail */
  this.tail = node;
}
The most confusing line above is probably the this.tail.next = node. We are doing this because when we add a new node, we also want the current tail to point at the new node, which will became the new tail. The first time we insert a node, the next pointer of our head will point at the new node — as in our constructor, where we have set this.tail = this.head.
You can also visualize this by heading to this website, which will help you understand how the insertion is happening (press esc to get rid of the annoying popup).
The next method we will implement is deleting a node. The first thing we have to decide is whether our param will be a value or a reference to a node (in an interview, it is good to ask the interviewer this). For our sake, we will say that a value is passed. Removing a node from our list by value is a slow process since we must loop through our entire list to find the value.
We do this like so:
removeNode(val) {
  /* begin at the head */
  let currentNode = this.head
  /* we need to hold reference to the previous node */
  let previousNode
  /* while we have a node i.e. not passed the tail */
  while(currentNode) {
     /* if we find our value then break out */
     if(currentNode.value === val) {
        break;
     }
    /* with no value found currentNode we set this to previousNode */
    previousNode = currentNode
    /* we get the next node and assign it to currentNode  */
    currentNode = currentNode.next
  }
  /* we return undefined as we have found no node with that value  */
  if (currentNode=== null) {
    return false;
  }

  // if the node is the head then we set our head to the next value
  // of the head node
  if (currentNode === this.head) {
    this.head = this.head.next;
    return;
  }
  /* so we remove our node by setting the node before it to the node in front of it */
  previousNode.next = currentNode.next
}
The removeNode method gives us some great insight into how the LinkedList works.
So just to explain again, we are first setting our variable currentNode to the head of our LinkedList since that is our first node. We then create a placeholder variable called previousNode, which we will use in our while loop. We begin our while loop with the condition currentNode — it will keep running as long as we have a currentNode.
The first check in our while loop is to check whether we have our value. If we don’t, we then set our previousNode to our currentNode, and our currentNode is set to the next node in the list. We continue this process until we either find our value or run out of nodes.
After the while loop, if we have no currentNode, we return false, which indicates to the user that no node was found. If we do have a currentNode, we check if our currentNode is our head. If it is, we set the head of our LinkedList to be the second node, which will become the head.
Finally, if our currentNode is not our head, we set the previousNode to point at the node just ahead of our currentNode, which will remove our currentNode from the object.
Another method that is quite popular (that an interviewer may also ask you) is the removeTail method. This method does what it says on the tin, which is simply to remove the tail of our LinkedList. As you can imagine, this is much easier than the method above but works similarly.
I would suggest trying this yourself first, then looking at the code below (to make it a little trickier, we won’t use the tail in our constructor):
removeTail() {
  let currentNode = this.head;
  let previousNode;
  while (currentNode) {
    /* the tail is the only node without a `next` value, so if no next value is present, then this must be our tail */
    if (!currentNode.next) {
      break;
    }
    // get a reference to our previous node
    previousNode = currentNode;
    // move onto the next node
    currentNode = currentNode.next;
  }
  // to remove the tail, we set the previousNode.next to null
  previousNode.next = null;
}
That is a few of the main methods of the LinkedList. You may come across all kinds of methods, but with the knowledge you have gained from the above, you should be able to manage all of them.
Hash table
So the second-to-last data structure we are tackling is the mighty hash table. I purposefully placed this after the LinkedList explanation, as they are not a million miles away from each other.
A hash table is a data structure that implements an associative array, which means it maps keys to values. A JavaScript object is a hash table, as it stores key-value pairs.
Visually, this can be represented like so:

Before we start talking about how to implement the hash table, we need to discuss the importance of the hashing function. The core concept of the hashing function is that it takes an input of any size and returns a hash code identifier of a fixed size.
hashThis('i want to hash this') => 7
The hashing function can be very complicated or straightforward. Each of your files on GitHub are hashed, which makes the lookup for each file quite fast. The core idea behind a hashing function is that given the same input will return the same output.
With the hashing function covered, it’s time to talk about how we would implement a hash table.
The three operations we will discuss are insert, get, and, finally, remove.
The core code to implement a hash table is as follows:
class HashTable {
  constructor(size) {
    // define the size of our hash table, which will be used in our hashing function
    this.size = size;
    this.storage = [];
  }
  insert(key, value) { }
  get() {}
  remove() {}
  // this is how we will hash our keys
  myHashingFunction(str, n) {
    let sum = 0;
    for (let i = 0; i < str.length; i++) {
      sum += str.charCodeAt(i) * 3;
    }
    return sum % n;
  }
}
Now let’s tackle our first method, which is insert. The code to insert into a hash table is as follows (to keep things simple, this method will handle collisions but not duplicates):
insert(key, value) {
  // will give us an index in the array
  const index = this.myHashingFunction(key, this.size);
  // handle collision - hash function returns the same
  // index for a different key - in complicated hash functions it is very unlkely
  // that a collision would occur
  if (!this.storage[index]) {
    this.storage[index] = [];
  }
  // push our new key value pair
  this.storage[index].push([key, value]);
}
So if we were to call the insert method like so:
const myHT = new HashTable(5);
myHT.insert("a", 1);
myHT.insert("b", 2);
What do you think our hash table would look like?

You can see our key-value pair has been inserted into our table at index 1 and 4.
Now how would we remove from a hash table?
remove(key) {
    // first we get the index of our key
    // remember, the hashing function will always return the same index for the same
    // key
    const index = this.myHashingFunction(key, this.size);
    // remember we could have more than one array at an index (unlikely)
    let arrayAtIndex = this.storage[index];
    if (arrayAtIndex) {
      // let's loop over all the arrays at that index
      for (let i = 0; i < arrayAtIndex.length; i++) {
        // get the pair (a, 1)
        let pair = arrayAtIndex[i];
        // check if the key matches the key param
        if (pair[0] === key) {
          // delete the arrayatindex
          delete arrayAtIndex[i];
          // job done, so break out of the loop
          break;
        }
      }
    }
}
Regarding the above, you may be thinking, “Is this not linear time? I thought hash tables are meant to be constant?” You would be correct in thinking that, but since this situation is quite rare with complicated hashing functions, we still consider hash tables to be constant.
The final method we will implement is the get method. This is the same as the remove method, but this time, we return the pair rather than delete it.
get(key) {
    const index = this.myHashingFunction(key, this.size);
    let arrayAtIndex = this.storage[index];
    if (arrayAtIndex) {
      for (let i = 0; i < arrayAtIndex.length; i++) {
        const pair = arrayAtIndex[i];
        if (pair[0] === key) {
          // return the value
          return pair[1];
        }
      }
    }
  }
I don’t think there is a need to go through this, as it acts the same as the remove method.
This is a great introduction to the hash table, and as you can tell, it is not as complicated as it initially seems. This is a data structure that is used all over the place, so it is a great one to understand!
Binary search tree
Sadly (or maybe thankfully), this is the last data structure that we will tackle — the notorious binary search tree.
When we think of a binary search tree, the three things we should think of are:
- Root: This is the very top node of a tree structure and does not have a parent
- Parent: It is a child of a node but also the parent of a node
- Child: This node is the child of a node and does not necessarily have a child
In a binary search tree, each node either has zero, one, or two children. The child on the left is called the left child, and the child on the right is the right child. In a binary search tree, the child on the left must be smaller than the child on the right.
Visually, you can picture a binary search tree like so:

The core class for a tree would look like:
class Tree {
   constructor(value) {
     this.root = null
   }

   add(value) {
    // we'll implement this below
   }

}
We’ll also create a Node class to represent each of our nodes.
class Node {
  constructor(value, left = null, right = null) {
    this.value = value;
    this.left = left;
    this.right = right;
  }
}
OK, let’s implement the add method. I have commented the code very well, but if you find it confusing, just remember that all we are doing is going from our root and checking the left and right of each node.
add(value) {
    // if we do not have a root, then we create one
    if (this.root === null) {
      this.root = new Node(value);
      return;
    }
    let current = this.root;
    // keep looping
    while (true) {
      // go left if our current value is greater
      // than the value passed in
      if (current.value > value) {
        // if there is a left child then run the
        // loop again
        if (current.left) {
          current = current.left;
        } else {
          current.left = new Node(value);
          return;
        }
      }
      // the value is smaller, so we go right
      else {
        // go right
        // if there is a left child then run the
        // loop again
        if (current.right) {
          current = current.right;
        } else {
          current.right = new Node(value);
          return;
        }
      }
    }
}
Let’s test our new add method like so:
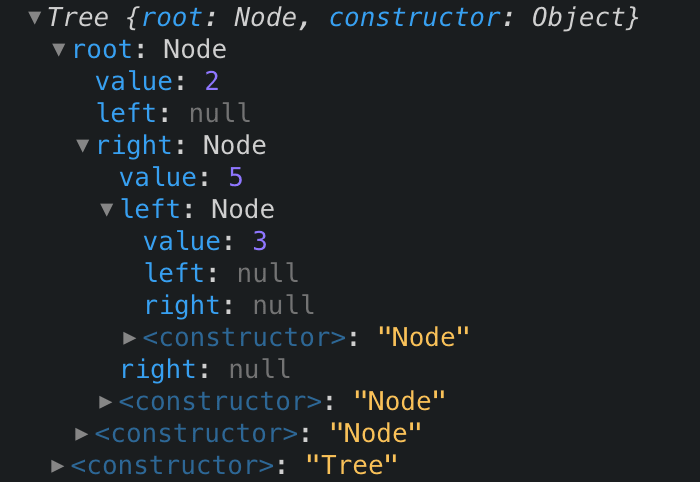
const t = new Tree();
t.add(2);
t.add(5);
t.add(3);
Our tree now looks like:
So to get an even better understanding, let’s implement a method that checks if our tree contains a value.
contains(value) {
  // get the root
  let current = this.root;
  // while we have a node
  while (current) {
    // check if our current node has the value
    if (value === current.value) {
      return true; // leave the function
    }
    // we decide on the next current node by comparing our value
    // against current.value - if its less go left else right
    current = value < current.value ? current.left : current.right;
  }
  return false;
}
Add and Contains are the two core methods of the binary search tree. An understanding of both these methods give you better perspective on how you would tackle problems at your day-to-day job.
Conclusion
Wow, this was a long one. We have covered a lot in this article, and going into an interview with this knowledge will put you in a great position. I really hope you learned something (I know I have) and that you will feel more comfortable approaching technical interviews (especially the nasty white-boarding ones).
Editor's note: Seeing something wrong with this post? You can find the correct version here.
Plug: LogRocket, a DVR for web apps

LogRocket is a frontend logging tool that lets you replay problems as if they happened in your own browser. Instead of guessing why errors happen, or asking users for screenshots and log dumps, LogRocket lets you replay the session to quickly understand what went wrong. It works perfectly with any app, regardless of framework, and has plugins to log additional context from Redux, Vuex, and @ngrx/store.
In addition to logging Redux actions and state, LogRocket records console logs, JavaScript errors, stacktraces, network requests/responses with headers + bodies, browser metadata, and custom logs. It also instruments the DOM to record the HTML and CSS on the page, recreating pixel-perfect videos of even the most complex single-page apps.
Try it for free.
The post Know your JavaScript data structures appeared first on LogRocket Blog.


Top comments (2)
Wow, what a great article. I've been lacking this knowledge, i knew how these methods work but haven't really implemented them. Thank you so much.
As it's been pointed out, in the pop() method of Stack we should get the index by simply subtracting 1 - [this._length-1]. Otherwise it just decrements our initial length and that's not what we need.
Also, in dequeqe of Queue i believe the return statement is missing.
Thanks again for such a great article.
There seems to be a small mistake in the pop() method of Stack. We are using the prefix -- to evaluate, resulting in decrement of _length more times than required.