
Written by Dylan Tientcheu✏️
If you’ve been working with web and mobile apps for a while, you know that great animations give your app that ‘wow’ factor and make an impression on your users.
Their appeal among users makes animations a great way to boost UX.
Sometimes you need these animations to react according to user interactions — for example, with scrolling, cursor moving, or clicking.
In this post, we are going to integrate the Vue Kinesis interactive animation library into our Vue.js application.
Vue.js is a developer-friendly, progressive JavaScript framework that is great for making fast applications with a soft learning curve.
Vue’s ease of use is largely attributable to its CLI library, which enables anyone to quickly scaffold an app without spending hours on configuration.
Vue Kinesis, on the other hand, is a set of components that allows you to create interactive animations for your Vue.js application.
What we are creating
We want to create an interactive LogRocket logo animation that reacts to cursor movement.

From the awesome gif above, we can see that the rocket moves according to the cursor.
The elements sitting in the background follow the movement, too.

Getting started
Before we start, we’ll create the Vue.js project and then install the Kinesis library.
There’s nothing as easy as creating a Vue.js project: first, you install Vue CLI.
Then, in your terminal, type vue create <project-name> and simply follow the default steps.
Once installed, you can clear the unused components (Hello.vue) and keep a clean App.vue.
We’ll need a clean project to start playing with the given examples.
Adding the Kinesis plugin
Now we need to install our interactive animation library, Kinesis. Once we are in the project file, we’ll run this command in our terminal:
npm install -i vue-kinesis
Open your main.js file and copy the following code to add Kinesis to your Vue project:
import Vue from 'vue'
import VueKinesis from 'vue-kinesis'

Vue.use(VueKinesis)
Now that you’ve added VueKinesis, you can use any Kinesis component inside your Vue <template> tags.
Playing with a simple example
Before we implement our desired animation, in order to familiarize ourselves a little more with the Kinesis library, we’ll spin up an example taken from its website.
This will help us understand the behavior of the library.
<div id="app">
    <kinesis-container>
     Here, you can put
       <kinesis-element :strength="10">
          whatever
       </kinesis-element>
       <kinesis-element :strength="20">
          content!
       </kinesis-element>
    </kinesis-container>
</div>
Above is a snippet I got from Kinesis’ home page.
These tags are the Kinesis components: the kinesis-container tag is able to hold a multitude of kinesis-elements. However, it’s not possible for an element to exist without its container.
The strength attribute is actually the animation factor. A higher strength will result in a higher motion.
Below is an illustration of this example using 2 material svg icons. (Try moving the mouse around the 2 icons.)
Creating our interactive animation
Let’s start building our custom interactive animation with Vue Kinesis.
From the analysis of our gif above, all we have is a purple background, an animated rocket, and some moving circles in the back.
How can we achieve this with Kinesis?
First, clean up the template tags in your App.vue file.
Notice that the only moving elements are the rocket and the four circles.
This simply means that the only kinesis-element tags that we should have will be on those five elements. We can already structure our template file this way:
<template>
  <div id="app">
    <kinesis-container class="container">
      <kinesis-element>
        <!-- LogRocket logo -->
      </kinesis-element>

      <!-- background-circles-props -->
      <kinesis-element>
        <div class="circle circle-purple"></div>
      </kinesis-element>
      <kinesis-element>
        <div class="circle circle-purple1"></div>
      </kinesis-element>
      <kinesis-element>
        <div class="circle circle-purple2"></div>
      </kinesis-element>
      <kinesis-element>
        <div class="circle circle-purple3"></div>
      </kinesis-element>
    </kinesis-container>
  </div>
</template>
After structuring, we’ll add some styles in our App.vue file to create the solid purple background and the circle designs.
<style>
#app {
  text-align: center;
}

.container {
  padding: 15rem 0;
  background-color: #7749BD;
}

.circle {
  position: absolute;
  border-radius: 100%;
}

.circle.circle-purple {
  border: 10px solid #f2eafa;
  opacity: 0.1;
  width: 4vw;
  height: 4vw;
  left: 10%;
  top: 25%;
}

.circle.circle-purple1 {
  border: 15px solid #f2eafa;
  opacity: 0.1;
  width: 8vw;
  height: 8vw;
  right: -2%;
  bottom: 17%;
}
.circle.circle-purple2 {
  background-color: #f2eafa;
  opacity: 0.1;
  width: 5vw;
  height: 5vw;
  left: 20%;
  bottom: 17%;
}

.circle.circle-purple3 {
  border: 15px solid #f2eafa;
  opacity: 0.3;
  width: 3vw;
  height: 3vw;
  top: 80%;
  left: 60%;
}
</style>
We’ll get this cool animated background as result:

Kinesis options
The kinesis-container and kinesis-element tags are able to take attributes that will help us make it look and feel the way we want.

Now, you may be wondering: if we need to configure this plugin, why is the previous background we created already animated?
This is because they have predefined default values which help them do their work without taking any specified attributes.
Setting up our animation
When creating an animation, we should always have an aim in mind, because animations give users the feeling that they’re living.
This feel contributes to the ‘wow’ effect.
Editing constraints
Our four circles should have a restricted motion on the y-axis.
We want the circles to only move up and down to give the impression of taking off and landing.
There’s no need to have them going left and right.
To do this, we’ll add the attribute axis=y to our circles’ Kinesis elements.
Our code now looks like this:
<template>
  <div id="app">
    <kinesis-container class="container">
      <kinesis-element>
        <!-- LogRocket logo -->
      </kinesis-element>

      <!-- background-circles-props -->
      <kinesis-element axis="y">
        <div class="circle circle-purple"></div>
      </kinesis-element>
      <kinesis-element axis="y">
        <div class="circle circle-purple1"></div>
      </kinesis-element>
      <kinesis-element axis="y">
        <div class="circle circle-purple2"></div>
      </kinesis-element>
      <kinesis-element axis="y">
        <div class="circle circle-purple3"></div>
      </kinesis-element>
    </kinesis-container>
  </div>
</template>
Our animations seem set up already — however, we haven’t tweaked the most important attribute yet.
The whole motion magic with Vue Kinesis happens with the strength attribute.
This attribute is the force that holds the element from its origin.
Think of it as a gravitational force. However, in this case, the greater the strength, the further the element is able to go (so it’s more like inverse gravitational force).
By default, the strength attribute on the kinesis-element is set to 10.
In our animation, we need to have a little more motion from the circles and the rocket image.
We want the rocket to be able to move the furthest, so it must be freer compared to the circles.
<template>
  <div id="app">
    <kinesis-container class="container">
      <kinesis-element :strength="150">
        <!-- LogRocket logo -->
      </kinesis-element>

      <!-- background-circles-props -->
      <kinesis-element :strength="50" axis="y">
        <div class="circle circle-purple"></div>
      </kinesis-element>
      <kinesis-element :strength="80" axis="y">
        <div class="circle circle-purple1"></div>
      </kinesis-element>
      <kinesis-element :strength="80" axis="y">
        <div class="circle circle-purple2"></div>
      </kinesis-element>
      <kinesis-element :strength="80" axis="y">
        <div class="circle circle-purple3"></div>
      </kinesis-element>
    </kinesis-container>
  </div>
</template>
Once done, we can add our LogRocket logo.png to its kinesis-element:
<kinesis-element :strength="150">
    <img src="./assets/lrlogo.png" alt="logrocket logo">
</kinesis-element>
Its style:
img {
  width: 4rem;
}
This will create the animation we want.
Since we need to make sure the rocket is free to move, we have to give it a higher strength value.
Feel free to tweak the strength attribute of all the elements and check out how this feels.
More animations and interactions
Vue Kinesis is able to do more than just move an object from one place to another interactively.
This library can also animate on scroll with depth using the gyroscope. We can even animate based on audio waves.

<kinesis-container :audio="audio">
    <kinesis-audio :audioIndex="10">
        <kinesis-element :strength="10" type="depth">
         <!-- cover art -->
        </kinesis-element>
    </kinesis-audio>
</kinesis-container>
Here, a path to the audio file is linked on the kinesis-container.
The kinesis-audio component is a child to the container with the :audioIndex being the frequency to which the animation reacts.
Finally, we’ll add a kinesis-element component to set up the animation as shown in our example above.
More constraints
We can place more limits to shape our animations to our desire.
As shown above, constraints can be added on the axis of motion (horizontal or vertical).
Also, we can restrain the objects to move a certain distance away from their origins using transformOrigin, maxY, minY, maxX, and minX on the kinesis-element component.
Moreover, you have the ability to switch the type of animation from translation to rotation, scaling, and depth.
Conclusion
Vue Kinesis is a powerful animation tool that can help Vue developers quickly bring life to any of their websites.
It allows them to create stunning interactive animations based on a variety of events.
It also enables a panoply of customization properties to help achieve the desired effect.
Experience your Vue apps exactly how a user does
Debugging Vue.js applications can be difficult, especially when there are dozens, if not hundreds of mutations during a user session. If you’re interested in monitoring and tracking Vue mutations for all of your users in production, try LogRocket.
LogRocket is like a DVR for web apps, recording literally everything that happens in your Vue apps including network requests, JavaScript errors, performance problems, and much more. Instead of guessing why problems happen, you can aggregate and report on what state your application was in when an issue occurred.
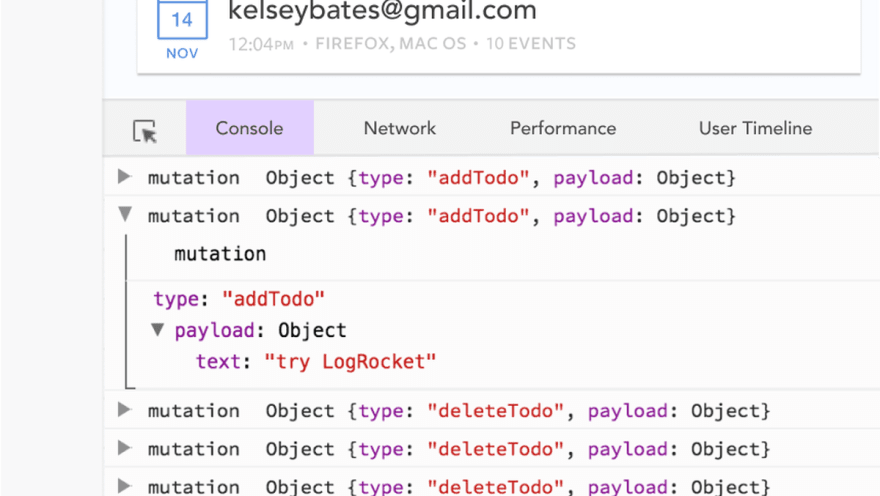
The LogRocket Vuex plugin logs Vuex mutations to the LogRocket console, giving you context around what led to an error, and what state the application was in when an issue occurred.
Modernize how you debug your Vue apps - Start monitoring for free.
The post Interactive Vue animations with Kinesis appeared first on LogRocket Blog.

Top comments (0)