
Written by Preetish HS✏️
VuePress is a static site generator powered by Vue and developed and maintained by the Vue.js team. Although it was built with technical documentation in mind, it can be used to create so much more than that, including landing pages, portfolios, blogs, and more.
VuePress comes with some default plugins out of the box, and users can also install custom plugins. The default theme is optimized for documentation, but users can also install custom themes or develop their own.
How VuePress works
VuePress is written using Markdown, and its engine converts each Markdown file to a prerendered static HTML page. Since it is statically rendered, the application is fast and SEO-friendly. The site still uses Vue.js under the hood, meaning it is still an SPA after the initial page load, so we enjoy smooth navigation features as well.
Technically, you don’t need to know Vue.js at all to create a website using VuePress, but knowing Vue.js affords you numerous advantages. If you’re writing custom Vue components in between your Markdown files as Markdown you will find yourself limited in what you can do with VuePress.
Installing and using VuePress
To install VuePress, enter the following code.
yarn global add vuepress
Note: at the time of writing, I wasn’t able to install VuePress using NPM.
Next, create a directory for your VuePress app and create a starter file. Let’s try to build a simple portfolio with a blog using VuePress.
Start the application by running the following.
vuepress dev
Open the browser localhost:8080, and you’ll see an application running with just a single Markdown file. Remember, the README.md file is converted to index.html. If we had used some other name (say, Hello.md ), we would’ve had to open localhost:8080/hello.
vuepress dev causes VuePress to run in the root directory. We’ll create an src or docs directory to keep all our files, then use:
vuepress dev src
Directory structure

This is roughly what the directory structure of a VuePress app looks like. We’ll go over each of these directories and their uses in detail.

Page routing
The routing table is created automatically based on the directory structure. The root README.md file will be our main index.html, and subsequent directories inside the root will take the URL pathname as their directory names.
Before we get too deep in the weeds, let’s create a few more files to see the routing in action.
Create a directory called src and move the README.md file into this folder. Create one more file called Article.md in the src directory and add the following Markdown code.
//Article.md
# My first Article
VuePress is an amazing static site generator!
Now rerun the project using the following.
vuepress dev src
Open the browser, and you’ll see localhost:8080/article, as well as the first article. But our website looks a little plain without anything in the header, so let’s configure that now.
Configuration
VuePress is highly customizable. Let’s create a .vuepress directory inside the src folder and a config.js file inside that. The config.js file is used to define all the global configurations, such as the main title, theme config, webpack config, adding plugins, and more.
//config.js
module.exports = {
  title: 'Preetish HS',
  description: 'My awesome portfolio blog'
}
Save and reload the application, and you’ll see the title displayed in the header. Let’s do some more theme-specific modifications in this file.
//config.js
module.exports = {
  title: 'Preetish HS',
  description: 'My awesome portfolio blog',
  themeConfig: {
    nav: [
      { text: 'Home', link: '/' },
      { text: 'Article', link: '/article' }
    ]
  }
}
We just added two navbar links, which should look like this:

Before we customize our app any further, let’s add two more articles. Create Article2.md and Article3.md. The default theme supports all basic Markdown features, such as headers, tables, and syntax highlighting for code blocks.
//Article2.md
# My second article

VuePress has been great so far. We were able to create pages and customize the theme.

Add some content to create a third article. Since the number of articles is increasing, let’s put all the articles into a blog folder and create a separate page for them.
Change the config.js to link to the blog.
 themeConfig: {
    nav: [
      { text: 'Home', link: '/' },
      { text: 'blog', link: '/blog' }
    ]
  },
Clicking on the blog link on the navbar will result in a 404 page because there is no Readme.md file inside the blog folder, but the articles are still accessible from localhost:8080/blog/article.
Let’s design a page to showcase all our articles. We could build something like this:
//blog/Readme.md

# My Posts
[Article 1](Article.md)
[Article 2](Article2.md)
[Article 3](Article3.md)
This would work, but it would look like something straight out of the 90s. Instead, let’s take advantage of Vue.js and write a beautiful card layout for our blog page.
Using Vue components in Markdown
We can create Vue components inside the .vuepress/components directory. Any .vue files in this folder will be registered globally and accessible from any of our Markdown files by directly using the component name.
Let’s create a Posts.vue component with some cards.
<template>
  <div class="post-container">
    <router-link to="article">
      <div class="post-card">
        <img class="article-image" src="../public/images/blog_hero_image.jpg" />
        <div class="description">
          My first Article
        </div>
      </div>
    </router-link>
    <router-link to="article2">
      <div class="post-card">
        <img class="article-image" src="../public/images/blog_hero_image.jpg" />
        <div class="description">
          My Second Article
        </div>
      </div>
    </router-link>
    <router-link to="article3">
      <div class="post-card">
        <img class="article-image" src="../public/images/blog_hero_image.jpg" />
        <div class="description">
          My third Article
        </div>
      </div>
    </router-link>
  </div>
</template>
<script>
export default {}
</script>
<style scoped>
.post-container {
  display: flex;
  flex-wrap: wrap;
  width: 100%;
}
.post-card {
  width: 600px;
  height: 150px;
  margin: 10px;
  border: 1px solid #ccc;
  border-radius: 3px;
  padding: 10px;
  display: flex;
  align-items: center;
}
.article-image {
  height: 100%;
}
.description {
  width: 100%;
  display: flex;
  justify-content: center;
}
</style>
Use the below component in the Markdown file and reload the page.
# My Posts
<posts />
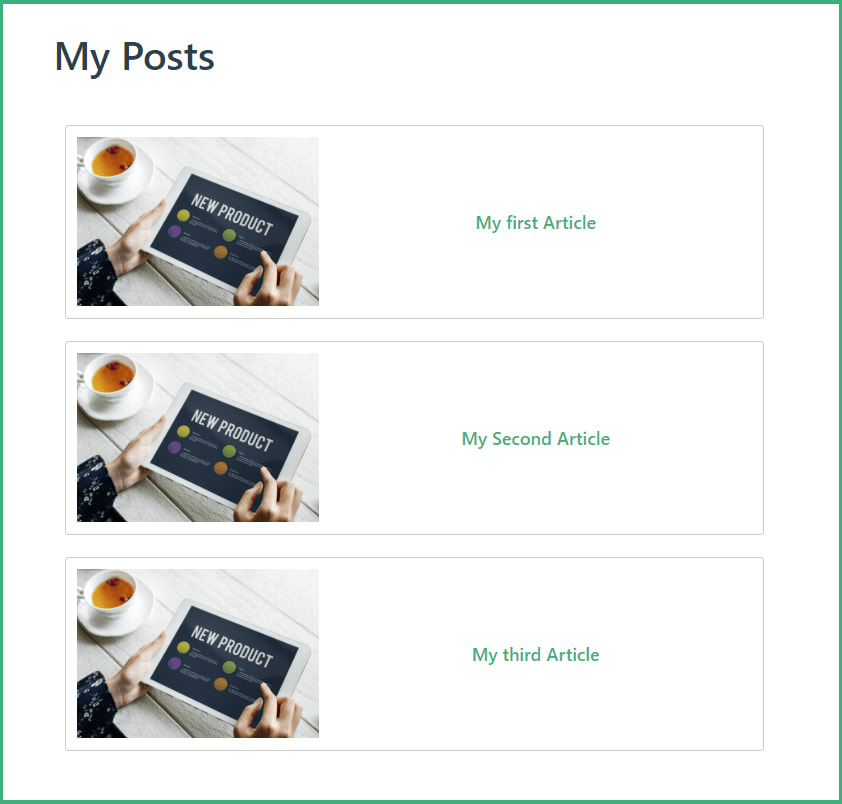
This looks much better, but still not perfect. We are hardcoding everything, and a blog post card should have more details, such as the author name and a short description.
VuePress injects the whole site’s data into all the components. This enables us to access $site and $page, which consists of site- and page-related data in our Vue components and Markdown files.
$site data would look something like this:

This includes data related to both the complete application configuration and individual pages. We use $site.pages to create our posts page dynamically instead of hardcoding it. The problem is that this array lists all the pages, including the homepage and the posts page itself. We need to differentiate the article pages from other pages.
Frontmatter
In each page object, you’ll see an object called frontmatter. The frontmatter is essentially page-specific metadata, which we can write in YAML, JSON, or TOML format at the beginning of the file. Let’s write frontmatter for our article pages.
//Article.md

---
title: My first article
description: Basic intro to vuepress
author: Preetish HS
type: article
---
Now we can use these to dynamically populate our posts page.
<template>
  <div class="post-container">
    <router-link v-for="page in pages" :to="page.path">
      <div class="post-card">
        <img class="article-image" src="../public/images/blog_hero_image.jpg" />
        <div class="page-detail">
          <div class="page-title">{{ page.title }}</div>
          <div class="page-description">{{ page.frontmatter.description }}</div>
          <div class="page-author">Author: {{ page.frontmatter.author }}</div>
        </div>
      </div>
    </router-link>
  </div>
</template>
<script>
export default {
  data() {
    return {
      pages: []
    }
  },
  mounted() {
    this.$site.pages.forEach(page => {
      if (page.frontmatter.type === 'article') {
        this.pages.push(page)
      }
    })
  }
}
</script>

The code looks much cleaner, and the cards look better too.
Now let’s create another folder for portfolio, add each of our projects, and, finally, add a link to the navbar.
Homepage customization
Until now, we haven’t done much to the homepage. We can customize VuePress’ default theme to create a stunning homepage, complete with banner images and more. Open the Readme.md from the root directory and add the following frontmatter code.
---
home: true
heroImage: /images/banner.jpg
heroText: Hi, I am Preetish. Welcome to my blog!
tagline: I am a Remote Vue.js Developer and a Tech Blogger
actionText: See my work →
actionLink: /blog/
features:
  - title: Frontend Developer
    details: I am a frontend developer with expertise in Vue.js and Nuxt.js
  - title: Tech Blogger
    details: I love writing tech articles to share my knowledge on frontend frameworks, libraries, best practices and more.
  - title: Traveller
    details: Travelling is my favourite activity, I am an avid hiker and backpacker
footer: Developed using VuePress ♥️
---
We added a lot of things, such as headers, a banner image, and a few other details, to our portfolio homepage. It should now look something like this:

You might recognize this layout from the official Vue.js documentation — VuePress was initially written to maintain Vue.js and other official Vue package documents — but we can still customize it further. We can override default CSS, write custom CSS or even write custom layouts for the entire website.
Custom CSS
To write custom, page-specific CSS, add a class name to the page using frontmatter and write styles under that class to override the existing ones.
Let’s customize our homepage to make it look a little better. Add the below code in the Readme.md of the root directory.
---
pageClass: homepage
---
We need to write the styles in the .vuepress/styles/index.styl file in stylus format. Let’s create a file there and make some changes to the homepage.
.theme-container.homepage {
  .hero {
    img {
      width: 100%;
      object-fit: cover;
      margin: 30px 0 0 0;
    }
  }
  .home {
    max-width: 100%;
    padding: 0;
  }
  .features {
    padding: 0.5rem 1rem;
  }
}
With the above code, we added some custom CSS to make our page and hero image full-width. We can also override the default color scheme, change the height of the navbar, or even modify the responsive breakpoints of the default theme.
Let’s modify the main color and change it to teal for now. This code is written in the .vuepress/styles/palette.styl file:
$accentColor = #007f80

Now our portfolio website is shaping up!
Installing plugins
Create a package.json file by running:
npm init
VuePress has many official plugins as well as countless community plugins. Let’s install a plugin that enables readers to share an article on social media.
npm install vuepress-plugin-social-share -D
To use the plugin, we need to declare it in the config.js file with additional configurations, if required.
//config.js
module.exports = {
  plugins: [
      'social-share',
      {
         networks: ['twitter', 'facebook', 'reddit', 'telegram']
      },
  ],
}
Now let’s apply the plugin to our article.
//Article2.md
.
.
<social-share :networks="['facebook', 'twitter']"/>

More customizations
It may be helpful to rename each of our article files to something meaningful (e.g., my-first-article.md) to generate a more SEO-friendly URL (e.g., http://localhost:8080/blog/my-first-article.html).
When we open an individual article, we see a lot of space on the sides. Also, we cannot navigate to other articles directly. Let’s fix this by making use of the siderbar feature in the default theme.
In the config.js file, add the following code.
themeConfig: {
    sidebar: [
      '/blog/my-first-article',
      '/blog/my-second-article',
      '/blog/my-third-article'
    ]
}

This should create a sidebar for navigation as well as links to navigate to the previous and next article.
Deployment
Finally, let’s build and deploy our application by running:
vuepress run build src
Build files will be available in .vuepress/dist. Similar to Nuxt generate, VuePress creates HTML static pages for all possible routes. This can be deployed easily in any static hosting service, such as GitHub Pages, Netlify, etc.
Conclusion
Now you should be able to build an SEO-friendly static portfolio and blog using VuePress in about 10 minutes. As you can see, you can use VuePress even without knowledge of Vue. The default theme has myriad features out of the box, and you can customize it to any extent by modifying the existing theme or writing a new theme altogether from scratch. VuePress is powerful, and its use should not be limited to documentation.
Experience your Vue apps exactly how a user does
Debugging Vue.js applications can be difficult, especially when there are dozens, if not hundreds of mutations during a user session. If you’re interested in monitoring and tracking Vue mutations for all of your users in production, try LogRocket.
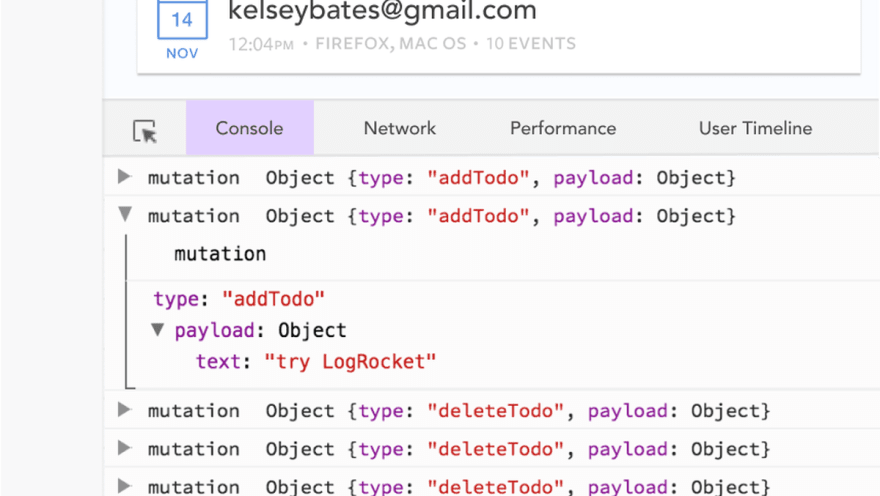
LogRocket is like a DVR for web apps, recording literally everything that happens in your Vue apps including network requests, JavaScript errors, performance problems, and much more. Instead of guessing why problems happen, you can aggregate and report on what state your application was in when an issue occurred.
The LogRocket Vuex plugin logs Vuex mutations to the LogRocket console, giving you context around what led to an error, and what state the application was in when an issue occurred.
Modernize how you debug your Vue apps - Start monitoring for free.
The post How to create a portfolio and blog using VuePress and Markdown appeared first on LogRocket Blog.


Top comments (0)