
Written by Yusuff Faruq✏️
Sometimes, while building an application, we want each user to have a personalized experience. This is made possible through user authentication, whereby a user logs in to the application to access personalized information such as a social media feed or use a personalized service.
In this article, we will which is a backend-as-a-service (BaaS) that allows both web and mobile developers to perform common backend tasks with no need for maintenance or upkeep.
At the end of this article, we will have built a simple React app that logs users in and displays their username, email, and profile picture. You can find a demo of the application here.
Prerequisites
This article is primarily targeted towards intermediate-level React developers. However, no matter your skill level, you can still follow along well if you have an understanding of routing, the Context API, and other concepts that will be used in this article.
We will be using Tailwind CSS to style our components. Tailwind CSS is a utility-first CSS framework for rapidly building custom designs. It is very similar to Bootstrap, so it’s easy to pick up. You do not need to have a solid understanding of Tailwind CSS to follow along with this article.

Setting up
Before we begin coding, we need to set up some things for our app to work. Firstly, we need to create a new React app. You can easily do that using create-react-app:
npx create-react-app firebase-auth-app
Now that we have done that, we need to set up Tailwind CSS to work with React. Here’s a great guide that helps you get Tailwind CSS up and running with create-react-app in minutes.
Next, we need to install Firebase:
npm install --save firebase
With that done, we can now set up Firebase.
Setting up Firebase
Firstly, we need to create a new file dedicated to Firebase. Create a src folder in the root directory, and in it, create a file called firebase.js.
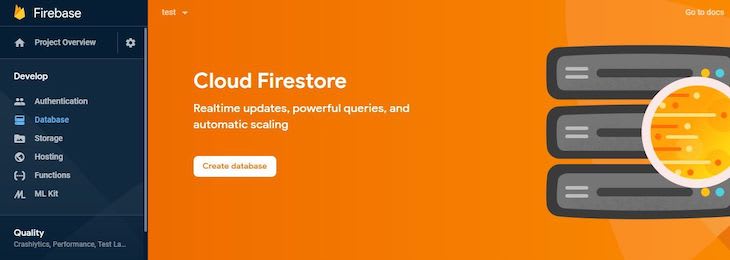
Now, go to the Firebase website and click on the Get started button. You will be taken to a page where you can create a new project. Once you are done, you should be taken to a dashboard page similar to the image below.

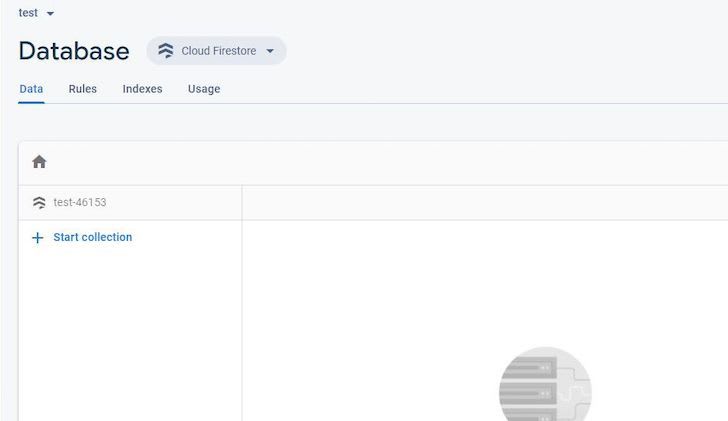
We will be using two Firebase services for this project: the Authentication service and Cloud Firestore service. Let’s set up Cloud Firestore first.
Select the Database option from the side menu. You should now be able to choose either of the two database services that Firebase provides: Cloud Firestore or the Realtime Database. In this article, we will use Cloud Firestore.
Now create a Cloud Firestore database. You should now see a modal for setting the security rules of your database. Choose Start in test mode. You should have an empty database ready for use. It should look like this:
Now that we have our database ready, let’s set up authentication. From the side menu, select the Authentication option. Now, select the Sign-in method tab. You should have something like this:
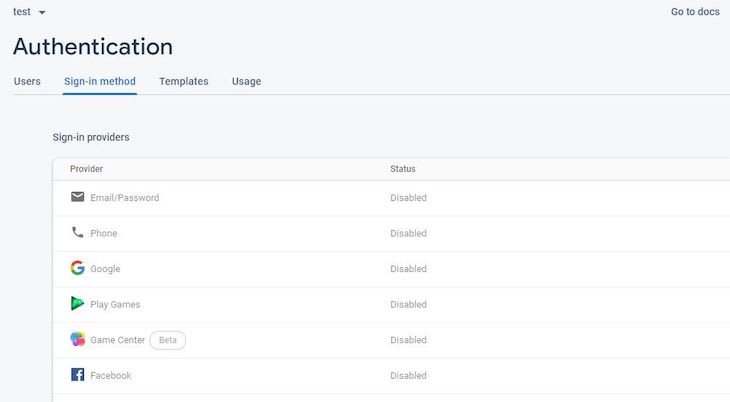
Here, you can set up authentication for different providers such as Google, Facebook, GitHub, and so on. In our app, we want to enable Google authentication and email/password authentication. Let’s set up Google authentication first. Click on the Google option.
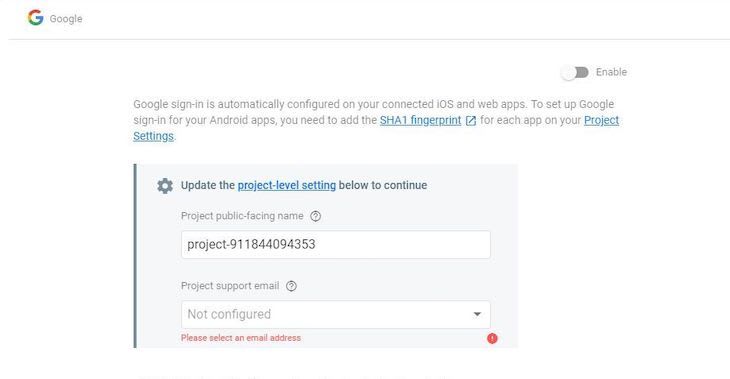
You can now enable Google authentication by toggling the button at the upper right-hand side. You also need to provide a project support email. Once that is done, save the changes and do the same with the email/password option.
Now that Cloud Firestore and authentication have been set up, we need to get our project’s configuration details. This is needed to link our code to our Firebase project.
To get our Firebase configuration details, go back to the project overview page and add a web app to the Firebase project. After registering the app, you should get the configuration details in the form of a JavaScript object.
const firebaseConfig = {
  apiKey: 'AIzaXXXXXXXXXXXXXXXXXXXXXXX',
  authDomain: 'test-XXXX.firebaseapp.com',
  databaseURL: 'https://test-XXXXXX.firebaseio.com',
  projectId: 'test-XXXX',
  storageBucket: 'test-XXXX.appspot.com',
  messagingSenderId: 'XXXXXXX',
  appId: "XXXXXXXXXXXXXXXXXXXXXXXXXXXXXXXXXXXX"
};
Now open your firebase.js file and import Firebase, Cloud Firestore, and Firebase’s Authentication service:
import firebase from "firebase/app";
import "firebase/auth";
import "firebase/firestore";

const firebaseConfig = {
  apiKey: 'AIzaXXXXXXXXXXXXXXXXXXXXXXX',
  authDomain: 'test-XXXX.firebaseapp.com',
  databaseURL: 'https://test-XXXXXX.firebaseio.com',
  projectId: 'test-XXXX',
  storageBucket: 'test-XXXX.appspot.com',
  messagingSenderId: 'XXXXXXX',
  appId: "XXXXXXXXXXXXXXXXXXXXXXXXXXXXXXXXXXXX"
};
Now we just need to initialize our Firebase app using the configuration details we got from Firebase. Once that is done, we need to get references to Cloud Firestore and the Authentication service and export them.
firebase.initializeApp(firebaseConfig);
export const auth = firebase.auth();
export const firestore = firebase.firestore();
Building our components
Now that Firebase is fully set up, we can start building our components. Our application will cover:
- Signing in and signing out
- Signing up with Google or email/password
- Password reset
- A profile page
Therefore, we will build five components:
- An
Applicationcomponent, which will render either the sign-in/sign-up routes or the profile page, depending on whether the user has been signed into the application - A
PasswordResetcomponent, which allows the user to reset their password in the event they lose or forget it - A
ProfilePagecomponent, which will display the user’s display name, email, and profile picture or a placeholder image if they are signing in via email/password - A
SignIncomponent for logging the user in to the application - A
SignUpcomponent, which allows new users to sign up to use the application
Reach router will be used to route between the sign-in and sign-up routes or pages. Reach router is an accessibility-focused routing library for React. It is very easy to get started with and is a perfect fit for our application.
Now that we know what we want to do, let’s start writing some code!
In your src folder, create a new folder called Components. This is where our components will reside. Let’s start with the Application component.
The Application renders the ProfilePage component if the user has logged in and a Router component (which comes from Reach Router) housing the SignUp, SignIn, and PasswordReset components/routes otherwise.
Later on, we will use React’s Context API to pass the current user to all the components that need it. For now, we will just create a placeholder variable to represent the current user.
In case you are not familiar with Reach Router, the Router component is used to house the different routes we want to route between. Each immediate child of the Router component must have a path prop, which acts as a link to that route.
import React from "react";
import { Router } from "@reach/router";
import SignIn from "./SignIn";
import SignUp from "./SignUp";
import ProfilePage from "./ProfilePage";
import PasswordReset from "./PasswordReset";
function Application() {
  const user = null;
  return (
        user ?
        <ProfilePage />
      :
        <Router>
          <SignUp path="signUp" />
          <SignIn path="/" />
          <PasswordReset path = "passwordReset" />
        </Router>

  );
}
export default Application;
Now, let’s build our SignIn component. The code for that is as follows:
import React, {useState} from "react";
import { Link } from "@reach/router";

const SignIn = () => {
    const [email, setEmail] = useState('');
    const [password, setPassword] = useState('');
    const [error, setError] = useState(null);
    const signInWithEmailAndPasswordHandler =
            (event,email, password) => {
                event.preventDefault();
    };

      const onChangeHandler = (event) => {
          const {name, value} = event.currentTarget;

          if(name === 'userEmail') {
              setEmail(value);
          }
          else if(name === 'userPassword'){
            setPassword(value);
          }
      };

  return (
    <div className="mt-8">
      <h1 className="text-3xl mb-2 text-center font-bold">Sign In</h1>
      <div className="border border-blue-400 mx-auto w-11/12 md:w-2/4 rounded py-8 px-4 md:px-8">
        {error !== null && <div className = "py-4 bg-red-600 w-full text-white text-center mb-3">{error}</div>}
        <form className="">
          <label htmlFor="userEmail" className="block">
            Email:
          </label>
          <input
            type="email"
            className="my-1 p-1 w-full"
            name="userEmail"
            value = {email}
            placeholder="E.g: faruq123@gmail.com"
            id="userEmail"
            onChange = {(event) => onChangeHandler(event)}
          />
          <label htmlFor="userPassword" className="block">
            Password:
          </label>
          <input
            type="password"
            className="mt-1 mb-3 p-1 w-full"
            name="userPassword"
            value = {password}
            placeholder="Your Password"
            id="userPassword"
            onChange = {(event) => onChangeHandler(event)}
          />
          <button className="bg-green-400 hover:bg-green-500 w-full py-2 text-white" onClick = {(event) => {signInWithEmailAndPasswordHandler(event, email, password)}}>
            Sign in
          </button>
        </form>
        <p className="text-center my-3">or</p>
        <button
          className="bg-red-500 hover:bg-red-600 w-full py-2 text-white">
          Sign in with Google
        </button>
        <p className="text-center my-3">
          Don't have an account?{" "}
          <Link to="signUp" className="text-blue-500 hover:text-blue-600">
            Sign up here
          </Link>{" "}
          <br />{" "}
          <Link to = "passwordReset" className="text-blue-500 hover:text-blue-600">
            Forgot Password?
          </Link>
        </p>
      </div>
    </div>
  );
};
export default SignIn;
As you can see, our SignIn component has three pieces of state: email, for storing the user’s email address; password, for storing the user’s password; and error, for displaying error messages in the event of an error during the sign-in process.
Our SignIn component also uses the Link component that Reach Router provides. This component is very similar to the anchor element in HTML, and the to prop of the Link component is similar in function to the href attribute of the anchor element.
Your SignIn component should look like this:

Next, let’s build our SignUp component. The SignUp component is very similar to the SignIn component, and the code is as follows:
import React, { useState } from "react";
import { Link } from "@reach/router";
const SignUp = () => {
  const [email, setEmail] = useState("");
  const [password, setPassword] = useState("");
  const [displayName, setDisplayName] = useState("");
  const [error, setError] = useState(null);
  const createUserWithEmailAndPasswordHandler = (event, email, password) => {
    event.preventDefault();
    setEmail("");
    setPassword("");
    setDisplayName("");
  };
  const onChangeHandler = event => {
    const { name, value } = event.currentTarget;
    if (name === "userEmail") {
      setEmail(value);
    } else if (name === "userPassword") {
      setPassword(value);
    } else if (name === "displayName") {
      setDisplayName(value);
    }
  };
  return (
    <div className="mt-8">
      <h1 className="text-3xl mb-2 text-center font-bold">Sign Up</h1>
      <div className="border border-blue-400 mx-auto w-11/12 md:w-2/4 rounded py-8 px-4 md:px-8">
        {error !== null && (
          <div className="py-4 bg-red-600 w-full text-white text-center mb-3">
            {error}
          </div>
        )}
        <form className="">
          <label htmlFor="displayName" className="block">
            Display Name:
          </label>
          <input
            type="text"
            className="my-1 p-1 w-full "
            name="displayName"
            value={displayName}
            placeholder="E.g: Faruq"
            id="displayName"
            onChange={event => onChangeHandler(event)}
          />
          <label htmlFor="userEmail" className="block">
            Email:
          </label>
          <input
            type="email"
            className="my-1 p-1 w-full"
            name="userEmail"
            value={email}
            placeholder="E.g: faruq123@gmail.com"
            id="userEmail"
            onChange={event => onChangeHandler(event)}
          />
          <label htmlFor="userPassword" className="block">
            Password:
          </label>
          <input
            type="password"
            className="mt-1 mb-3 p-1 w-full"
            name="userPassword"
            value={password}
            placeholder="Your Password"
            id="userPassword"
            onChange={event => onChangeHandler(event)}
          />
          <button
            className="bg-green-400 hover:bg-green-500 w-full py-2 text-white"
            onClick={event => {
              createUserWithEmailAndPasswordHandler(event, email, password);
            }}
          >
            Sign up
          </button>
        </form>
        <p className="text-center my-3">or</p>
        <button
          className="bg-red-500 hover:bg-red-600 w-full py-2 text-white"
        >
          Sign In with Google
        </button>
        <p className="text-center my-3">
          Already have an account?{" "}
          <Link to="/" className="text-blue-500 hover:text-blue-600">
            Sign in here
          </Link>
        </p>
      </div>
    </div>
  );
};
export default SignUp;
Our SignUp component should look like this:

Now let’s build our ProfilePage component. We will use placeholder values for the profile picture, email, and display name. The code for the ProfilePage should look like this:
import React from "react";

const ProfilePage = () => {
  return (
    <div className = "mx-auto w-11/12 md:w-2/4 py-8 px-4 md:px-8">
      <div className="flex border flex-col items-center md:flex-row md:items-start border-blue-400 px-3 py-4">
        <div
          style={{
            background:
                `url(https://res.cloudinary.com/dqcsk8rsc/image/upload/v1577268053/avatar-1-bitmoji_upgwhc.png)  no-repeat center center`,
            backgroundSize: "cover",
            height: "200px",
            width: "200px"
          }}
          className="border border-blue-300"
        ></div>
        <div className = "md:pl-4">
        <h2 className = "text-2xl font-semibold">Faruq</h2>
        <h3 className = "italic">faruq123@gmail.com</h3>
        </div>
      </div>
      <button className = "w-full py-3 bg-red-600 mt-4 text-white">Sign out</button>
    </div>
  )
};
export default ProfilePage;
With that done, let’s move to the PasswordReset component. This is where the user can input their email into a form and have a password reset email sent to them in case they lose their password. The code for this component is as follows:
import React, { useState } from "react";
import { Link } from "@reach/router";
const PasswordReset = () => {
const [email, setEmail] = useState("");
const [emailHasBeenSent, setEmailHasBeenSent] = useState(false);
const [error, setError] = useState(null);
const onChangeHandler = event => {
const { name, value } = event.currentTarget;
if (name === "userEmail") {
setEmail(value);
}
};
const sendResetEmail = event => {
event.preventDefault();
};
return (
<div className="mt-8">
<h1 className="text-xl text-center font-bold mb-3">
Reset your Password
</h1>
<div className="border border-blue-300 mx-auto w-11/12 md:w-2/4 rounded py-8 px-4 md:px-8">
<form action="">
{emailHasBeenSent && (
<div className="py-3 bg-green-400 w-full text-white text-center mb-3">
An email has been sent to you!
</div>
)}
{error !== null && (
<div className="py-3 bg-red-600 w-full text-white text-center mb-3">
{error}
</div>
)}
<label htmlFor="userEmail" className="w-full block">
Email:
</label>
<input
type="email"
name="userEmail"
id="userEmail"
value={email}
placeholder="Input your email"
onChange={onChangeHandler}
className="mb-3 w-full px-1 py-2"
/>
<button
className="w-full bg-blue-400 text-white py-3"
>
Send me a reset link
</button>
</form>
<Link
to ="/"
className="my-2 text-blue-700 hover:text-blue-800 text-center block"
>
← back to sign in page
</Link>
</div>
</div>
);
};
export default PasswordReset;
Passing down the current user with the Context API
Like I pointed out earlier, we will pass down the current user to all the components that need it using React’s Context API.
The Context API allows us to pass data down a tree of components without pass that data as props of intermediate components. Therefore, regardless of how deeply nested in a component tree a component may be, it will have easy access to whatever data is stored in the context. You can learn more about Context here.
To pass down the data from Context, we will use a provider component that will house the Application component in our App.js file.
You can create a providers folder in your src folder. Inside the providers folder, create a new file called UserProvider.jsx. Import createContext alongside React. We also need to import auth from our firebase.js file. With that done, let’s create and export our context, which we will call UserContext. Its initial value will be an object with a property called user, whose value is null.
export const UserContext = createContext({ user: null });
Now let’s create the actual UserProvider component. We need to add a piece of state in the UserProvider component called user. This piece of state will later be passed down to the other components as the value of the UserContext context.
We also need to perform some operations as soon as the UserProvider component mounts. Firebase gives us an observer called onAuthStateChanged, which we can set on the auth object to listen for changes in the state of the current user (when the user logs in and logs out).
We can also get the current user and some information about that user, such as uid, email, display name, and so on, with onAuthStateChanged. What we want to do is get the current user and set it as the value of the user state. In this case, our current user is userAuth.
componentDidMount = () => {
    auth.onAuthStateChanged(userAuth => {
      this.setState({ user: userAuth});
    });
};
Our UserProvider component can now render the provider component that comes with our UserContext and, in turn, house the child components passed to it. Our UserProvider component should look like this:
import React, { Component, createContext } from "react";
import { auth } from "../firebase";

export const UserContext = createContext({ user: null });
class UserProvider extends Component {
  state = {
    user: null
  };

  componentDidMount = () => {
    auth.onAuthStateChanged(userAuth => {
      this.setState({ user: userAuth});
    });
  };
  render() {
    return (
      <UserContext.Provider value={this.state.user}>
        {this.props.children}
      </UserContext.Provider>
    );
  }
}
export default UserProvider;
Once we have our UserProvider ready, we will use it to wrap our Application component in our App.js file.
import React from "react";
import Application from "./Components/Application";
import UserProvider from "./providers/UserProvider";
function App() {
  return (
    <UserProvider>
      <Application />
    </UserProvider>
  );
}
export default App;
Implementing Google sign-in
Implementing Google sign-in with Firebase is simple. Let’s go to our firebase.js file and create a variable called provider, whose value will be an instance of the Google provider object.
const provider = new firebase.auth.GoogleAuthProvider();
Firebase Auth provides different methods of signing in, such as signInWithRedirect, which redirects the user to a new page, and signInWithPopup, which makes use of a pop-up. After choosing our sign-in method, we can now write and export our simple Google sign-in function:
export const signInWithGoogle = () => {
  auth.signInWithPopup(provider);
};
We can now use this SignInWithGoogle function in the onClick handler functions for the Sign In with Google button in our SignIn and SignUp components.
Now, when you sign in with your Google account, you should be signed in to the application and taken to your profile page where you should see your display name, email, and display picture. However, because we are still using the placeholder values in the ProfilePage, this is not so. Also, the Sign out button doesn’t work so we need to modify our ProfilePage, like so:
import React, { useContext } from "react";
import { UserContext } from "../providers/UserProvider";
import {auth} from "../firebase";
const ProfilePage = () => {
  const user = useContext(UserContext);
  const {photoURL, displayName, email} = user;
  return (
    <div className = "mx-auto w-11/12 md:w-2/4 py-8 px-4 md:px-8">
      <div className="flex border flex-col items-center md:flex-row md:items-start border-blue-400 px-3 py-4">
        <div
          style={{
            background: `url(${photoURL || 'https://res.cloudinary.com/dqcsk8rsc/image/upload/v1577268053/avatar-1-bitmoji_upgwhc.png'})  no-repeat center center`,
            backgroundSize: "cover",
            height: "200px",
            width: "200px"
          }}
          className="border border-blue-300"
        ></div>
        <div className = "md:pl-4">
        <h2 className = "text-2xl font-semibold">{displayName}</h2>
        <h3 className = "italic">{email}</h3>
        </div>
      </div>
      <button className = "w-full py-3 bg-red-600 mt-4 text-white" onClick = {() => {auth.signOut()}}>Sign out</button>
    </div>
  )
};
export default ProfilePage;
As you can see, we used the useContext Hook to get the current value of UserContext and grabbed the necessary data from it. We also added an onClick handler to our sign-out button. This function uses the signOut method provided by the auth object.
Now you should be able to see your correct details on your profile page.
Implementing email/password sign-in
When we implement email/password authentication, we cannot add additional data such as display name on user creation. As a solution, we will save and retrieve each user’s data on Cloud Firestore. This article will not discuss Cloud Firestore in detail but will cover the parts of Cloud Firestore we need to understand. You can visit the docs to learn more about Firestore.
So what is Cloud Firestore, and how does it store data? Well, according to the docs:
Cloud Firestore is a NoSQL, document-oriented database. Unlike a SQL database, there are no tables or rows. Instead, you store data in documents, which are organized into collections.
Each document contains a set of key-value pairs. Cloud Firestore is optimized for storing large collections of small documents.
So, for our application, we will create a collection called users, which will contain documents for each user. These documents will contain information about the user, such as display name, email, and photo URL. We will also create an async function called generateUserDocument, which will then return the user data with the help of another function called getUserDocument.
Now, let’s write our generateUserDocument function in our firebase.js file. First of all, we need to get a reference to the user’s document in the users collection. We can do this with the doc method that Firestore provides. Once that’s done, we need to get the current content of the document, and we can do this with the get method of the user reference.
const userRef = firestore.doc(`users/${user.uid}`);
const snapshot = await userRef.get();
We now want to check if there is data at the specified reference. If there is no data, we want to write some data to that document. After that, we will return the user’s data using the getUserDocument function. If there is data, we will return the user’s data right away.
export const generateUserDocument = async (user, additionalData) => {
  if (!user) return;
  const userRef = firestore.doc(`users/${user.uid}`);
  const snapshot = await userRef.get();
  if (!snapshot.exists) {
    const { email, displayName, photoURL } = user;
    try {
      await userRef.set({
        displayName,
        email,
        photoURL,
        ...additionalData
      });
    } catch (error) {
      console.error("Error creating user document", error);
    }
  }
  return getUserDocument(user.uid);
};
const getUserDocument = async uid => {
  if (!uid) return null;
  try {
    const userDocument = await firestore.doc(`users/${uid}`).get();
    return {
      uid,
      ...userDocument.data()
    };
  } catch (error) {
    console.error("Error fetching user", error);
  }
};
Now that we have a function to host our users’ data on Firestore, let’s use that function in the createUserWithEmailAndPasswordHandler in our SignUp component. We can create a new user with email and password using the createUserWithEmailAndPassword method provided by Firebase, and then generate a user document for the new user with our new function, like so:
const createUserWithEmailAndPasswordHandler = async (event, email, password) => {
    event.preventDefault();
    try{
      const {user} = await auth.createUserWithEmailAndPassword(email, password);
      generateUserDocument(user, {displayName});
    }
    catch(error){
      setError('Error Signing up with email and password');
    }

    setEmail("");
    setPassword("");
    setDisplayName("");
  };
Next, let us modify the event handler for signing in using email and password in the SignIn component. We can sign in an already registered user using the signInWithEmailAndPassword method of the Firebase Auth object.
const signInWithEmailAndPasswordHandler = (event, email, password) => {
    event.preventDefault();
    auth.signInWithEmailAndPassword(email, password).catch(error => {
      setError("Error signing in with password and email!");
      console.error("Error signing in with password and email", error);
    });
  };
The final thing to do in order to fully implement the email/password sign-in is to modify the componentDidMount method of our UserProvider component. Since we are no longer retrieving data directly from the user object provided by the onAuthStateChanged method, we need to modify our code like so:
componentDidMount = async () => {
    auth.onAuthStateChanged(async userAuth => {
      const user = await generateUserDocument(userAuth);
      this.setState({ user });
    });
  };
Now, new users should be able to create an account in our application using their email and password.
Implementing the password reset feature
It is a good idea to provide a password reset feature so users can reset their passwords in the event they lose them.
Firebase makes this very easy to do with a handy function called sendPasswordResetEmail, which takes in an email as an argument and sends a reset link to the email if the user has an account with our application. If the user does not have an account with our app, this function throws an error. Let’s edit the sendResetEmail function in our PasswordReset component as follows:
const sendResetEmail = event => {
    event.preventDefault();
    auth
      .sendPasswordResetEmail(email)
      .then(() => {
        setEmailHasBeenSent(true);
        setTimeout(() => {setEmailHasBeenSent(false)}, 3000);
      })
      .catch(() => {
        setError("Error resetting password");
      });
  };
Now, registered users should be able to reset their passwords using the PasswordReset component.
Conclusion
Finally, we have come to the end of this article!
You should now be able to authenticate users in your React apps using Firebase. Firebase also supports other authentication providers such as GitHub, Twitter, and so on, and you can learn more about authentication in Firebase here.
You can also find the app we built live here.
Full visibility into production React apps
Debugging React applications can be difficult, especially when users experience issues that are difficult to reproduce. If you’re interested in monitoring and tracking Redux state, automatically surfacing JavaScript errors, and tracking slow network requests and component load time, try LogRocket.

LogRocket is like a DVR for web apps, recording literally everything that happens on your React app. Instead of guessing why problems happen, you can aggregate and report on what state your application was in when an issue occurred. LogRocket also monitors your app's performance, reporting with metrics like client CPU load, client memory usage, and more.
The LogRocket Redux middleware package adds an extra layer of visibility into your user sessions. LogRocket logs all actions and state from your Redux stores.
Modernize how you debug your React apps — start monitoring for free.
The post Handling user authentication with Firebase in your React apps appeared first on LogRocket Blog.


Top comments (0)