
Create React App is a popular toolchain for building simple apps. The goal of this post is to explain the components of Create React App at a deeper level to give you much better control and confidence over the development environment.
Introduction
Before we understand what Create React App solves, let’s first learn what a toolchain is. eLinux.org describes it as “a set of distinct software development tools that are linked (or chained) together by specific stages.”
In other words, any software development framework is made up of a bunch of supporting tools optimized to do specific functions. For instance, in C++ development, we need a compiler to compile the code and a build system like CMake to manage all the dependencies if the project is fairly big. In this case, the compiler and CMake become part of the toolchain.
In React development, different toolchains satisfy different requirements for product development. For instance, Next.js is great for building a server-rendered website, and GatsbyJS is optimized for static, content-oriented websites like blogs and newsletters.
Create React App is also a toolchain. It is specifically recommended by the React community for building single-page applications (SPAs) and for learning React (for building “hello, world” applications). It sets up your development environment so that you can use the latest JavaScript features, provides a nice developer experience, and optimizes your app for production.
At the time of this writing, you’ll need to have Node ≥ v6.0.0 and npm ≥ v5.2.0 on your machine.

History
Create React App was created by Joe Haddad and Dan Abramov. The GitHub repository is very active and maintained by the creators, along with a few open source developers from different parts of the world. If you’re interested in contributing, the repository’s contributing page is a good place to start.
Getting started
Now that we have some relevant context about Create React App, let’s get started by installing it. In this tutorial, I am going to build a simple SPA that displays restaurants on a webpage and lets users rate them.
Installation
Run the following npx command on a terminal to install and bootstrap the application using Create React App. Let’s call our application “rate-restaurants.”
~ npx create-react-app rate-restaurants
This command runs for a few seconds and exits happily after creating a bare-bones React application under a new directory called rate-restaurants. Now, cd into the directory. The directory initially looks something like this:

Let’s understand what each folder is:
node_modules
This folder is part of the npm system. npm puts local installs of packages in ./node_modules of the current package root. Basically, the packages you want to use by calling an “import” statement go here.
public
This folder contains the index.html and manifest.json files. Let’s look at the files inside the public folder.
index.html
This index.html serves as a template for generating build/index.html, which is ultimately the main file that gets served on the browser. Let’s take a look at this file’s contents:
<!DOCTYPE html>
<html lang="en">
  <head>
    <meta charset="utf-8" />
    <link rel="shortcut icon" href="%PUBLIC_URL%/favicon.ico" />
    <meta
      name="viewport"
      content="width=device-width, initial-scale=1, shrink-to-fit=no"
    />
    <meta name="theme-color" content="#000000" />
    <!--
      manifest.json provides metadata used when your web app is installed on a
      user's mobile device or desktop. See https://developers.google.com/web/fundamentals/web-app-manifest/
    -->
    <link rel="manifest" href="%PUBLIC_URL%/manifest.json" />
    <!--
      Notice the use of %PUBLIC_URL% in the tags above.
      It will be replaced with the URL of the `public` folder during the build.
      Only files inside the `public` folder can be referenced from the HTML.

      Unlike "/favicon.ico" or "favicon.ico", "%PUBLIC_URL%/favicon.ico" will
      work correctly both with client-side routing and a non-root public URL.
      Learn how to configure a non-root public URL by running `npm run build`.
    -->
    <title>React App</title>
  </head>
  <body>
    <noscript>You need to enable JavaScript to run this app.</noscript>
    <div id="root"></div>
    <!--
      This HTML file is a template.
      If you open it directly in the browser, you will see an empty page.

      You can add webfonts, meta tags, or analytics to this file.
      The build step will place the bundled scripts into the <body> tag.

      To begin the development, run `npm start` or `yarn start`.
      To create a production bundle, use `npm run build` or `yarn build`.
    -->
  </body>
</html>
Title and meta tags
The tags provide metadata about the HTML document; they describe the content of the page. tags usually aren’t displayed on the webpage, but they’re machine parsable. The bundled scripts are finally placed into the <body> tag of this HTML file.
So what are “bundled scripts”?
In order to understand this, we need to learn about one more concept in the world of toolchains, which is webpack. Think of webpack as a tool that bundles up all your source files(.js, .css, etc.) and creates a single bundle.js file that can be served from the index.html file inside a <script> tag.
This way, the number of HTML requests made within the app is significantly reduced, which directly improves the app’s performance on the network. Besides, webpack also helps in making the code modular and flexible when you supply it with additional config options.
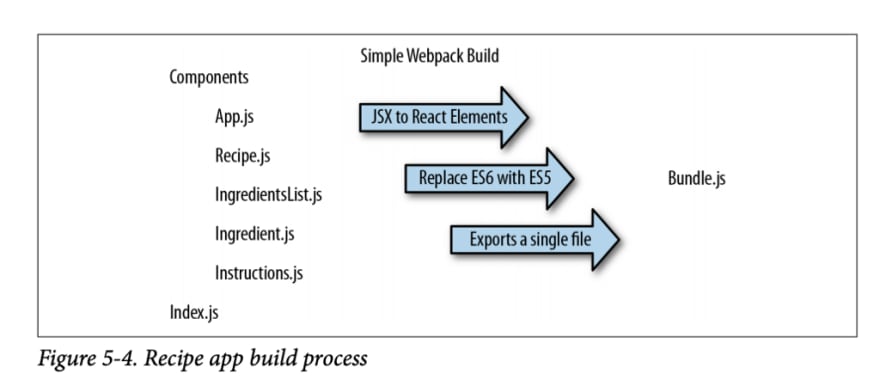
The above figure shows an example recipe app built using React and bundled using webpack.
webpack has a webpack.config.js file, which is used for specifying the configuration settings. It typically looks something like this:
const path = require('path');

module.exports = {
  entry: './src/index.js',
  output: {
    path: path.resolve(__dirname, 'dist'),
    filename: 'bundle.js'
  }
};
The entry key specifies the entry point for webpack, and output specifies the location where the bundle.js file will be stored after the build process.
Coming back to index.html, Create React App uses html-webpack-plugin for bundling. If you look at the webpack.config.js here, the entry key points to src/index.js, which specifies the entry point for webpack.
When webpack compiles the assets, it produces a single bundle (or several, if you use code splitting). It makes their final paths available to all plugins — one such plugin is for injecting scripts into HTML.
html-webpack-plugin is also enabled to generate the HTML file. In Create React App’s webpack.config.js, it is specified that it should read public/index.html as a template. The inject option is also set to true. With that option, html-webpack-plugin adds a <script> with the path provided by webpack right into the final HTML page.
This final page is the one you get in build/index.html after running npm run build, and the one that gets served from / when you run npm start.
Now that we understand index.html, let’s move on to manifest.json.
manifest.json
This is a web app manifest that describes your application, and it’s used by, e.g., mobile phones if a shortcut is added to the home screen . Let’s look at the contents to understand it further:
{
  "short_name": "React App",
  "name": "Create React App Sample",
  "icons": [
    {
      "src": "favicon.ico",
      "sizes": "64x64 32x32 24x24 16x16",
      "type": "image/x-icon"
    }
  ],
  "start_url": ".",
  "display": "standalone",
  "theme_color": "#000000",
  "background_color": "#ffffff"
}
The contents of this file are pretty self-explanatory. But where are these values used?
When a user adds a web app to their home screen using Chrome or Firefox on Android, the metadata in manifest.json determines what icons, names, and branding colors to use when the web app is displayed. The web app manifest guide provides more context about what each field means, and how your customizations will affect your users’ experience.
Basically, the information read from this file is used to populate the web app’s icons, colors, names, etc.
favicon.ico
This is simply the icon image file used for our application. You can see this linked inside index.html and manifest.json.
Before moving on to the src/ directory, let’s look at a couple other files on our root.
package.json
This file lists the packages your project depends on and which versions of a package your project can use. It also makes your build reproducible and, therefore, easier to share with other developers.
scripts is of particular interest here. You can see that the start, build, test, and eject commands point to react-scripts’ version of start, build, test, and eject. This specifies that when you run npm commands like npm start, it will actually run react-scripts start.
react-scripts is a set of scripts from the create-react-app starter pack. react-scripts start sets up the development environment and starts a server, as well as hot module reloading. You can read here to see everything it does for you.
yarn.lock
Before learning the purpose of yarn.lock, let’s first understand what Yarn is. Yarn allows you to use and share code with other developers from around the world. Yarn does this quickly, securely, and reliably so you don’t ever have to worry.
It allows you to use other developers’ solutions to different problems, making it easier for you to develop your own software. Code is shared through something called a package (sometimes referred to as a module). A package contains all the code being shared as well as a package.json file, which describes the package.
In order to get consistent installs across machines, Yarn needs more information than the dependencies you configure in your package.json. Yarn needs to store exactly which versions of each dependency were installed. To do this, Yarn uses a yarn.lock file in the root of your project.
Running the app
Let’s now fire up the application. To run the app, you can either run npm start or yarn start. Once you run the command, open http://localhost:3000 to view the application.
Note that npm run build or yarn build will build the app for production and store it inside the build/ folder, which can be deployed to production. For the sake of this tutorial, let’s use npm start instead of building it for production.

The app looks something like the above figure when you run it. Let’s try and understand what the entry point is for this app. When we looked at webpack, I mentioned that webpack’s entry is index.js, which is the entry point for the React application.
The index.js file has the following line:
ReactDOM.render(<App/>, document.getElementById('root'));
This line calls ReactDOM’s render() method, which renders a React element into the DOM in the supplied container and returns a reference to the component. The React element here is the <App> component, and the supplied container is the DOM element root (which is referenced in index.html).
<App> is the root component of this app. Let’s look at App.js, where it is defined:
import React, { Component } from 'react';
import logo from './logo.svg';
import './App.css';

class App extends Component {
  render() {
    return (
      <div className="App">
        <header className="App-header">
          <img src={logo} className="App-logo" alt="logo" />
          <p>
            Edit <code>src/App.js</code> and save to reload.
          </p>
          <a
            className="App-link"
            href="https://reactjs.org"
            target="_blank"
            rel="noopener noreferrer"
          >
            Learn React
          </a>
        </header>
      </div>
    );
  }
}

export default App;
The App component is a class the extends React’s Component class for defining a React component. This is the place that we are interested in. Any application can be built by stripping stuff out and tweaking the App.js. We can even build React components separately inside a src/components/ folder and import these components inside App.js.
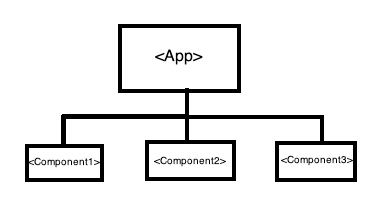
A typical React application looks something like the above figure. There is a root component, <App>, that imports other child components, which in turn import other child components. Data flows from root to children through React properties and flows back up using callback functions. This is the design pattern used by any basic React application.
At this point, we should be able to start building any simple single-page application by tweaking App.js and adding the necessary components. The App.css file can be used for styling the application.
Rate Restaurants App
Our final app will look something like this:
The first step is to write our app’s state-less components, which we’ll need to build the cards with the data and rating system in them. In order to do this, we create a folder called components/ inside src/ and add a file called card.js:
import React from 'react';

const CardBox = (props) => {
  return(
    <div className="card-body">
      {props.children}
    </div>
  )
}

const Image = (props) => {
  return(
    <img src={props.image} alt="Logo" className="picture">
    </img>
  )
}

const Name = (props) => {
  return(
    <div className="name">
      {props.name}
    </div>
  )
}

const Details = (props) => {
  return(
    <div className="details">
      {props.details}
    </div>
  )
}

const Star = ({ selected=false, onClick=f=>f }) =>
 <div className={(selected) ? "star selected" : "star"}
      onClick={onClick}>
 </div>

const Card = (props) => {
  return(
    <CardBox>
      <div className="inner-body">
        <Image image={props.image}/>
        <div className="body">
          <div className="inner-body">
            <Name name={props.name}/>
          </div>
          <Details details={props.details}/>
          <div className="inner-body">
          {[...Array(5)].map((n, i) =>
            <Star key={i}
                  selected={i<props.starsSelected}
                  onClick={() => props.change(props.id, i+1)}
          />)}
          </div>
        </div>
      </div>
    </CardBox>
  )
}

export { Card }
As you can see, we are creating a separate state-less component for each element inside the card — namely, the restaurant name, details, image, and the rating section. Then, we wrap all of this inside a Card component and export it as a default:
import React, { Component } from 'react';
import { Card } from './components/card.js'
import uuid from 'uuid/v1'
import './App.css';

class App extends Component {
  constructor(props) {
    super(props)
    this.state={
      restaurants:
      [
      ]
    }
  }

  componentWillMount() {
    this.getData()
  }

  getData() {
    this.setState({
      restaurants:[
        {
          id: uuid(),
          name: "Sushi S",
          details: "2301 Moscrop Street, Burnaby, BC V61 23Y",
          image: "null",
          starsSelected: 0,
        },
        {
          id: uuid(),
          name: "Agra Tandoori",
          details: "1255 Canada Way, Burnaby, BC V61 23Y",
          image: "null",
          starsSelected: 0,
        },
        {
          id: uuid(),
          name: "Bandidas Taqueria",
          details: "2544 Sanders Avenue, Richmond, BC V6Y 0B5",
          image: "null",
          starsSelected: 0,
        },
      ]
    });
  }

  OnChange(id, starsSelected) {
    this.setState(
      [...this.state.restaurants].map((restaurant) => {
        if(restaurant.id === id) {
          restaurant.starsSelected = starsSelected
        }
      })
    );
  }

  render() {
    return (
      <div className="main-body">
        {[...this.state.restaurants].map((restaurant, index) => {
          let name = restaurant.name
          let image = restaurant.image
          let details = restaurant.details
          let starsSelected = restaurant.starsSelected
          let id = restaurant.id
          return(
            <Card
              key={index}
              name={name}
              details={details}
              image={image}
              starsSelected={starsSelected}
              id={id}
              change={(id, starsSelected) => this.OnChange(id, starsSelected)}
             />
          )
        })}
      </div>
    );
  }
}

export default App;
In the App.js, we import Card . The restaurant data is modeled as the state of this app. Saving the state separately in a file outside of App.js is a better design as the app and its restaurant data grow. In the render() function, we pass this data to the Card component as properties.
Data flows down to child components as properties and flows back up through callbacks, which is the OnChange callback used for updating the star ratings.
All the styles are inside App.css. If you’re interested in forking this app, you can find it here.
That’s it! Now when you go to http://localhost:3000/, you should see the rate restaurant app, ready to go.
Hot module replacement
Hot Module Replacement (HMR) is a feature in webpack to inject updated modules into the active runtime. It’s like LiveReload for every module. HMR is “opt-in,” so you need to input some code at chosen points of your application. The dependencies are handled by the module system.
So how do you enable this in a project created using Create React App?
This is quite simple! Just add the following code inside index.js and HMR is ready to go.
// regular imports
ReactDOM.render(<App /> , document.getElementById('root'))

if (module.hot) {
  module.hot.accept('./App', () => {
    ReactDOM.render(<App />, document.getElementById('root'))
  })
}
npm vs. Yarn
Both npm and Yarn are package managers. Yarn was created by Facebook in order to solve some of the problems they faced with npm. Looking purely at the number of stars on the GitHub repositories for Yarn and npm, Yarn has significantly more stars than npm.
Also, Yarn’s installation speed is much faster than npm, and Yarn is more secure than npm. You can read a more in-depth analysis comparing their speed and security here. These are some of the compelling reasons why Yarn is more popular and a recommended package manager to use.
Apps built using Create React App
Finally, for some motivation to use Create React App for building apps, let’s look at some of the well-known products bootstrapped and built using Create React App.
This GitHub comments section has a long list of production-ready apps built using Create React App. A couple of the ideas are even part of Y-Combinator.
Conclusion
I hope you now understand the different elements of Create React App better. What are you waiting for? Fire that terminal up, install create-react-app, and start building your awesome ideas!
Plug: LogRocket, a DVR for web apps

LogRocket is a frontend logging tool that lets you replay problems as if they happened in your own browser. Instead of guessing why errors happen, or asking users for screenshots and log dumps, LogRocket lets you replay the session to quickly understand what went wrong. It works perfectly with any app, regardless of framework, and has plugins to log additional context from Redux, Vuex, and @ngrx/store.
In addition to logging Redux actions and state, LogRocket records console logs, JavaScript errors, stacktraces, network requests/responses with headers + bodies, browser metadata, and custom logs. It also instruments the DOM to record the HTML and CSS on the page, recreating pixel-perfect videos of even the most complex single-page apps.
The post Getting started with Create React App appeared first on LogRocket Blog.


Top comments (0)