
Written by Ogundipe Samuel✏️
In 2018, the total value of online shopping markets was estimated to be around $2.84 trillion. Companies like Amazon, Walmart, and Alibaba top the charts. Through their massive platforms, these giants have opened a new window for small businesses to also operate and own their e-commerce stores.
In this tutorial, we will build an e-commerce website using React for the frontend and 8base for the backend.
N/B: To follow this tutorial, a basic understanding of React and Node.js is required. Please ensure that you have Node and npm/yarn installed before you begin. We’ll also be making use of some GraphQL queries in the project, so some familiarity with GraphQL will be helpful.
What is React?
React is a component-based JavaScript library for building user interfaces. It allows us to build encapsulated components that manage their state, then compose them to make complex UIs.
What is 8base?
8base is a GraphQL backend that lets javascript developers quickly deliver enterprise applications using full-stack JavaScript. It is a front-end framework agnostic, therefore it enables developers to create customer-facing applications however they choose to.
We will use 8base as a backend database layer for our app. This is where we will store the products for our e-commerce website.

Getting Started
8base offers a wide array of features to help developers build performant applications at a faster and much easier rate. Using the 8base Console, you can build your backend using a simple GUI that allows you to do things like:
- Define data schemas: create tables/table relationships
- Set permission and authorization roles
- Organize multiple projects into Workspaces
- Design queries using the API explorer (based on GraphQL)
- Manage files
To get started using 8base, follow the steps listed below:
- Create an account on 8base. You can start using 8base for free.

- After sign up is complete, click on the Data Builder button to navigate to the Data menu and click on “New Table” to start building your backend.

- After your new table is loaded, you’ll be taken to the schema to begin defining fields. Let’s take a look around and note a couple of things. On the left, you’ll see there are
System TablesandYour Tables.
Every new 8base workspace automatically comes prepackaged with some built-in tables. These tables are used to handle things like Files, Settings, and Permissions and can all be accessed through the 8base GraphQL API.
- Go ahead and create a table,
Products, which will consist of the following fields:
name: “”
type: Field type is text.
description: “This will be the name of the product”
price: “”
type: Field type is number.
description: “This field will hold the price of our product.”
description: “”
type: Field type is text.
description: “This field will hold the description of our product.”
image: “”
type: Field type is file.
description: “This field will hold the image of our product.”

- We need some sample posts to work with, so let’s add some sample data. Next to the schema menu icon where we created our schema, click on the Data tab and add a sample Product record by setting a title and body.

- Next, copy the API endpoint URL (available on the bottom left) — this is the single endpoint for communication between your frontend and your 8base backend.

- Finally, for this tutorial, we’re going to allow open access to Guests by default so that dealing with authentication is optional. To allow guest access to your new Products table, navigate to
Settings > Roles > Guest,and check the appropriate boxes under Products and Files.
All unauthenticated users who access your API endpoint are assigned the role of Guest by default.
We won’t cover authentication in this tutorial. You can see how authentication should be handled in more detail here.

In just a few simple steps, we’ve finished setting up a production-ready CMS backend using 8base. Let’s start work on the frontend side of the application.
Using React
To start using React, we must first install it. The fastest way to get up and running is by using CRA.
If you don’t already have it installed on your development machine, open your terminal and run the following command:
npx create-react-app
Generate a React project
Once the installation is successful, you can now bootstrap a new react project. To create our project run the following command:
npx create-react-app shopping-cart
Start the React app server by running npm start in a terminal in the root folder of your project.

Creating our layout
Let’s start creating the layout for our project. Our app will have 5 different components.
- Navbar : To hold our navigation and cart icon
- Products : To display a list of products. – Product : The markup for a single product
- Footer : The footer of our app
- Cart : To hold the items in our cart
We will make use of bootstrap in our project, so first let’s include it. Open up your index.html in the public folder and add the following link tag to the head section:
// ./public/index.html
<link href="https://stackpath.bootstrapcdn.com/bootstrap/4.3.1/css/bootstrap.min.css" rel="stylesheet" integrity="sha384-ggOyR0iXCbMQv3Xipma34MD+dH/1fQ784/j6cY/iJTQUOhcWr7x9JvoRxT2MZw1T" crossorigin="anonymous">
Now we can make use of bootstrap classes in our application.
Next, create a components folder and create the following components inside it: Navbar.js, Products.js, Product.js, Footer.js, Cart.js.
Open up the Navbar.js and add the following code:
// src/components/Navbar.js
import React from 'react';

const Navbar = () => {
  return (
    <nav className="navbar navbar-light bg-light">
      <a className="navbar-brand">Shoppr</a>
        <button className="btn btn-outline-success my-2 my-sm-0" type="submit">Cart</button>
    </nav>
  );
};
export default Navbar;
Open up the Footer.js and add the following code to it:
// src/components/Footer.js
import React from 'react';
import '../App.css';

const Footer = () => {
  return (
      <footer className="page-footer font-small bg-blue pt-4">
        <div className="container text-center text-md-left">
          <div className="row">
            <div className="col-md-6 mt-md-0 mt-3">
              <h5 className="text-uppercase font-weight-bold">Contact Us</h5>
              <p>You can contact us on 234-8111-111-11</p>
            </div>
            <div className="col-md-6 mb-md-0 mb-3">
              <h5 className="text-uppercase font-weight-bold">Return Policy</h5>
              <p>We accept returns after 7 days max</p>
            </div>
          </div>
        </div>
        <div className="footer-copyright text-center py-3">© 2019 Copyright:
          <span> Shoppr</span>
        </div>
      </footer>
  );
};
export default Footer;
Our footer needs some styling so we’d add the following styles to the App.css file:
// src/App.css
footer {
  position: absolute;
  bottom: 0;
  width: 100%;
  background-color: #333;
  color:#fff;
}
Before we create our products component we need to query 8base to send us our product details to display. Let’s do that now.
Connecting to the 8base backend with GraphQL
To connect our application to the backend we need to install a couple of GraphQL packages. One of the libraries we’d use is apollo-boost, it provides a client for connecting to the GraphQL backend using a URI.
The URI is the endpoint provided by 8base and is available on the data page of the dashboard.
Run the following command in your terminal to install the necessary packages:
npm install apollo-boost graphql graphql-tag react-apollo
Once successful, go ahead and update the index.js file in the src directory to the following code:
import React from 'react';
    import ReactDOM from 'react-dom';
    import './index.css';
    import App from './App';
    import { ApolloProvider } from "react-apollo";
    import ApolloClient from "apollo-boost";
    import * as serviceWorker from './serviceWorker';

    const client = new ApolloClient({
      uri: "<YOUR_8BASE_ENDPOINT>"
    });

    ReactDOM.render(
      <ApolloProvider client={client}>
        <App />
      </ApolloProvider>,
      document.getElementById('root')
    );

    serviceWorker.unregister();
We’ve wrapped our entire application with the ApolloProvider that takes a single prop, the client. The ApolloProvider loads the 8base table schema, which gives you access to all properties of the data model inside your application.
Displaying our products
We’ve been able to load our table schema from 8base into our application. The next step is to fetch and display our products.
Create a product-list folder under the component folder and then create an index.js file and add the following to it:
// src/components/product-list/index.js
import gql from "graphql-tag";
import { graphql } from "react-apollo";

const PRODUCTS_QUERY = gql`
  query {
    productsList {
      items {
        id
        createdAt
        name
        price
        description
        image {
          downloadUrl
        }
      }
    }
  }
`;
export default PRODUCTS_QUERY;
Here, we create a constant called PRODUCTS_QUERY that stores the query. The gql function is used to parse the plain string that contains the GraphQL code.
We’ve already populated the backend with some data. To test if our query works properly, 8base provides a handy GraphQL explorer specifically for this. In the menu of your 8base dashboard click on the API explorer icon and run the query.

Now, we are certain our query works as it should. Let’s go ahead and create our product’s components.
Open up your the Products.js component and add the following code to it:
// src/components/Products.js
import React, { Component } from 'react';
import { Query } from 'react-apollo';
import PRODUCTS_QUERY from './product-list/index';
import Product from './Product';
import Navbar from './Navbar';

class Products extends Component {

   constructor(props) {
    super(props);
    this.state = {
      cartitems: []
    };
   }

   addItem = (item) => {
      this.setState({
          cartitems : this.state.cartitems.concat([item])
      });
    }

  render() {
    return (
      <Query query={PRODUCTS_QUERY}>
       {({ loading, error, data }) => {

          if (loading) return <div>Fetching</div>
          if (error)   return <div>Error</div>

          const items = data.productsList.items;
          return (
            <div>
              <Navbar/>
              <div className="container mt-4">
                <div className="row">
                   {items.map(item => <Product key={item.id} product={item} addItem={this.addItem} />)}
                </div>
              </div>
            </div>
          )
        }}
      </Query>
    );
  }

};
export default Products;Here, we wrap our products with the <Query/> component and pass the PRODUCTS_QUERY as props.
Apollo injected several props into the component’s render prop function. These props themselves provide information about the state of the network request:
-
loading: This istrueas long as the request is still ongoing and the response hasn’t been received. -
error: In case the request fails, this field will contain information about what exactly went wrong. -
data: This is the actual data that was received from the server. It has theitemsproperty which represents a list ofproductelements.
Finally, we loop through all the received items and pass them as a prop to our Product component. Before we see what it looks like, let’s create our Product component.
Open up your Product.js and add the following code to it:
// src/components/Product.js
import React from 'react';

const Product = (props) => {
  return (
      <div className="col-sm-4">
          <div className="card" style={{width: "18rem"}}>
            <img src={props.product.image.downloadUrl} className="card-img-top" alt="shirt"/>
            <div className="card-body">
              <h5 className="card-title">{props.product.name}</h5>
              <h6 className="card-title">$ {props.product.price}</h6>
              <button className="btn btn-primary" onClick={() => props.addItem(props.product)}>Buy now</button>
            </div>
          </div>
      </div>
  );
}
export default Product;
Our Product.js is a functional component that receives product details via props and displays them.
We also call the addItem function on the click method to add the current product to the cart when it is clicked.
Now, all our components are setup we need to import them in our App.js component which is our base component. Open it up and add the following to it:
// src/App.js
import React from 'react';
import './App.css';
import Footer from './components/Footer';
import Products from './components/Products';

function App() {
  return (
    <div className="App">
      <Products />
      <Footer/>
    </div>
  );
}
export default App;
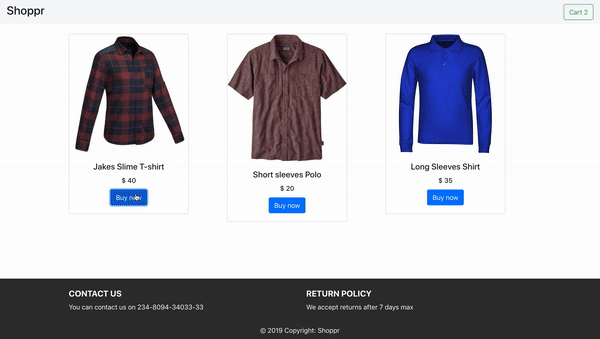
Go to, https://localhost:3000 in your browser and you will see the following:

At this point, we have a store that displays products, we need to add functionality to add items to our cart.
Adding the Cart functionality
To add our cart functionality we’d need to add some more methods to our components.
Update your products.js to this:
// src/components/products.js
import React, { Component } from 'react';
import { Query } from 'react-apollo';
import PRODUCTS_QUERY from './product-list/index';
import Product from './Product';
import Cart from './Cart';
import Navbar from './Navbar';

class Products extends Component {

  constructor(props) {
    super(props);
    this.state = {
      cartitems: []
    };
    this.addItem = this.addItem.bind(this);
  }

    addItem(item){
      this.setState({
          cartitems : this.state.cartitems.concat([item])
      });
    }

    showModal = () => {
      this.setState({ show: true });
    };

    hideModal = () => {
      this.setState({ show: false });
    };

  render() {

    return (
          <Query query={PRODUCTS_QUERY}>
           {({ loading, error, data }) => {

              if (loading) return <div>Fetching</div>
              if (error)   return <div>Error</div>

              const items = data.productsList.items;
              const itemssent = this.state.cartitems;

              return (
                <div>
                 <Navbar cart={itemssent} show={this.showModal} />
                 <Cart show={this.state.show} items={itemssent} handleClose={this.hideModal}>
                  </Cart>
                  <div className="container mt-4">
                    <div className="row">
                       {items.map(item => <Product key={item.id} product={item} addItem={this.addItem} />)}
                    </div>
                  </div>
                </div>
              )
            }}
          </Query>
      )
   };
};

export default Products;
Update your Navbar.js with the following code:
// src/components/Navbar.js
    import React from 'react';

    const Navbar = (props) => {
      return (
        <nav className="navbar navbar-light bg-light">
          <h3>Shoppr</h3>
            <button className="btn btn-outline-success my-2 my-sm-0" onClick={() => props.show()}>Cart {(props.cart.length)}</button>
        </nav>
      );
    };

    export default Navbar;
Now, create a Cart.js file and add the following code to it:
import React from 'react';


const Cart = ({ handleClose, show, items }) => {

  return (
    <div className={show ? "modal display-block" : "modal display-none"}>
      <section className="modal-main">
        {items.map(item =>
           <div className="card" style={{width: "18rem"}}>
              <img src={item.image.downloadUrl} className="card-img-top" alt="shirt"/>
              <div className="card-body">
                <h5 className="card-title">{item.name}</h5>
                <h6 className="card-title">$ {item.price}</h6>
              </div>
            </div>
        )}
         Total items: {items.length}
        <button className="btn btn-warning ml-2" onClick={handleClose}>close</button>
      </section>
    </div>
  );

};

export default Cart;
We need a bit of styling to display our cart modal properly. Open up your app.css and add the following code to it:
.modal {
  position: fixed;
  top: 0;
  left: 0;
  width:100%;
  height: 100%;
  background: rgba(0, 0, 0, 0.6);
}

.modal-main {
  position:fixed;
  background: white;
  width: 80%;
  height: auto;
  top:50%;
  left:50%;
  padding: 10px;
  transform: translate(-50%,-50%);
}

.display-block {
  display: block;
}

.display-none {
  display: none;
}
Now open your shopping cart add items to it and view it via the cart button:
Conclusion
In this tutorial, we have created a basic e-commerce store. The concepts learned here can help you create powerful e-commerce websites without worrying about your backend infrastructure. You can learn more about React here and 8base here. You can find the code used in this tutorial here.
Happy coding.
Editor's note: Seeing something wrong with this post? You can find the correct version here.
Plug: LogRocket, a DVR for web apps

LogRocket is a frontend logging tool that lets you replay problems as if they happened in your own browser. Instead of guessing why errors happen, or asking users for screenshots and log dumps, LogRocket lets you replay the session to quickly understand what went wrong. It works perfectly with any app, regardless of framework, and has plugins to log additional context from Redux, Vuex, and @ngrx/store.
In addition to logging Redux actions and state, LogRocket records console logs, JavaScript errors, stacktraces, network requests/responses with headers + bodies, browser metadata, and custom logs. It also instruments the DOM to record the HTML and CSS on the page, recreating pixel-perfect videos of even the most complex single-page apps.
Try it for free.
The post Building an e-commerce website with React and 8base appeared first on LogRocket Blog.


Top comments (1)
I always like how you balance the 'brand thing' with great technical content, it never seems too salesman-y!
Keep up the great work Brian!
🔥 🚀