Blog written by: Hongche Liu & Jurgen Philippaerts from Bloomreach, 2015
Introduction
At Bloomreach, we use Redis, an open source advanced key-value cache and store, which is often referred to as a data structure server since values can contain strings, hashes, lists, sets, sorted sets, bitmaps and hyperloglogs. In one application, we use Redis to store 16 billion URLs in our massive parallel crawlers in. We use Redis to store/compute Cassandra clients’ access rate for rate limiting purpose in another. But this post is focused on yet another particular application — real-time personalization, in which we use Redis to store in-session user activities.
For this job, fault tolerance is a requirement. Without it, there would be no real-time, in-session personalization. As far as a Redis cluster development is concerned, fault tolerance and scalability have received attention only recently. Some features, like sharding, are not even available as a stable version yet in the main Redis repository. Fortunately, there are some industry solutions to fill the gap. This article covers the operations and administration of fault tolerance and scalability of the Redis cluster architecture used at Bloomreach. Many of the topics are discoverable but scattered around the Web, indicating the high commonality, but wide variety, among many industry applications using Redis.
Failsafe Redis Setup - we had a humble beginning.
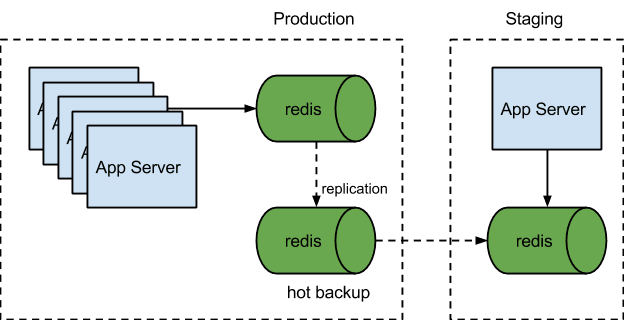
The simple setup here suits our need at the time because our data is less than the memory capacity of the instance we are using. If our user in-session data grows out of the current instance’s memory capacity, we will have to migrate the Redis node to a bigger instance. If you are asking, “How the heck can this system scale up?” — good. You are ahead of the game. We will cover scaling in a later section. Here we will focus on fault tolerance.
Fault Tolerance Against Instance Failure
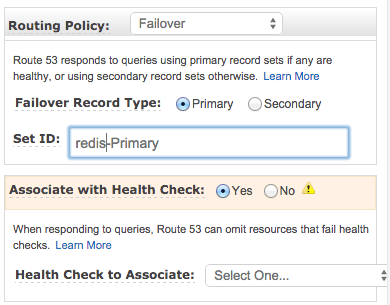
For fault tolerance against instance failure, we take advantage of the DNS failover setup (for example, AWS Route 53 Failover Policy) as in the diagram below.
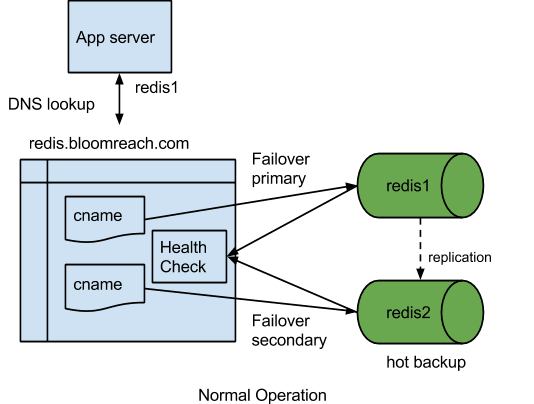
We set up two CNAME records in DNS. In each of them, we configure the routing policy to be failover. For Redis1 CNAME, we set up the failover record type to be primary and attach the proper health check. For Redis2 (the hot backup), we set up the failover record type to be secondary and attach the proper health check.
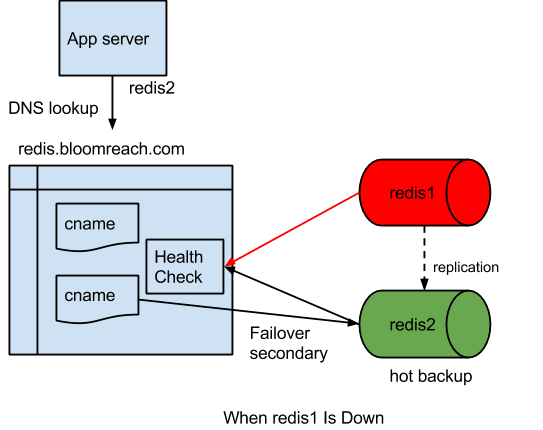
In this setup, under normal circumstances, DNS for Redis.bloomreach.com (mock name) returns Redis1 (mock name). When the health check for Redis1 detects that it is down, the DNS resolution will point to Redis2 (mock name) automatically. When Redis1 is back, the DNS server will resolve Redis.bloomreach.com back to Redis1 again.
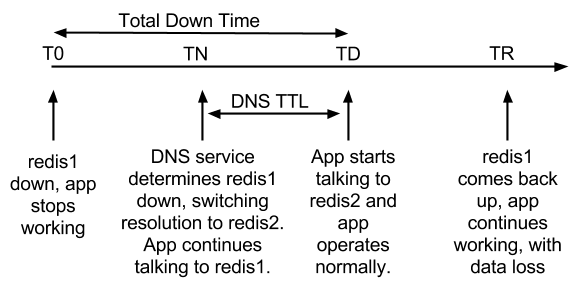
T0 is the time when Redis1 goes down.
TN is the time when the DNS service’s health check determines that Redis1 is down. It is also the time when the DNS resolution will point to Redis2, the backup live one.
TD is the time when the application’s DNS TTL (Time to Live) elapsed. It is also the time when application will get Redis2 host for the DNS lookup for Redis.bloomreach.com.
TR is the time when Redis1 comes back.
Between T0 and TD, the application would try to write or read from Redis1, which would fail.
So the application down time is
TD – T0 = health_check_grace_period + DNS_TTL
Between TD and TR, all the data, say D, go to Redis2, not replicated to Redis1.
So at TR when DNS points back to Redis1, all the written data D will be non-accessible.
To prevent the loss, we set up pager alert on Redis1 down, with the instruction to flip the replication from Redis2 to Redis1. Before we tried to automate this manual task. Redis has since come up with a good solution with sentinel in version 2.8, which is what we moved to next. It will be covered in the next section.
Fault Prevention Tips
But before we go there, I’d like to cover some topics that prevent faults (instead of tolerating faults):
1) If you are building a production grade Redis cluster, you must follow the tips on this Redis Administration page. During the pre-production baking stage, I personally encountered an issue “fork() error during background save”. The problem and the solution (setting overcommit on Linux to 1) has been noted here. Various production level issues and troubleshooting tips have been well documented on the Redis Administration page and it’s really helpful to pay attention to the issues listed there.
2) One item not covered on the above page is eviction policy. Without setting it up properly, we have encountered the case of Redis being stuck. Our application uses a Redis cluster mainly as a data store for in-session user activities. During peak traffic time, or season, the amount of data could spike beyond the capacity. The default eviction policy is “noeviction.”
maxmemory-policy noeviction
It means when the memory is full, no new data can be written into Redis, not a behavior we would like. After studying the industry experiences and testing, we settled on the following eviction policy. This is the policy that when memory is full, it evicts the data that is closest to expiring. It is the safest behavior in our application.
maxmemory-policy volatile-ttl
3) Another configuration issue we ran into was with Linux open file ulimit. Every TCP connection to Redis is an open file in Linux. The standard AWS Ubuntu image comes with open file size limit of 1024. When we provisioned more application servers for a stress test in preparation for the holiday season, we encountered the serious problem of application servers getting stuck in startup phase when they initialized sessions with Redis and the Redis hosts ran out of open file handles. It is particularly difficult to trace the problem correctly to the ulimit setting because restarting Redis (the most intuitive operation) resolves the symptoms temporarily. There are also many other settings (wrong port, authentication setting) that can result in the similar symptoms. The key thing to observe is the error message, “Connection reset by peer.” It is an Linux level error, not Redis. Using lsof command confirmed the connection count.
Do not confuse the Linux open files ulimit with Redis configuration of maxclient.
maxclients 10000
Although both must be sufficient for your application’s architecture. There are many resources pointing to the solutions to this problem. We set up an Ubuntu upstart conf with the following line:
limit nofile 10240 10240
This helped us pass the stress test.
Automatic Failover with Redis Sentinel
The previous section describes a simple fault-tolerant Redis setup that does not handle recovery well. So during the holiday season, we upgraded from the default Ubuntu Redis version 2.2 to 2.8, which has a new Redis component called sentinel, with the distinct feature of automatic recovery during a server fault. The setup is depicted in the following diagram:
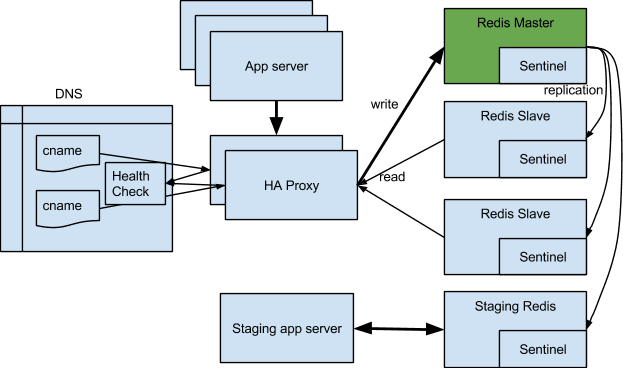
In this setup, Redis sentinel plays a crucial role in system monitoring and failover situation. It keeps constant watch on the status of the master and of the replication status of each slave.
Leader Election
In the case of the master crashing, like in the following diagram, all the surviving sentinels get together and agree on the master being incapacitated and then proceed to vote for the next master, which is the slave with the most up to date replicated data.
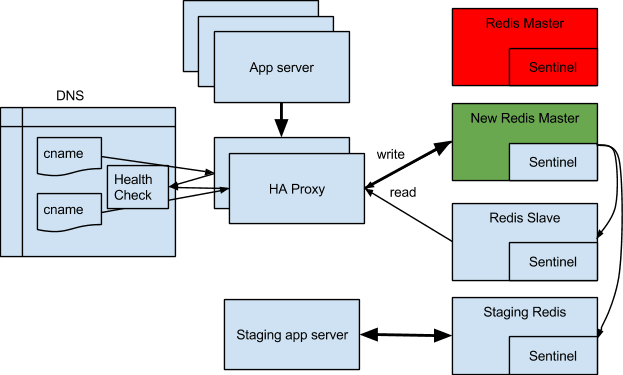
The reason we have 4 sentinels installed is for decisive majority vote among 3 when one of the hosts is down. Note that one of the sentinels is actually running on the staging Redis.
Added to this new architecture is a set of load balancers. In our case, we use HAProxy. Now we are no longer relying on just DNS to send clients to the active Redis master node. Thanks to HAProxy’s health check capabilities, we can now reduce the load on the master Redis node by sending read traffic to all nodes, not just to the master.
HAProxy has some built in Redis check capabilities, but unfortunately, it only checks to see if a Redis node is healthy. It doesn’t report back if it is a master or slave node. Luckily, it allows you to write your own set of commands into a tcp check. The following configuration snippet allows us to configure a backend pool to be used only for Redis write commands.
tcp-check send info\ replication\r\n

tcp-check expect string role:master

tcp-check send QUIT\r\n

tcp-check expect string +OK
Another backend pool that takes Redis read commands can be setup with the built-in Redis check:
option Redis-check
A configuration like this needs one more customization in your application, as you now have two endpoints for your Redis connections, one for reads and one for writes.
Compared with the first approach we used, this setup is a cabinet model of government, where the cabinet members get together to decide if the executive head is incapacitated and then to take proper actions. For example, selecting the next executive head. The previous model is like the vice president model, where the vice president, in normal situations, does not serve any active purposes, but if the president is out, he/she is the automatic successor.
Cross Data Center Serving Infrastructure and Automatic Failover
When we evolve into the multi-region distributed serving infrastructure (e.g. east coast and west coast), we have the following setup:
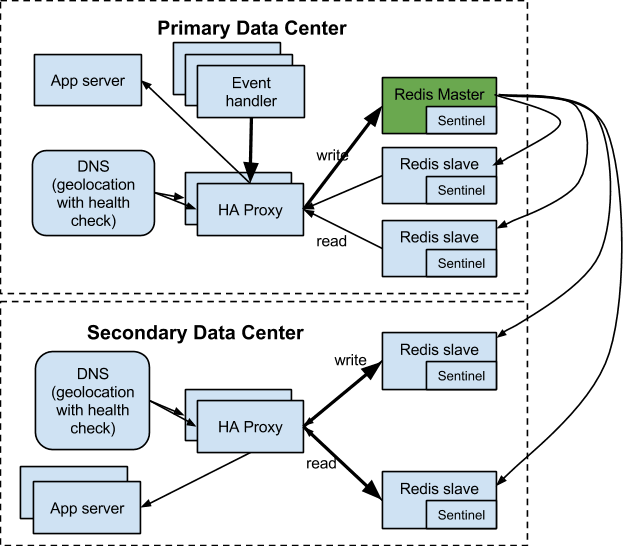
The reason we need to have a separate Redis cluster is for the high SLA (10ms response time average), which cannot be achieved with cross-continent access due to high network latency.
In this setup, we have event handlers that register user activities in real-time to Redis. Our application server mostly performs read operations on Redis. The SLA on the event handler is not as high as the app server requirement (next page response time is OK), so we can pipe all event handlers’ traffic to the main Redis cluster and then replicate the data to the secondary clusters.
In this setup, one particular sentinel configuration is worth noting — slave priority. On the secondary cluster, you must set:
slave-priority = 0
This is because you would never want the new master to be in the secondary cluster. If you did, you would send all events from the primary cluster to this new master, replicating the data from the secondary cluster to the primary, increasing latency unnecessarily.
Scalable Redis Using Twemproxy
As our business grows, our data outgrows the capacity of any single node’s memory with acceptable cost. Unfortunately, Redis cluster is still a work in progress. However, others in the industry (more specifically, Twitter) have encountered and solved the data distribution problem in an acceptable way and then open-sourced it. The project is called twemproxy, which we adopted after some study and testing.
The following diagram depicts our setup. We have the production Redis sharded N ways behind 2 twemproxy servers.
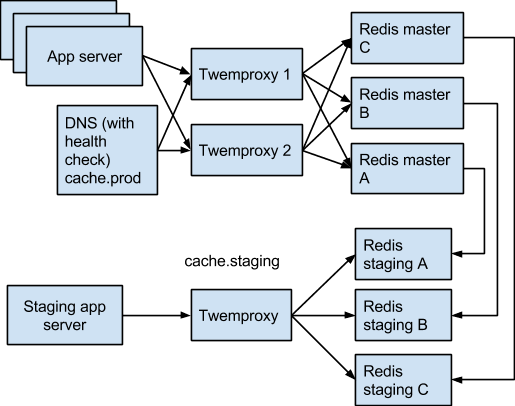
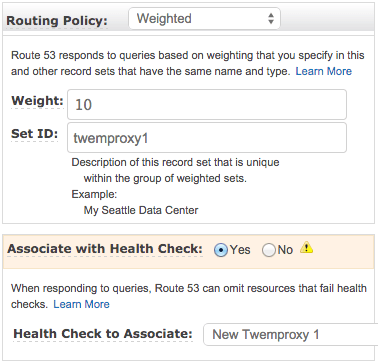
In this setup, a fault in twemproxy server is handled by DNS setup with health checks. Unlike the first setup we used, the multiple CNAME records but use weighted routing policy with the same weight, so both twemproxy servers can route traffic to Redis, avoiding a single bottleneck while achieving higher availability.
A fault in a Redis master is handled by twemproxy using a configuration called auto_eject_hosts.
auto_eject_hosts: true
We followed the liveness recommendation section of the twemproxy document. In short, twemproxy detects Redis host failure with some retries and timeout built-in to avoid false alarms. Once such a situation is detected, it ejects the host from the Redis data distribution pool, using:
distribution: katema
The accessibility of data on the surviving nodes is preserved.
Tips for Twemproxy Configuration
1) Similar to Fault Prevention Tip 3, remember to set the Linux host’s ulimit for open files to an appropriately high number for your application, now that the application is actually connecting to a twemproxy host instead of Redis hosts.
2) If you, like us, have a staging replication setup similar to the diagram above, here is an important configuration to note. In nutcracker.yml, for each pool of Redis nodes, there is a servers configuration like this:
servers:

- 10.34.145.16:6379:1 server1

- 10.32.54.221:6379:1 server2

- 10.65.7.21:6379:1 server3
In the production settings, the Redis servers’ IP addresses, naturally, are different from those of the staging Redis servers’ IP addresses. However, make sure to put in the server names (in the above case, server1, server2, server3), even though the server name is optional. Also make sure the order of the servers correspond to the replication setup. That is, production server1 replicating to staging server1, and so on. The reason for this is that the data distribution hash will be based on the server name when it is provided. Making the production and staging server names and sequence the same ensures that the data distribution is consistent between production and staging. We had started without this configuration and found out only one-third of the data was accessible in staging.
Trade-offs of Using Twemproxy vs. Previous Solutions
Drawbacks of using twemproxy:
- The data on the crashed node is not accessible until it comes back into service.
- The data written to the other nodes during the downtime of the crashed node is not accessible after it is revived.
- Only a subset of the Redis commands are supported. We had to rewrite part of our application to make this migration work. For example, we used to use Redis pipelining for higher throughput but it is not supported by twemproxy (I guess, due to the incompatibility between the pipelining intrinsic sequential nature and twemproxy’s parallel nature).
- During the downtime of a production Redis node, say Redis A, staging twemproxy would be out of sync with its Redis cluster because: the staging data is replicated from production Redis nodes directly, not distributed through the staging twemproxy; the production twemproxies distribute data among the live nodes, Redis B and Redis C; the staging twemproxy, not knowing production Redis A is down, seeing all nodes (staging Redis A, B, C) alive, following the original data distribution scheme based on 3 shards, would sometimes go to the staging Redis A, where the replication has already stopped from production Redis A, resulting in a miss.
Gains of using Twemproxy:
- Naturally, with this architecture, we are able the scale up our Redis capacity three times. If data grows even more, we can linearly scale up.
- Additionally, in our throughput test, we discovered that twemproxy’s throughput is actually higher than the previous setup, even though there is an extra hop in data transmission. Twemproxy’s own documentation claims that the internal pipelining implementation cuts down the overhead and improves performance.
To us, the gains are more than the sacrifices. So we continue to use twemproxy.
Cross Data Center Scaling
When we scale the multi-region distributed serving infrastructure, we have the following setup:
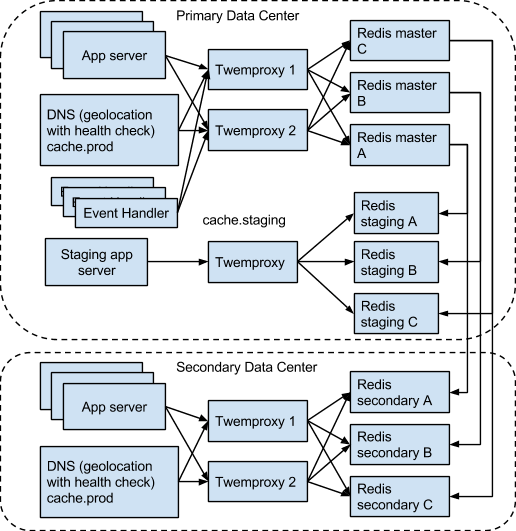
In this setup, all regions can be scaled up at the same time.
Conclusions
In our evolution of Redis deployment strategy:
- We used DNS failover settings to achieve fault tolerant Redis cluster for our first implementation.
- We used Redis Sentinel for automatic failover for our second version.
- We are using the open source twemproxy package to scale the capacity and the twemproxy automatic failover setting for fault tolerance.
Along this journey, Redis has proven to:
- Have high performance (high throughput and low latency).
- Contain convenient data structures for diverse application use cases.
- Require a lot of thought and surrounding infrastructure when fault tolerance is a requirement.
And so you can see our journey has been an interesting one — so far. We’re sharing these tips and pitfalls in the hope that they will help smooth your way in adopting this wonderful technology.

Top comments (0)