Introduction
In case you haven't heard, Azure App Configuration is a newer service out of Azure that is billed as a tool that provides a way to centrally manage application settings. Azure App Configuration is not just another way to manage configuration files, in my opinion, it is a bit different because it actually provides a mechanism to easily modify your application's behavior at runtime with the click of a button. It does this through the use of Feature Flags which seamlessly connect to App Configuration and can easily be used through a few simple NuGet packages in your applications.
The ability to easily change my application's behavior would have been nice to have in a side project I worked on this year. I was creating a dashboard and scoring application in Blazor that I needed for a local event. II had two goals for this project. One, I wanted to learn how to use Blazor, and two, I needed to build something fast as I only had a few days to create a solution. Had I started with App Configuration in Blazor and utilized a Feature Flag, I would have saved myself from the production disaster that happened during the event.
Keep reading this blog post to find out How to Add Azure App Configuration and Feature Flags into Blazor in .NET 5.0.
Step 1 - Create Your Blazor App with .NET 5.0
In my opinion the best way to get started with Blazor today is to use the .NET 5.0 version that is available at this time. That would be .NET 5 Preview 6 at time of writing this blog post. If you don't have the preview build on your machine, you need to start with downloading the .NET 5 Preview SDK. Go do that if you haven't. Once the SDK is installed I would create a new folder on your drive to house the new project and then fire up a terminal window through VS Code or open up PowerShell to that location. You could use Visual Studio 2019 to do this, but you would need a recent preview build of Studio to make that happen. Honestly, it is easier and faster with VS Code and a terminal because we are going to use the DotNet CLI tool to create our basic structure.
At a terminal, run the following command to see if you have the SDK correctly installed. It should indicate that you also have the Blazorserver or Blazorwasm templates available.
dotnet new -h
You should see the welcome message stating preview 6 and in the list of templates the two Blazor templates should be there.
Now to create the project for VS Code run the following command:
dotnet new blazorserver -o BlazorFeatureFlags
This command will create a new Blazor Server application in a sub folder named BlazorFeatureFlags. The name in the -o switch can be whatever you want. I always like to make sure that the first install of a project works so optionally you can then run dotnet build to see the project compile, and then run dotnet run to be able to browse to the website at port 5000 or port 5001 on https. But you don't have to if you are a brave soul.
Once the base is there, we need to add in a few NuGet packages from Microsoft to work with an Azure App Configuration resource and the ability to use Feature Flags in our C# project.
dotnet add package Microsoft.Extensions.Configuration.AzureAppConfiguration

dotnet add package Microsoft.Azure.AppConfiguration.AspNetCore

dotnet add package Microsoft.FeatureManagement
Running those commands will restore the NuGet packages into the new project and set us up to start using Azure App Configuration in Blazor.
Step 2 - Modify Startup.cs and Program.cs to Know About Azure App Configuration
Now that the base of the project is there, we need to start using the features we just added through the NuGet packages. This second step is the most crucial step to get correct, and my motivation for this blog post, as it just didn't seem to be fully clear on how best to do this when I was working on it myself.
Inside of Startup.cs we need to add in a using statement and inside of ConfigureServices(...) add the ability to use FeatureManagement.
using Microsoft.FeatureManagement;

public void ConfigureServices(IServiceCollection services)
{
    services.AddRazorPages();
    services.AddServerSideBlazor();
    services.AddFeatureManagement();
    services.AddSingleton<WeatherForecastService>();
}

// This method gets called by the runtime. Use this method to configure the HTTP request pipeline.
public void Configure(IApplicationBuilder app, IWebHostEnvironment env)
{
    if (env.IsDevelopment())
    {
        app.UseDeveloperExceptionPage();
    }
    else
    {
        app.UseExceptionHandler("/Error");
        // The default HSTS value is 30 days. You may want to change this for production scenarios, see https://aka.ms/aspnetcore-hsts.
        app.UseHsts();
    }

    app.UseHttpsRedirection();
    app.UseStaticFiles();
    app.UseAzureAppConfiguration();
    app.UseRouting();

    app.UseEndpoints(endpoints =>
    {
        endpoints.MapBlazorHub();
        endpoints.MapFallbackToPage("/_Host");
    });
}
The next file we need to modify is inside of Program.cs. We need to replace the creation of default host builder with one that uses Azure App Configuration.
public static IHostBuilder CreateHostBuilder(string[] args) =>

 Host.CreateDefaultBuilder(args)
    .ConfigureWebHostDefaults(webBuilder =>
     webBuilder.ConfigureAppConfiguration((hostingContext, config) =>
     {
        var settings = config.Build();
        config.AddAzureAppConfiguration(options => {
            options.Connect(Environment.GetEnvironmentVariable("ConnectionString"))
                    .ConfigureRefresh(refresh => {
                            refresh.Register("Settings:Sentinel", refreshAll: true)
                                   .SetCacheExpiration(new TimeSpan(0, 1, 0));
                        })
                   .UseFeatureFlags();
        });
     })
     .UseStartup<Startup>());
There is an important note about this configuration. We are telling the application to refresh the values of the configuration every 1 minute based off of a Sentinel key. There is nothing special about the name Sentinel other than its our main indicator that if we change this key value, the configuration of the entire Azure App Configuration gets reloaded. Note the UseFeatureFlags method has a way to do this for just Feature Flags inside of the Azure resource, but technically you can have both Feature Flags and Configuration without Feature Flags if you want. In this example we are now refreshing both types of configs because we have the middlewear pipeline being refreshed in Startup.cs with the call to use.AzureAppConfiguration() (which technically is optional, but required for dynamic refresh).
Step 3 - Create an Azure App Configuration Resource
With the base project setup, and the code aware of wanting to connect to an Azure App Configuration resource let's actually create the resource in Azure. I am not going to re-write what is already 100% documented, so just follow the documentation at this link to create the Azure resource. If you are reading this blog post, I am assuming you are very familiar with creating resources in Azure and most likely even already have the resource generated.
However, to complete this example, make sure you create a new key value in Configuration explorer named Setting:Sentinel with an empty value and empty category and empty label. Also go ahead and create a new Feature Flag inside of the Feature Manager called LiveReload and turn the State On.


Once the resource is created, with the configurations mentioned above, we can grab the connection string from the Access Keys blade. Grab the primary or secondary connection string and copy it to your clipboard.

Then we are going to go back to powersell in your project and run the following command to place the connection string value as an Environment Variable.
$Env:ConnectionString = "connection-string-of-your-app-configuration-store"
Again, make sure you replace the value in the command from the Access Keys -> Connection String in the Azure Portal. This lines up with line 32 or so in your Program.cs file.
Step 4 - Create a Feature Flag and Represent It in Code
Most of the setup is now done and we can move on to coding. Create a folder in your project called Features and add a public enum named FeatureFlags there.
using System;

namespace BlazorFeatureFlags.Features
{
    public enum Flags
    {
        LiveReload,
        Preview
    }
}
Make sure you define a flag with the same name as you made the Feature Flag in Azure. If you are following along you should have at least one named LiveReload. You can have a few others if you like. But these flags should match up with the names you see as keys in the Feature Manager in the App Configuration resource.
Step 5 - Modify Your Razor Component to use the new Feature Flag
This is the last step. We are going to now tell the home page of the Blazor app to use a feature flag through Azure App Configuration. Most examples you will see on Blazor talk about adding all the code in the main razor component file. I am not a fan of that. I like having the code behind the file in a .cs file to keep the C# away from the HTML. I know, old habits die hard. To do that create a new file named Index.razor.cs inside of the Pages folder in your application with the following.
using Microsoft.AspNetCore.Components;
using System.Threading.Tasks;
using Microsoft.FeatureManagement;
using BlazorFeatureFlags.Features;

namespace BlazorFeatureFlags.Pages
{
    public partial class Index : ComponentBase
    {
        [Inject]
        private IFeatureManager FeatureManager { get; set; }

        protected string featureDisplay { get; set; }

        protected override async Task OnInitializedAsync()
        {
            if (await FeatureManager.IsEnabledAsync(nameof(Flags.LiveReload)))
            {
                featureDisplay = "true";
            }
            else
            {
                featureDisplay = "false";
            }
        }
    }
}
I am keeping this really simple just to show the connection has worked between the Blazor app and Azure. I'm injecting the FeatureManager object into the razor component and then checking is the feature enabled in for the LiveReload enum flag we created.
The very last step is to take that simple string property and add it on the front end file. Open up the main Index.razor file and add in some html to show the property value. Save the new files you created.
@page "/"

<h1>Hello, world!</h1>

Welcome to your new app.

<SurveyPrompt Title="How is Blazor working for you?" />

<h2>The Feature from Azure App Config is enabled: @featureDisplay</h2>
Then simply build and run the project and you should see the word "true" show up. By now you should be able to run your application and see the following:

Bonus: Make the Blazor App Editable with Kentico Kontent
I am not a huge fan of having content directly in the code base, as I am a .NET CMS enthusiast. So if you are at all interested in checking out Kentico Kontent, a headless cms that can make your apps editable, this section is for you. You can sign up for a free Kentico Kontent developer account quite easily to check it out.
I created a simple Page content type in Kontent to represent the home page.
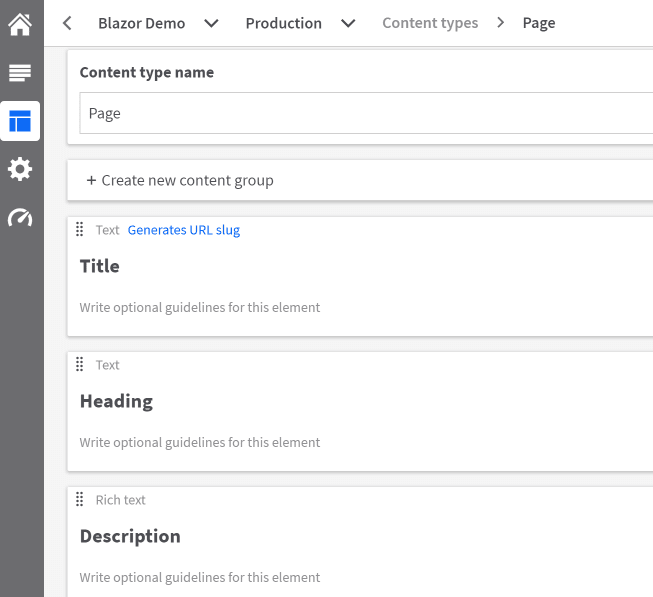
Using the the Kontent Model Generator I created a C# class that represented the Page content type and placed the two files it generates (Page.cs and CustomTypeProvider.cs) into a Models folder in our application. To do that you install the Kontent Model Generator global tool and run the following command.
KontentModelGenerator --projectid <your-project-id>
Now to use the content in Kontent for your Blazor app, simply add in the NuGet package for Kontent:
dotnet add package Kentico.Kontent.Delivery
Then add in configuration for the DeliveryClient options into your appSettings.json file as the documentation for Kontent states.
{
  "Logging": {
    "LogLevel": {
      "Default": "Information",
      "Microsoft": "Warning",
      "Microsoft.Hosting.Lifetime": "Information"
    }
  },
  "DeliveryOptions-Production": {
        "ProjectId": "bfa07c03-your-key-here-3eadfb798",
        "PreviewApiKey": "GMpaUsCDs3alio8sbwmlBGf------8",
        "WaitForLoadingNewContent": "true"
    },
  "DeliveryOptions-Development": {
      "ProjectId": "e452de54-your-key-here-e53bb287ae3d",
      "PreviewApiKey": "ew0KICAiYWxnIjogIkhTMjU2IiwNC----o",
      "WaitForLoadingNewContent": "true"
  },
  "AllowedHosts": "*"
}
Modify Startup.cs again to use the Delivery SDK for Kontent:
public void ConfigureServices(IServiceCollection services)
{
    services.AddRazorPages();
    services.AddServerSideBlazor();
    services.AddFeatureManagement();
    services.AddDeliveryClient("production", Configuration, "DeliveryOptions-Production");
    services.AddDeliveryClient("development", Configuration, "DeliveryOptions-Development");
    services.AddSingleton<WeatherForecastService>();
}
I added two clients so I can actually tie an Azure Feature Flag to tell the app to use either the Production environment in Kontent or the Development environment (a new feature of Kontent) by simply enabling or disabling a flag in Azure.
To use the Kontent Delivery Client I had to modify Index.razor.cs to look like the following:
using Microsoft.AspNetCore.Components;
using System.Threading.Tasks;
using Microsoft.FeatureManagement;
using BlazorFeatureFlags.Features;
using Kentico.Kontent.Delivery.Abstractions;
using BlazorFeatureFlags.Models;

namespace BlazorFeatureFlags.Pages
{
    public partial class Index : ComponentBase
    {
        [Inject]
        private IDeliveryClientFactory DeliveryClientFactory {get;set;}

        [Inject]
        private IFeatureManager FeatureManager { get; set; }

        protected string featureDisplay { get; set; }

        protected Page homePageContentItem {get;set;}

        protected override async Task OnInitializedAsync()
        {
            string environmentName = "production";

            if (await FeatureManager.IsEnabledAsync(nameof(Flags.PreviewInApp)))
            {
                environmentName = "development";
            }

            //Get a DeliveryClient object from the DeliveryClientFactory
            var deliveryClient = DeliveryClientFactory.Get(environmentName);

            //Get our home page item if type Page from Kontent
            var itemResponse = await deliveryClient.GetItemAsync("home_page");

            //Assume we found it, and cast it to a strongly typed model of Home
            homePageContentItem = itemResponse.Item.CastTo<Page>();

            if (await FeatureManager.IsEnabledAsync(nameof(Flags.LiveReload)))
            {
                featureDisplay = "true";
            }
            else
            {
                featureDisplay = "false";
            }
        }
    }
}
And then the front end Index.razor file to use the new content fields.
@page "/"

@if (homePageContentItem == null)
{
    <p><em>Loading ...</em></p>
}
else
{
    <h1>@homePageContentItem.Heading</h1>

    @((MarkupString)homePageContentItem.Description)

    <SurveyPrompt Title="How is Blazor working for you?" />

    <h2>The Feature from Azure App Config is enabled: @featureDisplay</h2>
}
And now I can switch to either my production Kontent environment or development Kontent environment to have a Headless CMS connected to my Blazor app.
Here is the content in Kontent and how it shows up on the website.


And if I toggle the Feature Flag in Azure App Configuration:

In less than a minute I can refresh my page and see the development content:

That's pretty cool for less than an hour of more work.
Conclusion
There you have it. You have seen how easily it is to get dynamically reloaded configuration at runtime into your Blazor Server application using Azure App Configuration. If you are creating .NET Core of .NET 5.0 apps this could be a useful tool in your developer tool belt.

Top comments (0)