Purpose
HTML and CSS are extremely important parts of learning about how websites work. Every website uses HTML in order to display things such as text or images on sites. Being able to grasp a few concepts of HTML and CSS can help a lot when it comes to learning more intricate subjects in computer science. For this reason, it is important to get some experience with it!
This tutorial will give you a walkthrough on how certain functions of HTML work and why they are important, all while learning how to build a cool mini-city!
Setup
Open any HTML/CSS editor. Here is a good browser-based editor.
Follow along with this tutorial, and you will be one step closer to building your first mini-city!
Walkthrough
This tutorial will go over the HTML and CSS portion of the mini-city. You can think of HTML as the foundation of the entire project! If we work to build a strong foundation, our mini-city will look fantastic!
Our first step when using HTML is to establish a “!DOCTYPE html” function. This simply means that all of our code below this will be rendered as an HTML document.
So, your first line should look like this:
<!DOCTYPE html>
Got it? Great!
Next, we have to actually create our HTML tag. Tags are essentially commands that tell our editor what type of HTML we are writing. This just means that we are beginning to write our HTML code, but first we must actually tell our computer that we will be writing in HTML. To do this, simply type <html> on your second line. Your code should look like this so far:
<!DOCTYPE html>
<html>
Now that we have established the fact that we will be writing in HTML, it’s time to get into the fun stuff. We start by writing <head> in our third line of code. This tells our editor that the information for our header will be stored here.
After we write our <head> tag, we know that we should give our project a title. Let’s title our project “My Mini City”. This is how your code should look now:
<!DOCTYPE html>
<html>
    <head>
        <title>My Mini City</title>
You may notice that there is a </title> tag after our title’s name. This is called a closing tag. Closing tags have a “/” before they state which tag they are closing. This just tells our editor that we are no longer editing this tag.
To create our body section, simply type body on your next line.
Now, let’s make our classes! Let’s think about what we want our city to look like.
We know that we want the following objects in our city:
The ground
A skyscraper
A smaller building
A road
A bridge
An ocean
A waterfall
A car
In order to eventually create these objects, we have to make classes for them. Classes are simply declarations that we use to establish the fact that we are going to create an object. Then, we actually create it in CSS!
We create classes using the <div> tag. Like this:
  <body>
      <div class = "ground">
As you can see, we just created a class called “ground”. Now our editor knows that we are planning to create an object.
We do the same thing with all of our other objects. When you are done, it should look something like this:
<body>
      <div class = "ground">
        <div class = "bottomSide"></div>
        <div class = "bottomFront"></div>
        <div class = "building1">
          <div class = "wall1"></div>
          <div class = "wall2"></div>
          <div class = "roof"></div>
          <div class = "railing1"></div>
          <div class = "railing2"></div>
        </div>
        <div class = "building2">
          <div class = "wall3"></div>
          <div class = "wall4"></div>
          <div class = "roof2"></div>
        </div>
        <div class = "road1"></div>
        <div class = "road2"></div>
      </div>

        <div class = "ocean"></div>
        <div class = "ramp1"></div>
      <div class = "ramp2"></div>

      <div class = "bridge"></div>

        <div class = "waterfall"></div>

        <div class = "ground2">
            <div class = "grassArea"> <!--GRASS AREA-->
                <div class = "treeTrunks"></div>
          <div class = "triangleTops"></div>
          <div class = "circleTops"></div>
            </div>
        <div class = "bottomFront"></div>
        </div>

      <div class = "car">
        <div></div>
        <div></div>
      </div>

        <div class = "boat">
        <div></div>
        <div></div>
        <div></div>
      </div>

        <div class = "sun"></div>
  </body>

</html>
This looks like a huge chunk of code right now, but let’s break it down!
For every object in our city, we create a div class for it. That way, we can edit it using our CSS. HTML is just our canvas for all of our objects, while CSS is like our paint!
Sometimes, objects have “children”. For example, since our buildings are placed on the ground, the buildings are “children” of the ground.
You can see that “building1” is placed within the “ground” tag in our code.
Our “building1” also has children of its own. Since walls and a roof are components of our building, we place them inside our <building1> tag. We repeat this whenever components belong to each other. (You can also see this with the grass area and trees)
After we create all of our objects and their “children”, it is time to close our body and our html tag by using /body and /html.
When it’s time to design our objects in CSS, we MUST use the exact name we created for them in our HTML. For example, if I want to change the color of the bridge in my city, I need to name it “bridge” in my CSS, just like how it is in my HTML.
Next, let’s prepare our editor for the CSS portion of the code. We do this by establishing a style tag. Since we will be using CSS, our style tag will look like this:
<!DOCTYPE html>
<html>
    <head>
        <title>Mini City Webinar</title>
        <style TYPE="text/css">
We will be writing all of our CSS in our head portion of our code.
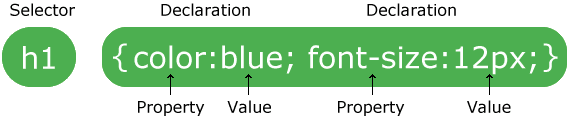
To style our webpage, we will need to learn the CSS syntax. A CSS rule-set consists of a selector and a declaration block.
Apart from color and font-size, these are some of the properties you will require to get started:
- Position: It specifies the type of positioning method used for an element: static, relative, fixed, absolute or sticky.
- Static: static positions are always positioned according to the normal flow of the page.
- Relative: relative positions are positioned relative to another object in your CSS.
- Fixed: elements with fixed positions will always stay in the same place no matter which way the page is scrolled.
- Absolute: similar to fixed, but will always stay in the same place relative to another object rather than the page.
- Sticky: an element positioned based on the user's scroll position.
- Display: it handles whether an element is shown or not. If you choose display: none, the element will not be visible.
- Background-color: It determines the background color of the element. A color can be specified by a valid color name - like “black”, a hexadecimal value - like “ffffff” or an rgb value - like “rgb(255,0,0)”.
- Height and Width: These are properties used to set the height and width of the element.
- Transform: This property is used to make 2D transformations. The most commonly used transformations are: rotate() and skew.
- rotate(): It rotates an element clockwise or counter-clockwise according to a given degree. For example, transform: rotate(20deg);
- skew(): skews an element along the X and Y-axis by the given angles. For example, this example skews the element 30 degrees along the X-axis, and 50 degrees along the Y-axis. transform: skew(30deg, 50deg);
- Top: It affects the vertical position of the element. The above example sets the element 18px below the top edge of its nearest positioned ancestor.
- Left: It affects the horizontal position of the element. The above example sets the element 90px from the left edge of its nearest positioned ancestor.
- Z-Index: It specifies the stack order of an element. You can think about Z-Index like layers of a sandwich. If the Z-Index value is higher for one item than another, the higher value will be drawn first.
To begin with, you will need a foundation for your city to be built upon. You can use the following code as a starting off point:
.ground{ /*foundation*/
        position: absolute;
        display: block;
        /*purple*/
        background-color: #D3D3D3;
        width: 200px;
        height: 148px;
        transform: skew(60deg, -15deg);
        top: 100px;
        left: -150px;
        z-index:-999;
      }
      .ground .bottomSide{
        position: absolute;
        display: block;
        width: 16px;
        height: 148px;
        background-color: #C0C0C0;
        transform: skew(0deg, -30deg);
        top: 4px;
        left: -16px;
        z-index:-1001;
      }
      .ground .bottomFront{
        position: absolute;
        display: block;
        width: 210px;
        height: 9.5px;
        background-color: #C0C0C0;
        transform: skew(-60deg, 0deg);
        top: 147px;
        left: -8px;
        z-index:-1001;
      }
Now that you have your foundation, you might want to start building. To help you get started, this is what the code to draw a road looks like:
.ground .road1 {
        position: absolute;
        display: block;
        background-color: #C0C0C0;
        width: 20px;
        height: 200px;
        transform: rotateZ(90deg);
        top: 18px;
        left: 90px;
        z-index:-998;
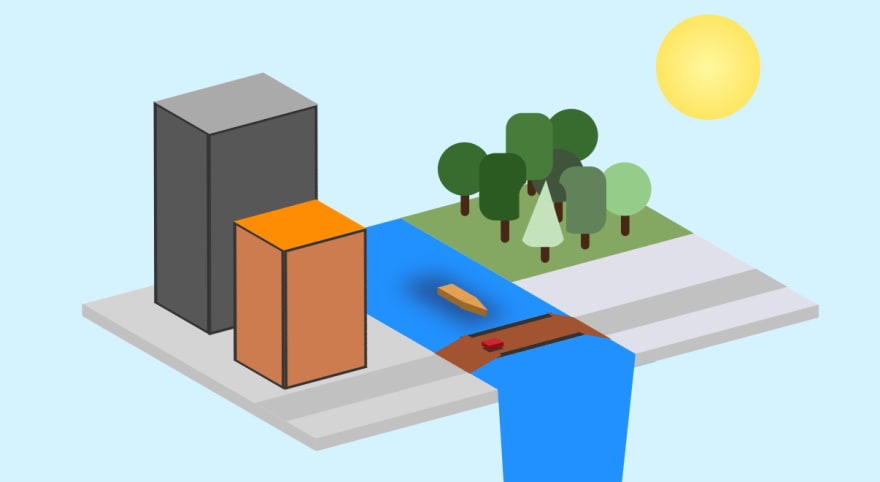
Now that you’ve laid down the foundation and built a road, you can start building more roads, bridges, buildings, or anything else you might want in your mini city! This is what our city looked like after creating all the code described in this tutorial:


Top comments (0)