Objective: In this article, you will know Component.
Pre-requisite Prior to completing this article, you should have already installed all pre-requisite tooling including: Visual Studio Code, Node Package Manager (NPM), Node, Angular CLI.
Component
- Create a component
- Register it in a module
- Add an element in an HTML markup
Objectives and Outcomes
At first you will add the first component to your Angular application and update its template. At the end of this article you will be able to:
- Add components to your Angular application
- Update the templates of your component.
Adding a Menu Component
Move few images folder containing some PNG files to the Angular project's src/assets folder. These image files will be useful for our exercises.
Next, use the CLI's ng generate command to generate a new component named menu as follows:
ng generate component menuThis will create the necessary files for the menu component in a folder named menu, and also import this component into
app.module.ts.Next, open
app.component.htmlfile and add the following after the toolbar:
<app-menu></app-menu>
Creating the Menu
- Next, create a folder named shared under the
src/appfolder. To this folder, add a file nameddish.tswith the following code:
export class Dish {
    id: string;
    name: string;
    image: string;
    category: string;
    featured: boolean;
    label: string;
    price: string;
    description: string;
}
- Update
menu.component.tsas follows to add in the data for four menu items:
import { Component, OnInit } from '@angular/core';
import { Dish } from '../shared/dish';

@Component({
  selector: 'app-menu',
  templateUrl: './menu.component.html',
  styleUrls: ['./menu.component.css']
})
export class MenuComponent implements OnInit {

  dishes: Dish[] = [
    {
      id: '0',
      name: 'Uthappizza',
      image: '/assets/images/uthappizza.png',
      category: 'mains',
      featured: true,
      label: 'Hot',
      price: '4.99',
      // tslint:disable-next-line:max-line-length
      description: 'A unique combination of Indian Uthappam (pancake) and Italian pizza, topped with Cerignola olives, ripe vine cherry tomatoes, Vidalia onion, Guntur chillies and Buffalo Paneer.'
    },
    {
      id: '1',
      name: 'Zucchipakoda',
      image: '/assets/images/zucchipakoda.png',
      category: 'appetizer',
      featured: false,
      label: '',
      price: '1.99',
      description: 'Deep fried Zucchini coated with mildly spiced Chickpea flour batter accompanied with a sweet-tangy tamarind sauce'
    },
    {
      id: '2',
      name: 'Vadonut',
      image: '/assets/images/vadonut.png',
      category: 'appetizer',
      featured: false,
      label: 'New',
      price: '1.99',
      description: 'A quintessential ConFusion experience, is it a vada or is it a donut?'
    },
    {
      id: '3',
      name: 'ElaiCheese Cake',
      image: '/assets/images/elaicheesecake.png',
      category: 'dessert',
      featured: false,
      label: '',
      price: '2.99',
      description: 'A delectable, semi-sweet New York Style Cheese Cake, with Graham cracker crust and spiced with Indian cardamoms'
    }
   ];

  constructor() { }

  ngOnInit(): void {
  }

}
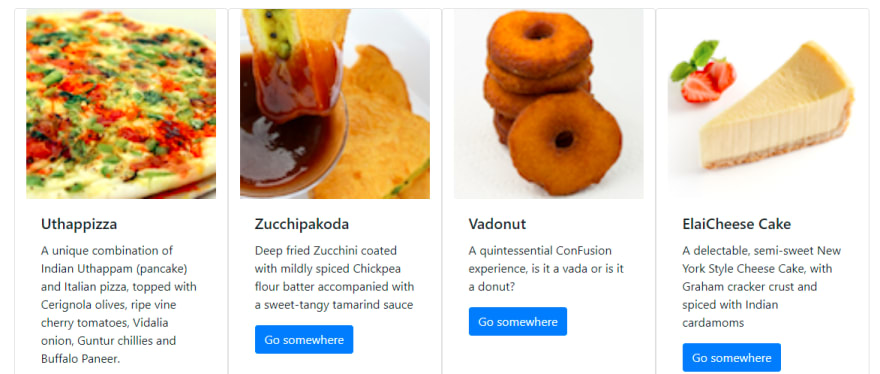
- Next, update the
menu.component.htmltemplate as follows:
<div class="container">
    <div class="row">
        <div class="card col" *ngFor="let dish of dishes">
            <img src="{{dish.image}}" class="card-img-top" alt="...">
            <div class="card-body">
              <h5 class="card-title">{{dish.name}}</h5>
              <p class="card-text">{{dish.description}}</p>
              <a href="#" class="btn btn-primary">Go somewhere</a>
            </div>
          </div>
    </div>
</div>
- Next, open
app.module.tsand update it as follows:
import { MenuComponent } from './menu/menu.component';

@NgModule({
  declarations: [
    AppComponent,
    MenuComponent
   ]
})
Selected Image
menu.component.html
<div class="container">
    <div class="row">
        <div class="card col" *ngIf="selectedDish">
            <img src="{{selectedDish.image}}" class="card-img-top" alt="...">
            <div class="card-body">
              <h5 class="card-title">{{selectedDish.name | uppercase}}</h5>
              <p class="card-text">{{selectedDish.description}}</p>
              <a href="#" class="btn btn-primary">Go somewhere</a>
            </div>
          </div>
    </div>
</div>
menu.component.ts
import { Component, OnInit, DebugElement } from '@angular/core';
import { Dish } from '../shared/dish';

const DISHES: Dish[] = [
  {
    id: '0',
    name: 'Uthappizza',
    image: '/assets/images/uthappizza.png',
    category: 'mains',
    featured: true,
    label: 'Hot',
    price: '4.99',
    // tslint:disable-next-line:max-line-length
    description: 'A unique combination of Indian Uthappam (pancake) and Italian pizza, topped with Cerignola olives, ripe vine cherry tomatoes, Vidalia onion, Guntur chillies and Buffalo Paneer.'
  },
  {
    id: '1',
    name: 'Zucchipakoda',
    image: '/assets/images/zucchipakoda.png',
    category: 'appetizer',
    featured: false,
    label: '',
    price: '1.99',
    description: 'Deep fried Zucchini coated with mildly spiced Chickpea flour batter accompanied with a sweet-tangy tamarind sauce'
  },
  {
    id: '2',
    name: 'Vadonut',
    image: '/assets/images/vadonut.png',
    category: 'appetizer',
    featured: false,
    label: 'New',
    price: '1.99',
    description: 'A quintessential ConFusion experience, is it a vada or is it a donut?'
  },
  {
    id: '3',
    name: 'ElaiCheese Cake',
    image: '/assets/images/elaicheesecake.png',
    category: 'dessert',
    featured: false,
    label: '',
    price: '2.99',
    description: 'A delectable, semi-sweet New York Style Cheese Cake, with Graham cracker crust and spiced with Indian cardamoms'
  }
]

@Component({
  selector: 'app-menu',
  templateUrl: './menu.component.html',
  styleUrls: ['./menu.component.css']
})
export class MenuComponent implements OnInit {

  dishes: Dish[] = DISHES;
  selectedDish = DISHES[0];

  constructor() { }

  ngOnInit(): void {
  }

}
Directives
- Angular templates are dynamic
- Directive give instruction to Angular on how to render the templates to the DOM
- A directive can be defined in Angular as a class with the @Directive decorator
- Two other kinds of directive in Angular: Structural and Attribute
Structural Directives
- Allows you alter the layout by adding, removing and replacing elements in DOM
Common Structural Directives
- ngIf, ngFor, ngSwitch


Top comments (0)