
Suppose that you have a domain name that you want to forward to an absolute URL. For example, you have a domain name dev.codewithyou.com and you want to forward it to https://www.codewithyou.com/blog/cloudfront-restrict-user-access-by-signed-urls. You can do this with Route53 and S3.
How to do it
Step 1: Create a bucket and redirect it to an absolute URL
- Open the Amazon S3 console at https://console.aws.amazon.com/s3/.
- Under Buckets, create a new bucket with the name
dev.codewithyou.com.Name of the bucket MUST is the name of the domain. If the name is different, you will not see the bucket in the route53 alias record. - Choose the bucket that you created in step 2 and click on the Properties tab.
- Under Static website hosting, choose Edit.
- Choose Redirect requests for an object.
- In the Host name box, enter
www.codewithyou.com/blog/cloudfront-restrict-user-access-by-signed-urls. This is the absolute URL that you want to forward to your domain. You can use any domain name you want. The URL must not include the protocol (http://orhttps://). - For Protocol, choose none

- Choose Save changes.
You can test the redirect by visiting the bucket url in your browser. For example, http://dev.codewithyou.com.s3-website-ap-southeast-1.amazonaws.com/. You should see it redirect to the https://www.codewithyou.com/blog/cloudfront-restrict-user-access-by-signed-urls URL.
Step 2: Create a Route53 alias record
Now you need to create a Route53 alias record. You can do this by going to the Route53 console at https://us-east-1.console.aws.amazon.com/route53/v2/home#Dashboard
- Click on the Create record button.
- Specify the following values:
- Record name
dev - Record type
AChoose A – IPv4 address. - Alias. Select
Yes. Choose the bucket that you created in step 1.
- Record name
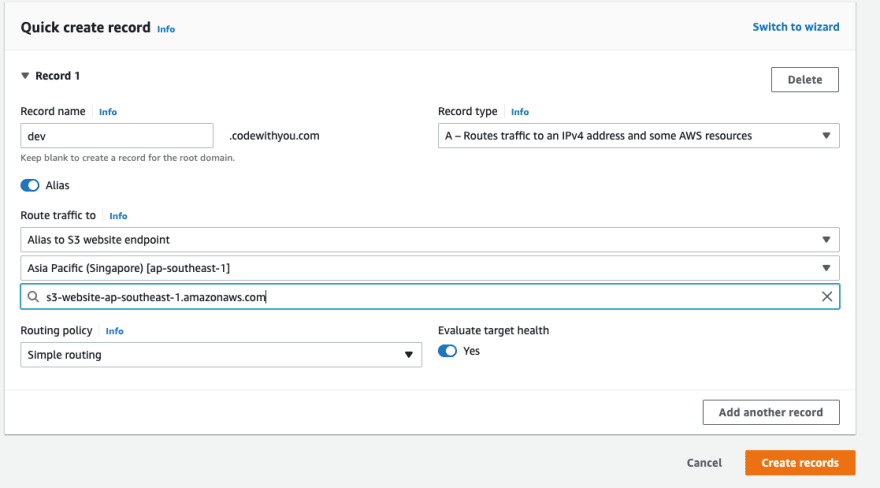
Click on the Create records button and wait for the record to be created.
After the record is created, you can test the redirect by visiting the alias record url in your browser. For example, http://dev.codewithyou.com/. You should see it redirect to the https://www.codewithyou.com/blog/cloudfront-restrict-user-access-by-signed-urls URL.
Conclusion
This is a simple example of how to use Route53 and S3 to forward your domain to absolute URLs.
You can also do many other things with Route53 and S3.
- Redirect requests for your bucket's website endpoint to another bucket or domain
- Configure redirection rules to use advanced conditional redirects
- Redirect requests for an object
I will continue to add more examples in the future. Thanks for reading!

Top comments (0)