
In this post, I want to show how you can use Spring Batch. This is a step by step Spring Batch Tutorial.
In enterprise applications, batch processing is common. But with data becoming more prevalent on the internet, it has also become important how we process this data. There are multiple solutions available. Apache Storm or Apache Spark helps with processing and transforming the data in the required format. In this post, we will be looking at Spring Batch more closely.
What is Spring Batch?
Spring Batch is a lightweight framework designed to facilitate batch processing. It allows developers to create batch applications. In turn, these batch applications process the incoming data and transform it for further usage.
Another big advantage of using the Spring Batch is that it allows for high-performance processing of this data. The applications that rely upon data heavily, it is of utmost importance that data becomes instantly available.
Spring Batch allows a developer to use POJO based approach. In this approach, a developer can transform the batch-processed data into data models that she can further use for application business logic.
In this post, I will cover an example where we will batch process a data-intensive CSV file for employee records and transform, validate that data to load into our database.
What is Batch Processing?
Batch processing is a data processing mode. It involves consuming all the data, processing that data, transforming it, and then sending it to another data source. Usually, this is done through an automated job. Either a triggering system or a user triggers a job and that job processes the job definition. Job definition will be about consuming the data from its source.
The key advantage of batch processing is it handles a large volume of data. Nevertheless, this operation can be asynchronous. Most applications perform batch processing separately from real-time user interaction.
Next, we will learn about the Spring Batch framework and what it comprises.
Spring Batch Framework
The following architecture shows the components of the Spring Batch framework.
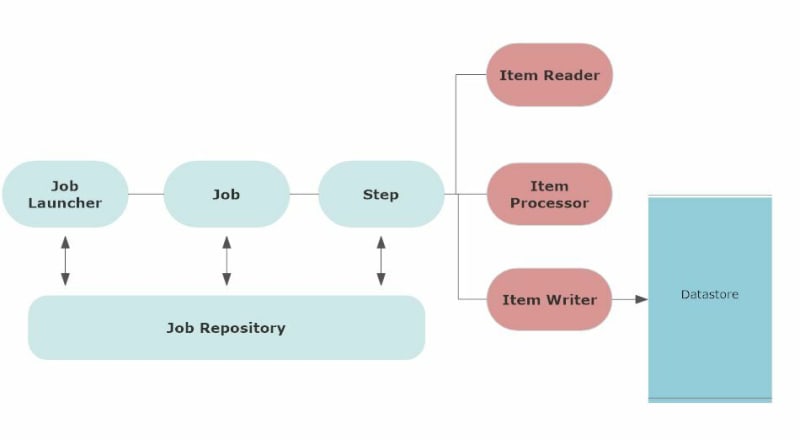
First, the batch process involves a job. User schedules a job to be run at a certain time or based on a certain condition. This can also involve a job trigger.
Spring Batch framework also includes
- logging and tracing
- transaction management
- job processing statistics
- job restart
- resource management
Usually, when you configure a job, it will be saved in the job repository. Job Repository keeps the metadata information of all the jobs. A trigger starts these jobs at their scheduled time.
A job launcher is an interface to launch a job or runs a job when the jobs’ scheduled time arrives.
Job is defined with job parameters. When a job starts, a job instance runs for that job. Every execution of job instance has job execution and it keeps track status of the job. A job can have multiple steps.
Step is an independent phase of a job. A job can be comprised of more than one step. Similar to the job, each step has step execution that executes the step and keeps track of the status of the step.
Each step has an item reader that basically reads the input data, an item processor that processes the data and transforms it, and an item writer that takes the processed data and output it.
Now, let’s see all these components in our demo.
Step by Step Spring Batch Tutorial with an example
As part of the demo, we will be uploading a csv file through Spring Batch Framework. So to start with, create the spring project and add the following dependency:
implementation 'org.springframework.boot:spring-boot-starter-batch'
This is the main dependency of our project. Also out main application will look like below:
package com.betterjavacode.springbatchdemo;

import org.springframework.boot.SpringApplication;
import org.springframework.boot.autoconfigure.SpringBootApplication;


@SpringBootApplication
public class SpringbatchdemoApplication
{

    public static void main(String[] args)
    {
        SpringApplication.run(SpringbatchdemoApplication.class, args);
    }

}
Create DTO Object
I will be uploading employee data through a CSV file, so I will have my DTO object for Employee created as below:
package com.betterjavacode.springbatchdemo.dtos;

import com.betterjavacode.springbatchdemo.models.Company;
import com.betterjavacode.springbatchdemo.models.Employee;
import com.betterjavacode.springbatchdemo.repositories.CompanyRepository;
import org.springframework.beans.factory.annotation.Autowired;


import java.io.Serializable;

public class EmployeeDto implements Serializable
{
    private static final long serialVersionUID = 710566148641281929L;

    @Autowired
    public CompanyRepository companyRepository;

    private int employeeId;
    private int companyId;
    private String firstName;
    private String lastName;
    private String email;
    private String jobTitle;

    public EmployeeDto()
    {

    }

    public EmployeeDto(int employeeId, String firstName, String lastName, String email,
                        String jobTitle, int companyId)
    {
        this.employeeId = employeeId;
        this.firstName = firstName;
        this.lastName = lastName;
        this.email = email;
        this.jobTitle = jobTitle;
        this.companyId = companyId;
    }

    public Employee employeeDtoToEmployee()
    {
        Employee employee = new Employee();
        employee.setEmployeeId(this.employeeId);
        employee.setFirstName(this.firstName);
        employee.setLastName(this.lastName);
        employee.setEmail(this.email);
        Company company = companyRepository.findById(this.companyId).get();
        employee.setCompany(company);
        employee.setJobTitle(this.jobTitle);
        return employee;
    }

    public int getEmployeeId ()
    {
        return employeeId;
    }

    public void setEmployeeId (int employeeId)
    {
        this.employeeId = employeeId;
    }

    public int getCompanyId ()
    {
        return companyId;
    }

    public void setCompanyId (int companyId)
    {
        this.companyId = companyId;
    }

    public String getFirstName ()
    {
        return firstName;
    }

    public void setFirstName (String firstName)
    {
        this.firstName = firstName;
    }

    public String getLastName ()
    {
        return lastName;
    }

    public void setLastName (String lastName)
    {
        this.lastName = lastName;
    }

    public String getEmail ()
    {
        return email;
    }

    public void setEmail (String email)
    {
        this.email = email;
    }

    public String getJobTitle ()
    {
        return jobTitle;
    }

    public void setJobTitle (String jobTitle)
    {
        this.jobTitle = jobTitle;
    }
}
This DTO class also uses a repository CompanyRepository to get a company object and convert DTO to a database object.
Setting up Spring Batch Configuration
Now, we will set up a batch configuration for our job that will run to upload a CSV file into the database. Our class BatchConfig contain an annotation @EnableBatchProcessing. This annotation enables Spring Batch features and provides a base configuration to set up batch jobs in a @Configuration class.
@Configuration
@EnableBatchProcessing
public class BatchConfig
{

}
This Batch Configuration will include a definition of our job, steps involved in the job. It will also include how we want to read our file data and process it further.
    @Bean
    public Job processJob(Step step)
    {
        return jobBuilderFactory.get("processJob")
                .incrementer(new RunIdIncrementer())
                .listener(listener())
                .flow(step).end().build();
    }

    @Bean
    public Step orderStep1(JdbcBatchItemWriter writer)
    {
        return stepBuilderFactory.get("orderStep1").<EmployeeDto, EmployeeDto> chunk(10)
                .reader(flatFileItemReader())
                .processor(employeeItemProcessor())
                .writer(writer).build();
    }
Above bean declares the job processJob.incrementer adds job parameters. listener will listen to job and handle job status. The bean for listener will handle job completion or job failure notification. As discussed in Spring Batch architecture, every job includes more than one step.
@Bean for step uses stepBuilderFactory to create a step. This step processes a chunk of data in a size of 10. It has a Flat File Reader flatFileItemReader(). A processor employeeItemReader will process the data that has been read by Flat File Item Reader.
    @Bean
    public FlatFileItemReader flatFileItemReader()
    {
        return new FlatFileItemReaderBuilder()
                .name("flatFileItemReader")
                .resource(new ClassPathResource("input/employeedata.csv"))
                .delimited()
                .names(format)
                .linesToSkip(1)
                .lineMapper(lineMapper())
                .fieldSetMapper(new BeanWrapperFieldSetMapper(){{
                    setTargetType(EmployeeDto.class);
                }})
                .build();
    }

    @Bean
    public LineMapper lineMapper()
    {
        final DefaultLineMapper defaultLineMapper = new DefaultLineMapper<>();
        final DelimitedLineTokenizer delimitedLineTokenizer = new DelimitedLineTokenizer();
        delimitedLineTokenizer.setDelimiter(",");
        delimitedLineTokenizer.setStrict(false);
        delimitedLineTokenizer.setNames(format);

        defaultLineMapper.setLineTokenizer(delimitedLineTokenizer);
        defaultLineMapper.setFieldSetMapper(employeeDtoFieldSetMapper);

        return defaultLineMapper;
    }

    @Bean
    public EmployeeItemProcessor employeeItemProcessor()
    {
        return new EmployeeItemProcessor();
    }

    @Bean
    public JobExecutionListener listener()
    {
        return new JobCompletionListener();
    }

    @Bean
    public JdbcBatchItemWriter writer(final DataSource dataSource)
    {
        return new JdbcBatchItemWriterBuilder()
                .itemSqlParameterSourceProvider(new BeanPropertyItemSqlParameterSourceProvider<>())
                .sql("INSERT INTO employee(employeeId, firstName, lastName, jobTitle, email, " +
                        "companyId) VALUES(:employeeId, :firstName, :lastName, :jobTitle, :email," +
                        " " +
                        ":companyId)")
                .dataSource(dataSource)
                .build();
    }
We will take a look at each of these beans now.
FlatFileItemReader will read the data from the flat file. We are using a FlatFileItemReaderBuilder to create a FlatFileItemReader of type EmployeeDto.
resource indicates the location of the file.
delimited – This builds a delimited tokenizer.
names – will show the order of fields in the file.
lineMapper is an interface to map lines from file to domain object.
fieldSetMapper will map the data from fieldset to an object.
lineMapper bean needs tokenizer and fieldsetmapper.
employeeDtoFieldSetMapper is another bean that we have autowired in this class.
package com.betterjavacode.springbatchdemo.configurations.processor;

import com.betterjavacode.springbatchdemo.dtos.EmployeeDto;
import org.springframework.batch.item.file.mapping.FieldSetMapper;
import org.springframework.batch.item.file.transform.FieldSet;
import org.springframework.stereotype.Component;
import org.springframework.validation.BindException;

@Component
public class EmployeeDtoFieldSetMapper implements FieldSetMapper
{

    @Override
    public EmployeeDto mapFieldSet (FieldSet fieldSet) throws BindException
    {
        int employeeId = fieldSet.readInt("employeeId");
        String firstName = fieldSet.readRawString("firstName");
        String lastName = fieldSet.readRawString("lastName");
        String jobTitle = fieldSet.readRawString("jobTitle");
        String email = fieldSet.readRawString("email");
        int companyId = fieldSet.readInt("companyId");

        return new EmployeeDto(employeeId, firstName, lastName, jobTitle, email, companyId);
    }
}
As you can see, this FieldSetMapper maps fields to individual objects to create an EmployeeDto.
EmployeeItemProcessor implements the interface ItemProcessor. Basically in this class, we validate EmployeeDto data to verify if the company, the employee belongs to, exists.
JobCompletionListener checks for job completion status.
    @Override
    public void afterJob(JobExecution jobExecution)
    {
        if (jobExecution.getStatus() == BatchStatus.COMPLETED)
        {
            // Log statement
            System.out.println("BATCH JOB COMPLETED SUCCESSFULLY");
        }
    }
Now, let’s look at ItemWriter. This bean basically uses JdbcBatchItemWriter. JdbcBatchItemWriter uses INSERT sql statement to insert processed EmployeeDto data into the configured data source.
Configuring Application Properties
Before we run our application to process a file, let’s look at application.properties.
spring.datasource.url=jdbc:mysql://127.0.0.1/springbatchdemo?autoReconnect=true&useSSL=false
spring.datasource.username = root
spring.datasource.password=*******
spring.datasource.driver-class-name=com.mysql.cj.jdbc.Driver
spring.jpa.show-sql=true
spring.jpa.properties.hibernate.dialect = org.hibernate.dialect.MySQL5Dialect
spring.datasource.hikari.connection-test-query=SELECT 1
spring.batch.initialize-schema=ALWAYS
Other than regular data source properties, we should understand the property spring.batch.initialize-schema=ALWAYS. If we don’t use this property and start the application, the application will complain Table batch_job_instance doesn't exist.
To avoid this error, we are basically telling to create batch job-related metadata during startup. This property will create additional database tables in your database like batch_job_execution, batch_job_execution_context, batch_job_execution_params, batch_job_instance etc.
Demo
Now if I execute my Spring Boot Application, it will run and execute the job. There are different ways to trigger a job. In an enterprise application, you will receive a file or data in some kind of storage place (S3 or Amazon SNS-SQS), you will have a job that will be monitoring this location to trigger file loading Spring Batch job.

You can see in the execution a message about job completion – “BATCH JOB COMPLETED SUCCESSFULLY“. If we check our database table, we will see the data loaded.

You can download code for this demo from my github repository.
What more?
I have covered a Spring Batch tutorial here, but this is not all. There is more to Spring Batch than this introductory part. You can have different input data sources or you can also load the data from file to file with various data processing rules.
There are also ways to automate these jobs and process a high volume of data in a performant manner.
Conclusion
In this post, I showed a step by step Spring Batch Tutorial. There are many ways to handle batch jobs, but Spring Batch has made this very easy.
In other news, I recently released my new book – Simplifying Spring Security. If you are looking to learn about Spring Security, you can buy the book here. Accompany this book with this post of Spring Boot Interview questions and you will be ready for your next job interview.

Top comments (0)