If you are working as a software developer in 2020, you probably have heard about Docker. In fact, by now over 20% of all hosts are running Docker with increasing numbers for the upcoming years.
If you have no experience and you want to get started with this technology, you have come to the right place. You will get a succinct overview of the topic and some best practices on how to leverage Docker for your own projects or your projects at work. In this part, we will learn a short definition of the technology and we will dive into more detail on the basic elements of Docker: images and containers. To get some immediate hands-on experience, we will build our own docker image and spin up containers from it.
Contents
Images (Part I)
Containerizing you application (Part I)
Containers (Part I)
Best Practices (Part II)
What Docker is and why you want to use it
You probably know about the concept of virtual machines (VMs). VMs are simulating operating systems with system-specific pre-installed software. They are managed by a hypervisor (virtual machine monitor) which manages and shares hardware for multiple VMs on a single physical machine. VMs need a big amount of memory and computing power and therefore are expensive to setup and maintain. Furthermore, moving VM workloads between hypervisors and cloud platforms is not as easy and intuitive as it could be.
In contrary, Docker or other containerization technologies are running on the host operating system (OS). Containers contain your application code, dependencies, your runtime system and system libraries, settings and tools. That is it. Nothing more than the bare minimum of what you need to run your application. They do not need a full-blown OS to setup, instead they free up a lot of CPU, RAM and storage for running applications. As long as a host has the Docker Engine running, you can easily port Docker containers from one host to another. You will never have to worry, what kind of server your application is running on or how to ship between hypervisors. You simply pick or create your own docker image and focus on developing your software.
This image visualisation is copied from the Docker website and illustrates the difference:
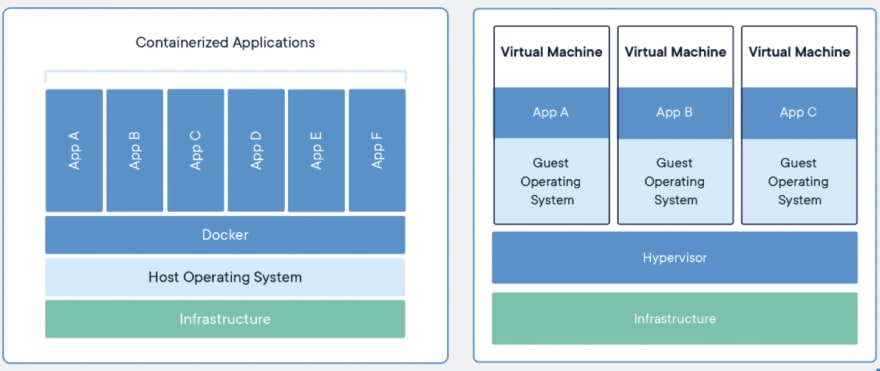
Source: https://www.docker.com/resources/what-container#/package_software
Images
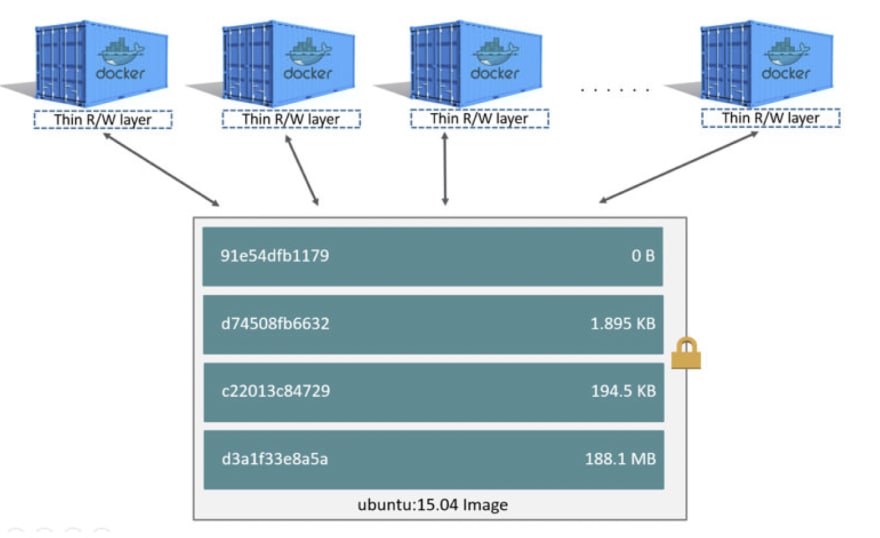
As a developer, you should be familiar with the concept of object-oriented programming. In a way, you can think of images as classes and containers as objects. Images are your templates to build containers on.
To start out, you usually pull an image from a docker registry like Docker Hub. Images are made of one or multiple stacked read-only layers. The only writable layer is build by the container as the illustration below shows. We will discuss what exactly a layer is in a minute.
Getting started
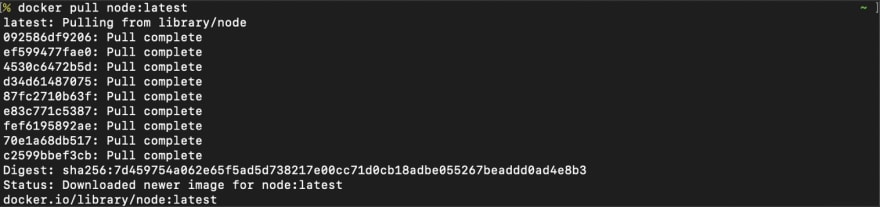
So, to dive deeper, let’s start and play around with Docker. If you have not done so already, go here and install the Docker Engine on your host. When you’re done, open your command line tool and type:
docker pull node:latest
Congratulations! You have pulled your first Docker image. Let’s look at what happened here:
The docker pull command initiates a call to a Docker registry (the default is Docker Hub) to pull an image with the name node and the tag latest. A Docker registry serves as a storage server for docker images. From the command above, we can extract the following syntax: docker pull <name>:<tag>
The name specifies the name of the image and the tag specifies the version of a particular image. (Attention: Image tags are mutable. To make sure, you can rely on an image version, you might want to consider image digests).
In this case, we pulled an image with a pre-installed version of Node.js. Your output should look like this:
Working with images
Let’s have a closer look at the image we just pulled. Execute the following command in your terminal:
docker images
This will return a list of all your images like this:

You can see the name of the image, the tag we specified before, a unique image id, a timestamp when it was created and the size of the image. To further inspect the image execute:
docker inspect node:latest
Here you can see a lot of metadata for the image like the size of the image, the different layers, the underlying OS and much more. We will come back to the inspect command in the the Best Practices section.
Now, let's remove the image with:
docker rmi node:latest

This way, we removed the image and the respective layers of the image from our Docker host.
Note that all these commands can be executed with the image id, but they will only work, as long as no container based on the image is running. To understand how images are built and why they are structured into layers, we will build a simple Node.js server, containerize it and spin up our first containers from it.
Containerizing your application
To keep things simple, I set up a simple Node.js server. You can find the source code here. For this example, you do not need any experience with Node.js. You simply need to have node and the node package manager npm installed and follow along the tutorial. You can install both as described here.
Clone the repository, cd into the repository’s folder and execute the following commands to build the application and install all dependencies.
npm install && npm run build
Now, let’s run the server with
npm start
Now, our server should be running. If you navigate your browser to http://localhost:8080, you should see a "Hello World of Docker" message.
Great! Now, let’s see how we can make an image of this application and spin up a container of it. Remember, our image is our template for all our containers and it should do only one thing: run our application.
In the project repository, create a new file and name it Dockerfile. In there, copy the following code:
FROM node:latest


WORKDIR app


COPY . .


RUN npm install && npm run build


EXPOSE 8080


ENTRYPOINT ["npm", "start"]
To build your image, execute docker build -t my-first-docker . in the same directory as your Dockerfile. You should see the different steps building. When we execute docker images, we can see our newly created image:

There are two kind of instructions in a Dockerfile. Those, which add data and therefore create a new layer and those which simply add metadata to the image. I will walk you through those steps and explain in detail what they are doing.
The FROM command specifies a base image, on which we want to build our image. In our case, we use the latest image from the node repository. This image has Node.js pre-installed since we want to build a Node.js server. In general, it is recommended to use base images from official repositories since you do not have to worry about installing Node.js properly.
WORKDIR creates a working directory for your application. It is seen as best practice, because we avoid unreadable syntax like cd .. && do foo. The working directory will be your default directory in which the following RUN, COPY, etc. commands will be executed. Our working directory will be app.
COPY copies files from your project directory into the Docker image. For now, we will just copy all files in our working directory, even though this is not considered best practice. Notice: this is the first time we are adding data to our image. Thus, this instruction creates a new layer in your image. Each instruction of this type creates its own layer.
RUN executes a command in the default shell of the image. Since it adds data, it creates another layer. In our case, we add data by installing all dependencies with npm install and building the compiled files with npm run build.
EXPOSE exposes a specified network port for our container.
ENTRYPOINT sets a default shell command, which will we be executed when we start a container and run it. This command makes the Docker image an executable when run. We could also use the CMD instruction to achieve this behaviour. Nevertheless, it is recommended to set ENTRYPOINT whenever you want your users to use this image in a specific way. If you want to give your users more flexibility, choose CMD, because it can be overwritten more easily.
Containers
As explained, containers are the runtime counterpart to images. Containers accept an image and a command as arguments. The image is used to run the container and the command specifies the application, the container should run. Let’s use our example to elaborate on this. Run:
docker run -it my-first-docker

And just like that, you have your first docker container running! The run command starts a container. You pass an image as an argument and with the -it flag you will attach your shell to the container’s shell. To exit the container, you can simply press CRTL-C on Linux/Win or CMD-C on MacOS.
Now, we do not want to attach our shell every time we build a Docker container. In these cases, you can add the -d flag to run a daemon of the container. We can try it like this:
docker run -d -p 8080:8080 my-first-docker
Your docker container is now started in the background. At the same time, we mapped the exposed port 8080 of the container to our local port 8080. Run:
docker ps

As you can see, our docker container is running. Docker assigns a unique CONTAINER ID to every container. We also can see the command, which is executed as specified in our ENTRYPOINT command in the image, the mapped ports and a randomly assigned name for the container (can be specified manually with the —name flag). If you move back to your browser and http://localhost:8080, you should see your “Welcome to Docker World” message again, since all traffic on our local port 8080 is routed to our running docker container.
To stop the container, simply use:
docker stop <CONTAINER ID>
Now that our container is stopped, we can see the running and stopped containers with:
docker ps -a

You can see the container still exists. To remove our container completely, we can use a final:
docker rm <CONTAINER ID>
Conclusion
For now, this should be everything to get started with Docker and experiment a bit on your own. We learned, why Docker is such a great alternative to VMs, what images and containers are, how we can containerize our own app and how to interact with our running containers. Hopefully, this has helped you to dive into this amazing technology.
In the next part, we will have a look at some general best practices when working with Docker, especially on how to build your images and set up your Dockerfiles.
Stay tuned!

Top comments (0)