Hello great friend, delighted that you landed on this tutorial.
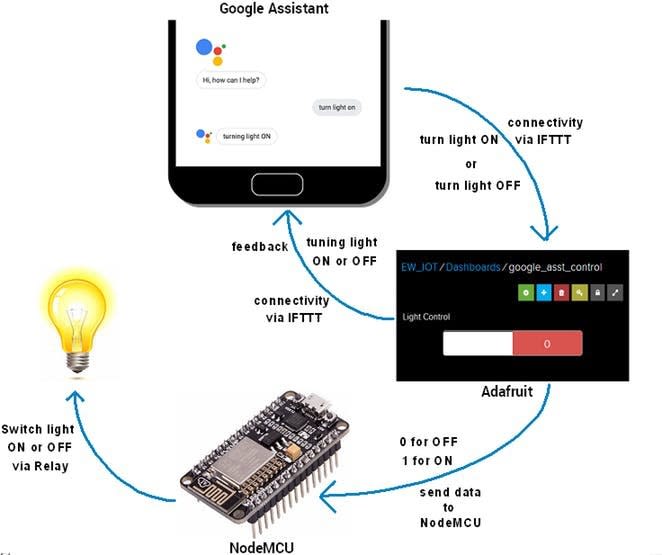
In this tutorial, i will be showing you how to create your own home Automation system with Google Voice Assistant on your phone.
If you are a tech savvy, you probably have heard of terms like 'Google Home', 'Amazon Alexa' just to mention a few. We will be focusing on the cheapest way possible to achieve this and save some few dollars. You will be able to customize this project to fit all your home appliances needs, be it remote switching,lighting, cooking etc.
Lets get into it!!!.
Before you get to this tutorial, you should be having some basic understanding of
Arduino
C++ (Embedded C++)
have worked with electronics.
Prerequisites.
- Arduino IDE
- Node MCU(Wifi Board)
- Four channel Relay
- Jumper Wires (Any)
- Your Phone
- AC Bulb with plug (For testing)
First things first !!!, before you begin developing for Node MCU with arduino IDE , you can follow a quick tutorial over here.
https://www.instructables.com/id/Quick-Start-to-Nodemcu-ESP8266-on-Arduino-IDE
With this you will be able to write code to the Node MCU just the same way you would for Arduino Micro-controller. I hope up to here you are good and set to get ourselves into deeper implementations.(Just make sure you install it correctly and that you ain't getting any error)
Step 1
For this tutorial we will be using two Web services to help us to get instructions from Google's Natural Language Processing into our Microcontroller.
So head over to :
https://io.adafruit.com
Create your account and verify.
Next, click on dashboard tab, you will meet "Welcome Dashboard", this dashboard will enable us to create trigger actions for our board. Go ahead and click on "Actions", create a new Dashboard Called "
IOT Google Assistant Home Automation" ->Click on the plus (+) button on your right. Here is where we will be adding our actions.
In our context we will be adding a toggle action,so select on/off
It should appear as this:
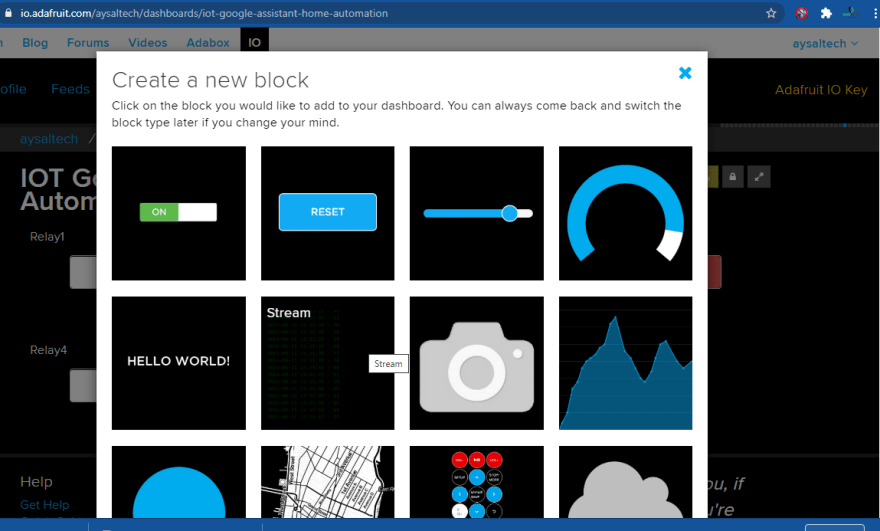
Enter the name of the feed as Relay1, then hit create.Tick it then click Next, Here is where we specify the data to be sent to our board. (Text on button Write 1, and 0) They will be used to simulate our actions. Repeat the same process for the four Relays
and it should be like this:

Step2
Head over to IFTT (If This Then That)
https://ifttt.com/create
Create your account, if you haven't done it yet.This second service will help us to listen to instructions from our voice assistant and relay those instructions to our Adafruit IO (The previous service we created).
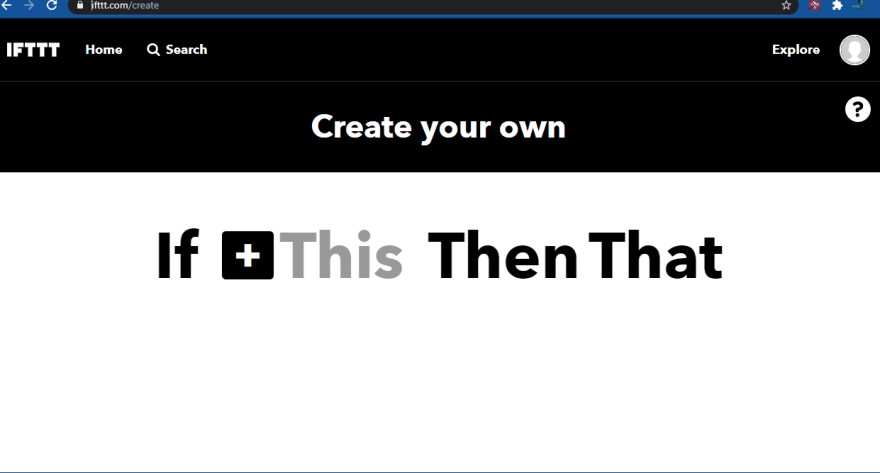
You will meet this screen with "If This then That", SO hit on "If + ", Search for Google Assistant -> Say a simple Phrase, You will meet some input fields, these fields will enable us to train our assistant to learn our instructions. So type in anything that you feel will be comfortable for your appliances : For my case i filled in as shown:

Click trigger.
You will be redirected to the previous page of "IF THIS THEN THAT", this time round you will see the first "if +" has been replaced with Google Assitant Icon. If thats so, then we are on the right track.
Next, click on the "+That" , the search for Adafruit-> Send Data to Adafruit IO, You will then be taken to the feed page, where you will see the feeds we already created for adafruit IO. Select the first one, Data to save write :1, this means when you say "Bedroom lights on, it will send to adafruit a value of 1".
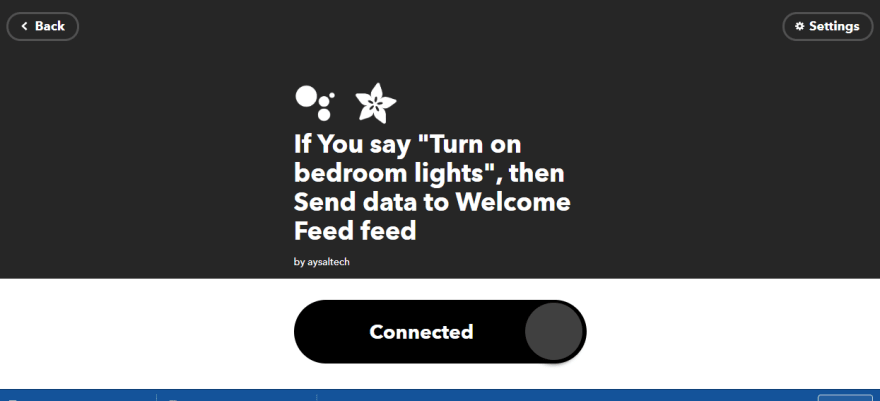
We will repeat the same process, for the off to send a value of 0.Tap on your account avartar, hit "Create", Repeat the same process, but this time with reverse of the previous commands. Select the same relay (Relay1) but this time the data to send it 0, for off.
Do this process for Relay2,3 and 4 Respectively attaching any action that you wish. When you click on my appelets, you should have something close to this:

This was a hectic trivial one!!, if you made it ...Congratulations!!!

Step 3
Once we have setup those, the rest will be a walk in the park.
Open up your arduino IDE, download the Afafruit Library for Adruino Here.
Step 4
Create an empty arduino Project and Write/Paste the following code.
//Aysal Tech
// https://play.google.com/store/apps/details?id=dev.bensalcie.portfolio&hl=en
//Google Assistant Home Automation
#include <ESP8266WiFi.h>
#include "Adafruit_MQTT.h"
#include "Adafruit_MQTT_Client.h"

#define Relay1            D1
#define Relay2            D2
#define Relay3            D3
#define Relay4            D4

#define WLAN_SSID       "bensalcie"             // Your SSID
#define WLAN_PASS       "password"        // Your password

/************************* Adafruit.io Setup *********************************/

#define AIO_SERVER      "io.adafruit.com" //Adafruit Server
#define AIO_SERVERPORT  1883
#define AIO_USERNAME    "xxxxxx"            // Username
#define AIO_KEY         "xxxxxx"   // Auth Key

//WIFI CLIENT
WiFiClient client;

Adafruit_MQTT_Client mqtt(&client, AIO_SERVER, AIO_SERVERPORT, AIO_USERNAME, AIO_KEY);

Adafruit_MQTT_Subscribe Light1 = Adafruit_MQTT_Subscribe(&mqtt, AIO_USERNAME"/feeds/Relay1"); // Feeds name should be same everywhere
Adafruit_MQTT_Subscribe Light2 = Adafruit_MQTT_Subscribe(&mqtt, AIO_USERNAME "/feeds/Relay2");
Adafruit_MQTT_Subscribe Light3 = Adafruit_MQTT_Subscribe(&mqtt, AIO_USERNAME "/feeds/Relay3");
Adafruit_MQTT_Subscribe Light4 = Adafruit_MQTT_Subscribe(&mqtt, AIO_USERNAME "/feeds/Relay4");

void MQTT_connect();

void setup() {
  Serial.begin(115200);

  pinMode(Relay1, OUTPUT);
  pinMode(Relay2, OUTPUT);
  pinMode(Relay3, OUTPUT);
  pinMode(Relay4, OUTPUT);

  // Connect to WiFi access point.
  Serial.println(); Serial.println();
  Serial.print("Connecting to ");
  Serial.println(WLAN_SSID);

  WiFi.begin(WLAN_SSID, WLAN_PASS);
  while (WiFi.status() != WL_CONNECTED) {
    delay(500);
    Serial.print(".");
  }
  Serial.println();

  Serial.println("WiFi connected");
  Serial.println("IP address: ");
  Serial.println(WiFi.localIP());

  mqtt.subscribe(&Light1);
  mqtt.subscribe(&Light3);
  mqtt.subscribe(&Light2);
  mqtt.subscribe(&Light4);
}

void loop() {

  MQTT_connect();


  Adafruit_MQTT_Subscribe *subscription;
  while ((subscription = mqtt.readSubscription(20000))) {
    if (subscription == &Light1) {
      Serial.print(F("Got: "));
      Serial.println((char *)Light1.lastread);
      int Light1_State = atoi((char *)Light1.lastread);
      digitalWrite(Relay1, Light1_State);

    }
    if (subscription == &Light2) {
      Serial.print(F("Got: "));
      Serial.println((char *)Light2.lastread);
      int Light2_State = atoi((char *)Light2.lastread);
      digitalWrite(Relay2, Light2_State);
    }
    if (subscription == &Light3) {
      Serial.print(F("Got: "));
      Serial.println((char *)Light3.lastread);
      int Light3_State = atoi((char *)Light3.lastread);
      digitalWrite(Relay3, Light3_State);
    }
    if (subscription == &Light4) {
      Serial.print(F("Got: "));
      Serial.println((char *)Light4.lastread);
      int Light4_State = atoi((char *)Light4.lastread);
      digitalWrite(Relay4, Light4_State);

    }
  }


}

void MQTT_connect() {
  int8_t ret;

  if (mqtt.connected()) {
    return;
  }

  Serial.print("Connecting to MQTT... ");

  uint8_t retries = 3;

  while ((ret = mqtt.connect()) != 0) {
    Serial.println(mqtt.connectErrorString(ret));
    Serial.println("Retrying MQTT connection in 5 seconds...");
    mqtt.disconnect();
    delay(5000);
    retries--;
    if (retries == 0) {
      while (1);
    }
  }
  Serial.println("MQTT Connected!");

}
As you can see in the code, you will need to provide parameters such as your Wifi name and password, please write them accordingly.
On the Adafruit Key and User name, you can find them on your Adafruit IO dashboard when you click "Adafruit IO Key"
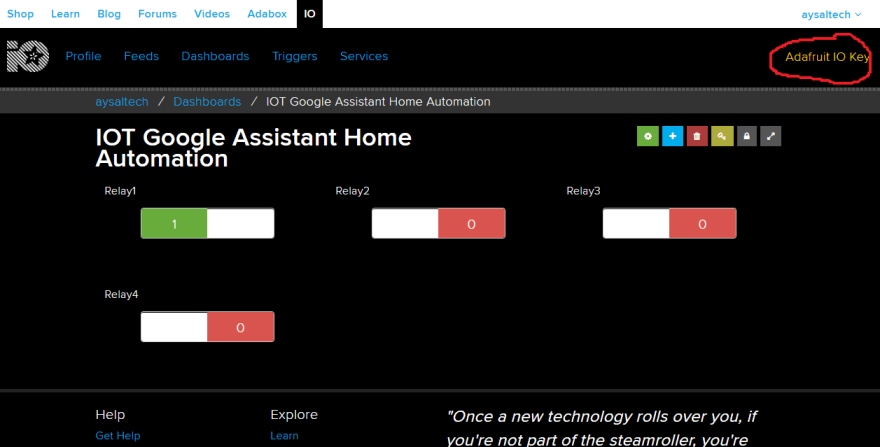
What the code does, is to listen any form of communication between your assistant and Adafruit IO, the response is then sent to our Micro controller inform on 1/0 this is the language that micro- controller will understand.
I hope up to here you went success as well.
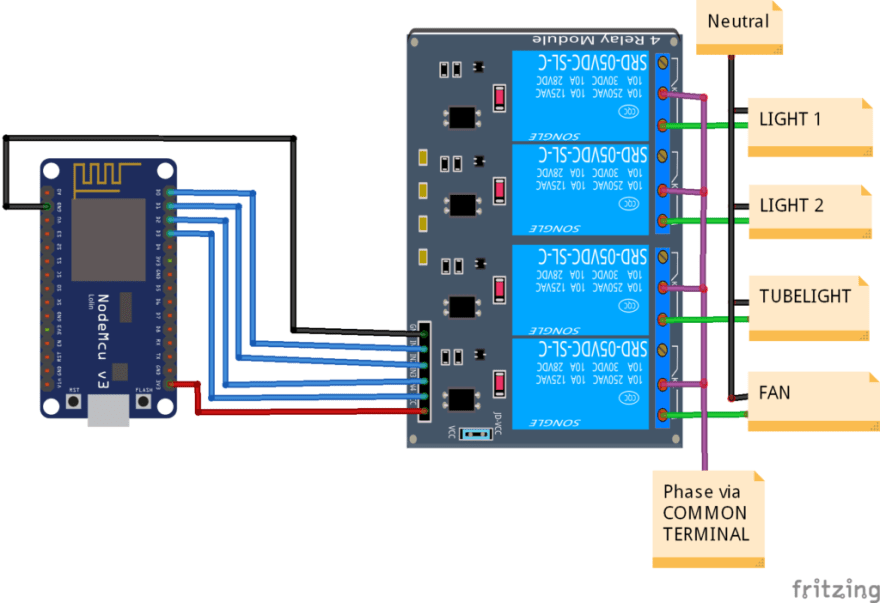
Step 4 (Wiring and Circuitry)
We will be using D0-D4 of our nodemcu and they will be connected to our 4-Channel Relay.
Finally
Power Your node mcu with any phone charger, (5V 3A) or using your pc. Connect to your wifi Using the same username and password as in the code. Make sure to select the same email you used in the Adafruit and IFTT on your phone voice assistant.
You can now test and implementing your voice commands, for my case when i say "Bedroom Lights on", it will trigger my relay right away.

That's the end of our tutorial, i hope you enjoyed it.


Top comments (0)