So... Catalyst, huh? The ultimate promise that a click on a checkbox and minimal effort will bring your iPad app to the Mac. If you have ever tried porting an app with this technology, you surely know by now that it is unfortunately not that simple. But, hey, in the end you finally managed to port your app, in all its glory, to the Mac. You've got all, or most of your features, you revamped some controllers, you have it all under control. Catalyst is great, long live Catalyst.
There is one thing that Catalyst won't do for you, though: menus. In order for your Catalyst app to feel right at home on the Mac, a well thought-out menu can really add to the experience. And, oddly enough, there are not that many resources on the subject. There are some, of course, but they really just scratch the surface. That article will not be the universal answer on the matter, but my hope is that it will help you a little bit more than what is currently out there. With that in mind, let's get started, shall we?
The Menu Bar
Throughout the numerous iterations of Mac OS (or macOS as of 2020), the Menu Bar has seen slight graphical evolutions, but at its core, its mission always remained the same: to provide easy access to features of your application. Often, the Menu Bar is actually the only way to even access those features!

Mac OS 9.1 (Fortissimo) - 1999

Mac OS X 10.4 (Tiger) - 2005

macOS 10.15 (Catalina) – 2019
First, a little terminology. In this article, we will mainly make use of three UIKit classes: UIMenu, UIKeyCommand, and UICommand. Although they all inherit from the same UIMenuElement class, they don’t have the same role:
-
UIMenuis a container. Its job is to contain and regroup commands or other menus, called children. From now on, the terms menu and submenu will refer to an instance ofUIMenu. -
UIKeyCommandandUICommanditems are found within a menu. The main difference between aUIKeyCommandand aUICommandis the former’s ability to be associated with a keyboard shortcut. That said, they will perform the same, and as such they will simply be referred to as commands, when there is no need to differentiate.
Menu composition
Let’s take a look at the Edit menu from the TextEdit app.

TextEdit's Edit menu
There is quite a lot of stuff in there. Let’s deconstruct this menu so we have a better idea of how it was made.
First, we have an Edit menu item in the Menu Bar.

Edit menu main structure
As previously stated, this Edit menu is merely a container. It only contains what appears to be commands and submenus.
If we delve a bit deeper, we can see that these commands are actually all contained within submenus. That’s right, each group of commands you see, separated by dividers, is actually another menu within the menu.

Edit menu detailed structure
As we can see here, the Edit menu is composed of five submenus:
- The first submenu contains two commands:
- Both are
UIKeyCommands, shown by the keyboard shortcuts
- Both are
- The second submenu contains seven commands:
- One of them is a
UICommand, as there is no keyboard shortcut associated with it
- One of them is a
- The third one is interesting:
- Its children are a mixture of one menu and two commands
- The fourth one contains menus only
- And the fifth one contains commands only
If we go even deeper, we can observe that the Insert submenu contains three commands.
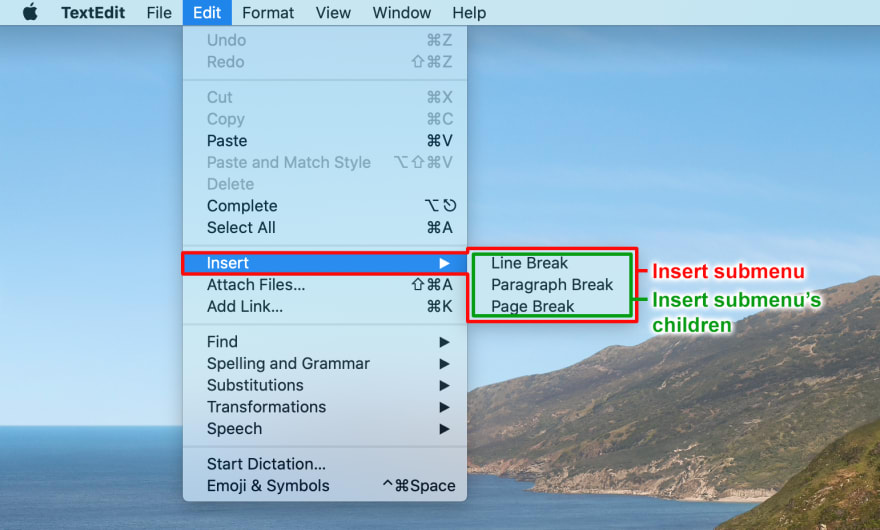
Insert menu main structure
By now, you may be wondering: how come some submenus, such as the Undo Redo menu, display their commands as is, while others, such as the Insert menu, group their commands one level deeper?
This is all by design. A menu can be displayed either inline (Undo Redo), or as its own entity (Insert). This behavior is set by a property when creating the menu.
Now that we have a good idea of what is a menu and how commands and submenus fit into it, let’s see how to make our own!
Creating a menu in Storyboard – easy, but limited
Using the main storyboard of our app is the fastest and easiest way to have a simple menu up and running.
The first thing we need to do is to drag a Main Menu component in our storyboard. This will result in a standard Menu Bar showing alongside our controllers.

Main menu componant in component picker
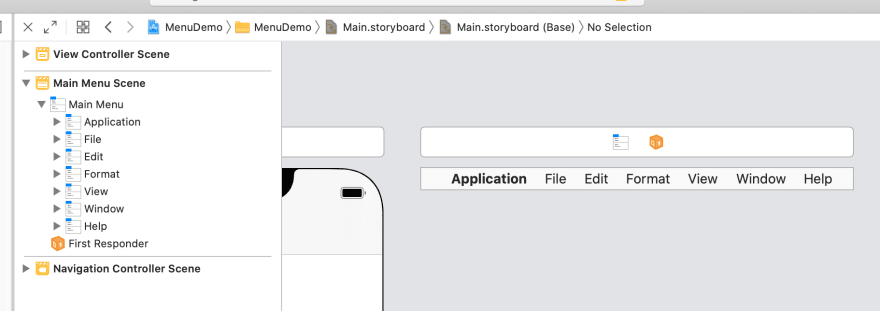
Main menu componant in Interface Builder
From there, we can add any Menu Command, Sub Menu and / or Inline Section Menu, until we get the Menu Bar that fits our needs.
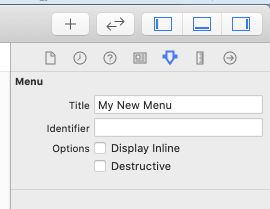
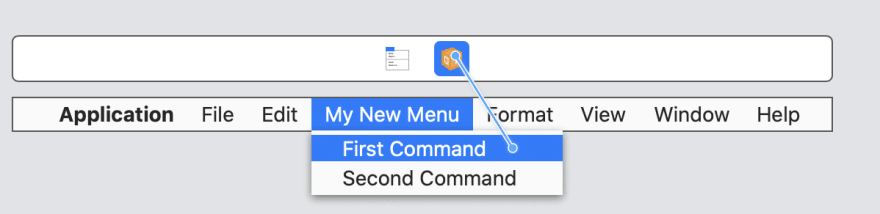
In this example, I’ve added a new Sub Menu, conveniently named My New Menu, as well as two Menu Commands: First Command and Second Command. To rename them, we can double-click the current values and replace them, or use the Inspector.
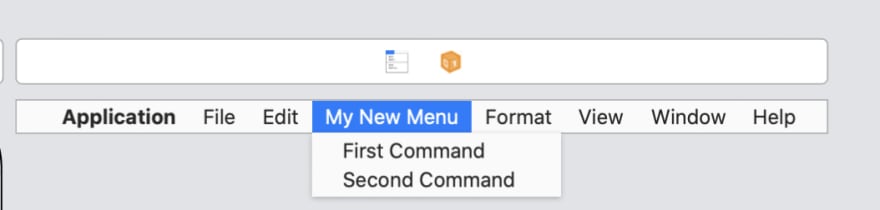
Our first menu

Attributes inspector for a menu
Attributes inspector for a command
The next step would be, naturally, to have actions linked to those commands. Those exist through @IBActions. In that way, it's not very different from a UIButton’s behaviour.
@IBAction func firstCommandAction(_ sender: Any) {
    // Do something
}

@IBAction func secondCommandAction(_ sender: Any) {
    // Do something
}
Connecting those @IBActions to our commands is really simple, as it usually is with Interface Builder: we right-click a command and drag the connecting line to the First Responder, just above it. Our actions will be presented among others (and there might be quite a lot of them here).
Linking our menu to the first responder

Selecting the action to link against
⚠️ If our command is not connected to any action, it will stay greyed out when our app is launched.
Next, we will add keyboard shortcuts to those commands. This is easily done by double-clicking on the area at the right of the command’s title, or in the Inspector.
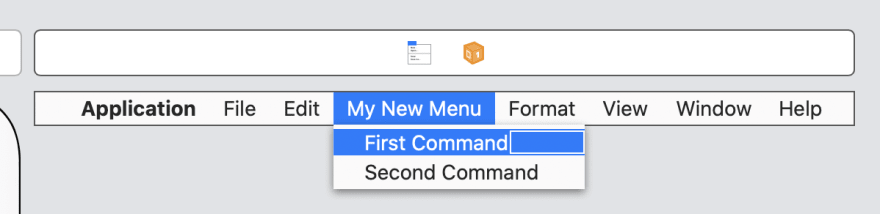
Selecting the keyboard shortcut area

Setting the keyboard shortcut
⚠️ Please note that our app will crash if we try to “steal” an already attributed keyboard shortcut, such as ⌘C
If we take a closer look at the Inspector, we find a bunch of options, which differ for menus and commands.
I won’t go into much detail here, as those will be covered in the next chapter.
If we want to alter a command at runtime (change its name, check it, grey it out, etc.), we will need to override UIResponder’s validate(:_) method in the same class our @IBAction is defined in. This will also be covered later.
Well, that was easy! Still, this way of implementing menus and commands has a very serious limitation: it is static. Once we have created our menus and commands, this is it. It cannot be changed at runtime.
You might wonder why someone would want to change a list of menus and commands at runtime. It does not seem very obvious why they would want a dynamic list of menus, or commands. And yet, from your browser, right now (if you are on a computer browser), click on the History menu. This menu does need to be dynamic. It needs to be able to show you, at any time, the latest websites you have visited. This cannot be predetermined. This is one of the reasons a dynamic menu might be needed.
Creating menus in code - harder, (better?) faster, stronger
Creating menus and commands programmatically is the alternative to creating them in storyboards (who knew!). This gives us much more control, but is also more difficult. That can lead to a lot of trial and error, since there are many things that can prevent our menus from working as expected.
Our entry point will be UIReponder’s buildMenu(with:) method. It will provide us with the UIMenuBuilder needed to build our menu.
First things first, let’s override this method in our AppDelagate.
 override func buildMenu(with builder: UIMenuBuilder) {

 }
This article focuses on the Menu Bar, also known as the main system menu, so we will make sure to only use the main menu’s builder (as opposed to contextual menus).
if builder.system == .main {

}
From here, the builder object is what will allow us to manipulate the Menu Bar, remove existing menus, add new ones, etc.
For more information on the UIMenuBuilder protocol, please have a look at the Apple documentation.
We will focus our attention on a limited number of the methods exposed by this class, as this is enough to get a good grasp of its usage.
remove(menu:)
This one is pretty straightforward. The default Menu Bar provided with every application surely contains menus which are useless to us.
Each menu is usually associated with a unique identifier, which will be used as a parameter to tell Xcode precisely which menu to remove.
Remember our Edit menu, which is itself composed of several other submenus?
Edit menu detailed structure
We can remove what we called submenu 1 on this capture, leaving all the other menus intact, thanks to this code:
builder.remove(menu: .undoRedo)

The Undo Redo submenu is removed
We can also remove the whole Edit menu:
builder.remove(menu: .edit)

The Edit menu is removed
⚠️ This method cannot be used to remove individual commands.
insertSibling(_:beforeMenu:) | insertSibling(_:afterMenu:)
If used with a top-level menu (such as the Edit menu in this example), these methods will allow us to create new top-level menus.
let menu1 = UIMenu(title: "Menu 1")

builder.insertSibling(menu1,
                      afterMenu: .edit)

The new Menu 1 menu has been inserted as a top-level sibling
If used with a submenu (such as the Undo Redo submenu in this example), this will create a new submenu entry, with dividers.
let menu1 = UIMenu(title: "Menu 1")

builder.insertSibling(menu1,
                      afterMenu: .undoRedo)

The new Menu 1 menu has been inserted as a submenu sibling
insertChild(_:atStartOfMenu:) | insertChild(_:atEndOfMenu:)
If insertChild(_:atStartOfMenu:) is used with a top-level menu, it will have the same effect as using insertSibling(_:beforeMenu:) with the first submenu.
If used with a submenu, this will add our menu as if it was part of that submenu, without any divider.
let menu1 = UIMenu(title: "Menu 1")

builder.insertChild(menu1,
                    atEndOfMenu: .undoRedo)

The new Menu 1 menu has been inserted as a submenu child
So, as the name suggests, insertSibling will add a new menu with the same hierarchy level as the reference menu.
insertChild, on the other hand, will add a new menu with a lower hierarchy level than the reference menu.
Instantiating a UIMenu
As seen in the previous examples, the UIMenu class is used to create the object that represents our menu.
UIMenu(title: String,
       image: UIImage?,
       identifier: UIMenu.Identifier?,
       options: UIMenu.Options,
       children: [UIMenuElement])
Let’s have a look at all those properties:
-
title: the title of our menu -
image: an image to be set to the left of the menu’s title (15x15 ideally, but can be bigger)- In my testing, this parameter had no effect whatsoever. I reckon this feature is broken in the current version of Catalyst
-
identifier: a unique identifier for our menu. While this parameter is not mandatory, it will be essential if / when you need to reference the menu when inserting siblings or children. It can be ignored if you don’t intend to reference it ever- If this parameter is set, it must be absolutely unique within your application. Failing to meet this requirement will result in a menu no showing
-
options: defines how our menu appears (option set)-
[]will either be used for a top-level menu, as well as a dropdown submenu, as shown in the example above (Menu 1 menu) -
.displayInlinewill hide the menu title and directly expose its children, as shown in the example above (Undo Redo menu) -
.destructivewill change the menu’s appearance to represent a destructive action- In my testing, this value had no effect whatsoever. I reckon this feature is broken in the current version of Catalyst
-
-
children: the list of commands and / or menus to be displayed by the menu we are defining
Most of these parameters have default values, so we don’t need to define them if we don’t use them.
For example, the image parameter being rarely used (or never as long as it doesn’t work), we can use
:
UIMenu(title: String,
       identifier: UIMenu.Identifier?,
       options: UIMenu.Options,
       children: [UIMenuElement])
or even
UIMenu(title: String,
       children: [UIMenuElement])
For more information on the UIMenu class, please have a look at the Apple documentation.
⚠️ Tips and watch points
- As stated before, a menu is merely a container for a list of commands and / or submenus. That said, if you intend to create a top-level menu, I would advise not to directly add commands as children, but rather create inline submenus for those commands. This will make it easier later on if you ever need to add more children or siblings, as you will have a reference to those submenus
- An identifier, if defined, has to be unique. If this requirement is not met, the menu will not display
- If your menu is displayed inline, the title value will be unused
Instantiating a command
As we have said before, there will be two kinds of commands for us to study: UIKeyCommand and UICommand.
With a keyboard shortcut
Let’s start with the former.
UIKeyCommand(title: String,
             image: UIImage?,
             action: Selector,
             input: String,
             modifierFlags: UIKeyModifierFlags,
             propertyList: Any?,
             alternates: [UICommandAlternate],
             discoverabilityTitle: String?,
             attributes: UIMenuElement.Attributes,
             state: UIMenuElement.State)
As for UIMenu, let’s explain what we have here.
-
title: the title of our command -
image: an image to be set to the left of the command’s title (15x15 ideally, but can be bigger)- Unlike
UIMenu’s image, this one works as intended. You are not limited in the size of the image, but any image larger than 15x15 will change the command’s height accordingly
- Unlike
-
action: represents the method that should be called upon selection- This method needs to accept parameters if several commands call the same action
-
input: a string representing the keyboard key defining the keyboard shorcut- Some values exist for special keys (including, but not limited to: arrow keys, escape key, function keys, etc.). These may be used as such:
UIKeyCommand.inputDownArrow
- Some values exist for special keys (including, but not limited to: arrow keys, escape key, function keys, etc.). These may be used as such:
-
modifierFlags: the special keys that will need to be pressed for the command to execute (option set)- Including, but not limited to: command, alternate, control, shift, etc.
-
propertyList: an object that contains data to associate with the key command- This is useful when several commands use the same selector, to establish the one from which the call originated from
-
alternates: defines alternate behaviours (option set)- The same input will be used, but different modifier flags, title and selector will be defined
- An example can be found in the Apple Menu: About this Mac is turned into System Information… when holding the option key
-
discoverabilityTitle: not used on Mac- This is actually used on iPad to display a string in a cheat sheet in the middle of the screen, when holding down the command key
- A really nice article can be found here if you are interested in the subject
-
Attributes: defines whether a command is disabled, destructive, hidden, or any combination of the above (option set)-
.disabledwill grey the command out -
.hiddenwill hide the command -
.destructivewill display the command in a more prominent style, such as with red text- In my testing, this value had no effect whatsoever. I reckon this feature is broken in the current version of Catalyst.
-
-
State: adds a symbol to the left of the command’s title (enum)-
.offdisplays nothing -
.mixeddisplays a hyphen -
.ondisplays a checkmark
-
As for UIMenu, most of these parameters have a default value, so we don’t need all of them every time we want to create a command.
UIKeyCommand(title: String,
             action: Selector,
             input: String,
             modifierFlags: UIKeyModifierFlags)
is perfectly acceptable.
For more information on the UIKeyCommand class, please have a look at the Apple documentation.
Without a keyboard shortcut
If we don’t intend to use any input and modifier flags, we will need to use UICommand instead.
UICommand(title: String,
          image: UIImage?,
          action: Selector,
          propertyList: Any?,
          alternates: [UICommandAlternate],
          discoverabilityTitle: String?,
          attributes: UIMenuElement.Attributes,
          state: UIMenuElement.State)
Except for the previously stated input and modifierFlags, all parameters are exactly the same as for UIKeyCommand.
⚠️ Tips and watch points
- Each command must be absolutely unique
- If we reuse the same input for several commands, our app will crash
- If we use the same selector for several commands, we must make absolutely sure our property list’s content is different for each command, otherwise our app will either crash or won’t show our commands
propertyListcan only contain plist-safe types (String,Number,Date,Data,Boolean,Array, andDictionary). Other types might lead to a crash- In the sample code I will distribute below, all of the selector’s methods are defined in the AppDelegate. These methods can be defined in other classes, but I encountered some issues while testing. I would advise to keep all of those methods in the AppDelegate to guarantee success, but feel free to experiment.
- If your attributes and / or state properties are subject to change as the user uses your app, don’t bother giving them an initial value
- The
.hiddenattribute is not enough to prevent a command from being used – it can still be used ifinputandmodifierFlagsare defined. If you want to hide a command and prevent it from being used, you should also use the.disabledattribute
Again, it may sound redundant, but unicity is the key here. If there is an issue with a command not showing, there is a great probability that unicity is the issue.
Here is what instantiating a command might look like:
let command = UIKeyCommand(title: "Search",
                           action: #selector(search),
                           input: "F",
                           modifierFlags: .command)

@objc func search() {
    // Do something
}
Or, with a selector shared between multiple commands:
let command = UIKeyCommand(title: "Open \(segmentedControl.titleForSegment(at: 0)!)",
                           action: #selector(open(_:)),
                           input: "0",
                           modifierFlags: .command,
                           propertyList: ["segmentIndex": 0])

@objc func open(_ sender: AnyObject) {
    guard let command = sender as? UICommand,
        let propertyList = command.propertyList as? [String: Int],
        let segmentIndex = propertyList["segmentIndex"] else {
            return
    }

    // Do something
}
Updating commands with validate(:_)
Now that we have the tools to build menus, submenus, and commands, let's see how we can update them.
At times, we might need to disable a command. On some instances, we might need to check, or uncheck a command, or even change its title or image. This is accomplished with the UIResponder’s validate(:_) method.
The validate(:_) method is called whenever a command is about to be shown on screen.
Based on the two commands we created before, here is what it would look like.
override func validate(_ command: UICommand) {
    switch command.action {
    case #selector(search):
        if UIViewController.current is LoginViewController {
            command.attributes = .disabled
        } else {
            command.attributes = []
        }
    default:
        break
    }
}
This is where we should determine whether our command must be enabled, checked, hidden, etc.
For more information on the validate(:_) method, please have a look at the Apple documentation.
Changing a menu’s composition contextually
We do have the possibility to change a menu’s composition after our app has been launched, if needed. We addressed such a case earlier with the browser’s History menu example.
Whenever we need our menu to be rebuilt, we can just call UIMenuSystem.main.setNeedsRebuild().
This will trigger the buildMenu(with:) method to be called again. Then, whatever condition we may have set to allow (or not) the creation of menus and commands will be evaluated again and allow us to have the menu we need at any time.
Sample code
Apple has a sample code available. It does not cover as much as this article does, but I did use it as a reference. My own sample code is available on Github, and covers everything I wrote about, save for the Storyboard section.
Feel free to ask any question that you may still have.

Top comments (0)