
Context
Last week, the Ghost instance I'm using started behaving inappropriately. I was unable to upload new images and after a while, I completely lost access to the website due to a 504 Gateway Timeout... 😭
Since I use Ghost only as a backend (I am building my website with Eleventy), I didn't panicked as I could simply recreate every post from the static version. It would take a little while, but it is possible. ⏱️
Unfortunately, there is a catch: the unpublished posts (drafts or scheduled) are not generated. The Ghost Content API doesn't return them, so I was a little worried about them, as I usually keep 3 or 4 posts ready to publish. So if the website didn't come back, I would lose them for good... 😟
Fortunately, I went to bed and the next day, the site was back. Phew! 😌
I quickly export my content to save it, but the whole incident got me thinking... Maybe it's time that I completely own my Ghost instance by self-hosting it. 🦚
Guide
This guide is complementary to the official Ghost documentation: How to migrate data from Ghost to Ghost and Imports and exports in Ghost: Access your content and data - FAQ.
Prerequisites
For the following guide, I assume that:
- you have a version of Node.js that supports top-level await (like 16.1.0)
- you have already configured a new Ghost instance
- you are an owner of your Ghost instances
- you have direct access, via SSH, to the hosting server of your new Ghost instance
First step – Download the data
If you are an owner of your Ghost instance, you should have access to the " Labs" menu, where you can find a button to export your bloc content. Click on it and voila, you have a JSON file with your entire site. 🤗
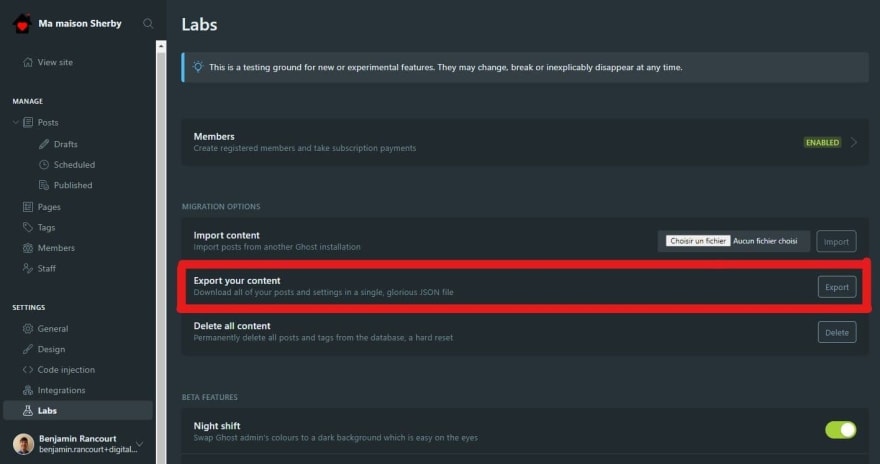
If your are on the latest Ghost version (currently 4.5), the Labs options menu is no longer in the main menu, it is now hidden in the Settings (⚙️) option menu!
Unfortunately, the button exports only the data, the images are not yet exported... And if the images have been inserted into the data as absolute URLs (with https://), you will also have to edit them also if you want to delete your previous Ghost instance... 🥴
Since the images are public, you could download them directly from the Web and while your are, change their URL from absolute to relative (like /content/images). 😉
Second step – Download the images
If you look into the data of your export file, you may see that your images are hosted on another server like I did. In my case, all images were served under https://digitalpress.fra1.cdn.digitaloceanspaces.com/rec0035/.
To find all the URLs of the images, I created the following Node.js script that extracts them and downloads them to my computer.
import escapeStringRegExp from 'escape-string-regexp'
import fetch from 'node-fetch';
import fs from 'fs/promises';
import path from 'path'

// Configuration
const oldServerURL = "https://digitalpress.fra1.cdn.digitaloceanspaces.com/rec0035/"
const newServerURL = '/content/images/'
const oldGhostContentFile = 'ma-maison-sherby.ghost.2021-05-15-17-33-42.json'
const newGhostContentFile = oldGhostContentFile.replace('.json', '-output.json')
const imageDirectory = 'images/'

// Regexes
const filenameRegex = /(.*?\.(?:avif|ico|gif|jpe?g|png))/
const serverURLRegex = new RegExp(escapeStringRegExp(oldServerURL), 'gi')
const imageRegex = new RegExp(serverURLRegex.source + filenameRegex.source, 'gi')

// Utility functions
const stringify = object => JSON.stringify(object)
const parse = object => JSON.parse(object)
const returnBoolean = bool => () => bool

// Utility filesystem functions
const fileExists = async filePath => await fs.access(filePath, fs.F_OK)
.then(returnBoolean(true))
.catch(returnBoolean(false))

console.log(`Loading the Ghost content into memory...`)
const content = await fs.readFile(oldGhostContentFile, 'utf8')

const extractInformationsFromImageMatch = match => ({
  absoluteURL: match[0],
  directory: imageDirectory + path.dirname(match[1]),
  fileName: path.basename(match[1]),
  filePath: imageDirectory + match[1],
})

console.log(`Finding all unique images...`)
let images = [...content.matchAll(imageRegex)].map(extractInformationsFromImageMatch);
images = new Set(images.map(stringify))
images = Array.from(images).map(parse)

console.log(`${images.length} images found!`)

// Download an image inside a match object
const download = async (matchObject) => {
  // Check if we have already download the image on our disk
  const skipDownload = await fileExists(matchObject.filePath)
  if (skipDownload) {
    return
  }

  console.log(`Downloading ${matchObject.filePath}...`)

  // Download the image
  const response = await fetch(matchObject.absoluteURL);

  // Check if everything is ok
  if (!response.ok) {
    throw new Error(`Unexpected response ${response.statusText}`);
  }

  // Transform the response to buffer
  const buffer = await response.buffer();

  // Make sure the directory of the file exists and create it otherwise
  await fs.mkdir(matchObject.directory, {recursive: true})

  // Write the image on disk
  await fs.writeFile(matchObject.filePath, buffer)

  console.log(`Download finished for ${matchObject.filePath}!`)
}

console.log(`Downloading all images found...`)
for (let i = 0; i < images.length; ++i) {
  await download(images[i])
}

// Replace all occurrences of the old server to the new one
const newContent = content.replaceAll(serverURLRegex, newServerURL)

// Write the output inside a new file that can be imported
await fs.writeFile(newGhostContentFile, newContent)
download.mjs file, to download all images and create a new JSON file.{
"dependencies": {
"escape-string-regexp": "^5.0.0",
"node-fetch": "^2.6.1"
}
}
package.json file, with only two dependencies.After adjusting the four configuration variables at the top of the file, you can simply run the script with the node download.mjs command and the images should normally be downloaded into the images folder.
If you've read my script carefully , you might also have seen that my script creates a new file with almost the same content as the exported data, but with relative image URLs. 😮
Third step – Upload the images
Rest assured, this step is less complicated than the previous one. 😅
In my case, because I had direct access to the server of my new Ghost instance, I was able to upload the images at the correct location over an SSH connection with the following command:
scp -r images IP_ADDRESS:/var/opt/ghost/mamaisonsherby
scp (secure copy) to upload all the content under the images directory to my remote server.Final step – Import the content
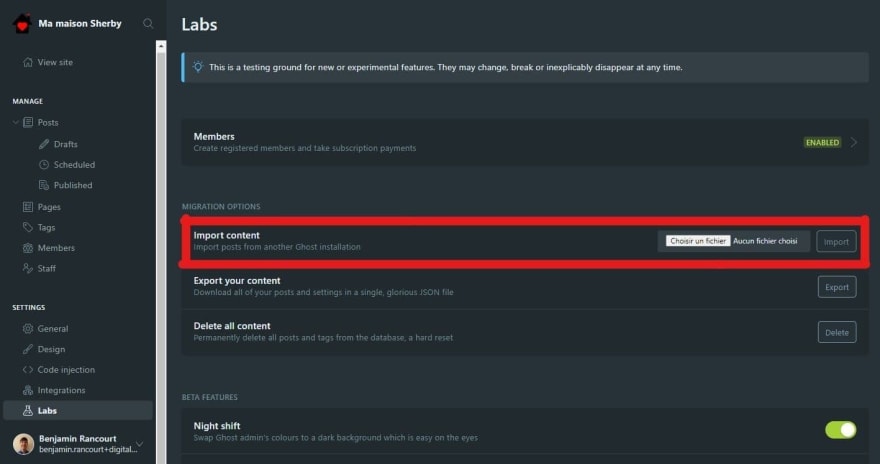
We can now import the new content file produced in step 2 with in Import content button in Settings → Labs.
If you have any issue, you can always click on the Delete button just below Export button to restart the procedure and correct your data. The button will delete all posts and tags. 😈
If everything was successful, you should see a confirmation message like below. In my case, there were a few warnings but they were only minor.

Verification step
What? There is another step? Yep, this is only optional if you don't care about the end results. So maybe, it is mandatory in that case... 🤔
I recommend you that you check all of your webpages (posts, tags, authors and pages), to see if an image is missing.
And, as always, you can also update the global CSS of your site (Settings → Code injection → Site header) to visually mark images that need more attention.
img[src*="digitaloceanspaces"] {
  border: 5px dashed darkred;
}
Conclusion
It's not every day that you move your Ghost instance, but the next time you need it, the path will have been cleared. 🌾


Top comments (0)