In today's digital age, data has become one of the most valuable assets for businesses. Losing data due to disasters, human error, or cyber-attacks can result in severe consequences, including financial loss and damage to reputation. Therefore, having a robust backup and recovery strategy is critical to ensure business continuity.
Amazon Web Services (AWS) offers a backup solution called AWS Backup, which provides a centralized way to manage backups across multiple AWS services and accounts. AWS Backup allows businesses to create, automate, and manage backups of their data, applications, and resources in a cost-effective and scalable way.
One of the essential features of cross-account backups allows businesses to copy backups to a different AWS account. This feature is particularly useful for businesses that have multiple AWS accounts for various departments or projects. With cross-account backups, businesses can centralize their backup management and easily restore data from different accounts.
Overall, AWS Backup provides a secure and efficient backup solution for businesses of all sizes. The cross-region and cross-account backup features add an extra layer of resilience and flexibility to the backup strategy, making it an essential tool for businesses that prioritize data protection and business continuity.
Architecture: Cross-Region and cross-account backup (CRAB)
In my case, I am using two different AWS accounts and two different zones for the same organization. To ensure data protection, high availability, and efficient management, I have implemented a multi-account architecture that utilizes AWS Organizations and AWS Backup.

For DynamoDB tables we added a tag (key/value):
{
    key: “daily-backup”,
    value: “enable”
}
For more information;
https://docs.aws.amazon.com/amazondynamodb/latest/APIReference/API_TagResource.html
https://docs.aws.amazon.com/amazondynamodb/latest/developerguide/Tagging.html
Prerequisites
Management Account in AWS Organization
We need two different accounts belonging to the same organization.
One of them is for the source account, and the other is for the target account.”
Step 1: Enable cross-account backup in the management account
In the AWS Management Console, select AWS Backup.
in both accounts, source, and destination accounts, select Settings, and under Cross-account management, ensure that you have enabled Cross-account backup. Backup policies and Cross-account monitoring are not needed for just the backup process.

Step 2: Step 2: Service opt-in for Amazon DynamoDB
From the same page, under Service opt-in, ensure that you have enabled DynamoDB. If it is not enabled, you can enable it by selecting Configure resources.

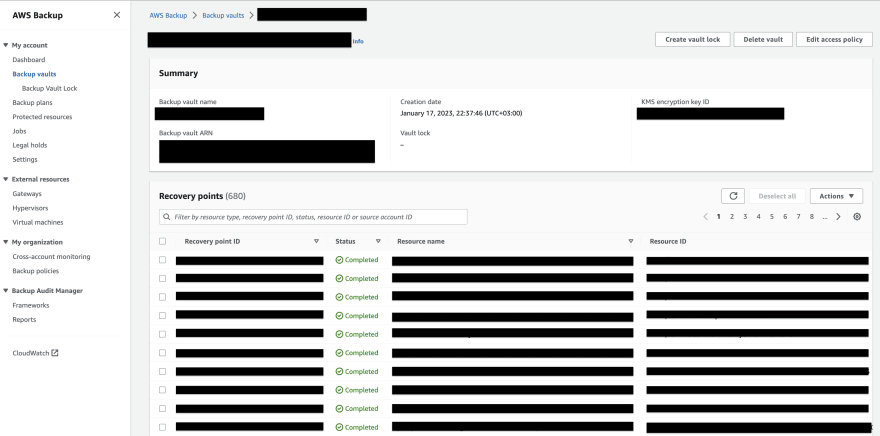
Step 3: Create a vault in the destination account
In the AWS Management Console, select AWS Backup. Select Backup vaults and Create backup vault

We can easily choose a name for the backup vault here. Afterward, we can select the (default aws/backup) for the Encryption key.

After creating the backup vault, in the vault we created, you will see the access policy below it. From there, we select 'Allow account level access to a Backup vault'.

After selecting, we enter the source account ID number here and click 'Save'.

Step 4: Create a source vault in the source account
In the AWS Management Console, select AWS Backup. Select Backup vaults and Create backup vault

We can easily choose a name for the backup vault here. Afterward, we can select the (default aws/backup) for the Encryption key.

After creating the backup vault, in the vault we created, you will see the access policy below it. From there, we select 'Allow account level access to a Backup vault'.

After selecting, we enter the destination account ID number here and click 'Save'.

Step 5: Create a backup plan in the source account
In the AWS Backup console, select Backup plans, and select Create a Backup plan.

We have three options here, and we will choose to Build a new plan.
Backup plan name: daily-backup-plan

Then in the Backup rule configuration section;
Backup rule name: daily
Backup vault: source-backup-rule
Backup frequency: Daily
Backup windows means, it's gonna run every day at 5 AM UTC

For Copy to destination, select the region for the destination account. Enable the Copy to another account’s vault and provide the External vault ARN. You can find out that ARN from the destination account → select created vault → Backup vault ARN.
In the Advanced settings, keep the default for Transition to cold storage. In the Retention period section, select Days and enter “2” – or any number of days you desire.
Select Allow, allowing for backup vault access in the destination account.

After creating the plan, we can select Assign Resources.

Our plan is to create a tag-based backup, so we are adding daily-backup equals to enable

That's all we need to do. After the backup is completed, you can see it in the destination account.
I hope what I have explained here will be sufficient for you. If there is anything that you are unsure of, please do not hesitate to ask.

Top comments (0)