
Kafka is often used to aggregate massive amounts of log data and stream it to analytics engines and big data repositories. In a scenario of processing large amount of collected data, the analysis may result in actionable events that need to be delivered to specific destinations. Using only Kafka, it’s hard to achieve scalable, targeted distribution to many individual consumers. For more information on this, I will refer you to part 2 of Ken Barr’s “Why You Need to Look Beyond Kafka for Operational Use Cases” series.
Especially in IoT, consumers and the network infrastructure may not have the throughput and processing capability of picking out relevant events from a stream, so delivery must be filtered and targeted for efficiency. A good example is the case of collecting and analyzing real-time vehicle mechanical IoT data from a fleet of city buses and reacting to results by delivering commands back to individual buses.
The Solace PubSub+ Platform inherently helps to overcome this limitation. The goal of this blog is to present a practical solution and to demonstrate how to integrate the Kafka platform with the PubSub+ event mesh (a network of PubSub+ event brokers) using the PubSub+ Connector for Kafka: Sink.
In the solution, one will notice that Kafka topics are coarse-grained and cannot be used to address individual vehicles, but PubSub+ allows fine-grained filtering because topics aren’t actually configured on the broker – they are defined by the publishing application. PubSub+ topics can be thought of as a property of a message, or metadata, and not like “writing to a file” or “sending to a destination.” Each and every message could be published with a unique topic. For more information on Solace topics vs. Kafka topics, read this blog post.
The Solace PubSub+ Kafka Source Connector and PubSub+ Kafka Sink Connector provide easy integration between events to/from the PubSub+ event mesh and Kafka records.
Customizing the Data Conversion Code in “Processors”
As the Kafka Connector Developer Guide suggests, PubSub+ event messages must be modeled as a partitioned stream to Kafka records and vice-versa. The PubSub+ Connectors have been architected such that this mapping is located in Processors (MessageProcessors in the Source Connector and RecordProcessors in the Sink Connector). This approach enables developers to easily customize the data conversion code to their specific application needs and the rest is taken care of by the PubSub+ Connector code, making use of the tunable, high-performance Solace-Java messaging API.
The Source and Sink Connector projects include sample Processors: simple ones that just map PubSub+ message contents to Kafka record values, and more advanced ones that can additionally map message properties to Kafka records keys.
As an example, the following scenario is easy to implement with the Kafka Sink Connector using the DynamicDestinations record processor. DynamicDestinations makes use of a unique Solace connector feature that supports dynamic generation of topics that overrides the static topics in the connector configuration. The source code is available from the Sink Connector GitHub location.
Example: IoT Data from Public Transport
In our city bus IoT scenario – similar to this demo – analytics produce Kafka records that may represent commands to a fleet of buses, each listening to a PubSub+ topic structured as ctrl/bus/<bus-id>/<command>. In this case, a command of “stop” may mean an emergency request to take the bus out of service and “start” may mean allowing the bus back into service.
Below is an example of fine-grained filtered delivery to consumers. With the Kafka Sink Connector deployed (1.), a single Kafka topic can dynamically create any destination topics as PubSub+ event message attributes, individually routing events to the correct physical destination (2.).

In this scenario, it is possible to add any number of new destinations (i.e. buses) anytime, without addition of a new Kafka topic or any other change in the systems. Note that once the message is in the PubSub+ event mesh, it is converted to MQTT for sending to the appropriate bus without the need for an additional adapter.
Build a Kafka Source/Sink Connector Demo
The following main components will be required for this demo (all networked):
- PubSub+ Event Broker
- Kafka server
- PubSub+ Connector for Kafka: Sink deployed
- MQTT consumers, simulating individual buses in a fleet
- Kafka console producer, simulating an analytics engine writing command records
For this demo we will use a free-tier of the PubSub+ Event Broker: Cloud service, with all other components locally deployed.
Step 1: Get access to a PubSub+ Event Broker
Sign up for a free service PubSub+ Event Broker: Cloud – this video provides a quick walkthrough, if needed.
Once the service is active, obtain connection details for the connecting clients:
- For one, the Kafka Sink Connector needs to connect to PubSub+ using the Solace Java API. The connection details include Username, Password, Message VPN, and Secured SMF Host (we are going to use TLS).

- On the other end, the MQTT clients will connect using MQTT connections. The connection details will include Username, Password, and Secured MQTT Host.
Step 2: Set up a Kafka server
Note: the followings assume Linux is running locally, you can adjust commands to reflect your environment.
Kafka requires Java JRE 8 or later, so ensure it is already installed locally.
Follow the Apache Kafka quickstart to:
- Download the code for your platform. This demo assumes following location:
/opt/apache/kafka_2.12-2.5.0 - Start the server – it is recommended to use dedicated command-line session for each component as they all log to the console; and
- Create a topic (named “test”).
Tip: if you see issues with starting the server, try to clear the Zookeeper (default /tmp/zookeeper) and Kafka logs (default /tmp/kafka-logs) then try again.
Step 3: Deploy PubSub+ Connector for Kafka: Sink
Obtain the download link, then download and expand the connector to a location accessible by Kafka. In this example we will place the connector into the /opt/apache/kafka_2.12-2.5.0/connectors directory.
 1 $ mkdir -p /opt/apache/kafka_2.12-2.5.0/connectors
 2 $ cd /opt/apache/kafka_2.12-2.5.0/connectors
 3 $ wget https://solaceproducts.github.io/pubsubplus-connector-kafka-sink/downloads/pubsubplus-connector-kafka-sink-<version>.tar
 4 $ tar -xvf pubsubplus-connector-kafka-sink-<version>.tar ; rm ./*.tar
Add the connector’s location to the Kafka plugin search path. We will use Kafka Connect in standalone mode, so we will edit this properties file:
 1 $ cd /opt/apache/kafka_2.12-2.5.0
 2 $ vi config/connect-standalone.properties
Edit the last line, ensure it is not commented out:
 1 # Set to a list of filesystem paths separated by commas (,) to enable class loading isolation for plugins:
 2 plugin.path=/opt/apache/kafka_2.12-2.5.0/connectors
Make the necessary configurations in the PubSub+ Sink Connector’s properties:
 1 $ cd /opt/apache/kafka_2.12-2.5.0
 2 $ vi connectors/pubsubplus-connector-kafka-sink-<version>/etc/solace_sink.properties
Set followings correctly in the property file:
 1 :
 2 :
 3
 4 # Kafka topics to read from
 5 topics=test
 6
 7 # PubSub+ connection information
 8 sol.host= tcps://mrbkvuibog5lt.messaging.solace.cloud:55443
 9 sol.username=solace-cloud-client
10 sol.password=vkghqm3aobegnmn6r2eu3manem
11 sol.vpn_name=kafkatest
12
13
14 # PubSub+ Kafka Sink connector record processor
15 sol.record_processor_class=com.solace.connector.kafka.connect.sink.recordprocessor.SolDynamicDestinationRecordProcessor
16
17
18 # Set to true only if using SolDynamicDestinationRecordProcessor and dynamic destinations
19 sol.dynamic_destination=true
20
21 # Connector TLS session to PubSub+ message broker properties
22 sol.ssl_trust_store=/usr/lib/jvm/java-8-openjdk-amd64/lib/security/cacerts
23 sol.ssl_trust_store_password=changeit
24
25
26 :
27 :
In the code snipped above:
- Line 5 is the Kafka topic created in Step 2,
- The values in lines 8-11 are taken from the Solace Java API connection details from Step 1,
- The sample in line 15 is using the SolDynamicDestinationRecordProcessor,
- The “true” in line 19 will enable destinations to generate dynamically, and
- Because you’re using TLS, provide the file location of your JRE trust store (depends on your install) and password (“changeit” is the JRE defualt) in lines 22-23
Start the connector deployment in standalone mode, providing the property files just edited:
 1 $ cd /opt/apache/kafka_2.12-2.5.0
 2 $ bin/connect-standalone.sh \
 3 config/connect-standalone.properties \
 4 connectors/pubsubplus-connector-kafka-sink-<version>/etc/solace_sink.properties
In the console logs you should see similar message to:
INFO ================ JCSMPSession Connected
At this point, PubSub+ Connector for Kafka: Sink is up and running, ready to interpret, convert, and forward new records from the test Kafka topic to PubSub+ as events.
Step 4: Set up the MQTT consumers
There are many MQTT clients around that can be used, or one could easily build one following the MQTT tutorial from Solace Samples. Here we will use the ready-to-go, open-source, third-party client: MQTT Explorer.
- Download MQTT Explorer for your OS platform, install and start it.
- Create a new connection and configure the MQTT connection details, obtained from Step 1.
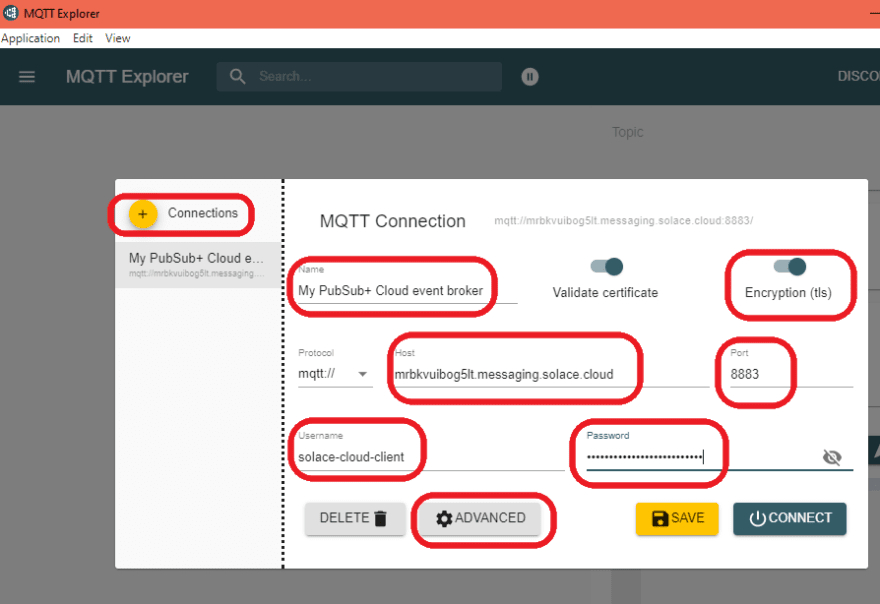
Configure the following Advanced settings:
- Set a unique MQTT Client ID – this client will represent Bus “1234”, so set it to
Bus-Nr-1234. - We will send control messages like
ctrl/bus/1234/startso set it to listen to any messages sent to the topic starting withctrl/bus/1234– add wildcard topicctrl/bus/1234/#. - Remove the standard “listen-to-all” topic rule
#and only keep the ones seen below.

Hit BACK, then SAVE.
Initiate “CONNECT” and the connection indicator should turn green:
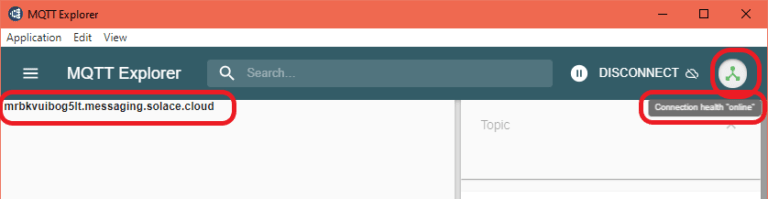
We have one of our “buses”, bus 1234 listening!
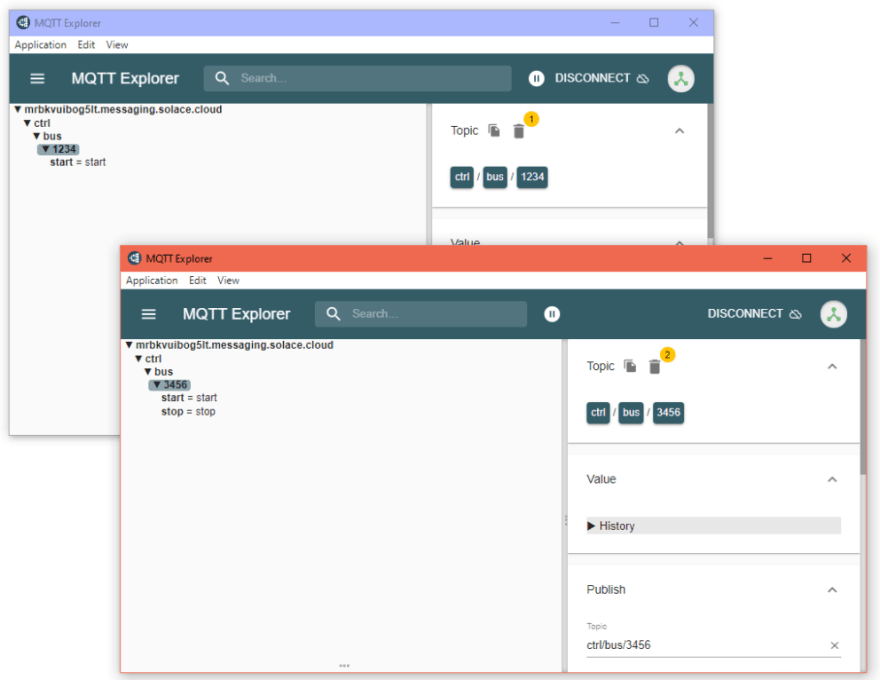
Let’s set up a second “bus” – start a second instance of MQTT Explorer.
It should already offer the saved connection to your PubSub+ Cloud broker.
Go to the advanced settings and configure:
- Set a unique MQTT Client ID – this client will represent Bus “3456” so set it to
Bus-Nr-3456 - Add wildcard topic
ctrl/bus/3456/# - Remove anything else, except
$SYS/#

Hit BACK, then SAVE, and CONNECT.
Now we have our second “bus” 3456 listening!
Step 5: Test the system
You are now ready to run the scenario!
From a command-line session start the Kafka console publisher tool and manually emulate an Analytics Engine creating Kafka control records to be delivered to the buses:
 1 $ cd /opt/apache/kafka_2.12-2.5.0
 2 $ bin/kafka-console-producer.sh --bootstrap-server localhost:9092 --topic test
 3 >1234 start
 4 >3456 start
 5 >3456 stop
 6 >
Checking the MQTT clients, you can see that the Connector has converted these records to PubSub+ events and set the event destinations to the topics the buses are listening to. PubSub+ Event Broker has delivered them to the consumer using the MQTT protocol:
Conclusion
The demonstration above showed how the Kafka Sink Connector enabled fine-grained filtering, protocol conversion, and scalable delivery to endpoints by connecting Kafka to PubSub+. This would have been difficult to achieve by only using Kafka.
The DynamicDestinations record processor is an example how a PubSub+ Kafka Connector can be easily extended to implement protocol conversion and business logic, tailored to a specific use case.
Additional Reading and References
Check out these additional resources to discover the possibilities unleashed by PubSub+ Platform and Kafka integration:
The Kafka page in the Solace Resource Hub.
Solace PubSub+ Connector for Kafka: Source and Solace PubSub+ Connector for Kafka: Sink are available as GitHub projects. They also include Quick Start instructions.


Top comments (0)