
Make phone calls from your browser, entirely in Python
Twilio provides APIs for developers to build SMS, voice calls, video and more into their mobile and web applications.
I'm going to show you how we can use Anvil and Twilio's Voice API and Client SDK to make a phone call from your browser.
Because this is Anvil, we can do it all with Python! We're going to build our front-end in Python, including live voice calls in the browser, with no Javascript. Then we'll write a hosted Python back end to control the call, and make it available on the web without any DevOps or server setup.
This is how we'll build it:
- First, we'll create an Anvil app and set up a Twilio phone number.
- We'll direct our call by setting up an HTTP endpoint.
- We can then [set up the Twilio Client SDK to talk to that endpoint.
- Finally, we'll add a couple of buttons to our app's front-end and make a call from the browser.
1. Create a new Anvil app
We first need to create a blank Anvil app:

2. Sign up for Twilio
Next, we need to sign up for Twilio and purchase a Twilio phone number. With the free trial account, Twilio will give you $15 in credit, so you don't need to add a credit card or pay anything at first.
Go to twilio.com and create an account. Once you have an account, navigate to "Buy a Number" on the Phone Numbers dashboard in the console. You'll need to search for a number with voice capabilities and click "Buy" to add it to your account.

Next, we need our Account SID and Auth Token, which can be found on the home page of the console. We can store each of these in an App Secret in our Anvil app. This way, our AccountSid and Auth Token will be stored encrypted in our app.
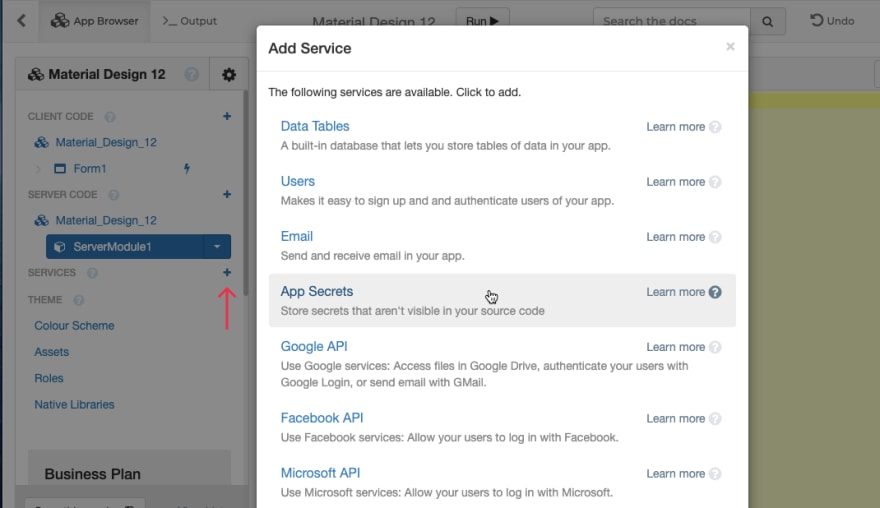
Now we need to create an API key. Go to "API Keys" under "Settings" in the sidebar of the console. Adding a new API key will give you an API SID and a Secret. Store both of these values in an App Secret like before.

3. Add an HTTP endpoint
The next step is to specify what Twilio should do when our browser code connects. Twilio thinks of our browser as a virtual phone, and when we call connect() on Twilio's Client SDK, Twilio will make an HTTP request to our app, and use the response to direct the call.
We're going to create an HTTP endpoint that returns instructions in Twilio's own markup language, TwiML. There are many actions available in TwiML. For example, we could use <Say> to read a message which would play in the browser, or <Play> to play a recorded message. We're going to be even more interactive: we'll use <Dial>, which will place a call to a phone number, so audio from the computer goes to the phone, and vice versa.
In our Anvil app, let's add a Server Module and write an HTTP endpoint function. This function responds with TwiML telling Twilio to dial a number:
@anvil.server.http_endpoint("/call-connected")
def get_twiml(**kwargs):
  resp = anvil.server.HttpResponse()
  resp.headers["Content-Type"] = "text/xml"
  # callerId should be your Twilio phone number
  resp.body = "<Response><Dial callerId='+1000000000'>+1555555555</Dial></Response>"
  return resp
Now that we've set up the endpoint, we need to tell Twilio to send its requests to this URL. This endpoint will live at https://<my-anvil-app-url>/_/api/call-connected. (You can find the URL for your Anvil app in the Gear Menu under "Publish". If your app is published under a private URL, check the message at the bottom of your Server Module for the correct endpoint URL)
Back in the Twilio console, open TwiML apps and add a new app with the URL we just set up. We'll need the ID for this app, the Application SID:
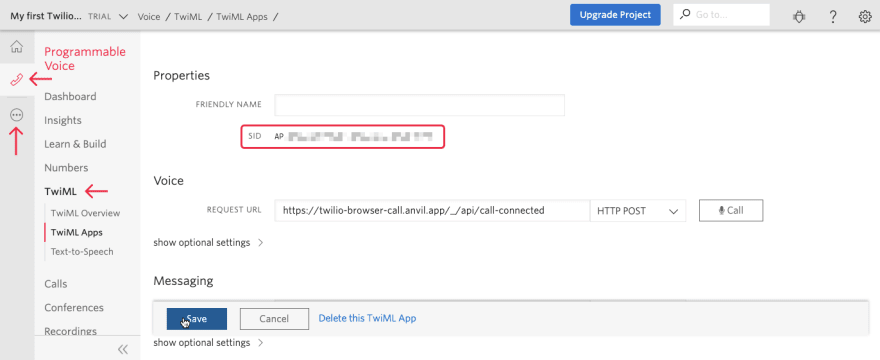
Copy the Application SID, and store it as an App Secret called application_sid.
4. Set up the Twilio Client SDK
Now we're going to add the Twilio Client SDK, and use it to make voice calls from the browser. First, we need to import the SDK. Then we need to configure it to connect to the TwiML app we've just created.
Importing the SDK
Let's start by importing the Twilio JavaScript SDK to our app. Even though we are using the JS SDK, don't worry, we will still do everything in Python! In the Anvil app, paste the following code into Native Libraries to add the SDK to the app:
<script type="text/javascript" src="https://media.twiliocdn.com/sdk/js/client/v1.13/twilio.min.js"></script>
Configuring the connection
We want to configure the Client SDK to connect to our TwiML app. To do this, we create a time-limited, cryptographically-signed token (using our Twilio API keys, on the server) and then pass it to the client SDK (in the browser). When the client connects to Twilio, Twilio will see that the token is genuine and that it corresponds to our app, and Twilio will call our HTTP endpoint to direct the call.
We'll write a function that generates and returns an access token based on the "Voice" example on this page. We will then call it when the page loads, and immediately use it to initialise the Twilio Client SDK.
In our server module, we first need to add the following import statements:
from twilio.jwt.access_token import AccessToken
from twilio.jwt.access_token.grants import VoiceGrant
Now here's the meat of the function. It loads the necessary tokens and SIDs that we stored in App Secrets, and then generates a voice Access Token pointing at our TwiML application:
@anvil.server.callable
def get_access_token():
  # required for all twilio access tokens
  account_sid = anvil.secrets.get_secret('account_sid')
  api_key = anvil.secrets.get_secret('api_sid')
  api_secret = anvil.secrets.get_secret('api_secret')

  # required for Voice grant
  outgoing_application_sid = anvil.secrets.get_secret('application_sid')
  identity = 'user'

  # Create access token with credentials
  token = AccessToken(account_sid, api_key, api_secret, identity=identity)

  # Create a Voice grant and add to token
  voice_grant = VoiceGrant(
      outgoing_application_sid=outgoing_application_sid
  )
  token.add_grant(voice_grant)

  return token.to_jwt()
We've added the @anvil.server.callable decorator to our function, which means we can call this function in the client to return the generated token.
Let's now write some code in the browser so we can actually make calls.
5. Set up calling on the browser
First, let's add a quick front-end to our app. In the App Designer, let's drag and drop two Buttons onto the form, one for making a call and the other for hanging up the call. In the Properties panel, untick the visible property for the button that hangs up the call -- we don't want it shown until the call starts. Scroll down to the bottom of the properties panel and create click events for each button:

Let's now switch to our form's code view, and import the Twilio object from Javascript (yes, you can import JS libraries from Python). Add this at the top of our code:
from anvil.js.window import Twilio
Now, when the form loads (in its __init__ method), we'll get our access token:
  def __init__(self, **properties):
    # Set Form properties and Data Bindings.
    self.init_components(**properties)

    # Add this line:
    self.token = anvil.server.call("get_access_token")
With the access token, we can now create a Twilio Device, which is basically a virtual phone. We'll then use it to make a Connection, which is an object representing the call made from our browser.
We want to do all this when the button is clicked, so we'll do it in the call_button_click function:
    def call_button_click(self, **event_args):
      """This method is called when the button is clicked"""
      self.device = Twilio.Device() #initialize the Device
      self.device.setup(self.token)
      #when the device is ready, we can connect
      self.device.on("ready", self.make_connection)

      #make the hang_up_button visible during a call
      #and the call_button not
      self.hang_up_button.visible = True
      self.call_button.visible = False

  def make_connection(self, ready):
    connection = self.device.connect()
We can't make the Connection until the Device has been successfully set up. So we need to wait until the Device.on("ready") event triggers before we call self.device.connect().
If you don't do this, you risk intermittent call failures. This isn't spelled out in Twilio's docs, but you can find the reference for Device.on("ready")here.
Finally, we want to be able to hang up the call. We can disconnect the call by calling the Device's disconnectAll() method. We'll do this when the user clicks the "Hang Up" button:
  def hang_up_button_click(self, **event_args):
    """This method is called when the button is clicked"""
    self.device.disconnectAll()
    self.call_button.visible = True
    self.hang_up_button.visible = False
Try it out
That's all there is to it. Click the call_button to make a call from your browser!
To check out the source code, you can clone the app by clicking here.
That's It!
We've just built a web app that can make phone calls from the browser using Twilio's Voice API, and all we needed was Python and a few lines of code
More about Anvil
Anvil is a platform for building full-stack web apps with nothing but Python. No need to wrestle with JS, HTML, CSS, Python, SQL and all their frameworks – just build it all in Python.

Top comments (0)