
Dialogflow is one of the best and most popular tools on the market for Natural Language Processing. However, creating a full, rich chatbot conversation using only Dialogflow (and most other NLP libraries or services) can be quite difficult, which is why we created a NLP connector between CSML Studio and Dialogflow to get the best of both worlds!
Step 0. Setup
For this tutorial, we are going to assume that you already have setup a free Dialogflow account. For this example we will be using one of the simple pre-built agents, "User Name".
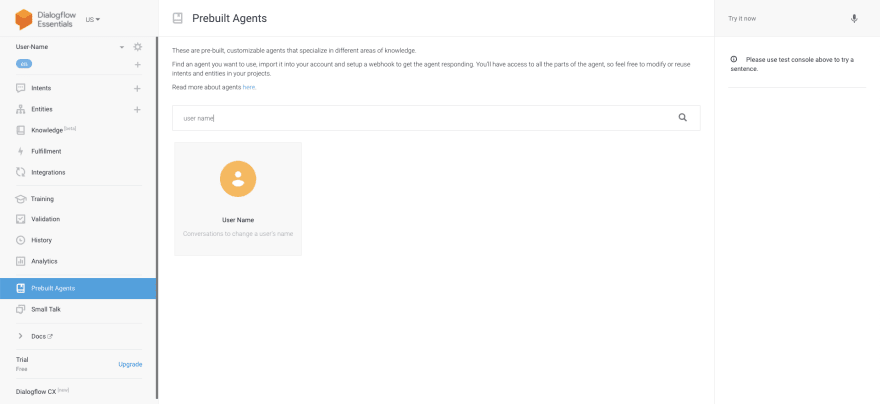 You can install this agent by searching for User Name under "pre-built agents"
You will also need a free CSML Studio account which will allow you to create rich chatbots and deploy them easily on any communication channel. Once that is done, simply create an empty bot, which you can do by visiting this page and clicking on "Create bot". If you are new to CSML or CSML Studio, I suggest you read the Getting Started first!
Step 1. Connecting Dialogflow and CSML Studio
To connect your chatbot with the Dialogflow agent, you will first need to get a Dialogflow service account key.
- Visit your Dialogflow agent's settings panel
- Under Google Project, click on the Project ID
- Under IAM & Admin, go to Service Account.
- If no service account exists, create one, otherwise go to step 5. Give the new service account a name (for example "Dialogflow CSML"), and click Create. Then give it a role of Dialogflow API Admin, continue. Finally, create the Service Account.
- Find the service account in the list, and click on "create key". Select JSON, and click Create. A file will download to your computer.
Now that you have retrieved service account credentials for your Dialogflow agent, you can add them to your CSML chatbot:
- Visit your chatbot settings on CSML Studio
- Go to NLP and select Dialogflow as a NLP provider
- Upload the file you downloaded before
Voilà! Your CSML chatbot is now correctly configured with your Dialogflow agent. Below is a video of the full setup process:
Step 2. Using Dialogflow NLP in your CSML Chatbot
NLP can be used in several different ways in a CSML chatbot: horizontally by matching intents with flows, or vertically to progress in a flow. Let's start with matching intents and flows.
Flow triggers
CSML flows are triggered by *commands. *When a command is found, the corresponding flow is launched, taking precedence over any other behavior. If an intent should launch a flow, you should add its name to the flow commands. This can be done in the flow's configuration.
 Configuring flow commands
In this case, we created a flow called GetUsername and set one of its commands to name.user.get. If a user says "What's my name?", the the request will be sent for analysis to Dialogflow, which will return a match with intent name.user.get, which will then trigger the start step in flow GetUsername in the CSML Engine, closing any previously open conversation.
Inside flows
You can also use Dialogflow inside a flow to match incoming user events. For example, in this scenario, the bot asks the user if they like their username, and shows them 2 buttons:
At this stage, the user could use one of the buttons, but they could also type something like "I like my name very much", which we would like to match with one of the buttons. That's very easy! There are already 2 intents for that, name.user.feedback.good and name.user.feedback.bad. We can simply add the intent names to the corresponding buttons accepts parameter, and match the user input like this:
  say Question(
    "Do you like your name?",
    button_type="quick_reply",
    buttons=[
      Button("Yay!", accepts=["name.user.feedback.good"]) as btny,
      Button("Meh...", accepts=["name.user.feedback.bad"]) as btnn,
    ]
  )
  hold

  if (event.match(btny)) {
    say "I'm glad you like it!"
    goto end
  }
  else if (event.match(btnn)) {
    say "Oh, I'm sorry to hear that!"
    goto end
  }
  else {
    say "I'm sorry, I didn't get that."
    goto feedback
  }
Matching intents inside a flow
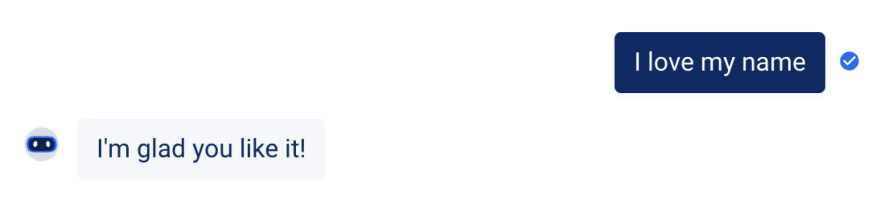
Now, if the user says something that is interpreted as name.user.feedback.good, the bot will react as if the user clicked on the Yay! button.
Entities
The final trick I would like to show is that you can also use your agent's *entities *in CSML!
Let's imagine a scenario where the user would want to change their name. They would say something like "now call me John". This sentence matches the name.user.save intent in Dialogflow, but also the given-name entity is set to "John".

Let's use this in our bot. We'll create a new flow to handle the request to change the name (with a name.user.save command), and try to trigger it with NLP.
If we try to print the event's content with say "{{event.get_content()}}", we see that we receive a large object containing quite a lot of information:
{
  "payload": "name.user.change",
  "text": "I want to change my name to John",
  "_nlp_provider": {
    "provider": "dialogflow",
    "project_id": "user-name-hetw"
  },
  "_original_event": {
    "content_type": "text",
    "content": {
      "text": "I want to change my name to John"
    }
  },
  "_nlp_result": {
    "allRequiredParamsPresent": true,
    "queryText": "I want to change my name to John",
    "intent": {
      "inputContextNames": [],
      "name": "projects/user-name-hetw/agent/intents/5d1759cb-6eb1-4cec-bde2-d7391c9a932d",
      "trainingPhrases": [],
      "followupIntentInfo": [],
      "displayName": "name.user.change",
      "parentFollowupIntentName": "",
      "messages": [],
      "rootFollowupIntentName": "",
      "mlDisabled": false,
      "outputContexts": [],
      "defaultResponsePlatforms": [],
      "parameters": [],
      "events": [],
      "priority": 0,
      "action": "",
      "resetContexts": false,
      "webhookState": "WEBHOOK_STATE_UNSPECIFIED",
      "isFallback": false
    },
    "speechRecognitionConfidence": 0,
    "languageCode": "en",
    "fulfillmentMessages": [
      {
        "message": "text",
        "platform": "PLATFORM_UNSPECIFIED",
        "text": {
          "text": [
            ""
          ]
        }
      }
    ],
    "webhookPayload": null,
    "action": "name.user.change",
    "intentDetectionConfidence": 1,
    "fulfillmentText": "",
    "webhookSource": "",
    "parameters": {
      "fields": {
        "last-name": {
          "stringValue": "",
          "kind": "stringValue"
        },
        "nick-name": {
          "stringValue": "",
          "kind": "stringValue"
        },
        "given-name": {
          "stringValue": "John",
          "kind": "stringValue"
        },
        "type": {
          "kind": "stringValue",
          "stringValue": ""
        }
      }
    },
    "sentimentAnalysisResult": null,
    "outputContexts": [],
    "diagnosticInfo": null
  }
}
We can see that event._nlp_result key contains everything as returned by Dialogflow's API (I encourage you to click through this link and see all the data that you can retrieve this way). You can actually access the entities this way: indeed, event._nlp_result.parameters.fields does contain all the possible entities for this intent, and in our case we can see that the given-name entity is set to "John".
Let's create a small function to extract any name-related entities from incoming intents:
fn getNameEntity(event):
  do entities = event._nlp_result.parameters.fields
  if (entities) {
    if (entities["given-name"].stringValue) return entities["given-name"].stringValue
    if (entities["last-name"].stringValue) return entities["last-name"].stringValue
    if (entities["nick-name"].stringValue) return entities["nick-name"].stringValue
  }
  return Null
Now, if the user says "I want to set my name to John", we will be able to directly detect the value of the name they want to set and set it directly with just a simple yes/no confirmation, but if they did not give us a name, we need to ask them for their name first.
start:
  // We know that the matched intent for this flow requires us to change the user's name,
  // but we need to check if the event triggering this flow has one of the `name` entities set
  remember newname = getNameEntity(event)

  // The user did not give us their new name, we need to specifically ask for it
  if (!newname) goto askForNameInput

  // Otherwise we can just ask for confirmation that we understood it right
  // and skip the "what's your new name" part
  goto confirmNewName
Sure enough, here is the result of this conversation:

Conclusion
As you saw, using an existing Dialogflow agent with CSML Studio is quite easy. The setup of this integration takes less than one minute, and lets you very easily benefit from the conversation building advantages of both platforms: with CSML, you can easily build rich conversations using not only text but also images, videos, carousels..., connect them to any API or service using built-in apps or your own functions in any programming language, and enhance your chatbot's comprehension skills by using Dialogflow's very powerful NLU!
In this tutorial, we only scratched the surface of what's possible to achieve with Dialogflow and CSML together as a brief introduction to this exciting feature of CSML Studio. The full source code of the chatbot demonstrated above is available on github. You can also import it on CSML Studio in just one click to get started quickly!
I'm confident that you will be able to use Dialogflow to its full power in your next CSML projects!

Top comments (0)