
In the fast-paced world of software development, ensuring code quality is essential to delivering reliable and efficient applications that stand the test(😉) of time.
However, achieving comprehensive code coverage and seamlessly integrating it into our development workflows can often feel overwhelming and manually straining.
In this article we will go over the easiest path you can take to effortlessly incorporate coverage reports in your GitLab CI pipelines using JaCoCo and S3.
The reason we gathered here today...
The end goal of this tutorial is to guide you through the process of utilizing dockerized JaCoCo-CLI to effortlessly generate a coverage report. You'll then integrate that report into GitLab merge requests to create a visualization of the coverage. And finally, elevate the experience by uploading the report to S3 and linking it as a merge request comment to enhance visibility and quality assessments.

The Basics
First, let's go over some basic terms, so we can all be on the same page.
- Code Coverage - measures the percentage of code that is executed when running automated tests. It provides insights into the effectiveness of the testing process by indicating which parts of the code have been executed by the tests and which remain untested. It helps uncover untested areas of code, which can help in identifying potential areas of failure and vulnerabilities and thus, increase confidence in the reliability and quality of the code and its tests. It's important to note that code coverage alone does not assess the quality of the tests, particularly in terms of handling edge cases and other complex scenarios, its main functionality is to make sure that each line of code is covered with at least one test.
- JaCoCo- stands for Java Code Coverage. JaCoCo is a widely-used tool for measuring code coverage in Java applications.
Creating the JaCoCo Image
When tasked with establishing a coverage report pipeline, I researched different code coverage tools and eventually settled on JaCoCo. I discovered that JaCoCo is commonly integrated as a Maven plugin - an approach that seemed inefficient, especially given the complexity of managing coverage across 17 microservices comprising my application. This is where JaCoCoCli as a docker image comes in. I wanted to have the ability to create a coverage report to any project without changing its code.
This is how I created the image:
- Download the necessary JaCoCo dependencies:
- Create the following DockerFile: ```
Use a base image compatible with running your java application
FROM maven:3-openjdk-17
Set the working directory
WORKDIR /jacoco
Copy the JaCoCo CLI JAR file into the container
COPY jacococli.jar /jacoco/
Copy the JaCoCo Java Agent JAR file into the container
COPY jacocoagent.jar /jacoco/
Set the entry point for the Docker container
ENTRYPOINT ["/bin/sh"]
Build the image and upload it to your chosen repository.

### Generating the reports
Now that we have the Jacoco image ready, we can begin the truly exciting work.
Add this step to your .gitlab-ci.yml:
test:
stage: test
image:
name: barg7/coverage:jacoco-maven
entrypoint: [""]
script:
- mvn test -DargLine='-javaagent:/jacoco/jacocoagent.jar'
- mkdir -p reports
- java -jar /jacoco/jacococli.jar report jacoco.exec --classfiles . --html reports --xml reports/jacoco.xml
artifacts:
paths:
- reports/*
only:
- merge_requests
- main
- dev
Notice that we're using the image we've created in the previous section. I chose to call it 'jacoco-maven' but you can use any name you want.
This step can replace your current test step as it runs your tests with your chosen java image as the base, the only difference is that the JaCoCo-CLI agent is included when running the tests.

After running the tests we need to create 2 different formats of our coverage report, the first XML and the other HTML. These formats will later be utilized for visualizing the coverage in GitLab merge requests and uploading to S3.
Once this step is completed, the coverage reports need to be saved as artifacts so that the subsequent steps can access them.
artifacts:
paths:
- reports/*
It's important to note that I've chosen to run this step on specific branches, so you'll need to adjust the only clause in the step to match the branches that are relevant to your workflow.
only:
- merge_requests
- main
- dev
### Integrating the Report in Gitlab's Merge Request
After the coverage is created, we can employ GitLab-CI's functionality to add a nice visualization on the merge-request's code.
Add this step to the .gitlab-ci.yml:
coverage:
stage: coverage
image: haynes/jacoco2cobertura:latest
script:
- python /opt/cover2cover.py reports/jacoco.xml $CI_PROJECT_DIR/src/main/java/ > cobertura.xml
needs: [test]
artifacts:
reports:
coverage_report:
coverage_format: cobertura
path: cobertura.xml
only:
- merge_requests
- main
- dev
GitLab's coverage functionality only support cobertura.xml. Therefore, in order to integrate JaCoCo XML report, we need to convert it to a Cobertura report.
In this step, we're utilizing an image equipped with a script capable of converting a JaCoCo XML report to cobertura.xml.
After the script is run and cobertura.xml report is generated we can use it to create a visualization of the coverage report in GitLab's UI.
If you'd like to explore more about this functionality, you can access the GitLab documentation through the following link:
Uploading to s3 and creating a PR comment
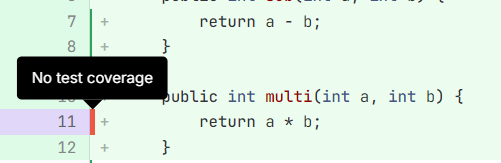
If we add the coverage report to the GitLab's Merge request, it only provides a visual representation where covered code lines are highlighted in green and uncovered ones in red. However, to fully utilize the benefits of the report, its essential to have access to the full code coverage report.
That's where uploading to S3 comes in. By uploading the HTML coverage report files to S3, we can access them via a URL.
We'll go even further and add that URL as a merge request comment to make the report as accessible as possible.

The Script
First create this python script:
import concurrent
import boto3
import os
import requests
import mimetypes
from botocore.exceptions import NoCredentialsError
S3_ACCESS_KEY = os.getenv('S3_ACCESS_KEY')
S3_SECRET_KEY = os.getenv('S3_SECRET_KEY')
S3_BUCKET = os.getenv('S3_BUCKET')
S3_ENDPOINT = os.getenv('S3_ENDPOINT')
CI_PROJECT_ID = os.getenv('CI_PROJECT_ID')
CI_MERGE_REQUEST_IID = os.getenv('CI_MERGE_REQUEST_IID')
GITLAB_TOKEN = os.getenv('GITLAB_TOKEN')
COVERAGE_REPORT_FOLDER = os.getenv('COVERAGE_REPORT_FOLDER')
CI_PIPELINE_IID = os.getenv('CI_PIPELINE_IID')
CI_PROJECT_NAME = os.getenv('CI_PROJECT_NAME')
S3_REGION = os.getenv('S3_REGION')
s3_client = boto3.client('s3', aws_access_key_id=S3_ACCESS_KEY, aws_secret_access_key=S3_SECRET_KEY)
def upload_file(bucket_name, dir_path, file_path, prefix, s3_client):
relative_path = os.path.relpath(file_path, dir_path)
bucket_key = f'{prefix}/{relative_path}'.replace('\', '/')
mime_type = mimetypes.guess_type(file_path)[0] if mimetypes.guess_type(file_path)[0] else 'application/html'
extra_args = {'ContentType': mime_type, 'StorageClass': 'STANDARD'}
try:
s3_client.upload_file(file_path, bucket_name, bucket_key, extra_args)
print(f'Uploaded file {file_path} as {mime_type}')
except Exception as e:
print(f'Failed to upload file {file_path} to bucket {bucket_name}/{bucket_key}: {str(e)}')
def upload_dir(bucket_name, dir_path, prefix):
with concurrent.futures.ThreadPoolExecutor() as executor:
for root, dirs, files in os.walk(dir_path):
for file in files:
file_path = os.path.join(root, file)
try:
executor.submit(upload_file, bucket_name, dir_path, file_path, prefix, s3_client)
except Exception as e:
print(f'error: {e}')
def add_merge_request_comment(gitlab_token, project_id, merge_request_iid, message):
print('Creating a new merge request comment...')
url = f'https://gitlab.com/api/v4/projects/{project_id}/merge_requests/{merge_request_iid}/notes'
headers = {'Content-Type': 'application/json', 'Private-Token': gitlab_token}
data = {'body': message}
try:
response = requests.post(url, headers=headers, json=data)
response.raise_for_status()
print(f'Merge request updated with coverage report access link.')
except requests.exceptions.HTTPError as err:
print(f'Failed to add a merge request comment: {err}')
if name == 'main':
pipeline_slug = f'coverage/{CI_PROJECT_NAME}-{CI_PIPELINE_IID}'
try:
upload_dir(S3_BUCKET, COVERAGE_REPORT_FOLDER, pipeline_slug)
print('All files uploaded successfully.')
access_url = f'https://s3.{S3_REGION}.amazonaws.com/{S3_BUCKET}/{pipeline_slug}/index.html'
message = f'The coverage report is ready. Check it out here!'
print(message)
add_merge_request_comment(GITLAB_TOKEN, CI_PROJECT_ID, CI_MERGE_REQUEST_IID, message)
except NoCredentialsError:
print('No s3 credentials found.')
except Exception as e:
print('Error:', e)
Now that we've developed a script capable of uploading our report to an S3 bucket, the next step is to create an image that can be used within our CI pipeline.

####The Docker Image
Create this Dockerfile:
Use a python image that works for you.
FROM python:3.10.0-alpine
WORKDIR /app
COPY requirements.txt /app/requirements.txt
Copy the script file.
COPY main.py /app/main.py
RUN pip install -r requirements.txt
ENTRYPOINT ["python", "/app/main.py"]
Build the image and upload it to your selected repository.

####The CI Step
Use that image, and add this step to your .gitlab-ci.yml file:
report:
stage: report
image: s3-upload
needs: [test]
script:
- echo "hi"
variables:
S3_BUCKET: $S3_BUCKET
COVERAGE_REPORT_FOLDER: "$CI_PROJECT_DIR/reports"
S3_ACCESS_KEY: $S3_SECRET_KEY
S3_SECRET_KEY: $S3_SECRET_KEY
S3_ENDPOINT: $S3_ENDPOINT
GITLAB_TOKEN: $GITLAB_TOKEN
artifacts:
paths:
- reports/*
only:
- merge_requests
Notice that in order to run the script we need to use environment variables. These variables need to be added as secrets to our GitLab repository project. The variables in question are:
- S3_ACCESS_KEY
- S3_SECRET_KEY
- S3_BUCKET
- S3_ENDPOINT
- GITLAB_TOKEN'
You have 2 options to create these variables:
1. You can manually add the required variables through the UI.
Make sure to check the protected checkbox only if you're planning to run this pipeline only on protected branches.
If you're unsure how to do this, you can refer to the GitLab documentation:

- You can use this script to add the variables through GitLab's api.
 docs.gitlab.com
!/bin/bash
ACCESS_TOKEN=$1
PROJECT_ID=$2
echo "Setting the GitLab variables..."
variables=(
"GITLAB_TOKEN:$ACCESS_TOKEN",
"S3_ACCESS_KEY:your_access_key",
"S3_SECRET_KEY: your_secret_key",
"S3_BUCKET: your_bucket_name"
"S3_ENDPOINT: your_s3_endpoint"
)
for pair in "${variables[@]}"; do
IFS=':' read -r key value <<< "$pair"
curl --request POST --header "PRIVATE-TOKEN: $ACCESS_TOKEN" \
"https://gitlab.com/api/v4/projects/$PROJECT_ID/variables" --form "key=$key" --form "value=$value"
done
I named my script **gitlab-variables.sh**, but feel free to rename it to whatever you prefer, just make sure it has the ".sh" extension.
To run the script, open a bash terminal and write:
`./gitlab-variables.sh your_gitlab_access_key your_project_id`
For example:
`./gitlab-variables.sh rjg12rf324df4th 12345`
To copy the project id go to Settings -> General.
If you're unsure how to create an access token you can follow this documentation:
After adding the step and the environment variables you can run your pipeline and you'll have a coverage report link accessible via a merge request comment.
Summary
If you're reading this, it means you either established a code coverage pipeline or you're well on your way to creating one—awesome job! Keep up the good work!
If you have any feedback or questions, you are more than welcome to leave them in the comments and I'll try to answer them the best I can.
Thanks for reading!


Top comments (0)